version
https://www.rabbitmq.com/versions.html
https://www.rabbitmq.com/which-erlang.html
Currently Supported Release Series
| Version | Latest Patch | First Release | End of General Support1 | End of Extended Support2 | In service for |
|---|---|---|---|---|---|
| 3.11 | 3.11.5 | 28 September 2022 | |||
| 3.10 | 3.10.13 | 3 May 2022 | |||
| 3.9 | 3.9.27 | 26 July 2021 | 31 January, 2023 | 31 July, 2023 | 24 months |
install
https://www.rabbitmq.com/install-rpm.html
Yum will verify signatures of any packages it installs, therefore the first step in the process is to import the signing key
## primary RabbitMQ signing key
rpm --import https://github.com/rabbitmq/signing-keys/releases/download/2.0/rabbitmq-release-signing-key.asc
## modern Erlang repository
rpm --import https://packagecloud.io/rabbitmq/erlang/gpgkey
## RabbitMQ server repository
rpm --import https://packagecloud.io/rabbitmq/rabbitmq-server/gpgkey
Add Yum Repositories for RabbitMQ and Modern Erlang
cd /etc/yum.repos.d/
vim rabbitmq.repo
# In /etc/yum.repos.d/rabbitmq.repo

##
## Zero dependency Erlang
##

[rabbitmq_erlang]
name=rabbitmq_erlang
baseurl=https://packagecloud.io/rabbitmq/erlang/el/8/$basearch
repo_gpgcheck=1
gpgcheck=1
enabled=1
# PackageCloud's repository key and RabbitMQ package signing key
gpgkey=https://packagecloud.io/rabbitmq/erlang/gpgkey
       https://github.com/rabbitmq/signing-keys/releases/download/2.0/rabbitmq-release-signing-key.asc
sslverify=1
sslcacert=/etc/pki/tls/certs/ca-bundle.crt
metadata_expire=300

[rabbitmq_erlang-source]
name=rabbitmq_erlang-source
baseurl=https://packagecloud.io/rabbitmq/erlang/el/8/SRPMS
repo_gpgcheck=1
gpgcheck=0
enabled=1
# PackageCloud's repository key and RabbitMQ package signing key
gpgkey=https://packagecloud.io/rabbitmq/erlang/gpgkey
       https://github.com/rabbitmq/signing-keys/releases/download/2.0/rabbitmq-release-signing-key.asc
sslverify=1
sslcacert=/etc/pki/tls/certs/ca-bundle.crt
metadata_expire=300

##
## RabbitMQ server
##

[rabbitmq_server]
name=rabbitmq_server
baseurl=https://packagecloud.io/rabbitmq/rabbitmq-server/el/8/$basearch
repo_gpgcheck=1
gpgcheck=0
enabled=1
# PackageCloud's repository key and RabbitMQ package signing key
gpgkey=https://packagecloud.io/rabbitmq/rabbitmq-server/gpgkey
       https://github.com/rabbitmq/signing-keys/releases/download/2.0/rabbitmq-release-signing-key.asc
sslverify=1
sslcacert=/etc/pki/tls/certs/ca-bundle.crt
metadata_expire=300

[rabbitmq_server-source]
name=rabbitmq_server-source
baseurl=https://packagecloud.io/rabbitmq/rabbitmq-server/el/8/SRPMS
repo_gpgcheck=1
gpgcheck=0
enabled=1
gpgkey=https://packagecloud.io/rabbitmq/rabbitmq-server/gpgkey
sslverify=1
sslcacert=/etc/pki/tls/certs/ca-bundle.crt
metadata_expire=300
# In /etc/yum.repos.d/rabbitmq.repo

##
## Zero dependency Erlang
##

[rabbitmq_erlang]
name=rabbitmq_erlang
baseurl=https://packagecloud.io/rabbitmq/erlang/el/8/$basearch
repo_gpgcheck=1
gpgcheck=1
enabled=1
# PackageCloud's repository key and RabbitMQ package signing key
gpgkey=https://packagecloud.io/rabbitmq/erlang/gpgkey
       https://github.com/rabbitmq/signing-keys/releases/download/2.0/rabbitmq-release-signing-key.asc
sslverify=1
sslcacert=/etc/pki/tls/certs/ca-bundle.crt
metadata_expire=300

[rabbitmq_erlang-source]
name=rabbitmq_erlang-source
baseurl=https://packagecloud.io/rabbitmq/erlang/el/8/SRPMS
repo_gpgcheck=1
gpgcheck=0
enabled=1
# PackageCloud's repository key and RabbitMQ package signing key
gpgkey=https://packagecloud.io/rabbitmq/erlang/gpgkey
       /opt/rabbitmq/rabbitmq-release-signing-key.asc
sslverify=1
sslcacert=/etc/pki/tls/certs/ca-bundle.crt
metadata_expire=300

##
## RabbitMQ server
##

[rabbitmq_server]
name=rabbitmq_server
baseurl=https://packagecloud.io/rabbitmq/rabbitmq-server/el/8/$basearch
repo_gpgcheck=1
gpgcheck=0
enabled=1
# PackageCloud's repository key and RabbitMQ package signing key
gpgkey=https://packagecloud.io/rabbitmq/rabbitmq-server/gpgkey
       /opt/rabbitmq/rabbitmq-release-signing-key.asc
sslverify=1
sslcacert=/etc/pki/tls/certs/ca-bundle.crt
metadata_expire=300

[rabbitmq_server-source]
name=rabbitmq_server-source
baseurl=https://packagecloud.io/rabbitmq/rabbitmq-server/el/8/SRPMS
repo_gpgcheck=1
gpgcheck=0
enabled=1
gpgkey=https://packagecloud.io/rabbitmq/rabbitmq-server/gpgkey
sslverify=1
sslcacert=/etc/pki/tls/certs/ca-bundle.crt
metadata_expire=300
Install Packages with Yum
Update Yum package metadata:
yum update -y
yum -q makecache -y --disablerepo='*' --enablerepo='rabbitmq_erlang' --enablerepo='rabbitmq_server'
Next install dependencies from the standard repositories:
## install these dependencies from standard OS repositories
yum install socat logrotate -y
此时会遇到问题
Failed to download metadata for repo ‘appstream‘
解决方法如下:
1、进入yum的repos目录
cd /etc/yum.repos.d/
复制
2、修改所有的CentOS文件内容
sed -i 's/mirrorlist/#mirrorlist/g' /etc/yum.repos.d/CentOS-*

sed -i 's|#baseurl=http://mirror.centos.org|baseurl=http://vault.centos.org|g' /etc/yum.repos.d/CentOS-*
复制
3、更新yum源为阿里镜像
wget -O /etc/yum.repos.d/CentOS-Base.repo https://mirrors.aliyun.com/repo/Centos-vault-8.5.2111.repo

yum clean all

yum makecache
复制
4、yum安装测试是否可以yum安装
yum install wget –y
rpm安装
# erlang下载地址:https://packagecloud.io/rabbitmq/erlang/

curl -s https://packagecloud.io/install/repositories/rabbitmq/erlang/script.rpm.sh | sudo bash


yum install erlang-23.3.4.3-1.el7.x86_64


# 安装socat

http://mirror.centos.org/altarch/7/os/aarch64/Packages/socat-1.7.3.2-2.el7.aarch64.rpm


yum list | grep socat

yum install socat-1.7.3.2-2.el7.x86_64

# 查询,已经安装的logrotate的版本信息
rpm -qa | grep logrotate


# rabbit-server下载地址:https://packagecloud.io/app/rabbitmq/rabbitmq-server/search
# 安装rabbitmq-server
curl -s https://packagecloud.io/install/repositories/rabbitmq/rabbitmq-server/script.rpm.sh | sudo bash
yum install rabbitmq-server-3.10.0-1.el7.noarch
Start the Server
The server is not started as a daemon by default when the RabbitMQ server package is installed. To start the daemon by default when the system boots, as an administrator run
chkconfig rabbitmq-server on
As an administrator, start and stop the server as usual, e.g. using service:
/sbin/service rabbitmq-server start

/sbin/service rabbitmq-server status

/sbin/service rabbitmq-server stop
If the service tool is not installed on the system, it can be installed using yum:
yum -y install initscripts
open port
firewall-cmd --add-port=5672/tcp --permanent

firewall-cmd --add-port=15672/tcp --permanent

firewall-cmd --add-port=15674/tcp --permanent

firewall-cmd --add-port=15675/tcp --permanent


firewall-cmd --add-port=1883/tcp --permanent


firewall-cmd --reload
rabbitmqctl
https://www.rabbitmq.com/rabbitmqctl.8.html
create user & Granting Permissions
# rabbitmqctl add_user <username> <password>
rabbitmqctl add_user weipeng weipeng


# First ".*" for configure permission on every entity
# Second ".*" for write permission on every entity
# Third ".*" for read permission on every entity
rabbitmqctl set_permissions -p "custom-vhost" "username" ".*" ".*" ".*"

# 给用户授权
rabbitmqctl set_permissions -p / weipeng ".*" ".*" ".*"

# 设置用户角色
rabbitmqctl set_user_tags weipeng administrator
rabbitmqctl help set_permissions


Usage

rabbitmqctl [--node <node>] [--longnames] [--quiet] set_permissions [--vhost <vhost>] <username> <conf> <write> <read>

Sets user permissions for a vhost.


General Options

The following options are accepted by most or all commands.

short            | long          | description
-----------------|---------------|--------------------------------
-?               | --help        | displays command help
-n <node>        | --node <node> | connect to node <node>
-l               | --longnames   | use long host names
-t               | --timeout <n> | for commands that support it, operation timeout in seconds
-q               | --quiet       | suppress informational messages
-s               | --silent      | suppress informational messages
                                 | and table header row
-p               | --vhost       | for commands that are scoped to a virtual host,
                 |               | virtual host to use
                 | --formatter   | alternative result formatter to use
                                 | if supported: json, pretty_table, table, csv, erlang
                                   not all commands support all (or any) alternative formatters.
set_user_tags username [tag ...]
username
The name of the user whose tags are to be set.
tag
Zero, one or more tags to set. Any existing tags will be removed.
For example, this command instructs the RabbitMQ broker to ensure the user named "janeway" is an administrator:

rabbitmqctl set_user_tags janeway administrator
# 创建vhost并授权给指定用户
rabbitmqctl add_vhost min-qing-test
rabbitmqctl set_permissions -p min-qing-test weipeng ".*" ".*" ".*"
management-plugin
https://www.rabbitmq.com/management.html
rabbitmq-plugins enable rabbitmq_management
mqtt-plugin
https://www.rabbitmq.com/mqtt.html
rabbitmq-plugins enable rabbitmq_mqtt
install for centos8
curl -s https://packagecloud.io/install/repositories/rabbitmq/erlang/script.rpm.sh | sudo bash
yum install erlang-23.3.1-1.el8.x86_64


yum install socat-1.7.4.1-1.el8.x86_64
yum install logrotate-3.14.0-4.el8.x86_64


curl -s https://packagecloud.io/install/repositories/rabbitmq/rabbitmq-server/script.rpm.sh | sudo bash
yum install rabbitmq-server-3.10.2-1.el8.noarch


chkconfig rabbitmq-server on
/sbin/service rabbitmq-server start
/sbin/service rabbitmq-server status

firewall-cmd --add-port=5672/tcp --permanent
firewall-cmd --add-port=15672/tcp --permanent
firewall-cmd --add-port=15674/tcp --permanent
firewall-cmd --add-port=15675/tcp --permanent
firewall-cmd --add-port=1883/tcp --permanent

firewall-cmd --reload


rabbitmqctl add_user weipeng weipeng
rabbitmqctl set_permissions -p / weipeng ".*" ".*" ".*"
rabbitmqctl set_user_tags weipeng administrator


rabbitmq-plugins enable rabbitmq_management
rabbitmq-plugins enable rabbitmq_mqtt
amqp-client
version select
https://www.rabbitmq.com/java-client.html
java doc
https://rabbitmq.github.io/rabbitmq-java-client/api/current/
amqp-concepts
https://www.rabbitmq.com/tutorials/amqp-concepts.html
Hello World
https://www.rabbitmq.com/getstarted.html
https://www.rabbitmq.com/tutorials/tutorial-one-java.html
<dependencies>
        <!-- https://mvnrepository.com/artifact/com.rabbitmq/amqp-client -->
        <dependency>
            <groupId>com.rabbitmq</groupId>
            <artifactId>amqp-client</artifactId>
            <version>5.15.0</version>
        </dependency>
        <!-- https://mvnrepository.com/artifact/org.slf4j/slf4j-simple -->
        <dependency>
            <groupId>org.slf4j</groupId>
            <artifactId>slf4j-simple</artifactId>
            <version>1.7.26</version>
            <scope>test</scope>
        </dependency>


    </dependencies>
package com.wp;

import com.rabbitmq.client.Channel;
import com.rabbitmq.client.Connection;
import com.rabbitmq.client.ConnectionFactory;

import java.nio.charset.StandardCharsets;

public class Send {

    private final static String QUEUE_NAME = "hello";

    public static void main(String[] argv) throws Exception {
        ConnectionFactory factory = new ConnectionFactory();
        factory.setHost("49.4.13.102");
        factory.setUsername("weipeng");
        factory.setPassword("weipeng");
        try (Connection connection = factory.newConnection();
             Channel channel = connection.createChannel()) {
            channel.queueDeclare(QUEUE_NAME, false, false, false, null);
            String message = "Hello World!";
            channel.basicPublish("", QUEUE_NAME, null, message.getBytes(StandardCharsets.UTF_8));
            System.out.println(" [x] Sent '" + message + "'");
        }
    }
}
package com.wp;

import com.rabbitmq.client.Channel;
import com.rabbitmq.client.Connection;
import com.rabbitmq.client.ConnectionFactory;
import com.rabbitmq.client.DeliverCallback;
import java.nio.charset.StandardCharsets;

public class Recv {

    private final static String QUEUE_NAME = "hello";

    public static void main(String[] argv) throws Exception {
        ConnectionFactory factory = new ConnectionFactory();
        factory.setHost("49.4.13.102");
        factory.setUsername("weipeng");
        factory.setPassword("weipeng");
        Connection connection = factory.newConnection();
        Channel channel = connection.createChannel();

        channel.queueDeclare(QUEUE_NAME, false, false, false, null);
        System.out.println(" [*] Waiting for messages. To exit press CTRL+C");

        DeliverCallback deliverCallback = (consumerTag, delivery) -> {
            String message = new String(delivery.getBody(), StandardCharsets.UTF_8);
            System.out.println(" [x] Received '" + message + "'");
        };
        channel.basicConsume(QUEUE_NAME, true, deliverCallback, consumerTag -> { });
    }
}
Two consumer
https://www.rabbitmq.com/tutorials/tutorial-two-java.html
import com.rabbitmq.client.Channel;
import com.rabbitmq.client.Connection;
import com.rabbitmq.client.ConnectionFactory;
import com.rabbitmq.client.MessageProperties;

public class NewTask {

  private static final String TASK_QUEUE_NAME = "task_queue";

  public static void main(String[] argv) throws Exception {
    ConnectionFactory factory = new ConnectionFactory();
    factory.setHost("localhost");
    try (Connection connection = factory.newConnection();
         Channel channel = connection.createChannel()) {
        channel.queueDeclare(TASK_QUEUE_NAME, true, false, false, null);

        String message = String.join(" ", argv);

        channel.basicPublish("", TASK_QUEUE_NAME,
                MessageProperties.PERSISTENT_TEXT_PLAIN,
                message.getBytes("UTF-8"));
        System.out.println(" [x] Sent '" + message + "'");
    }
  }

}
import com.rabbitmq.client.Channel;
import com.rabbitmq.client.Connection;
import com.rabbitmq.client.ConnectionFactory;
import com.rabbitmq.client.DeliverCallback;

public class Worker {

  private static final String TASK_QUEUE_NAME = "task_queue";

  public static void main(String[] argv) throws Exception {
    ConnectionFactory factory = new ConnectionFactory();
    factory.setHost("localhost");
    final Connection connection = factory.newConnection();
    final Channel channel = connection.createChannel();

    channel.queueDeclare(TASK_QUEUE_NAME, true, false, false, null);
    System.out.println(" [*] Waiting for messages. To exit press CTRL+C");

    channel.basicQos(1);

    DeliverCallback deliverCallback = (consumerTag, delivery) -> {
        String message = new String(delivery.getBody(), "UTF-8");

        System.out.println(" [x] Received '" + message + "'");
        try {
            doWork(message);
        } finally {
            System.out.println(" [x] Done");
            channel.basicAck(delivery.getEnvelope().getDeliveryTag(), false);
        }
    };
    channel.basicConsume(TASK_QUEUE_NAME, false, deliverCallback, consumerTag -> { });
  }

  private static void doWork(String task) {
    for (char ch : task.toCharArray()) {
        if (ch == '.') {
            try {
                Thread.sleep(1000);
            } catch (InterruptedException _ignored) {
                Thread.currentThread().interrupt();
            }
        }
    }
  }
}
deliver a message to multiple consumers-----fanout exchange
https://www.rabbitmq.com/tutorials/tutorial-three-java.html
public class EmitLog {

  private static final String EXCHANGE_NAME = "logs";

  public static void main(String[] argv) throws Exception {
    ConnectionFactory factory = new ConnectionFactory();
    factory.setHost("localhost");
    try (Connection connection = factory.newConnection();
         Channel channel = connection.createChannel()) {
        channel.exchangeDeclare(EXCHANGE_NAME, "fanout");

        String message = argv.length < 1 ? "info: Hello World!" :
                            String.join(" ", argv);

        channel.basicPublish(EXCHANGE_NAME, "", null, message.getBytes("UTF-8"));
        System.out.println(" [x] Sent '" + message + "'");
    }
  }
}
import com.rabbitmq.client.Channel;
import com.rabbitmq.client.Connection;
import com.rabbitmq.client.ConnectionFactory;
import com.rabbitmq.client.DeliverCallback;

public class ReceiveLogs {
  private static final String EXCHANGE_NAME = "logs";

  public static void main(String[] argv) throws Exception {
    ConnectionFactory factory = new ConnectionFactory();
    factory.setHost("localhost");
    Connection connection = factory.newConnection();
    Channel channel = connection.createChannel();

    channel.exchangeDeclare(EXCHANGE_NAME, "fanout");
    String queueName = channel.queueDeclare().getQueue();
    channel.queueBind(queueName, EXCHANGE_NAME, "");

    System.out.println(" [*] Waiting for messages. To exit press CTRL+C");

    DeliverCallback deliverCallback = (consumerTag, delivery) -> {
        String message = new String(delivery.getBody(), "UTF-8");
        System.out.println(" [x] Received '" + message + "'");
    };
    channel.basicConsume(queueName, true, deliverCallback, consumerTag -> { });
  }
}
routingKey & binding key----direct exchange
https://www.rabbitmq.com/tutorials/tutorial-four-java.html
A binding is a relationship between an exchange and a queue. This can be simply read as: the queue is interested in messages from this exchange.
channel.queueBind(queueName, EXCHANGE_NAME, "black");
上面的black 就是bindingKey
routing key 是Message 本身的属性
后面,exchange delivery message to queue,就是依赖于,bindingKey 和 routing key是否匹配
We will use a direct exchange instead. The routing algorithm behind a direct exchange is simple - a message goes to the queues whose binding key exactly matches the routing key of the message.
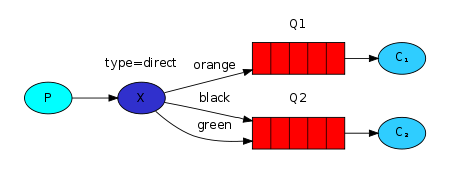
In this setup, we can see the direct exchange X with two queues bound to it. The first queue is bound with binding key orange, and the second has two bindings, one with binding key black and the other one with green.
In such a setup a message published to the exchange with a routing key orange will be routed to queue Q1. Messages with a routing key of black or green will go to Q2. All other messages will be discarded.
Multiple bindings
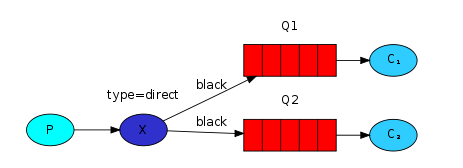
It is perfectly legal to bind multiple queues with the same binding key. In our example we could add a binding between X and Q1 with binding key black. In that case, the direct exchange will behave like fanout and will broadcast the message to all the matching queues. A message with routing key black will be delivered to both Q1 and Q2.
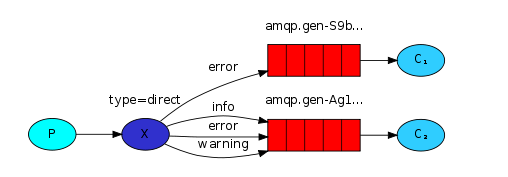
看下这个,按照日志级别,投送不同级别的日志,给到不同的queue
import com.rabbitmq.client.Channel;
import com.rabbitmq.client.Connection;
import com.rabbitmq.client.ConnectionFactory;

public class EmitLogDirect {

  private static final String EXCHANGE_NAME = "direct_logs";

  public static void main(String[] argv) throws Exception {
    ConnectionFactory factory = new ConnectionFactory();
    factory.setHost("localhost");
    try (Connection connection = factory.newConnection();
         Channel channel = connection.createChannel()) {
        channel.exchangeDeclare(EXCHANGE_NAME, "direct");

        String severity = getSeverity(argv);
        String message = getMessage(argv);

        channel.basicPublish(EXCHANGE_NAME, severity, null, message.getBytes("UTF-8"));
        System.out.println(" [x] Sent '" + severity + "':'" + message + "'");
    }
  }
  //..
}
import com.rabbitmq.client.*;

public class ReceiveLogsDirect {

  private static final String EXCHANGE_NAME = "direct_logs";

  public static void main(String[] argv) throws Exception {
    ConnectionFactory factory = new ConnectionFactory();
    factory.setHost("localhost");
    Connection connection = factory.newConnection();
    Channel channel = connection.createChannel();

    channel.exchangeDeclare(EXCHANGE_NAME, "direct");
    String queueName = channel.queueDeclare().getQueue();

    if (argv.length < 1) {
        System.err.println("Usage: ReceiveLogsDirect [info] [warning] [error]");
        System.exit(1);
    }

    for (String severity : argv) {
        channel.queueBind(queueName, EXCHANGE_NAME, severity);
    }
    System.out.println(" [*] Waiting for messages. To exit press CTRL+C");

    DeliverCallback deliverCallback = (consumerTag, delivery) -> {
        String message = new String(delivery.getBody(), "UTF-8");
        System.out.println(" [x] Received '" +
            delivery.getEnvelope().getRoutingKey() + "':'" + message + "'");
    };
    channel.basicConsume(queueName, true, deliverCallback, consumerTag -> { });
  }
}
topic exchange
https://www.rabbitmq.com/tutorials/tutorial-five-java.html
Messages sent to a topic exchange can't have an arbitrary routing_key - it must be a list of words, delimited by dots. The words can be anything, but usually they specify some features connected to the message. A few valid routing key examples: "stock.usd.nyse", "nyse.vmw", "quick.orange.rabbit". There can be as many words in the routing key as you like, up to the limit of 255 bytes.
The binding key must also be in the same form. The logic behind the topic exchange is similar to a direct one - a message sent with a particular routing key will be delivered to all the queues that are bound with a matching binding key. However there are two important special cases for binding keys:
- * (star) can substitute for exactly one word.
- # (hash) can substitute for zero or more words.
It's easiest to explain this in an example:
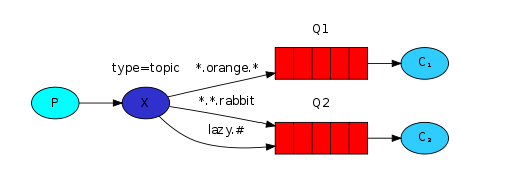
In this example, we're going to send messages which all describe animals. The messages will be sent with a routing key that consists of three words (two dots). The first word in the routing key will describe speed, second a colour and third a species: "..".
We created three bindings: Q1 is bound with binding key ".orange." and Q2 with "..rabbit" and "lazy.#".
These bindings can be summarised as:
- Q1 is interested in all the orange animals.
- Q2 wants to hear everything about rabbits, and everything about lazy animals.
A message with a routing key set to "quick.orange.rabbit" will be delivered to both queues. Message "lazy.orange.elephant" also will go to both of them. On the other hand "quick.orange.fox" will only go to the first queue, and "lazy.brown.fox" only to the second. "lazy.pink.rabbit" will be delivered to the second queue only once, even though it matches two bindings. "quick.brown.fox" doesn't match any binding so it will be discarded.
What happens if we break our contract and send a message with one or four words, like "orange" or "quick.orange.new.rabbit"? Well, these messages won't match any bindings and will be lost.
On the other hand "lazy.orange.new.rabbit", even though it has four words, will match the last binding and will be delivered to the second queue.
import com.rabbitmq.client.Channel;
import com.rabbitmq.client.Connection;
import com.rabbitmq.client.ConnectionFactory;

public class EmitLogTopic {

  private static final String EXCHANGE_NAME = "topic_logs";

  public static void main(String[] argv) throws Exception {
    ConnectionFactory factory = new ConnectionFactory();
    factory.setHost("localhost");
    try (Connection connection = factory.newConnection();
         Channel channel = connection.createChannel()) {

        channel.exchangeDeclare(EXCHANGE_NAME, "topic");

        String routingKey = getRouting(argv);
        String message = getMessage(argv);

        channel.basicPublish(EXCHANGE_NAME, routingKey, null, message.getBytes("UTF-8"));
        System.out.println(" [x] Sent '" + routingKey + "':'" + message + "'");
    }
  }
  //..
}
Publisher Confirms
https://www.rabbitmq.com/tutorials/tutorial-seven-java.html
Overview
In this tutorial we're going to use publisher confirms to make sure published messages have safely reached the broker. We will cover several strategies to using publisher confirms and explain their pros and cons.
Enabling Publisher Confirms on a Channel
Publisher confirms are a RabbitMQ extension to the AMQP 0.9.1 protocol, so they are not enabled by default. Publisher confirms are enabled at the channel level with the confirmSelect method:
Channel channel = connection.createChannel();
channel.confirmSelect();
This method must be called on every channel that you expect to use publisher confirms. Confirms should be enabled just once, not for every message published.
Strategy #1: Publishing Messages Individually
Let's start with the simplest approach to publishing with confirms, that is, publishing a message and waiting synchronously for its confirmation:
while (thereAreMessagesToPublish()) {
    byte[] body = ...;
    BasicProperties properties = ...;
    channel.basicPublish(exchange, queue, properties, body);
    // uses a 5 second timeout
    channel.waitForConfirmsOrDie(5_000);
}
In the previous example we publish a message as usual and wait for its confirmation with the Channel#waitForConfirmsOrDie(long) method. The method returns as soon as the message has been confirmed. If the message is not confirmed within the timeout or if it is nack-ed (meaning the broker could not take care of it for some reason), the method will throw an exception. The handling of the exception usually consists in logging an error message and/or retrying to send the message.
Different client libraries have different ways to synchronously deal with publisher confirms, so make sure to read carefully the documentation of the client you are using.
This technique is very straightforward but also has a major drawback: it significantly slows down publishing, as the confirmation of a message blocks the publishing of all subsequent messages. This approach is not going to deliver throughput of more than a few hundreds of published messages per second. Nevertheless, this can be good enough for some applications.
Strategy #3: Handling Publisher Confirms Asynchronously
The broker confirms published messages asynchronously, one just needs to register a callback on the client to be notified of these confirms:
Channel channel = connection.createChannel();
channel.confirmSelect();
channel.addConfirmListener((sequenceNumber, multiple) -> {
    // code when message is confirmed
}, (sequenceNumber, multiple) -> {
    // code when message is nack-ed
});
There are 2 callbacks: one for confirmed messages and one for nack-ed messages (messages that can be considered lost by the broker). Each callback has 2 parameters:
- sequence number: a number that identifies the confirmed or nack-ed message. We will see shortly how to correlate it with the published message.
- multiple: this is a boolean value. If false, only one message is confirmed/nack-ed, if true, all messages with a lower or equal sequence number are confirmed/nack-ed.
The sequence number can be obtained with Channel#getNextPublishSeqNo() before publishing:
int sequenceNumber = channel.getNextPublishSeqNo());
ch.basicPublish(exchange, queue, properties, body);
A simple way to correlate messages with sequence number consists in using a map. Let's assume we want to publish strings because they are easy to turn into an array of bytes for publishing. Here is a code sample that uses a map to correlate the publishing sequence number with the string body of the message:
ConcurrentNavigableMap<Long, String> outstandingConfirms = new ConcurrentSkipListMap<>();
// ... code for confirm callbacks will come later
String body = "...";
outstandingConfirms.put(channel.getNextPublishSeqNo(), body);
channel.basicPublish(exchange, queue, properties, body.getBytes());
The publishing code now tracks outbound messages with a map. We need to clean this map when confirms arrive and do something like logging a warning when messages are nack-ed:
ConcurrentNavigableMap<Long, String> outstandingConfirms = new ConcurrentSkipListMap<>();
ConfirmCallback cleanOutstandingConfirms = (sequenceNumber, multiple) -> {
    if (multiple) {
        ConcurrentNavigableMap<Long, String> confirmed = outstandingConfirms.headMap(
          sequenceNumber, true
        );
        confirmed.clear();
    } else {
        outstandingConfirms.remove(sequenceNumber);
    }
};

channel.addConfirmListener(cleanOutstandingConfirms, (sequenceNumber, multiple) -> {
    String body = outstandingConfirms.get(sequenceNumber);
    System.err.format(
      "Message with body %s has been nack-ed. Sequence number: %d, multiple: %b%n",
      body, sequenceNumber, multiple
    );
    cleanOutstandingConfirms.handle(sequenceNumber, multiple);
});
// ... publishing code
The previous sample contains a callback that cleans the map when confirms arrive. Note this callback handles both single and multiple confirms. This callback is used when confirms arrive (as the first argument of Channel#addConfirmListener). The callback for nack-ed messages retrieves the message body and issues a warning. It then re-uses the previous callback to clean the map of outstanding confirms (whether messages are confirmed or nack-ed, their corresponding entries in the map must be removed.)
To sum up, handling publisher confirms asynchronously usually requires the following steps:
- provide a way to correlate the publishing sequence number with a message.
- register a confirm listener on the channel to be notified when publisher acks/nacks arrive to perform the appropriate actions, like logging or re-publishing a nack-ed message. The sequence-number-to-message correlation mechanism may also require some cleaning during this step.
- track the publishing sequence number before publishing a message.
Re-publishing nack-ed Messages?
It can be tempting to re-publish a nack-ed message from the corresponding callback but this should be avoided, as confirm callbacks are dispatched in an I/O thread where channels are not supposed to do operations. A better solution consists in enqueuing the message in an in-memory queue which is polled by a publishing thread. A class like ConcurrentLinkedQueue would be a good candidate to transmit messages between the confirm callbacks and a publishing thread.
mqtt-plugin
https://www.rabbitmq.com/mqtt.html
MQTT 3.1 assumes two primary usage scenarios:
- Transient clients that use transient (non-persistent) messages
- Stateful clients that use durable subscriptions (non-clean sessions, QoS1)
This section briefly covers how these scenarios map to RabbitMQ queue durability and persistence features.
Transient (QoS0) subscription use non-durable, auto-delete queues that will be deleted when the client disconnects.
Durable (QoS1) subscriptions use durable queues. Whether the queues are auto-deleted is controlled by the client's clean session flag. Clients with clean sessions use auto-deleted queues, others use non-auto-deleted ones.
For transient (QoS0) publishes, the plugin will publish messages as transient (non-persistent). Naturally, for durable (QoS1) publishes, persistent messages will be used internally.
Queues created for MQTT subscribers will have names starting with mqtt-subscription-, one per subscription QoS level. The queues will have queue TTL depending on MQTT plugin configuration, 24 hours by default.
Queue TTL & Message TTL
https://www.rabbitmq.com/ttl.html
对队列中的所有消息,统一设置过期时间
Map<String, Object> args = new HashMap<String, Object>();
args.put("x-message-ttl", 60000);
channel.queueDeclare("myqueue", false, false, false, args);
对某个消息,单独设置过期时间
byte[] messageBodyBytes = "Hello, world!".getBytes();
AMQP.BasicProperties properties = new AMQP.BasicProperties.Builder()
                                   .expiration("60000")
                                   .build();
channel.basicPublish("my-exchange", "routing-key", properties, messageBodyBytes);
给队列本身,设置过期时间
Map<String, Object> args = new HashMap<String, Object>();
args.put("x-expires", 1800000);
channel.queueDeclare("myqueue", false, false, false, args);
queues
https://www.rabbitmq.com/queues.html
声明MessageQueue很重要
https://www.cnblogs.com/linkenpark/p/5393666.html
在Rabbit MQ中,无论是生产者发送消息还是消费者接受消息,都首先需要声明一个MessageQueue。
这就存在一个问题,是生产者声明还是消费者声明呢?要解决这个问题,首先需要明确:
a)消费者是无法订阅或者获取不存在的MessageQueue中信息。
b)消息被Exchange接受以后,如果没有匹配的Queue,则会被丢弃。
在明白了上述两点以后,就容易理解如果是消费者去声明Queue,就有可能会出现在声明Queue之前,生产者已发送的消息被丢弃的隐患。如果应用能够通过消息重发的机制允许消息丢失,则使用此方案没有任何问题。但是如果不能接受该方案,这就需要无论是生产者还是消费者,在发送或者接受消息前,都需要去尝试建立消息队列
但是,假如,在消费者声明完queue以后,也能接收到消息了。此时,消费者突然挂了,生产者继续在发送消息。注意,消息此时是不会丢的,仍然保存在queue中,消费者上线后,仍然能拿到宕机那段时间的消息。
cleanSession该如何设置
MQTT客户端向服务器发起CONNECT请求时,可以通过’Clean Session’标志设置会话。
‘Clean Session’设置为0,表示创建一个持久会话,在客户端断开连接时,会话仍然保持并保存离线消息,直到会话超时注销。
‘Clean Session’设置为1,表示创建一个新的临时会话,在客户端断开时,会话自动销毁。
durable & auto-delete
Transient (QoS0) subscription use non-durable, auto-delete queues that will be deleted when the client disconnects.
Durable (QoS1) subscriptions use durable queues. Whether the queues are auto-deleted is controlled by the client's clean session flag. Clients with clean sessions use auto-deleted queues, others use non-auto-deleted ones.
For transient (QoS0) publishes, the plugin will publish messages as transient (non-persistent). Naturally, for durable (QoS1) publishes, persistent messages will be used internally.
header中的mqtt_retained
retained的,顾名思义,该消息为“保留消息”。
让我们来看一下这个场景:
你有一个温度传感器,它每三个小时向一个 Topic 发布当前的温度。那么问题来了,有一个新的订阅者在它刚刚发布了当前温度之后订阅了这个主题,那么这个订阅端什么时候能才能收到温度消息?
对的,它必须等到三个小时以后,温度传感器再次发布消息的时候才能收到。在这之前,这个新的订阅者对传感器的温度数据一无所知。
怎么来解决这个问题呢?
这个时候就轮到 Retained 消息出场解决这个问题了。Retained 消息是指在 PUBLISH 数据包中 Retain 标识设为 1 的消息,Broker 收到这样的 PUBLISH 包以后,将保存这个消息,当有一个新的订阅者订阅相应主题的时候,Broker 会马上将这个消息发送给订阅者。
Retain 消息有以下一些特点:
- 一个 Topic 只能有 1 条 Retained 消息,发布新的 Retained 消息将覆盖老的 Retained 消息;
- 如果订阅者使用通配符订阅主题,它会收到所有匹配的主题上的 Retained 消息;
- 只有新的订阅者才会收到 Retained 消息,如果订阅者重复订阅一个主题,也会被当做新的订阅者,然后收到 Retained 消息;
- Retained 消息发送到订阅者时,消息的 Retain 标识仍然是 1,订阅者可以判断这个消息是否是 Retained 消息,以做相应的处理。
注意:Retained 消息和持久性会话没有任何关系,Retained 消息是 Broker 为每一个 Topic 单独存储的,而持久性会话是 Broker 为每一个 Client 单独存储的。
如果你想删除一个 Retained 消息也很简单,只要向这个主题发布一个 Payload 长度为 0 的 Retained 消息就可以了。
那么开头我们提到的那个场景的解决方案就很简单了,温度传感器每 3 个小时发布当前的温度的 Retained 消息,那么无论新的订阅者什么时候进行订阅,它都能收到温度传感器上一次发布的数据。
Rabbitmq新版本搭建
选择erlang的版本:https://packagecloud.io/rabbitmq/erlang
选择rabbitmq-server的版本:https://packagecloud.io/rabbitmq/rabbitmq-server
参考:https://www.rabbitmq.com/install-rpm.html
1.安装erlang的repo
curl -s https://packagecloud.io/install/repositories/rabbitmq/erlang/script.rpm.sh | sudo bash
yum install erlang-25.1.1-1.el8.x86_64

如果上面的命令,不可行的话,一般是因为,当前os不支持packagecloud.io。
比如,opencloudos就是不支持的,下面的链接就无法访问到数据
https://packagecloud.io/install/repositories/rabbitmq/erlang/config_file.repo?os=opencloudos&dist=8&source=script


下面,看一下rocky是支持的,所以用下面的链接是能访问到数据的
https://packagecloud.io/install/repositories/rabbitmq/erlang/config_file.repo?os=rocky&dist=8&source=script

centos也是支持的
https://packagecloud.io/install/repositories/rabbitmq/erlang/config_file.repo?os=centos&dist=8&source=script


解决办法
那么选择将script.rpm.sh 脚本文件先下载下来,再指定os。


查看当前系统的os信息
[root@VM-0-14-opencloudos Rabbitmq]# cat /etc/os-release
NAME="OpenCloudOS"
VERSION="8.6"
ID="opencloudos"
ID_LIKE="rhel fedora"
VERSION_ID="8.6"
PLATFORM_ID="platform:oc8"
PRETTY_NAME="OpenCloudOS 8.6"
ANSI_COLOR="0;31"
CPE_NAME="cpe:/o:opencloudos:opencloudos:8"
HOME_URL="https://www.opencloudos.org/"
BUG_REPORT_URL="https://bugs.opencloudos.tech/"

wget https://packagecloud.io/install/repositories/rabbitmq/erlang/script.rpm.sh

chmod u+x script.rpm.sh
os=centos dist=8 ./script.rpm.sh
2.安装erlang
yum install erlang-25.1.1-1.el8.x86_64
3.安装rabbitmq-server的repo和软件
curl -s https://packagecloud.io/install/repositories/rabbitmq/rabbitmq-server/script.rpm.sh | sudo bash
yum install rabbitmq-server-3.10.12-1.el8.noarch

同样,会遇到这个问题,所以,我们先下载,再指定os安装
wget https://packagecloud.io/install/repositories/rabbitmq/rabbitmq-server/script.rpm.sh
chmod u+x script.rpm.sh
os=centos dist=8 ./script.rpm.sh

yum install rabbitmq-server-3.10.12-1.el8.noarch
创建配置文件/etc/rabbitmq/rabbitmq.conf 和 /etc/rabbitmq/rabbitmq-env.conf
4.启动rabbit-server
chkconfig rabbitmq-server on

/sbin/service rabbitmq-server start
/sbin/service rabbitmq-server status
/sbin/service rabbitmq-server stop


# 可以被替换成
systemctl start rabbitmq-server.service
systemctl status rabbitmq-server.service
systemctl stop rabbitmq-server.service


systemctl start firewalld.service
firewall-cmd --state
firewall-cmd --add-port=5672/tcp --permanent
firewall-cmd --add-port=15672/tcp --permanent
firewall-cmd --add-port=15674/tcp --permanent
firewall-cmd --add-port=15675/tcp --permanent
firewall-cmd --add-port=1883/tcp --permanent

firewall-cmd --reload


rabbitmqctl add_user weipeng weipeng
rabbitmqctl set_permissions -p / weipeng ".*" ".*" ".*"
rabbitmqctl set_user_tags weipeng administrator


rabbitmq-plugins enable rabbitmq_management
rabbitmq-plugins enable rabbitmq_mqtt
5.修改/etc/hosts
[root@middleware ~]# hostname
middleware

vim /etc/hosts
127.0.0.1  middleware

rabbitmq-diagnostics status
配置文件
refer to : https://www.rabbitmq.com/configure.html#configuration-files
查看rabbitmq的有效配置
rabbitmqctl environment
查看the location of configuration files
https://www.rabbitmq.com/configure.html#verify-configuration-config-file-location
rabbitmq-diagnostics status
如果这个命令的输出中,Config files是个none,那么根据输出找到log file,然后less log file,找到config file,如果仍然是空,那么说明就没有配置文件
To accommodate this need, modern RabbitMQ versions allow for both formats to be used at the same time in separate files: rabbitmq.conf uses the new style format and is recommended for most settings, and advanced.config covers more advanced settings that the ini-style configuration cannot express. This is covered in more detail in the following sections.
| Configuration File | Format Used | Purpose |
|---|---|---|
| rabbitmq.conf | New style format (sysctl or ini-like) | Primary configuration file with a .conf extension. Should be used for most settings. It is easier for humans to read and machines (deployment tools) to generate. Not every setting can be expressed in this format. |
| advanced.config | Classic (Erlang terms) | A limited number of settings that cannot be expressed in the new style configuration format, such as LDAP queries. Only should be used when necessary. |
| rabbitmq-env.conf (rabbitmq-env.conf.bat on Windows) | Environment variable pairs | Used to set environment variables relevant to RabbitMQ in one place. |
配置文件的样例:
https://github.com/rabbitmq/rabbitmq-server/blob/v3.11.x/deps/rabbit/docs/rabbitmq.conf.example
an example rabbitmq.conf file named rabbitmq.conf.example. It contains examples of most of the configuration items you might want to set (with some very obscure ones omitted), along with documentation for those settings.
To override the main RabbitMQ config file location, use the RABBITMQ_CONFIG_FILE (or RABBITMQ_CONFIG_FILES to use a conf.d-style directory of sorted files) environment variables. Use .conf as file extension for the new style config format, e.g. /etc/rabbitmq/rabbitmq.conf or /data/configuration/rabbitmq/rabbitmq.conf
Using a Directory of .conf Files
A conf.d-style directory of files can also be used. Use RABBITMQ_CONFIG_FILES (note the plural "_FILES") to point the node at a directory of such files:
# uses a directory of .conf files loaded in alphabetical order
RABBITMQ_CONFIG_FILES=/path/to/a/custom/location/rabbitmq/conf.d
Target directory must contain a number of .conf files with the same syntax as rabbitmq.conf.
They will be loaded in alphabetical order. A common naming practice uses numerical prefixes in filenames to make it easier to reason about the order, or make sure a "defaults file" is always loaded first, regardless of how many extra files are generated at deployment time:
ls -lh /path/to/a/custom/location/rabbitmq/conf.d
# => -r--r--r--  1 rabbitmq  rabbitmq    87B Mar 21 19:50 00-defaults.conf
# => -r--r--r--  1 rabbitmq  rabbitmq   4.6K Mar 21 19:52 10-main.conf
# => -r--r--r--  1 rabbitmq  rabbitmq   1.6K Mar 21 19:52 20-tls.conf
# => -r--r--r--  1 rabbitmq  rabbitmq   1.6K Mar 21 19:52 30-federation.conf
Location of rabbitmq.conf, advanced.config and rabbitmq-env.conf
Default configuration file location is distribution-specific. RabbitMQ packages or nodes will not create any configuration files. Users and deployment tool should use the following locations when creating the files:
| Platform | Default Configuration File Directory | Example Configuration File Paths |
|---|---|---|
| Generic binary package | $RABBITMQ_HOME/etc/rabbitmq/ | RABBITMQ_HOME/etc/rabbitmq/rabbitmq.conf, RABBITMQ_HOME/etc/rabbitmq/advanced.config |
| Debian and Ubuntu | /etc/rabbitmq/ | /etc/rabbitmq/rabbitmq.conf, /etc/rabbitmq/advanced.config |
| RPM-based Linux | /etc/rabbitmq/ | /etc/rabbitmq/rabbitmq.conf, /etc/rabbitmq/advanced.config |
| Windows | %APPDATA%\RabbitMQ\ | %APPDATA%\RabbitMQ\rabbitmq.conf, %APPDATA%\RabbitMQ\advanced.config |
| MacOS Homebrew Formula | ${install_prefix}/etc/rabbitmq/, and the Homebrew cellar prefix is usually /usr/local | {install_prefix}/etc/rabbitmq/rabbitmq.conf, {install_prefix}/etc/rabbitmq/advanced.config |
How to Inspect and Verify Effective Configuration of a Running Node
It is possible to print effective configuration (user provided values from all configuration files merged into defaults) using the rabbitmq-diagnostics environment command:
# inspect effective configuration on a node
rabbitmq-diagnostics environment
The command above will print applied configuration for every application (RabbitMQ, plugins, libraries) running on the node. Effective configuration is computed using the following steps:
- rabbitmq.conf is translated into the internally used (advanced) config format. These configuration is merged into the defaults
- advanced.config is loaded if present, and merged into the result of the step above
Effective configuration should be verified together with config file location. Together, these steps help quickly narrow down most common misconfiguration problems.
Core Server Variables Configurable in rabbitmq.conf
refer to : https://www.rabbitmq.com/configure.html#config-items
配置文件的最佳实践
cd /etc/rabbitmq/
vim rabbitmq.conf
配置文件如下:
## millseconds     7 days
mqtt.subscription_ttl = 604800000
mqtt.prefetch         = 10

## use DETS (disk-based) store for retained messages
mqtt.retained_message_store = rabbit_mqtt_retained_msg_store_dets
## only used by DETS store
mqtt.retained_message_store_dets_sync_interval = 2000
重启:
/sbin/service rabbitmq-server stop
/sbin/service rabbitmq-server start
/sbin/service rabbitmq-server status
查看是否生效
rabbitmq-diagnostics environment
如果rabbitmq宕机,如何保证消息不丢失
1.queue是持久化的
2.message是持久化的。
使用spring-integration-mqtt,默认情况下,queue是持久化的。但是message不是持久化的,如果希望将message设置为持久化的,那么需要做以下设置:
CleanSession需要设置为false
@Bean
    public MqttPahoClientFactory mqttPahoClientFactory(CustomMqttProperties customMqttProperties) {
        DefaultMqttPahoClientFactory factory = new DefaultMqttPahoClientFactory();
        MqttConnectOptions options = new MqttConnectOptions();
        // 如果设置为true则接收不到掉线的消息,改为false则可以收到掉线的消息,
        options.setCleanSession(false);
        options.setServerURIs(customMqttProperties.getUris());
        options.setUserName(customMqttProperties.getUserName());
        options.setPassword(customMqttProperties.getPassword().toCharArray());
        factory.setConnectionOptions(options);
        return factory;
    }
发送的Qos设置为1
@Bean
    @ServiceActivator(inputChannel = "mqttOutboundChannel")
    public MessageHandler mqttOutbound(MqttPahoClientFactory mqttPahoClientFactory) {
        MqttPahoMessageHandler messageHandler =
                new MqttPahoMessageHandler("testClient", mqttPahoClientFactory);
        messageHandler.setAsync(true);
        messageHandler.setDefaultQos(1);
        messageHandler.setDefaultTopic("/testtopic");
        return messageHandler;
    }
配置日志和数据存放路径
1.先创建目录,并给权限
mkdir -p /mnt/sdc/lib/rabbitmq/mnesia

mkdir -p /mnt/sdc/log/rabbitmq


# 配置读写权限
chmod -R 777 /mnt/sdc/lib/rabbitmq
chmod -R 777 /mnt/sdc/log/rabbitmq

# 更改所属用户和用户组
chown  -R rabbitmq:rabbitmq  /mnt/sdc/lib/rabbitmq
chown  -R rabbitmq:rabbitmq  /mnt/sdc/log/rabbitmq
创建/etc/rabbitmq/rabbitmq-env.conf
2.在配置文件/etc/rabbitmq/rabbitmq-env.conf中,新增以下配置:
vim /etc/rabbitmq/rabbitmq-env.conf

RABBITMQ_MNESIA_BASE=/mnt/sdc/lib/rabbitmq/mnesia
RABBITMQ_LOG_BASE=/mnt/sdc/log/rabbitmq
RabbitMQ的启停命令比较
我们首先需要知道,当rabbitMQ跑起来后,就是一个RabbitMQ Node了,这个node其实包含2个进程。
- 一个erlang vm,就是erlang虚拟机,类似于Jvm;
- 另一个是rabbitmq application,就是应用程序,类似我们写的业务程序
refer to : https://www.rabbitmq.com/rabbitmqctl.8.html
先看RabbitmqCtl,关于启停命令如下:
-
rabbitmqctl stop: 这个命令,会同时停止erlang vm 和 rabbitMQ application -
rabbitmqctl stop_app:这个命令,不会停止erlang vm,只会停止 rabbitMQ application -
rabbitmqctl start_app: 这个命令,只能启动RabbitMQ application -
rabbitmq-server -detached:starts a RabbitMQ node in the background. 也就是说,这个命令,会同时启动erlang vm 和 rabbitMQ application -
rabbitmq-server:starts a RabbitMQ node in the foreground. 也就是说,这个命令,会同时启动erlang vm 和 rabbitMQ application
下面,我们再看几个启动命令:
/sbin/service rabbitmq-server start
systemctl start rabbitmq-server.service
首先,这2个命令,是一样的。当我们执行/sbin/service rabbitmq-server start,linux系统,会自动重定向到systemctl start rabbitmq-server.service这个命令,如下:
[root@VM-0-4-opencloudos ~]# /sbin/service rabbitmq-server start
Redirecting to /bin/systemctl start rabbitmq-server.service
Job for rabbitmq-server.service failed because the control process exited with error code.
See "systemctl status rabbitmq-server.service" and "journalctl -xe" for details.
那我们接下来,就分析下,systemctl start rabbitmq-server.service这个命令,是怎么执行的?
这个命令,在执行时,其实是查看/lib/systemd/system/rabbitmq-server.service文件,然后按照这个文件内的内容,来执行的。我们看下这个内容:
cd /lib/systemd/system

[root@VM-0-4-opencloudos system]# cat rabbitmq-server.service
[Unit]
Description=RabbitMQ broker
After=syslog.target network.target

[Service]
Type=notify
User=rabbitmq
Group=rabbitmq
UMask=0027
NotifyAccess=all
TimeoutStartSec=600

# To override LimitNOFILE, create the following file:
#
# /etc/systemd/system/rabbitmq-server.service.d/limits.conf
#
# with the following content:
#
# [Service]
# LimitNOFILE=65536

LimitNOFILE=32768

# Note: systemd on CentOS 7 complains about in-line comments,
# so only append them here
#
# Restart:
# The following setting will automatically restart RabbitMQ
# in the event of a failure. systemd service restarts are not a
# replacement for service monitoring. Please see
# https://www.rabbitmq.com/monitoring.html
Restart=on-failure
RestartSec=10
WorkingDirectory=/var/lib/rabbitmq
ExecStart=/usr/sbin/rabbitmq-server
ExecStop=/usr/sbin/rabbitmqctl shutdown
# See rabbitmq/rabbitmq-server-release#51
SuccessExitStatus=69

[Install]
WantedBy=multi-user.target
可以看到,ExecStart的值,就是在执行rabbitmq-server这个命令,也就是说,这个命令的作用是:starts a RabbitMQ node in the foreground。只是说,以操作系统服务的形式,来启动罢了。本质上来说,其实和直接执行rabbitmq-server这个命令,没有区别。
综上,我们常用的启停命令是:rabbitmq-server -detached、rabbitmqctl stop
RabbitmqCtl
refer to :
https://www.rabbitmq.com/rabbitmqctl.8.html
Cli
refer to: https://www.rabbitmq.com/cli.html
Command Line Tools
Overview
RabbitMQ ships with multiple command line tools, each with a set of related commands:
- rabbitmqctl for service management and general operator tasks
- rabbitmq-diagnostics for diagnostics and health checking
- rabbitmq-plugins for plugin management
- rabbitmq-queues for maintenance tasks on queues, in particular quorum queues
- rabbitmq-streams for maintenance tasks on streams
- rabbitmq-upgrade for maintenance tasks related to upgrades
rabbitmq-server
refer to : https://www.rabbitmq.com/rabbitmq-server.8.html
rabbitmq-server — starts a RabbitMQ node
RabbitMQ is an open source multi-protocol messaging broker.
Running rabbitmq-server starts a RabbitMQ node in the foreground.
The node will display a startup banner and report when startup is complete.
To shut down the server, use service management tools or rabbitmqctl(8).
-detached
Start the server process in the background. Note that this will cause the pid not to be written to the pid file.
For example, runs RabbitMQ AMQP server in the background:
rabbitmq-server -detached