Doc
refer to : https://www.rabbitmq.com/clustering.html#overview
Ways of Forming a Cluster
A RabbitMQ cluster can be formed in a number of ways:
- Declaratively by listing cluster nodes in config file
- Declaratively using DNS-based discovery
- Declaratively using AWS (EC2) instance discovery (via a plugin)
- Declaratively using Kubernetes discovery (via a plugin)
- Declaratively using Consul-based discovery (via a plugin)
- Declaratively using etcd-based discovery (via a plugin)
- Manually with rabbitmqctl
Please refer to the Cluster Formation guide for details.
The composition of a cluster can be altered dynamically. All RabbitMQ brokers start out as running on a single node. These nodes can be joined into clusters, and subsequently turned back into individual brokers again.
Node Names (Identifiers)
RabbitMQ nodes are identified by node names. A node name consists of two parts, a prefix (usually rabbit) and hostname. For example, rabbit@node1.messaging.svc.local is a node name with the prefix ofrabbitand hostname of node1.messaging.svc.local.
Node names in a cluster must be unique. If more than one node is running on a given host (this is usually the case in development and QA environments), they must use different prefixes, e.g.rabbit1@hostnameand rabbit2@hostname.
In a cluster, nodes identify and contact each other using node names. This means that the hostname part of every node name must resolve. CLI tools also identify and address nodes using node names.
When a node starts up, it checks whether it has been assigned a node name. This is done via the RABBITMQ_NODENAME environment variable. If no value was explicitly configured, the node resolves its hostname and prepends rabbit to it to compute its node name.
If a system uses fully qualified domain names (FQDNs) for hostnames, RabbitMQ nodes and CLI tools must be configured to use so called long node names. For server nodes this is done by setting the RABBITMQ_USE_LONGNAME environment variable to true.
For CLI tools, either RABBITMQ_USE_LONGNAME must be set or the --longnames option must be specified.
Cluster Formation Requirements
Hostname Resolution
RabbitMQ nodes address each other using a node name, a combination of a prefix and domain name, either short or fully-qualified (FQDNs).
Therefore every cluster member must be able to resolve hostnames of every other cluster member, its own hostname, as well as machines on which command line tools such as rabbitmqctl might be used.
Nodes will perform hostname resolution early on node boot. In container-based environments it is important that hostname resolution is ready before the container is started. For Kubernetes users, this means the DNS cache interval for CoreDNS to a value in the 5-10 second range.
Hostname resolution can use any of the standard OS-provided methods:
- DNS records
- Local host files (e.g.
/etc/hosts)
To use FQDNs, see RABBITMQ_USE_LONGNAME in the Configuration guide. See Node Names above.
Port Access
RabbitMQ nodes bind to ports (open server TCP sockets) in order to accept client and CLI tool connections. Other processes and tools such as SELinux may prevent RabbitMQ from binding to a port. When that happens, the node will fail to start.
CLI tools, client libraries and RabbitMQ nodes also open connections (client TCP sockets). Firewalls can prevent nodes and CLI tools from communicating with each other. The following ports are most relevant to inter-node communication in a cluster:
- 4369: epmd, a helper discovery daemon used by RabbitMQ nodes and CLI tools
- 6000 through 6500: used by RabbitMQ Stream replication
- 25672: used for inter-node and CLI tools communication (Erlang distribution server port) and is allocated from a dynamic range (limited to a single port by default, computed as AMQP port + 20000). Unless external connections on these ports are really necessary (e.g. the cluster uses federation or CLI tools are used on machines outside the subnet), these ports should not be publicly exposed. See networking guide for details.
- 35672-35682: used by CLI tools (Erlang distribution client ports) for communication with nodes and is allocated from a dynamic range (computed as server distribution port + 10000 through server distribution port + 10010).
It is possible to configure RabbitMQ to use different ports and specific network interfaces. See RabbitMQ Networking guide to learn more.
Nodes in a Cluster
What is Replicated?
All data/state required for the operation of a RabbitMQ broker is replicated across all nodes. An exception to this are message queues, which by default reside on one node, though they are visible and reachable from all nodes. To replicate queues across nodes in a cluster, use a queue type that supports replication. This topic is covered in the Quorum Queues guide.
Nodes are Equal Peers
Some distributed systems have leader and follower nodes. This is generally not true for RabbitMQ. All nodes in a RabbitMQ cluster are equal peers: there are no special nodes in RabbitMQ core.
Many CLI tool operations can be executed against any node. An HTTP API client can target any cluster node.
How CLI Tools Authenticate to Nodes (and Nodes to Each Other): the Erlang Cookie
RabbitMQ nodes and CLI tools (e.g. rabbitmqctl) use a cookie to determine whether they are allowed to communicate with each other. For two nodes to be able to communicate they must have the same shared secret called the Erlang cookie. The cookie is just a string of alphanumeric characters up to 255 characters in size. It is usually stored in a local file. The file must be only accessible to the owner (e.g. have UNIX permissions of 600 or similar). Every cluster node must have the same cookie.
If the file does not exist, Erlang VM will try to create one with a randomly generated value when the RabbitMQ server starts up. Using such generated cookie files are appropriate in development environments only. Since each node will generate its own value independently, this strategy is not really viable in a clustered environment.
Erlang cookie generation should be done at cluster deployment stage, ideally using automation and orchestration tools.
In distributed deployment
Cookie File Locations
On UNIX systems, the cookie will be typically located in /var/lib/rabbitmq/.erlang.cookie (used by the server) and $HOME/.erlang.cookie (used by CLI tools). Note that since the value of $HOME varies from user to user, it’s necessary to place a copy of the cookie file for each user that will be using the CLI tools. This applies to both non-privileged users and root.
RabbitMQ nodes will log its effective user’s home directory location early on boot.
Hostname Resolution
Since hostname resolution is a prerequisite for successful inter-node communication, starting with RabbitMQ 3.8.6, CLI tools provide two commands that help verify that hostname resolution on a node works as expected. The commands are not meant to replace dig and other specialised DNS tools but rather provide a way to perform most basic checks while taking Erlang runtime hostname resolver features into account.
The commands are covered in the Networking guide.
Node Counts and Quorum
Because several features (e.g. quorum queues, client tracking in MQTT) require a consensus between cluster members, odd numbers of cluster nodes are highly recommended: 1, 3, 5, 7 and so on.
Clustering and Observability
Client connections, channels and queues will be distributed across cluster nodes. Operators need to be able to inspect and monitor such resources across all cluster nodes.
RabbitMQ CLI tools such as rabbitmq-diagnostics and rabbitmqctl provide commands that inspect resources and cluster-wide state. Some commands focus on the state of a single node (e.g. rabbitmq-diagnostics environment and rabbitmq-diagnostics status), others inspect cluster-wide state. Some examples of the latter include rabbitmqctl list_connections, rabbitmqctl list_mqtt_connections, rabbitmqctl list_stomp_connections, rabbitmqctl list_users, rabbitmqctl list_vhosts and so on.
Such “cluster-wide” commands will often contact one node first, discover cluster members and contact them all to retrieve and combine their respective state. For example,rabbitmqctl list_connectionswill contact all nodes, retrieve their AMQP 0-9-1 and AMQP 1.0 connections, and display them all to the user. The user doesn’t have to manually contact all nodes.
Management UI works similarly: a node that has to respond to an HTTP API request will fan out to other cluster members and aggregate their responses. In a cluster with multiple nodes that have management plugin enabled, the operator can use any node to access management UI.
The same goes for monitoring tools that use the HTTP API to collect data about the state of the cluster. There is no need to issue a request to every cluster node in turn.
Node Failure Handling
RabbitMQ brokers tolerate the failure of individual nodes. Nodes can be started and stopped at will, as long as they can contact a cluster member node known at the time of shutdown.
Quorum queue allows queue contents to be replicated across multiple cluster nodes with parallel replication and a predictable leader election and data safety behavior as long as a majority of replicas are online.
Non-replicated classic queues can also be used in clusters. Non-mirrored queue behaviour in case of node failure depends on queue durability.
Metrics and Statistics
Every node stores and aggregates its own metrics and stats, and provides an API for other nodes to access it. Some stats are cluster-wide, others are specific to individual nodes. Node that responds to an HTTP API request contacts its peers to retrieve their data and then produces an aggregated result.
Clustering Transcript with rabbitmqctl
The following several sections provide a transcript of manually setting up and manipulating a RabbitMQ cluster across three machines: rabbit1, rabbit2, rabbit3. It is recommended that the example is studied before more automation-friendly cluster formation options are used.
Starting Independent Nodes
Clusters are set up by re-configuring existing RabbitMQ nodes into a cluster configuration. Hence the first step is to start RabbitMQ on all nodes in the normal way:
# on rabbit1
rabbitmq-server -detached
# on rabbit2
rabbitmq-server -detached
# on rabbit3
rabbitmq-server -detached
This creates three independent RabbitMQ brokers, one on each node, as confirmed by the cluster_status command:
# on rabbit1
rabbitmqctl cluster_status
# => Cluster status of node rabbit@rabbit1 ...
# => [{nodes,[{disc,[rabbit@rabbit1]}]},{running_nodes,[rabbit@rabbit1]}]
# => ...done.

# on rabbit2
rabbitmqctl cluster_status
# => Cluster status of node rabbit@rabbit2 ...
# => [{nodes,[{disc,[rabbit@rabbit2]}]},{running_nodes,[rabbit@rabbit2]}]
# => ...done.

# on rabbit3
rabbitmqctl cluster_status
# => Cluster status of node rabbit@rabbit3 ...
# => [{nodes,[{disc,[rabbit@rabbit3]}]},{running_nodes,[rabbit@rabbit3]}]
# => ...done.
The node name of a RabbitMQ broker started from the rabbitmq-server shell script is rabbit@*shorthostname, where the short node name is lower-case (as in rabbit@rabbit1, above). On Windows, if rabbitmq-server.bat batch file is used, the short node name is upper-case (as in rabbit@RABBIT1). When you type node names, case matters, and these strings must match exactly
Creating a Cluster
In order to link up our three nodes in a cluster, we tell two of the nodes, say rabbit@rabbit2 and rabbit@rabbit3, to join the cluster of the third, say rabbit@rabbit1. Prior to that both newly joining members must be reset.
We first join rabbit@rabbit2 in a cluster with rabbit@rabbit1. To do that, on rabbit@rabbit2 we stop the RabbitMQ application and join the rabbit@rabbit1 cluster, then restart the RabbitMQ application. Note that a node must be reset before it can join an existing cluster. Resetting the node removes all resources and data that were previously present on that node. This means that a node cannot be made a member of a cluster and keep its existing data at the same time. When that’s desired, using the Blue/Green deployment strategy or backup and restore are the available options.
# on rabbit2
rabbitmqctl stop_app
# => Stopping node rabbit@rabbit2 ...done.

rabbitmqctl reset
# => Resetting node rabbit@rabbit2 ...

rabbitmqctl join_cluster rabbit@rabbit1
# => Clustering node rabbit@rabbit2 with [rabbit@rabbit1] ...done.

rabbitmqctl start_app
# => Starting node rabbit@rabbit2 ...done.
We can see that the two nodes are joined in a cluster by running the cluster_status command on either of the nodes:
# on rabbit1
rabbitmqctl cluster_status
# => Cluster status of node rabbit@rabbit1 ...
# => [{nodes,[{disc,[rabbit@rabbit1,rabbit@rabbit2]}]},
# =>  {running_nodes,[rabbit@rabbit2,rabbit@rabbit1]}]
# => ...done.

# on rabbit2
rabbitmqctl cluster_status
# => Cluster status of node rabbit@rabbit2 ...
# => [{nodes,[{disc,[rabbit@rabbit1,rabbit@rabbit2]}]},
# =>  {running_nodes,[rabbit@rabbit1,rabbit@rabbit2]}]
# => ...done.
Now we join rabbit@rabbit3 to the same cluster. The steps are identical to the ones above, except this time we’ll cluster to rabbit2 to demonstrate that the node chosen to cluster to does not matter - it is enough to provide one online node and the node will be clustered to the cluster that the specified node belongs to.
# on rabbit3
rabbitmqctl stop_app
# => Stopping node rabbit@rabbit3 ...done.

# on rabbit3
rabbitmqctl reset
# => Resetting node rabbit@rabbit3 ...

rabbitmqctl join_cluster rabbit@rabbit2
# => Clustering node rabbit@rabbit3 with rabbit@rabbit2 ...done.

rabbitmqctl start_app
# => Starting node rabbit@rabbit3 ...done.
We can see that the three nodes are joined in a cluster by running the cluster_status command on any of the nodes:
# on rabbit1
rabbitmqctl cluster_status
# => Cluster status of node rabbit@rabbit1 ...
# => [{nodes,[{disc,[rabbit@rabbit1,rabbit@rabbit2,rabbit@rabbit3]}]},
# =>  {running_nodes,[rabbit@rabbit3,rabbit@rabbit2,rabbit@rabbit1]}]
# => ...done.

# on rabbit2
rabbitmqctl cluster_status
# => Cluster status of node rabbit@rabbit2 ...
# => [{nodes,[{disc,[rabbit@rabbit1,rabbit@rabbit2,rabbit@rabbit3]}]},
# =>  {running_nodes,[rabbit@rabbit3,rabbit@rabbit1,rabbit@rabbit2]}]
# => ...done.

# on rabbit3
rabbitmqctl cluster_status
# => Cluster status of node rabbit@rabbit3 ...
# => [{nodes,[{disc,[rabbit@rabbit3,rabbit@rabbit2,rabbit@rabbit1]}]},
# =>  {running_nodes,[rabbit@rabbit2,rabbit@rabbit1,rabbit@rabbit3]}]
# => ...done.
By following the above steps we can add new nodes to the cluster at any time, while the cluster is running.
Restarting Cluster Nodes
Nodes that have been joined to a cluster can be stopped at any time. They can also fail or be terminated by the OS.
In general, if the majority of nodes is still online after a node is stopped, this does not affect the rest of the cluster, although client connection distribution, queue replica placement, and load distribution of the cluster will change.
Schema Syncing from Online Peers
A restarted node will sync the schema and other information from its peers on boot. Before this process completes, the node won’t be fully started and functional.
It is therefore important to understand the process node go through when they are stopped and restarted.
A stopping node picks an online cluster member (only disc nodes will be considered) to sync with after restart. Upon restart the node will try to contact that peer 10 times by default, with 30 second response timeouts.
In case the peer becomes available in that time interval, the node successfully starts, syncs what it needs from the peer and keeps going.
If the peer does not become available, the restarted node will give up and voluntarily stop. Such condition can be identified by the timeout (timeout_waiting_for_tables) warning messages in the logs that eventually lead to node startup failure:
2020-07-27 21:10:51.361 [warning] <0.269.0> Error while waiting for Mnesia tables: {timeout_waiting_for_tables,[rabbit@node2,rabbit@node1],[rabbit_durable_queue]}
2020-07-27 21:10:51.361 [info] <0.269.0> Waiting for Mnesia tables for 30000 ms, 1 retries left
2020-07-27 21:11:21.362 [warning] <0.269.0> Error while waiting for Mnesia tables: {timeout_waiting_for_tables,[rabbit@node2,rabbit@node1],[rabbit_durable_queue]}
2020-07-27 21:11:21.362 [info] <0.269.0> Waiting for Mnesia tables for 30000 ms, 0 retries left
2020-07-27 21:15:51.380 [info] <0.269.0> Waiting for Mnesia tables for 30000 ms, 1 retries left
2020-07-27 21:16:21.381 [warning] <0.269.0> Error while waiting for Mnesia tables: {timeout_waiting_for_tables,[rabbit@node2,rabbit@node1],[rabbit_user,rabbit_user_permission, …]}
2020-07-27 21:16:21.381 [info] <0.269.0> Waiting for Mnesia tables for 30000 ms, 0 retries left
2020-07-27 21:16:51.393 [info] <0.44.0> Application mnesia exited with reason: stopped
2020-07-27 21:16:51.397 [error] <0.269.0> BOOT FAILED
2020-07-27 21:16:51.397 [error] <0.269.0> ===========
2020-07-27 21:16:51.397 [error] <0.269.0> Timeout contacting cluster nodes: [rabbit@node1].
When a node has no online peers during shutdown, it will start without attempts to sync with any known peers. It does not start as a standalone node, however, and peers will be able to rejoin it.
Hostname Changes Between Restarts
A node rejoining after a node name or host name change can start as a blank node if its data directory path changes as a result. Such nodes will fail to rejoin the cluster. While the node is offline, its peers can be reset or started with a blank data directory. In that case the recovering node will fail to rejoin its peer as well since internal data store cluster identity would no longer match.
Consider the following scenario:
- A cluster of 3 nodes, A, B and C is formed
- Node A is shut down
- Node B is reset
- Node A is started
- Node A tries to rejoin B but B’s cluster identity has changed
- Node B doesn’t recognise A as a known cluster member because it’s been reset
in this case node B will reject the clustering attempt from A with an appropriate error message in the log:
Node 'rabbit@node1.local' thinks it's clustered with node 'rabbit@node2.local', but 'rabbit@node2.local' disagrees
In this case B can be reset again and then will be able to join A, or A can be reset and will successfully join B.
Cluster Node Restart Example
The below example uses CLI tools to shut down the nodes rabbit@rabbit1 and rabbit@rabbit3 and check on the cluster status at each step:
# on rabbit1
rabbitmqctl stop
# => Stopping and halting node rabbit@rabbit1 ...done.

# on rabbit2
rabbitmqctl cluster_status
# => Cluster status of node rabbit@rabbit2 ...
# => [{nodes,[{disc,[rabbit@rabbit1,rabbit@rabbit2,rabbit@rabbit3]}]},
# =>  {running_nodes,[rabbit@rabbit3,rabbit@rabbit2]}]
# => ...done.

# on rabbit3
rabbitmqctl cluster_status
# => Cluster status of node rabbit@rabbit3 ...
# => [{nodes,[{disc,[rabbit@rabbit1,rabbit@rabbit2,rabbit@rabbit3]}]},
# =>  {running_nodes,[rabbit@rabbit2,rabbit@rabbit3]}]
# => ...done.

# on rabbit3
rabbitmqctl stop
# => Stopping and halting node rabbit@rabbit3 ...done.

# on rabbit2
rabbitmqctl cluster_status
# => Cluster status of node rabbit@rabbit2 ...
# => [{nodes,[{disc,[rabbit@rabbit1,rabbit@rabbit2,rabbit@rabbit3]}]},
# =>  {running_nodes,[rabbit@rabbit2]}]
# => ...done.
In the below example, the nodes are started back, checking on the cluster status as we go along:
# on rabbit1
rabbitmq-server -detached
rabbitmqctl cluster_status
# => Cluster status of node rabbit@rabbit1 ...
# => [{nodes,[{disc,[rabbit@rabbit1,rabbit@rabbit2,rabbit@rabbit3]}]},
# =>  {running_nodes,[rabbit@rabbit2,rabbit@rabbit1]}]
# => ...done.

# on rabbit2
rabbitmqctl cluster_status
# => Cluster status of node rabbit@rabbit2 ...
# => [{nodes,[{disc,[rabbit@rabbit1,rabbit@rabbit2,rabbit@rabbit3]}]},
# =>  {running_nodes,[rabbit@rabbit1,rabbit@rabbit2]}]
# => ...done.

# on rabbit3
rabbitmq-server -detached

# on rabbit1
rabbitmqctl cluster_status
# => Cluster status of node rabbit@rabbit1 ...
# => [{nodes,[{disc,[rabbit@rabbit1,rabbit@rabbit2,rabbit@rabbit3]}]},
# =>  {running_nodes,[rabbit@rabbit2,rabbit@rabbit1,rabbit@rabbit3]}]
# => ...done.

# on rabbit2
rabbitmqctl cluster_status
# => Cluster status of node rabbit@rabbit2 ...
# => [{nodes,[{disc,[rabbit@rabbit1,rabbit@rabbit2,rabbit@rabbit3]}]},
# =>  {running_nodes,[rabbit@rabbit1,rabbit@rabbit2,rabbit@rabbit3]}]
# => ...done.

# on rabbit3
rabbitmqctl cluster_status
# => Cluster status of node rabbit@rabbit3 ...
# => [{nodes,[{disc,[rabbit@rabbit1,rabbit@rabbit2,rabbit@rabbit3]}]},
# =>  {running_nodes,[rabbit@rabbit2,rabbit@rabbit1,rabbit@rabbit3]}]
# => ...done.
Forcing Node Boot in Case of Unavailable Peers
In some cases the last node to go offline cannot be brought back up. It can be removed from the cluster using the forget_cluster_node rabbitmqctl command.
Alternatively force_boot rabbitmqctl command can be used on a node to make it boot without trying to sync with any peers (as if they were last to shut down). This is usually only necessary if the last node to shut down or a set of nodes will never be brought back online.
Breaking Up a Cluster
Sometimes it is necessary to remove a node from a cluster. The operator has to do this explicitly using a rabbitmqctl command.
Some peer discovery mechanisms support node health checks and forced removal of nodes not known to the discovery backend. That feature is opt-in (deactivated by default).
We first remove rabbit@rabbit3 from the cluster, returning it to independent operation. To do that, on rabbit@rabbit3 we stop the RabbitMQ application, reset the node, and restart the RabbitMQ application.
# on rabbit3
rabbitmqctl stop_app
# => Stopping node rabbit@rabbit3 ...done.

rabbitmqctl reset
# => Resetting node rabbit@rabbit3 ...done.
rabbitmqctl start_app
# => Starting node rabbit@rabbit3 ...done.
Note that it would have been equally valid to list rabbit@rabbit3 as a node.
Running the cluster_status command on the nodes confirms that rabbit@rabbit3 now is no longer part of the cluster and operates independently:
# on rabbit1
rabbitmqctl cluster_status
# => Cluster status of node rabbit@rabbit1 ...
# => [{nodes,[{disc,[rabbit@rabbit1,rabbit@rabbit2]}]},
# => {running_nodes,[rabbit@rabbit2,rabbit@rabbit1]}]
# => ...done.

# on rabbit2
rabbitmqctl cluster_status
# => Cluster status of node rabbit@rabbit2 ...
# => [{nodes,[{disc,[rabbit@rabbit1,rabbit@rabbit2]}]},
# =>  {running_nodes,[rabbit@rabbit1,rabbit@rabbit2]}]
# => ...done.

# on rabbit3
rabbitmqctl cluster_status
# => Cluster status of node rabbit@rabbit3 ...
# => [{nodes,[{disc,[rabbit@rabbit3]}]},{running_nodes,[rabbit@rabbit3]}]
# => ...done.
We can also remove nodes remotely. This is useful, for example, when having to deal with an unresponsive node. We can for example remove rabbit@rabbit1 from rabbit@rabbit2.
# on rabbit1
rabbitmqctl stop_app
# => Stopping node rabbit@rabbit1 ...done.

# on rabbit2
rabbitmqctl forget_cluster_node rabbit@rabbit1
# => Removing node rabbit@rabbit1 from cluster ...
# => ...done.
Note that rabbit1 still thinks it’s clustered with rabbit2, and trying to start it will result in an error. We will need to reset it to be able to start it again.
# on rabbit1
rabbitmqctl start_app
# => Starting node rabbit@rabbit1 ...
# => Error: inconsistent_cluster: Node rabbit@rabbit1 thinks it's clustered with node rabbit@rabbit2, but rabbit@rabbit2 disagrees

rabbitmqctl reset
# => Resetting node rabbit@rabbit1 ...done.

rabbitmqctl start_app
# => Starting node rabbit@rabbit1 ...
# => ...done.
The cluster_status command now shows all three nodes operating as independent RabbitMQ brokers:
# on rabbit1
rabbitmqctl cluster_status
# => Cluster status of node rabbit@rabbit1 ...
# => [{nodes,[{disc,[rabbit@rabbit1]}]},{running_nodes,[rabbit@rabbit1]}]
# => ...done.

# on rabbit2
rabbitmqctl cluster_status
# => Cluster status of node rabbit@rabbit2 ...
# => [{nodes,[{disc,[rabbit@rabbit2]}]},{running_nodes,[rabbit@rabbit2]}]
# => ...done.

# on rabbit3
rabbitmqctl cluster_status
# => Cluster status of node rabbit@rabbit3 ...
# => [{nodes,[{disc,[rabbit@rabbit3]}]},{running_nodes,[rabbit@rabbit3]}]
# => ...done.
Note that rabbit@rabbit2 retains the residual state of the cluster, whereas rabbit@rabbit1 and rabbit@rabbit3 are freshly initialised RabbitMQ brokers.
If we want to re-initialise rabbit@rabbit2 we follow the same steps as for the other nodes:
# on rabbit2
rabbitmqctl stop_app
# => Stopping node rabbit@rabbit2 ...done.
rabbitmqctl reset
# => Resetting node rabbit@rabbit2 ...done.
rabbitmqctl start_app
# => Starting node rabbit@rabbit2 ...done.
How to Reset a Node
Sometimes it may be necessary to reset a node (wipe all of its data) and later make it rejoin the cluster. Generally speaking, there are two possible scenarios: when the node is running, and when the node cannot start or won’t respond to CLI tool commands e.g. due to an issue such as ERL-430.
Resetting a node will delete all of its data, cluster membership information, configured runtime parameters, users, virtual hosts and any other node data. It will also permanently remove the node from its cluster.
To reset a running and responsive node, first stop RabbitMQ on it using rabbitmqctl stop_app and then reset it using rabbitmqctl reset:
# on rabbit1
rabbitmqctl stop_app
# => Stopping node rabbit@rabbit1 ...done.
rabbitmqctl reset
# => Resetting node rabbit@rabbit1 ...done.
FAQ
1.To use FQDNs, see RABBITMQ_USE_LONGNAME in the Configuration guide. See Node Names above.
- used by RabbitMQ Stream replication
Streams are a persistent and replicated data structure which models an append-only log with non-destructive consumer semantics.
refer to: https://www.rabbitmq.com/stream.html
3.Hostname Resolution: The commands are covered in the Networking guide.
4.rabbitmq-server -detached 这个命令的作用是什么?
以守护程序的方式在后台运行。对应的前台运行命令是:rabbitmq-server start
refer to : https://www.rabbitmq.com/rabbitmq-server.8.html
6.怎么重启rabbitmq,并重新加入到集群中?
Learn more in the section on ports above and dedicated RabbitMQ Networking guide.
Networking
refer to : https://www.rabbitmq.com/networking.html
Port Access
RabbitMQ nodes bind to ports (open server TCP sockets) in order to accept client and CLI tool connections. Other processes and tools such as SELinux may prevent RabbitMQ from binding to a port. When that happens, the node will fail to start.
CLI tools, client libraries and RabbitMQ nodes also open connections (client TCP sockets). Firewalls can prevent nodes and CLI tools from communicating with each other. Make sure the following ports are accessible:
- 4369: epmd, a peer discovery service used by RabbitMQ nodes and CLI tools
- 5672, 5671: used by AMQP 0-9-1 and AMQP 1.0 clients without and with TLS
- 5552, 5551: used by the RabbitMQ Stream protocol clients without and with TLS
- 6000 through 6500: used by RabbitMQ Stream replication
- 25672: used for inter-node and CLI tools communication (Erlang distribution server port) and is allocated from a dynamic range (limited to a single port by default, computed as AMQP port + 20000). Unless external connections on these ports are really necessary (e.g. the cluster uses federation or CLI tools are used on machines outside the subnet), these ports should not be publicly exposed. See networking guide for details.
- 35672-35682: used by CLI tools (Erlang distribution client ports) for communication with nodes and is allocated from a dynamic range (computed as server distribution port + 10000 through server distribution port + 10010). See networking guide for details.
- 15672, 15671: HTTP API clients, management UI and rabbitmqadmin, without and with TLS (only if the management plugin is enabled)
- 61613, 61614: STOMP clients without and with TLS (only if the STOMP plugin is enabled)
- 1883, 8883: MQTT clients without and with TLS, if the MQTT plugin is enabled
- 15674: STOMP-over-WebSockets clients (only if the Web STOMP plugin is enabled)
- 15675: MQTT-over-WebSockets clients (only if the Web MQTT plugin is enabled)
- 15692: Prometheus metrics (only if the Prometheus plugin is enabled)
It is possible to configure RabbitMQ to use different ports and specific network interfaces.
EPMD and Inter-node Communication
What is EPMD and How is It Used?
epmd is a small helper daemon that runs next to a RabbitMQ node and lets its peers and CLI tools discover what port they should use to communicate to it.
epmd (for Erlang Port Mapping Daemon) is a small additional daemon that runs alongside every RabbitMQ node and is used by the runtime to discover what port a particular node listens on for inter-node communication. The port is then used by peer nodes and CLI tools.
When a node or CLI tool needs to contact node rabbit@hostname2 it will do the following:
- Resolve
hostname2to an IPv4 or IPv6 address using the standard OS resolver or a custom one specified in the inetrc file - Contact
epmdrunning onhostname2using the above address - Ask
epmdfor the port used by noderabbiton it - Connect to the node using the resolved IP address and the discovered port
- Proceed with communication
EPMD Port
The default epmd port is 4369, but this can be changed using the ERL_EPMD_PORT environment variable:
# makes epmd bind to port 4369
export ERL_EPMD_PORT="4369"
All hosts in a cluster must use the same port.
Inter-node Communication Port Range
RabbitMQ nodes will use a port from a certain range known as the inter-node communication port range. The same port is used by CLI tools when they need to contact the node. The range can be modified.
RabbitMQ nodes communicate with CLI tools and other nodes using a port known as the distribution port. It is dynamically allocated from a range of values. For RabbitMQ, the default range is limited to a single value computed as RABBITMQ_NODE_PORT (AMQP 0-9-1 and AMQP 1.0 port) + 20000, which results in using port 25672. This single port can be configured using the RABBITMQ_DIST_PORT environment variable.
RabbitMQ command line tools also use a range of ports. The default range is computed by taking the RabbitMQ distribution port value and adding 10000 to it. The next 10 ports are also part of this range. Thus, by default, this range is 35672 through 35682.
This range can be configured using the RABBITMQ_CTL_DIST_PORT_MIN and RABBITMQ_CTL_DIST_PORT_MAX environment variables. Note that limiting the range to a single port will prevent more than one CLI tool from running concurrently on the same host and may affect CLI commands that require parallel connections to multiple cluster nodes.
A port range of 10 is therefore a recommended value.
When configuring firewall rules it is highly recommended to allow remote connections on the inter-node communication port from every cluster member and every host where CLI tools might be used. epmd port must be open for CLI tools and clustering to function.
Cluster-formation
refer to : https://www.rabbitmq.com/cluster-formation.html
https://www.rabbitmq.com/clustering.html#overview
Cluster Best Practise
refer to : https://juejin.cn/post/7102347983202549791
集群搭建
修改hosts文件
在/etc/hosts中,添加主机名和ip的映射
[root@VM-0-14-opencloudos rabbitmq]# hostname
VM-0-14-opencloudos

[root@VM-0-9-opencloudos rabbitmq]# hostname
VM-0-9-opencloudos

[root@VM-0-4-opencloudos rabbitmq]# hostname
VM-0-4-opencloudos
各ip和主机的映射,关系如下:
1.13.175.185 VM-0-14-opencloudos VM-0-14-opencloudos
1.13.192.38 VM-0-9-opencloudos VM-0-9-opencloudos
1.13.16.140 VM-0-4-opencloudos VM-0-4-opencloudos
在VM-0-14-opencloudos上,做如下操作:
vim /etc/hosts
追加以下配置:
1.13.192.38 VM-0-9-opencloudos VM-0-9-opencloudos
1.13.16.140 VM-0-4-opencloudos VM-0-4-opencloudos
同样,VM-0-9-opencloudos 和 VM-0-4-opencloudos 这2个节点,也需要修改/etc/hosts
接下来,我们测试下,看配置是否生效了
refer to : https://www.rabbitmq.com/networking.html#dns-verify-resolution
在VM-0-14-opencloudos上,做如下操作:
[root@VM-0-14-opencloudos rabbitmq]# rabbitmq-diagnostics resolve_hostname VM-0-9-opencloudos
Asking node rabbit@VM-0-14-opencloudos to resolve hostname VM-0-9-opencloudos to IPv4 addresses...
1.13.192.38


[root@VM-0-14-opencloudos rabbitmq]# rabbitmq-diagnostics resolve_hostname VM-0-4-opencloudos
Asking node rabbit@VM-0-14-opencloudos to resolve hostname VM-0-4-opencloudos to IPv4 addresses...
1.13.16.140
启动第一个节点
安装erlang 和 rabbit-server
需要打开的端口:
chkconfig rabbitmq-server on
systemctl start firewalld.service
firewall-cmd --state


firewall-cmd --add-port=4369/tcp --add-port=5672/tcp --add-port=15672/tcp --add-port=15674/tcp --add-port=15675/tcp --add-port=1883/tcp --add-port=25672/tcp --permanent


firewall-cmd --reload
添加配置文件
cd /etc/rabbitmq/
vim rabbitmq.conf
配置文件如下:
## millseconds     7 days
mqtt.subscription_ttl = 604800000
mqtt.prefetch         = 10

## use DETS (disk-based) store for retained messages
mqtt.retained_message_store = rabbit_mqtt_retained_msg_store_dets
## only used by DETS store
mqtt.retained_message_store_dets_sync_interval = 2000
第一次启动命令使用:
rabbitmq-server -detached
第一个机器添加user 、virtualhost、permission等
rabbitmqctl add_user weipeng weipeng
rabbitmqctl set_permissions -p / weipeng ".*" ".*" ".*"
rabbitmqctl set_user_tags weipeng administrator


rabbitmq-plugins enable rabbitmq_management
rabbitmq-plugins enable rabbitmq_mqtt
查看给节点的信息
rabbitmqctl cluster_status

这样,就能找到,该节点的名字是: rabbit@VM-0-14-opencloudos.该名字,会作为后面命令的执行参数
安装剩余节点
需要注意的是,这一步,只能安装,不能启动。因为必须要在启动之前,先保证.erlang.cookier文件一致
安装erlang 和 rabbit-server
需要打开的端口:
chkconfig rabbitmq-server on
systemctl start firewalld.service
firewall-cmd --state


firewall-cmd --add-port=4369/tcp --add-port=5672/tcp --add-port=15672/tcp --add-port=15674/tcp --add-port=15675/tcp --add-port=1883/tcp --add-port=25672/tcp --permanent


firewall-cmd --reload
复制.erlang.cookie文件
1.查询erlang_cookie文件的位置
[root@VM-0-9-opencloudos rabbitmq]# rabbitmq-diagnostics erlang_cookie_sources
Listing Erlang cookie sources used by CLI tools...
Cookie File

Effective user: rabbitmq
Effective home directory: /var/lib/rabbitmq
Cookie file path: /var/lib/rabbitmq/.erlang.cookie
Cookie file exists? true
Cookie file type: regular
Cookie file access: read
Cookie file size: 20

Cookie CLI Switch

--erlang-cookie value set? false
--erlang-cookie value length: 0

Env variable  (Deprecated)

RABBITMQ_ERLANG_COOKIE value set? false
RABBITMQ_ERLANG_COOKIE value length: 0
2.复制.erlang.cookie文件,各节点保持一致
scp /var/lib/rabbitmq/.erlang.cookie root@VM-0-9-opencloudos:/var/lib/rabbitmq/.erlang.cookie

注意复制过来的,属于root用户,需要改成rabbitmq用户
chown rabbitmq:rabbitmq /var/lib/rabbitmq/.erlang.cookie

ls -la
注意,scp复制时,可能会报错,如下:
[root@VM-0-14-opencloudos rabbitmq]# scp /var/lib/rabbitmq/.erlang.cookie root@VM-0-9-opencloudos:/var/lib/rabbitmq/.erlang.cookie
@@@@@@@@@@@@@@@@@@@@@@@@@@@@@@@@@@@@@@@@@@@@@@@@@@@@@@@@@@@
@    WARNING: REMOTE HOST IDENTIFICATION HAS CHANGED!     @
@@@@@@@@@@@@@@@@@@@@@@@@@@@@@@@@@@@@@@@@@@@@@@@@@@@@@@@@@@@
IT IS POSSIBLE THAT SOMEONE IS DOING SOMETHING NASTY!
Someone could be eavesdropping on you right now (man-in-the-middle attack)!
It is also possible that a host key has just been changed.
The fingerprint for the ECDSA key sent by the remote host is
SHA256:iSnXNvRp2LgL18f96O2pyokB0GEEHksOLcttJ1J058Q.
Please contact your system administrator.
Add correct host key in /root/.ssh/known_hosts to get rid of this message.
Offending ECDSA key in /root/.ssh/known_hosts:1
ECDSA host key for vm-0-9-opencloudos has changed and you have requested strict checking.
Host key verification failed.
lost connection
解决方法是:
cd ~/.ssh/
vim known_hosts
将不可用的ip和主机名 删除即可
剩余节点修改配置文件
cd /etc/rabbitmq/
vim rabbitmq.conf
配置文件如下:
## millseconds     7 days
mqtt.subscription_ttl = 604800000
mqtt.prefetch         = 10

## use DETS (disk-based) store for retained messages
mqtt.retained_message_store = rabbit_mqtt_retained_msg_store_dets
## only used by DETS store
mqtt.retained_message_store_dets_sync_interval = 2000
剩余节点,单独启动
rabbitmq-server -detached

rabbitmq-plugins enable rabbitmq_management
rabbitmq-plugins enable rabbitmq_mqtt
关于management plugin,剩余节点最好一起启用,这样才能通过web页面更好的监控 和 可视化。
查看上面的配置文件,是否生效
rabbitmq-diagnostics environment
加入集群
rabbitmqctl stop_app
rabbitmqctl reset
rabbitmqctl join_cluster rabbit@VM-0-14-opencloudos
rabbitmqctl start_app
注意,当我们在执行rabbitmqctl join_cluster,可能会报错如下:
[root@VM-0-4-opencloudos rabbitmq]# rabbitmqctl join_cluster rabbit@VM-0-14-opencloudos
Clustering node rabbit@VM-0-4-opencloudos with rabbit@VM-0-14-opencloudos

15:12:57.854 [warning] Feature flags: the previous instance of this node must have failed to write the `feature_flags` file at `/var/lib/rabbitmq/mnesia/rabbit@VM-0-4-opencloudos-feature_flags`:

15:12:57.854 [warning] Feature flags:   - list of previously disabled feature flags now marked as such: [:maintenance_mode_status]

15:12:58.191 [warning] Feature flags: the previous instance of this node must have failed to write the `feature_flags` file at `/var/lib/rabbitmq/mnesia/rabbit@VM-0-4-opencloudos-feature_flags`:

15:12:58.191 [warning] Feature flags:   - list of previously enabled feature flags now marked as such: [:maintenance_mode_status]

15:12:58.235 [error] Failed to create a tracked connection table for node :"rabbit@VM-0-4-opencloudos": {:node_not_running, :"rabbit@VM-0-4-opencloudos"}

15:12:58.235 [error] Failed to create a per-vhost tracked connection table for node :"rabbit@VM-0-4-opencloudos": {:node_not_running, :"rabbit@VM-0-4-opencloudos"}

15:12:58.235 [error] Failed to create a per-user tracked connection table for node :"rabbit@VM-0-4-opencloudos": {:node_not_running, :"rabbit@VM-0-4-opencloudos"}
这个错误,可以直接忽略掉,接下来,继续执行rabbitmqctl start_app即可。
接下来,查看集群状态和各节点信息
[root@VM-0-4-opencloudos rabbitmq]# rabbitmqctl cluster_status
Cluster status of node rabbit@VM-0-4-opencloudos ...
Basics

Cluster name: rabbit@VM-0-4-opencloudos

Disk Nodes

rabbit@VM-0-14-opencloudos
rabbit@VM-0-4-opencloudos

Running Nodes

rabbit@VM-0-14-opencloudos
rabbit@VM-0-4-opencloudos

Versions

rabbit@VM-0-14-opencloudos: RabbitMQ 3.10.12 on Erlang 25.1.1
rabbit@VM-0-4-opencloudos: RabbitMQ 3.10.12 on Erlang 25.1.1

Maintenance status

Node: rabbit@VM-0-14-opencloudos, status: not under maintenance
Node: rabbit@VM-0-4-opencloudos, status: not under maintenance
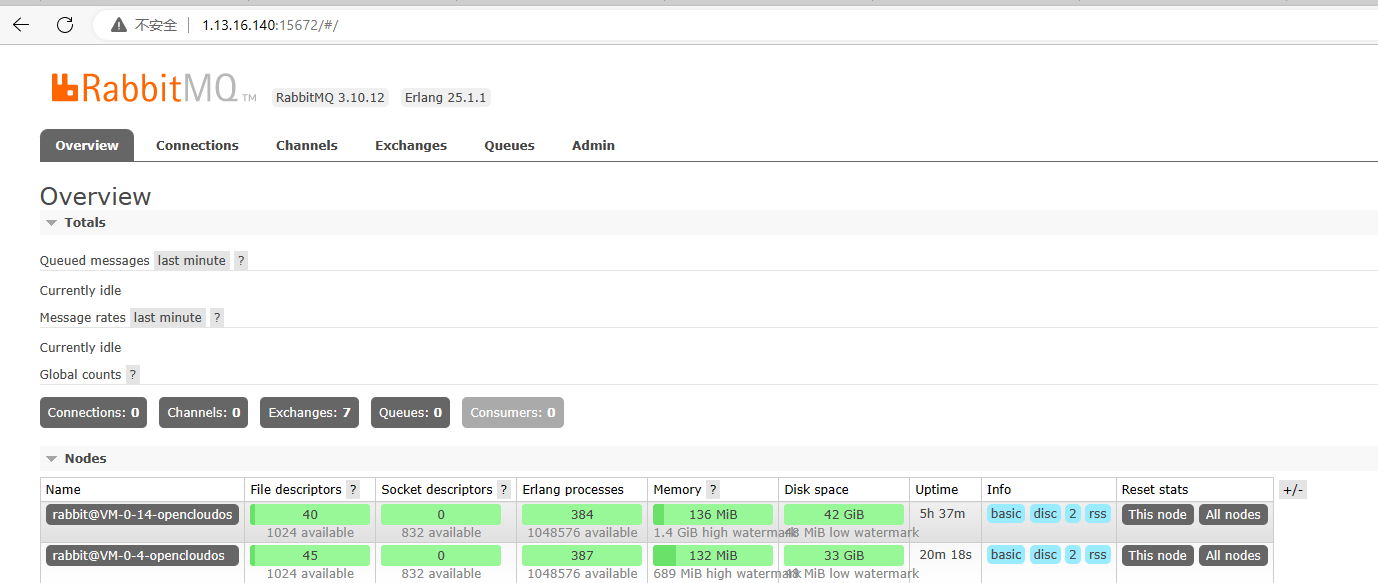
可以看到,rabbit@VM-0-14-opencloudos 和 rabbit@VM-0-4-opencloudos,这2个节点,已经组成了一个集群了。
打开web页面,会看到,节点已经被添加到集群中了
移出集群
当前,我们有3个节点:
[root@VM-0-9-opencloudos rabbitmq]# rabbitmqctl cluster_status
Cluster status of node rabbit@VM-0-9-opencloudos ...
Basics

Cluster name: rabbit@VM-0-9-opencloudos

Disk Nodes

rabbit@VM-0-14-opencloudos
rabbit@VM-0-4-opencloudos
rabbit@VM-0-9-opencloudos

Running Nodes

rabbit@VM-0-14-opencloudos
rabbit@VM-0-4-opencloudos
rabbit@VM-0-9-opencloudos
假设,我们将rabbit@VM-0-14-opencloudos节点,从集群中移出。我们需要做2步:
1.在rabbit@VM-0-14-opencloudos上,执行rabbitmqctl stop_app、rabbitmqctl reset
2.在集群中的其他任一一个节点上,执行 rabbitmqctl forget_cluster_node rabbit@VM-0-14-opencloudos


注意,这里必须要执行forget_cluster_node命令,因为如果不执行的话,那么集群的其他节点,认为rabbit@VM-0-14-opencloudos后面会恢复的,只是暂时失联了。同样,当rabbit@VM-0-14-opencloudos启动后,会自动加入到这个集群中的。


3.如果后面,rabbit@VM-0-14-opencloudos还想要重新加入到这个集群中,那么需要在rabbit@VM-0-14-opencloudos上执行stop_app、 reset、join_cluster、start_app等步骤
执行rabbitmqctl cluster_status,查看当前集群,有哪几个节点
[root@VM-0-9-opencloudos rabbitmq]# rabbitmqctl cluster_status
Cluster status of node rabbit@VM-0-9-opencloudos ...
Basics

Cluster name: rabbit@VM-0-9-opencloudos

Disk Nodes

rabbit@VM-0-14-opencloudos
rabbit@VM-0-4-opencloudos
rabbit@VM-0-9-opencloudos

Running Nodes

rabbit@VM-0-14-opencloudos
rabbit@VM-0-4-opencloudos
rabbit@VM-0-9-opencloudos
宕机重启
假设,我们的某个节点,突然宕机了,那么重启后,是需要额外执行reset和join_cluster命令的,重启后,会自动加入上之前的集群中。
rabbitmqctl stop_app
rabbitmqctl start_app