基本认识
HSSFWorkbook & XSSFWorkbook & SXSSFWorkbook
首先我们知道POI中我们最熟悉的莫过于WorkBook这样一个接口,我们的POI版本也在更新的同时对这个几口的实现类做了更新;
- HSSFWorkbook :
这个实现类是我们早期使用最多的对象,它可以操作Excel2003以前(包含2003)的所有Excel版本。在2003以前Excel的版本后缀还是.xls
- XSSFWorkbook :
这个实现类现在在很多公司都可以发现还在使用,它是操作的Excel2003–Excel2007之间的版本,Excel的扩展名是.xlsx
- SXSSFWorkbook :
这个实现类是POI3.8之后的版本才有的,它可以操作Excel2007以后的所有版本Excel,扩展名是.xlsx
优缺点
大致知道了我们在导入导出操作的时候会用到这样三个实现类以及他们可以操作的Excel版本和后缀之后,我们就要从优缺点分析他们了
- HSSFWorkbook
它是POI版本中最常用的方式,不过:
-
它的缺点是 最多只能导出 65535行,也就是导出的数据函数超过这个数据就会报错;
-
它的优点是 不会报内存溢出。(因为数据量还不到7w所以内存一般都够用,首先你得明确知道这种方式是将数据先读取到内存中,然后再操作)
-
XSSFWorkbook
优点:这种形式的出现是为了突破HSSFWorkbook的65535行局限,是为了针对Excel2007版本的1048576行,16384列,最多可以导出104w条数据;
缺点:伴随的问题来了,虽然导出数据行数增加了好多倍,但是随之而来的内存溢出问题也成了噩梦。因为你所创建的book,Sheet,row,cell等在写入到Excel之前,都是存放在内存中的(这还没有算Excel的一些样式格式等等),可想而知,内存不溢出就有点不科学了!!!
- SXSSFWorkbook
从POI 3.8版本开始,提供了一种基于XSSF的低内存占用的SXSSF方式;
优点:
- 这种方式不会一般不会出现内存溢出(它使用了硬盘来换取内存空间,
- 也就是当内存中数据达到一定程度这些数据会被持久化到硬盘中存储起来,而内存中存的都是最新的数据),
- 并且支持大型Excel文件的创建(存储百万条数据绰绰有余)。
缺点:
- 既然一部分数据持久化到了硬盘中,且不能被查看和访问那么就会导致,
- 在同一时间点我们只能访问一定数量的数据,也就是内存中存储的数据;
- sheet.clone()方法将不再支持,还是因为持久化的原因;
- 不再支持对公式的求值,还是因为持久化的原因,在硬盘中的数据没法读取到内存中进行计算;
- 在使用模板方式下载数据的时候,不能改动表头,还是因为持久化的问题,写到了硬盘里就不能改变了;
官方文档
https://poi.apache.org/components/index.html
HSSF and XSSF for Excel Documents
HSSF is our port of the Microsoft Excel 97 (-2003) file format (BIFF8) to pure Java. XSSF is our port of the Microsoft Excel XML (2007+) file format (OOXML) to pure Java. SS is a package that provides common support for both formats with a common API. They both support read and write capability. Please see the HSSF+XSSF project page for more information.
XSSF:https://poi.apache.org/components/spreadsheet/
POI-HSSF and POI-XSSF/SXSSF - Java API To Access Microsoft Excel Format Files
https://poi.apache.org/components/spreadsheet/
Overview
HSSF is the POI Project’s pure Java implementation of the Excel '97(-2007) file format. XSSF is the POI Project’s pure Java implementation of the Excel 2007 OOXML (.xlsx) file format.
HSSF and XSSF provides ways to read spreadsheets create, modify, read and write XLS spreadsheets. They provide:
- low level structures for those with special needs
- an eventmodel api for efficient read-only access
- a full usermodel api for creating, reading and modifying XLS files
For people converting from pure HSSF usermodel, who wish to use the joint SS Usermodel for HSSF and XSSF support, then see the ss usermodel converting guide.
An alternate way of generating a spreadsheet is via the Cocoon serializer (yet you’ll still be using HSSF indirectly). With Cocoon you can serialize any XML datasource (which might be a ESQL page outputting in SQL for instance) by simply applying the stylesheet and designating the serializer.
If you’re merely reading spreadsheet data, then use the eventmodel api in either the org.apache.poi.hssf.eventusermodel package, or the org.apache.poi.xssf.eventusermodel package, depending on your file format.
If you’re modifying spreadsheet data then use the usermodel api. You can also generate spreadsheets this way.
Note that the usermodel system has a higher memory footprint than the low level eventusermodel, but has the major advantage of being much simpler to work with. Also please be aware that as the new XSSF supported Excel 2007 OOXML (.xlsx) files are XML based, the memory footprint for processing them is higher than for the older HSSF supported (.xls) binary files.
SXSSF (Since POI 3.8 beta3)
Since 3.8-beta3, POI provides a low-memory footprint SXSSF API built on top of XSSF.
SXSSF is an API-compatible streaming extension of XSSF to be used when very large spreadsheets have to be produced, and heap space is limited. SXSSF achieves its low memory footprint by limiting access to the rows that are within a sliding window, while XSSF gives access to all rows in the document. Older rows that are no longer in the window become inaccessible, as they are written to the disk.
In auto-flush mode the size of the access window can be specified, to hold a certain number of rows in memory. When that value is reached, the creation of an additional row causes the row with the lowest index to to be removed from the access window and written to disk. Or, the window size can be set to grow dynamically; it can be trimmed periodically by an explicit call to flushRows(int keepRows) as needed.
Due to the streaming nature of the implementation, there are the following limitations when compared to XSSF:
- Only a limited number of rows are accessible at a point in time.
- Sheet.clone() is not supported.
- Formula evaluation is not supported
See more details at SXSSF How-To
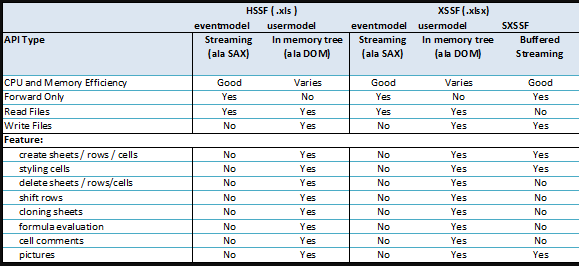
The table below synopsizes the comparative features of POI’s Spreadsheet API:
quick-guide
refer to : https://poi.apache.org/components/spreadsheet/quick-guide.html
New Workbook
Workbook wb = new HSSFWorkbook();
...
try  (OutputStream fileOut = new FileOutputStream("workbook.xls")) {
    wb.write(fileOut);
}
Workbook wb = new XSSFWorkbook();
...
try (OutputStream fileOut = new FileOutputStream("workbook.xlsx")) {
    wb.write(fileOut);
}
New Sheet
Workbook wb = new HSSFWorkbook();  // or new XSSFWorkbook();
Sheet sheet1 = wb.createSheet("new sheet");
Sheet sheet2 = wb.createSheet("second sheet");
// Note that sheet name is Excel must not exceed 31 characters
// and must not contain any of the any of the following characters:
// 0x0000
// 0x0003
// colon (:)
// backslash (\)
// asterisk (*)
// question mark (?)
// forward slash (/)
// opening square bracket ([)
// closing square bracket (])
// You can use org.apache.poi.ss.util.WorkbookUtil#createSafeSheetName(String nameProposal)}
// for a safe way to create valid names, this utility replaces invalid characters with a space (' ')
String safeName = WorkbookUtil.createSafeSheetName("[O'Brien's sales*?]"); // returns " O'Brien's sales   "
Sheet sheet3 = wb.createSheet(safeName);
try (OutputStream fileOut = new FileOutputStream("workbook.xls")) {
    wb.write(fileOut);
}
Creating Cells
Workbook wb = new HSSFWorkbook();
//Workbook wb = new XSSFWorkbook();
CreationHelper createHelper = wb.getCreationHelper();
Sheet sheet = wb.createSheet("new sheet");
// Create a row and put some cells in it. Rows are 0 based.
Row row = sheet.createRow(0);
// Create a cell and put a value in it.
Cell cell = row.createCell(0);
cell.setCellValue(1);
// Or do it on one line.
row.createCell(1).setCellValue(1.2);
row.createCell(2).setCellValue(
     createHelper.createRichTextString("This is a string"));
row.createCell(3).setCellValue(true);
// Write the output to a file
try (OutputStream fileOut = new FileOutputStream("workbook.xls")) {
    wb.write(fileOut);
}
Creating Date Cells
Workbook wb = new HSSFWorkbook();
//Workbook wb = new XSSFWorkbook();
CreationHelper createHelper = wb.getCreationHelper();
Sheet sheet = wb.createSheet("new sheet");
// Create a row and put some cells in it. Rows are 0 based.
Row row = sheet.createRow(0);
// Create a cell and put a date value in it.  The first cell is not styled
// as a date.
Cell cell = row.createCell(0);
cell.setCellValue(new Date());
// we style the second cell as a date (and time).  It is important to
// create a new cell style from the workbook otherwise you can end up
// modifying the built in style and effecting not only this cell but other cells.
CellStyle cellStyle = wb.createCellStyle();
cellStyle.setDataFormat(
    createHelper.createDataFormat().getFormat("m/d/yy h:mm"));
cell = row.createCell(1);
cell.setCellValue(new Date());
cell.setCellStyle(cellStyle);
//you can also set date as java.util.Calendar
cell = row.createCell(2);
cell.setCellValue(Calendar.getInstance());
cell.setCellStyle(cellStyle);
// Write the output to a file
try (OutputStream fileOut = new FileOutputStream("workbook.xls")) {
    wb.write(fileOut);
}
Working with different types of cells
Workbook wb = new HSSFWorkbook();
Sheet sheet = wb.createSheet("new sheet");
Row row = sheet.createRow(2);
row.createCell(0).setCellValue(1.1);
row.createCell(1).setCellValue(new Date());
row.createCell(2).setCellValue(Calendar.getInstance());
row.createCell(3).setCellValue("a string");
row.createCell(4).setCellValue(true);
row.createCell(5).setCellType(CellType.ERROR);
// Write the output to a file
try (OutputStream fileOut = new FileOutputStream("workbook.xls")) {
    wb.write(fileOut);
}
Files vs InputStreams
When opening a workbook, either a .xls HSSFWorkbook, or a .xlsx XSSFWorkbook, the Workbook can be loaded from either a File or an InputStream. Using a File object allows for lower memory consumption, while an InputStream requires more memory as it has to buffer the whole file.
If using WorkbookFactory, it’s very easy to use one or the other:
// Use a file
Workbook wb = WorkbookFactory.create(new File("MyExcel.xls"));
// Use an InputStream, needs more memory
Workbook wb = WorkbookFactory.create(new FileInputStream("MyExcel.xlsx"));
Demonstrates various alignment options
public static void main(String[] args) throws Exception {
    Workbook wb = new XSSFWorkbook(); //or new HSSFWorkbook();
    Sheet sheet = wb.createSheet();
    Row row = sheet.createRow(2);
    row.setHeightInPoints(30);
    createCell(wb, row, 0, HorizontalAlignment.CENTER, VerticalAlignment.BOTTOM);
    createCell(wb, row, 1, HorizontalAlignment.CENTER_SELECTION, VerticalAlignment.BOTTOM);
    createCell(wb, row, 2, HorizontalAlignment.FILL, VerticalAlignment.CENTER);
    createCell(wb, row, 3, HorizontalAlignment.GENERAL, VerticalAlignment.CENTER);
    createCell(wb, row, 4, HorizontalAlignment.JUSTIFY, VerticalAlignment.JUSTIFY);
    createCell(wb, row, 5, HorizontalAlignment.LEFT, VerticalAlignment.TOP);
    createCell(wb, row, 6, HorizontalAlignment.RIGHT, VerticalAlignment.TOP);
    // Write the output to a file
    try (OutputStream fileOut = new FileOutputStream("xssf-align.xlsx")) {
        wb.write(fileOut);
    }
    wb.close();
}
/**
 * Creates a cell and aligns it a certain way.
 *
 * @param wb     the workbook
 * @param row    the row to create the cell in
 * @param column the column number to create the cell in
 * @param halign the horizontal alignment for the cell.
 * @param valign the vertical alignment for the cell.
 */
private static void createCell(Workbook wb, Row row, int column, HorizontalAlignment halign, VerticalAlignment valign) {
    Cell cell = row.createCell(column);
    cell.setCellValue("Align It");
    CellStyle cellStyle = wb.createCellStyle();
    cellStyle.setAlignment(halign);
    cellStyle.setVerticalAlignment(valign);
    cell.setCellStyle(cellStyle);
}
Working with borders
Workbook wb = new HSSFWorkbook();
Sheet sheet = wb.createSheet("new sheet");
// Create a row and put some cells in it. Rows are 0 based.
Row row = sheet.createRow(1);
// Create a cell and put a value in it.
Cell cell = row.createCell(1);
cell.setCellValue(4);
// Style the cell with borders all around.
CellStyle style = wb.createCellStyle();
style.setBorderBottom(BorderStyle.THIN);
style.setBottomBorderColor(IndexedColors.BLACK.getIndex());
style.setBorderLeft(BorderStyle.THIN);
style.setLeftBorderColor(IndexedColors.GREEN.getIndex());
style.setBorderRight(BorderStyle.THIN);
style.setRightBorderColor(IndexedColors.BLUE.getIndex());
style.setBorderTop(BorderStyle.MEDIUM_DASHED);
style.setTopBorderColor(IndexedColors.BLACK.getIndex());
cell.setCellStyle(style);
// Write the output to a file
try (OutputStream fileOut = new FileOutputStream("workbook.xls")) {
    wb.write(fileOut);
}
wb.close();
Iterate over rows and cells
Sometimes, you’d like to just iterate over all the sheets in a workbook, all the rows in a sheet, or all the cells in a row. This is possible with a simple for loop.
These iterators are available by calling workbook.sheetIterator(), sheet.rowIterator(), and row.cellIterator(), or implicitly using a for-each loop. Note that a rowIterator and cellIterator iterate over rows or cells that have been created, skipping empty rows and cells.
for (Sheet sheet : wb ) {
    for (Row row : sheet) {
        for (Cell cell : row) {
            // Do something here
        }
    }
}
Iterate over cells, with control of missing / blank cells
In some cases, when iterating, you need full control over how missing or blank rows and cells are treated, and you need to ensure you visit every cell and not just those defined in the file. (The CellIterator will only return the cells defined in the file, which is largely those with values or stylings, but it depends on Excel).
In cases such as these, you should fetch the first and last column information for a row, then call getCell(int, MissingCellPolicy) to fetch the cell. Use a MissingCellPolicy to control how blank or null cells are handled.
// Decide which rows to process
int rowStart = Math.min(15, sheet.getFirstRowNum());
int rowEnd = Math.max(1400, sheet.getLastRowNum());
for (int rowNum = rowStart; rowNum < rowEnd; rowNum++) {
   Row r = sheet.getRow(rowNum);
   if (r == null) {
      // This whole row is empty
      // Handle it as needed
      continue;
   }
   int lastColumn = Math.max(r.getLastCellNum(), MY_MINIMUM_COLUMN_COUNT);
   for (int cn = 0; cn < lastColumn; cn++) {
      Cell c = r.getCell(cn, Row.RETURN_BLANK_AS_NULL);
      if (c == null) {
         // The spreadsheet is empty in this cell
      } else {
         // Do something useful with the cell's contents
      }
   }
}
Getting the cell contents
To get the contents of a cell, you first need to know what kind of cell it is (asking a string cell for its numeric contents will get you a NumberFormatException for example). So, you will want to switch on the cell’s type, and then call the appropriate getter for that cell.
In the code below, we loop over every cell in one sheet, print out the cell’s reference (eg A3), and then the cell’s contents.
// import org.apache.poi.ss.usermodel.*;
DataFormatter formatter = new DataFormatter();
Sheet sheet1 = wb.getSheetAt(0);
for (Row row : sheet1) {
    for (Cell cell : row) {
        CellReference cellRef = new CellReference(row.getRowNum(), cell.getColumnIndex());
        System.out.print(cellRef.formatAsString());
        System.out.print(" - ");
        // get the text that appears in the cell by getting the cell value and applying any data formats (Date, 0.00, 1.23e9, $1.23, etc)
        String text = formatter.formatCellValue(cell);
        System.out.println(text);
        // Alternatively, get the value and format it yourself
        switch (cell.getCellType()) {
            case CellType.STRING:
                System.out.println(cell.getRichStringCellValue().getString());
                break;
            case CellType.NUMERIC:
                if (DateUtil.isCellDateFormatted(cell)) {
                    System.out.println(cell.getDateCellValue());
                } else {
                    System.out.println(cell.getNumericCellValue());
                }
                break;
            case CellType.BOOLEAN:
                System.out.println(cell.getBooleanCellValue());
                break;
            case CellType.FORMULA:
                System.out.println(cell.getCellFormula());
                break;
            case CellType.BLANK:
                System.out.println();
                break;
            default:
                System.out.println();
        }
    }
}
Fills and colors
Workbook wb = new XSSFWorkbook();
Sheet sheet = wb.createSheet("new sheet");
// Create a row and put some cells in it. Rows are 0 based.
Row row = sheet.createRow(1);
// Aqua background
CellStyle style = wb.createCellStyle();
style.setFillBackgroundColor(IndexedColors.AQUA.getIndex());
style.setFillPattern(FillPatternType.BIG_SPOTS);
Cell cell = row.createCell(1);
cell.setCellValue("X");
cell.setCellStyle(style);
// Orange "foreground", foreground being the fill foreground not the font color.
style = wb.createCellStyle();
style.setFillForegroundColor(IndexedColors.ORANGE.getIndex());
style.setFillPattern(FillPatternType.SOLID_FOREGROUND);
cell = row.createCell(2);
cell.setCellValue("X");
cell.setCellStyle(style);
// Write the output to a file
try (OutputStream fileOut = new FileOutputStream("workbook.xls")) {
    wb.write(fileOut);
}
wb.close();
Merging cells
Workbook wb = new HSSFWorkbook();
Sheet sheet = wb.createSheet("new sheet");
Row row = sheet.createRow(1);
Cell cell = row.createCell(1);
cell.setCellValue("This is a test of merging");
sheet.addMergedRegion(new CellRangeAddress(
        1, //first row (0-based)
        1, //last row  (0-based)
        1, //first column (0-based)
        2  //last column  (0-based)
));
// Write the output to a file
try (OutputStream fileOut = new FileOutputStream("workbook.xls")) {
    wb.write(fileOut);
}
wb.close();
Working with fonts
Workbook wb = new HSSFWorkbook();
Sheet sheet = wb.createSheet("new sheet");
// Create a row and put some cells in it. Rows are 0 based.
Row row = sheet.createRow(1);
// Create a new font and alter it.
Font font = wb.createFont();
font.setFontHeightInPoints((short)24);
font.setFontName("Courier New");
font.setItalic(true);
font.setStrikeout(true);
// Fonts are set into a style so create a new one to use.
CellStyle style = wb.createCellStyle();
style.setFont(font);
// Create a cell and put a value in it.
Cell cell = row.createCell(1);
cell.setCellValue("This is a test of fonts");
cell.setCellStyle(style);
// Write the output to a file
try (OutputStream fileOut = new FileOutputStream("workbook.xls")) {
    wb.write(fileOut);
}
wb.close();
Note, the maximum number of unique fonts in a workbook is limited to 32767. You should re-use fonts in your applications instead of creating a font for each cell.
Reading and Rewriting Workbooks
try (InputStream inp = new FileInputStream("workbook.xls")) {
//InputStream inp = new FileInputStream("workbook.xlsx");
    Workbook wb = WorkbookFactory.create(inp);
    Sheet sheet = wb.getSheetAt(0);
    Row row = sheet.getRow(2);
    Cell cell = row.getCell(3);
    if (cell == null)
        cell = row.createCell(3);
    cell.setCellType(CellType.STRING);
    cell.setCellValue("a test");
    // Write the output to a file
    try (OutputStream fileOut = new FileOutputStream("workbook.xls")) {
        wb.write(fileOut);
    }
}
Using newlines in cells
Workbook wb = new XSSFWorkbook();   //or new HSSFWorkbook();
Sheet sheet = wb.createSheet();
Row row = sheet.createRow(2);
Cell cell = row.createCell(2);
cell.setCellValue("Use \n with word wrap on to create a new line");
//to enable newlines you need set a cell styles with wrap=true
CellStyle cs = wb.createCellStyle();
cs.setWrapText(true);
cell.setCellStyle(cs);
//increase row height to accommodate two lines of text
row.setHeightInPoints((2*sheet.getDefaultRowHeightInPoints()));
//adjust column width to fit the content
sheet.autoSizeColumn(2);
try (OutputStream fileOut = new FileOutputStream("ooxml-newlines.xlsx")) {
    wb.write(fileOut);
}
wb.close();
Data Formats
Workbook wb = new HSSFWorkbook();
Sheet sheet = wb.createSheet("format sheet");
CellStyle style;
DataFormat format = wb.createDataFormat();
Row row;
Cell cell;
int rowNum = 0;
int colNum = 0;
row = sheet.createRow(rowNum++);
cell = row.createCell(colNum);
cell.setCellValue(11111.25);
style = wb.createCellStyle();
style.setDataFormat(format.getFormat("0.0"));
cell.setCellStyle(style);
row = sheet.createRow(rowNum++);
cell = row.createCell(colNum);
cell.setCellValue(11111.25);
style = wb.createCellStyle();
style.setDataFormat(format.getFormat("#,##0.0000"));
cell.setCellStyle(style);
try (OutputStream fileOut = new FileOutputStream("workbook.xls")) {
    wb.write(fileOut);
}
wb.close();
javadoc: https://poi.apache.org/apidocs/dev/org/apache/poi/ss/usermodel/DataFormatter.html
默认的DataFormat格式有哪些呢?
public final class BuiltinFormats {
	/**
	 * The first user-defined number format starts at 164.
	 */
	public static final int FIRST_USER_DEFINED_FORMAT_INDEX = 164;

	private final static String[] _formats = {
        "General",
        "0",
        "0.00",
        "#,##0",
        "#,##0.00",
        "\"$\"#,##0_);(\"$\"#,##0)",
        "\"$\"#,##0_);[Red](\"$\"#,##0)",
        "\"$\"#,##0.00_);(\"$\"#,##0.00)",
        "\"$\"#,##0.00_);[Red](\"$\"#,##0.00)",
        "0%",
        "0.00%",
        "0.00E+00",
        "# ?/?",
        "# ??/??",
        "m/d/yy",
        "d-mmm-yy",
        "d-mmm",
        "mmm-yy",
        "h:mm AM/PM",
        "h:mm:ss AM/PM",
        "h:mm",
        "h:mm:ss",
        "m/d/yy h:mm",

        // 0x17 - 0x24 reserved for international and undocumented
        // TODO - one junit relies on these values which seems incorrect
        "reserved-0x17",
        "reserved-0x18",
        "reserved-0x19",
        "reserved-0x1A",
        "reserved-0x1B",
        "reserved-0x1C",
        "reserved-0x1D",
        "reserved-0x1E",
        "reserved-0x1F",
        "reserved-0x20",
        "reserved-0x21",
        "reserved-0x22",
        "reserved-0x23",
        "reserved-0x24",

        "#,##0_);(#,##0)",
        "#,##0_);[Red](#,##0)",
        "#,##0.00_);(#,##0.00)",
        "#,##0.00_);[Red](#,##0.00)",
		"_(* #,##0_);_(* (#,##0);_(* \"-\"_);_(@_)",
        "_(\"$\"* #,##0_);_(\"$\"* (#,##0);_(\"$\"* \"-\"_);_(@_)",
        "_(* #,##0.00_);_(* (#,##0.00);_(* \"-\"??_);_(@_)",
        "_(\"$\"* #,##0.00_);_(\"$\"* (#,##0.00);_(\"$\"* \"-\"??_);_(@_)",
        "mm:ss",
        "[h]:mm:ss",
        "mm:ss.0",
        "##0.0E+0",
        "@"
	};
Using the Convenience Functions
The convenience functions provide utility features such as setting borders around merged regions and changing style attributes without explicitly creating new styles.
Workbook wb = new HSSFWorkbook();  // or new XSSFWorkbook()
Sheet sheet1 = wb.createSheet( "new sheet" );
// Create a merged region
Row row = sheet1.createRow( 1 );
Row row2 = sheet1.createRow( 2 );
Cell cell = row.createCell( 1 );
cell.setCellValue( "This is a test of merging" );
CellRangeAddress region = CellRangeAddress.valueOf("B2:E5");
sheet1.addMergedRegion( region );
// Set the border and border colors.
RegionUtil.setBorderBottom( BorderStyle.MEDIUM_DASHED, region, sheet1, wb );
RegionUtil.setBorderTop(    BorderStyle.MEDIUM_DASHED, region, sheet1, wb );
RegionUtil.setBorderLeft(   BorderStyle.MEDIUM_DASHED, region, sheet1, wb );
RegionUtil.setBorderRight(  BorderStyle.MEDIUM_DASHED, region, sheet1, wb );
RegionUtil.setBottomBorderColor(IndexedColors.AQUA.getIndex(), region, sheet1, wb);
RegionUtil.setTopBorderColor(   IndexedColors.AQUA.getIndex(), region, sheet1, wb);
RegionUtil.setLeftBorderColor(  IndexedColors.AQUA.getIndex(), region, sheet1, wb);
RegionUtil.setRightBorderColor( IndexedColors.AQUA.getIndex(), region, sheet1, wb);
// Shows some usages of HSSFCellUtil
CellStyle style = wb.createCellStyle();
style.setIndention((short)4);
CellUtil.createCell(row, 8, "This is the value of the cell", style);
Cell cell2 = CellUtil.createCell( row2, 8, "This is the value of the cell");
CellUtil.setAlignment(cell2, HorizontalAlignment.CENTER);
// Write out the workbook
try (OutputStream fileOut = new FileOutputStream( "workbook.xls" )) {
    wb.write( fileOut );
}
wb.close();
Set a sheet as selected
Workbook wb = new HSSFWorkbook();
Sheet sheet = wb.createSheet("row sheet");
sheet.setSelected(true);
Splits and freeze panes
There are two types of panes you can create; freeze panes and split panes.
A freeze pane is split by columns and rows. You create a freeze pane using the following mechanism:
sheet1.createFreezePane( 3, 2, 3, 2 );
The first two parameters are the columns and rows you wish to split by. The second two parameters indicate the cells that are visible in the bottom right quadrant.
Workbook wb = new HSSFWorkbook();
Sheet sheet1 = wb.createSheet("new sheet");
Sheet sheet2 = wb.createSheet("second sheet");
Sheet sheet3 = wb.createSheet("third sheet");
Sheet sheet4 = wb.createSheet("fourth sheet");
// Freeze just one row
sheet1.createFreezePane( 0, 1, 0, 1 );
// Freeze just one column
sheet2.createFreezePane( 1, 0, 1, 0 );
// Freeze the columns and rows (forget about scrolling position of the lower right quadrant).
sheet3.createFreezePane( 2, 2 );

try (OutputStream fileOut = new FileOutputStream("workbook.xls")) {
    wb.write(fileOut);
}
Adjust column width to fit the contents
Sheet sheet = workbook.getSheetAt(0);
sheet.autoSizeColumn(0); //adjust width of the first column
sheet.autoSizeColumn(1); //adjust width of the second column
For SXSSFWorkbooks only, because the random access window is likely to exclude most of the rows in the worksheet, which are needed for computing the best-fit width of a column, the columns must be tracked for auto-sizing prior to flushing any rows.
SXSSFWorkbook workbook = new SXSSFWorkbook();
SXSSFSheet sheet = workbook.createSheet();
sheet.trackColumnForAutoSizing(0);
sheet.trackColumnForAutoSizing(1);
// If you have a Collection of column indices, see SXSSFSheet#trackColumnForAutoSizing(Collection<Integer>)
// or roll your own for-loop.
// Alternatively, use SXSSFSheet#trackAllColumnsForAutoSizing() if the columns that will be auto-sized aren't
// known in advance or you are upgrading existing code and are trying to minimize changes. Keep in mind
// that tracking all columns will require more memory and CPU cycles, as the best-fit width is calculated
// on all tracked columns on every row that is flushed.
// create some cells
for (int r=0; r < 10; r++) {
    Row row = sheet.createRow(r);
    for (int c; c < 10; c++) {
        Cell cell = row.createCell(c);
        cell.setCellValue("Cell " + c.getAddress().formatAsString());
    }
}
// Auto-size the columns.
sheet.autoSizeColumn(0);
sheet.autoSizeColumn(1);
Data Validations
As of version 3.8, POI has slightly different syntax to work with data validations with .xls and .xlsx formats.
hssf.usermodel (binary .xls format)
Check the value a user enters into a cell against one or more predefined value(s).
The following code will limit the value the user can enter into cell A1 to one of three integer values, 10, 20 or 30.
HSSFWorkbook workbook = new HSSFWorkbook();
HSSFSheet sheet = workbook.createSheet("Data Validation");
CellRangeAddressList addressList = new CellRangeAddressList(
  0, 0, 0, 0);
DVConstraint dvConstraint = DVConstraint.createExplicitListConstraint(
  new String[]{"10", "20", "30"});
DataValidation dataValidation = new HSSFDataValidation
  (addressList, dvConstraint);
dataValidation.setSuppressDropDownArrow(true);
sheet.addValidationData(dataValidation);
Drop Down Lists:
This code will do the same but offer the user a drop down list to select a value from.
HSSFWorkbook workbook = new HSSFWorkbook();
HSSFSheet sheet = workbook.createSheet("Data Validation");
CellRangeAddressList addressList = new CellRangeAddressList(
  0, 0, 0, 0);
DVConstraint dvConstraint = DVConstraint.createExplicitListConstraint(
  new String[]{"10", "20", "30"});
DataValidation dataValidation = new HSSFDataValidation
  (addressList, dvConstraint);
dataValidation.setSuppressDropDownArrow(false);
sheet.addValidationData(dataValidation);
Messages On Error:
To create a message box that will be shown to the user if the value they enter is invalid.
dataValidation.setErrorStyle(DataValidation.ErrorStyle.STOP);
dataValidation.createErrorBox("Box Title", "Message Text");
Replace ‘Box Title’ with the text you wish to display in the message box’s title bar and ‘Message Text’ with the text of your error message.
Prompts:
To create a prompt that the user will see when the cell containing the data validation receives focus
dataValidation.createPromptBox("Title", "Message Text");
dataValidation.setShowPromptBox(true);
The text encapsulated in the first parameter passed to the createPromptBox() method will appear emboldened and as a title to the prompt whilst the second will be displayed as the text of the message. The createExplicitListConstraint() method can be passed and array of String(s) containing interger, floating point, dates or text values.
Further Data Validations:
To obtain a validation that would check the value entered was, for example, an integer between 10 and 100, use the DVConstraint.createNumericConstraint(int, int, String, String) factory method.
dvConstraint = DVConstraint.createNumericConstraint(
  DVConstraint.ValidationType.INTEGER,
  DVConstraint.OperatorType.BETWEEN, "10", "100");
Look at the javadoc for the other validation and operator types; also note that not all validation types are supported for this method.
It is not possible to create a drop down list if the createNumericConstraint() method is called, the setSuppressDropDownArrow(false) method call will simply be ignored.
Date and time constraints can be created by calling the createDateConstraint(int, String, String, String) or the createTimeConstraint(int, String, String). Both are very similar to the above and are explained in the javadoc.
xssf.usermodel (.xlsx format)
Data validations work similarly when you are creating an xml based, SpreadsheetML, workbook file; but there are differences. Explicit casts are required, for example, in a few places as much of the support for data validations in the xssf stream was built into the unifying ss stream, of which more later. Other differences are noted with comments in the code.
Check the value the user enters into a cell against one or more predefined value(s).
XSSFWorkbook workbook = new XSSFWorkbook();
XSSFSheet sheet = workbook.createSheet("Data Validation");
XSSFDataValidationHelper dvHelper = new XSSFDataValidationHelper(sheet);
XSSFDataValidationConstraint dvConstraint = (XSSFDataValidationConstraint)
  dvHelper.createExplicitListConstraint(new String[]{"11", "21", "31"});
CellRangeAddressList addressList = new CellRangeAddressList(0, 0, 0, 0);
XSSFDataValidation validation =(XSSFDataValidation)dvHelper.createValidation(
  dvConstraint, addressList);
// Here the boolean value false is passed to the setSuppressDropDownArrow()
// method. In the hssf.usermodel examples above, the value passed to this
// method is true.
validation.setSuppressDropDownArrow(false);
// Note this extra method call. If this method call is omitted, or if the
// boolean value false is passed, then Excel will not validate the value the
// user enters into the cell.
validation.setShowErrorBox(true);
sheet.addValidationData(validation);
Drop Down Lists:
This code will do the same but offer the user a drop down list to select a value from.
XSSFWorkbook workbook = new XSSFWorkbook();
XSSFSheet sheet = workbook.createSheet("Data Validation");
XSSFDataValidationHelper dvHelper = new XSSFDataValidationHelper(sheet);
XSSFDataValidationConstraint dvConstraint = (XSSFDataValidationConstraint)
  dvHelper.createExplicitListConstraint(new String[]{"11", "21", "31"});
CellRangeAddressList addressList = new CellRangeAddressList(0, 0, 0, 0);
XSSFDataValidation validation = (XSSFDataValidation)dvHelper.createValidation(
  dvConstraint, addressList);
validation.setShowErrorBox(true);
sheet.addValidationData(validation);
Note that the call to the setSuppressDropDowmArrow() method can either be simply excluded or replaced with:
validation.setSuppressDropDownArrow(true);
Prompts and Error Messages:
These both exactly mirror the hssf.usermodel so please refer to the ‘Messages On Error:’ and ‘Prompts:’ sections above.
Further Data Validations:
To obtain a validation that would check the value entered was, for example, an integer between 10 and 100, use the XSSFDataValidationHelper(s) createNumericConstraint(int, int, String, String) factory method.
SSFDataValidationConstraint dvConstraint = (XSSFDataValidationConstraint)
 dvHelper.createNumericConstraint(
   XSSFDataValidationConstraint.ValidationType.INTEGER,
   XSSFDataValidationConstraint.OperatorType.BETWEEN,
   "10", "100");
Hiding and Un-Hiding Rows
Using Excel, it is possible to hide a row on a worksheet by selecting that row (or rows), right clicking once on the right hand mouse button and selecting ‘Hide’ from the pop-up menu that appears.
To emulate this using POI, simply call the setZeroHeight() method on an instance of either XSSFRow or HSSFRow (the method is defined on the ss.usermodel.Row interface that both classes implement), like this:
Workbook workbook = new XSSFWorkbook();  // OR new HSSFWorkbook()
Sheet sheet = workbook.createSheet(0);
Row row = workbook.createRow(0);
row.setZeroHeight();
If the file were saved away to disc now, then the first row on the first sheet would not be visible.
Using Excel, it is possible to unhide previously hidden rows by selecting the row above and the row below the one that is hidden and then pressing and holding down the Ctrl key, the Shift and the pressing the number 9 before releasing them all.
To emulate this behaviour using POI do something like this:
Workbook workbook = WorkbookFactory.create(new File(.......));
Sheet = workbook.getSheetAt(0);
Iterator<Row> row Iter = sheet.iterator();
while(rowIter.hasNext()) {
  Row row = rowIter.next();
  if(row.getZeroHeight()) {
    row.setZeroHeight(false);
  }
}
If the file were saved away to disc now, any previously hidden rows on the first sheet of the workbook would now be visible.
The example illustrates two features. Firstly, that it is possible to unhide a row simply by calling the setZeroHeight() method and passing the boolean value ‘false’. Secondly, it illustrates how to test whether a row is hidden or not. Simply call the getZeroHeight() method and it will return ‘true’ if the row is hidden, ‘false’ otherwise.
Setting Cell Properties
Sometimes it is easier or more efficient to create a spreadsheet with basic styles and then apply special styles to certain cells such as drawing borders around a range of cells or setting fills for a region. CellUtil.setCellProperties lets you do that without creating a bunch of unnecessary intermediate styles in your spreadsheet.
Properties are created as a Map and applied to a cell in the following manner.
Workbook workbook = new XSSFWorkbook();  // OR new HSSFWorkbook()
Sheet sheet = workbook.createSheet("Sheet1");
Map<String, Object> properties = new HashMap<String, Object>();
// border around a cell
properties.put(CellUtil.BORDER_TOP, BorderStyle.MEDIUM);
properties.put(CellUtil.BORDER_BOTTOM, BorderStyle.MEDIUM);
properties.put(CellUtil.BORDER_LEFT, BorderStyle.MEDIUM);
properties.put(CellUtil.BORDER_RIGHT, BorderStyle.MEDIUM);
// Give it a color (RED)
properties.put(CellUtil.TOP_BORDER_COLOR, IndexedColors.RED.getIndex());
properties.put(CellUtil.BOTTOM_BORDER_COLOR, IndexedColors.RED.getIndex());
properties.put(CellUtil.LEFT_BORDER_COLOR, IndexedColors.RED.getIndex());
properties.put(CellUtil.RIGHT_BORDER_COLOR, IndexedColors.RED.getIndex());
// Apply the borders to the cell at B2
Row row = sheet.createRow(1);
Cell cell = row.createCell(1);
CellUtil.setCellStyleProperties(cell, properties);
// Apply the borders to a 3x3 region starting at D4
for (int ix=3; ix <= 5; ix++) {
  row = sheet.createRow(ix);
  for (int iy = 3; iy <= 5; iy++) {
    cell = row.createCell(iy);
    CellUtil.setCellStyleProperties(cell, properties);
  }
}
NOTE: This does not replace the properties of the cell, it merges the properties you have put into the Map with the cell’s existing style properties. If a property already exists, it is replaced with the new property. If a property does not exist, it is added. This method will not remove CellStyle properties.
Cells with multiple styles (Rich Text Strings)
To apply a single set of text formatting (colour, style, font etc) to a cell, you should create a CellStyle for the workbook, then apply to the cells.
// HSSF Example
HSSFCell hssfCell = row.createCell(idx);
//rich text consists of two runs
HSSFRichTextString richString = new HSSFRichTextString( "Hello, World!" );
richString.applyFont( 0, 6, font1 );
richString.applyFont( 6, 13, font2 );
hssfCell.setCellValue( richString );
// XSSF Example
XSSFCell cell = row.createCell(1);
XSSFRichTextString rt = new XSSFRichTextString("The quick brown fox");
XSSFFont font1 = wb.createFont();
font1.setBold(true);
font1.setColor(new XSSFColor(new java.awt.Color(255, 0, 0)));
rt.applyFont(0, 10, font1);
XSSFFont font2 = wb.createFont();
font2.setItalic(true);
font2.setUnderline(XSSFFont.U_DOUBLE);
font2.setColor(new XSSFColor(new java.awt.Color(0, 255, 0)));
rt.applyFont(10, 19, font2);
XSSFFont font3 = wb.createFont();
font3.setColor(new XSSFColor(new java.awt.Color(0, 0, 255)));
rt.append(" Jumped over the lazy dog", font3);
cell.setCellValue(rt);
To apply different formatting to different parts of a cell, you need to use RichTextString, which permits styling of parts of the text within the cell.
There are some slight differences between HSSF and XSSF, especially around font colours (the two formats store colours quite differently internally), refer to the HSSF Rich Text String and XSSF Rich Text String javadocs for more details.
How to
refer to : https://poi.apache.org/components/spreadsheet/how-to.html
HSSF allows numeric, string, date or formula cell values to be written to or read from an XLS file. Also in this release is row and column sizing, cell styling (bold, italics, borders,etc), and support for both built-in and user defined data formats.
User API (HSSF and XSSF)
Writing a new file
The high level API (package: org.apache.poi.ss.usermodel) is what most people should use. Usage is very simple.
Workbooks are created by creating an instance of org.apache.poi.ss.usermodel.Workbook. Either create a concrete class directly (org.apache.poi.hssf.usermodel.HSSFWorkbook or org.apache.poi.xssf.usermodel.XSSFWorkbook), or use the handy factory class org.apache.poi.ss.usermodel.WorkbookFactory.
Sheets are created by calling createSheet() from an existing instance of Workbook, the created sheet is automatically added in sequence to the workbook. Sheets do not in themselves have a sheet name (the tab at the bottom); you set the name associated with a sheet by calling Workbook.setSheetName(sheetindex,“SheetName”,encoding). For HSSF, the name may be in 8bit format (HSSFWorkbook.ENCODING_COMPRESSED_UNICODE) or Unicode (HSSFWorkbook.ENCODING_UTF_16). Default encoding for HSSF is 8bit per char. For XSSF, the name is automatically handled as unicode.
Rows are created by calling createRow(rowNumber) from an existing instance of Sheet. Only rows that have cell values should be added to the sheet. To set the row’s height, you just call setRowHeight(height) on the row object. The height must be given in twips, or 1/20th of a point. If you prefer, there is also a setRowHeightInPoints method.
Cells are created by calling createCell(column, type) from an existing Row. Only cells that have values should be added to the row. Cells should have their cell type set to either Cell.CELL_TYPE_NUMERIC or Cell.CELL_TYPE_STRING depending on whether they contain a numeric or textual value. Cells must also have a value set. Set the value by calling setCellValue with either a String or double as a parameter. Individual cells do not have a width; you must call setColumnWidth(colindex, width) (use units of 1/256th of a character) on the Sheet object. (You can’t do it on an individual basis in the GUI either).
Cells are styled with CellStyle objects which in turn contain a reference to an Font object. These are created via the Workbook object by calling createCellStyle() and createFont(). Once you create the object you must set its parameters (colors, borders, etc). To set a font for an CellStyle call setFont(fontobj).
Once you have generated your workbook, you can write it out by calling write(outputStream) from your instance of Workbook, passing it an OutputStream (for instance, a FileOutputStream or ServletOutputStream). You must close the OutputStream yourself. HSSF does not close it for you.
Here is some example code (excerpted and adapted from org.apache.poi.hssf.dev.HSSF test class):
short rownum;
// create a new file
FileOutputStream out = new FileOutputStream("workbook.xls");
// create a new workbook
Workbook wb = new HSSFWorkbook();
// create a new sheet
Sheet s = wb.createSheet();
// declare a row object reference
Row r = null;
// declare a cell object reference
Cell c = null;
// create 3 cell styles
CellStyle cs = wb.createCellStyle();
CellStyle cs2 = wb.createCellStyle();
CellStyle cs3 = wb.createCellStyle();
DataFormat df = wb.createDataFormat();
// create 2 fonts objects
Font f = wb.createFont();
Font f2 = wb.createFont();
//set font 1 to 12 point type
f.setFontHeightInPoints((short) 12);
//make it blue
f.setColor( (short)0xc );
// make it bold
//arial is the default font
f.setBoldweight(Font.BOLDWEIGHT_BOLD);
//set font 2 to 10 point type
f2.setFontHeightInPoints((short) 10);
//make it red
f2.setColor( (short)Font.COLOR_RED );
//make it bold
f2.setBoldweight(Font.BOLDWEIGHT_BOLD);
f2.setStrikeout( true );
//set cell stlye
cs.setFont(f);
//set the cell format
cs.setDataFormat(df.getFormat("#,##0.0"));
//set a thin border
cs2.setBorderBottom(cs2.BORDER_THIN);
//fill w fg fill color
cs2.setFillPattern((short) CellStyle.SOLID_FOREGROUND);
//set the cell format to text see DataFormat for a full list
cs2.setDataFormat(HSSFDataFormat.getBuiltinFormat("text"));
// set the font
cs2.setFont(f2);
// set the sheet name in Unicode
wb.setSheetName(0, "\u0422\u0435\u0441\u0442\u043E\u0432\u0430\u044F " +
                   "\u0421\u0442\u0440\u0430\u043D\u0438\u0447\u043A\u0430" );
// in case of plain ascii
// wb.setSheetName(0, "HSSF Test");
// create a sheet with 30 rows (0-29)
int rownum;
for (rownum = (short) 0; rownum < 30; rownum++)
{
    // create a row
    r = s.createRow(rownum);
    // on every other row
    if ((rownum % 2) == 0)
    {
        // make the row height bigger  (in twips - 1/20 of a point)
        r.setHeight((short) 0x249);
    }
    //r.setRowNum(( short ) rownum);
    // create 10 cells (0-9) (the += 2 becomes apparent later
    for (short cellnum = (short) 0; cellnum < 10; cellnum += 2)
    {
        // create a numeric cell
        c = r.createCell(cellnum);
        // do some goofy math to demonstrate decimals
        c.setCellValue(rownum * 10000 + cellnum
                + (((double) rownum / 1000)
                + ((double) cellnum / 10000)));
        String cellValue;
        // create a string cell (see why += 2 in the
        c = r.createCell((short) (cellnum + 1));
        // on every other row
        if ((rownum % 2) == 0)
        {
            // set this cell to the first cell style we defined
            c.setCellStyle(cs);
            // set the cell's string value to "Test"
            c.setCellValue( "Test" );
        }
        else
        {
            c.setCellStyle(cs2);
            // set the cell's string value to "\u0422\u0435\u0441\u0442"
            c.setCellValue( "\u0422\u0435\u0441\u0442" );
        }
        // make this column a bit wider
        s.setColumnWidth((short) (cellnum + 1), (short) ((50 * 8) / ((double) 1 / 20)));
    }
}
//draw a thick black border on the row at the bottom using BLANKS
// advance 2 rows
rownum++;
rownum++;
r = s.createRow(rownum);
// define the third style to be the default
// except with a thick black border at the bottom
cs3.setBorderBottom(cs3.BORDER_THICK);
//create 50 cells
for (short cellnum = (short) 0; cellnum < 50; cellnum++)
{
    //create a blank type cell (no value)
    c = r.createCell(cellnum);
    // set it to the thick black border style
    c.setCellStyle(cs3);
}
//end draw thick black border
// demonstrate adding/naming and deleting a sheet
// create a sheet, set its title then delete it
s = wb.createSheet();
wb.setSheetName(1, "DeletedSheet");
wb.removeSheetAt(1);
//end deleted sheet
// write the workbook to the output stream
// close our file (don't blow out our file handles
wb.write(out);
out.close();
Reading or modifying an existing file
Reading in a file is equally simple. To read in a file, create a new instance of org.apache.poi.poifs.Filesystem, passing in an open InputStream, such as a FileInputStream for your XLS, to the constructor. Construct a new instance of org.apache.poi.hssf.usermodel.HSSFWorkbook passing the Filesystem instance to the constructor. From there you have access to all of the high level model objects through their assessor methods (workbook.getSheet(sheetNum), sheet.getRow(rownum), etc).
Modifying the file you have read in is simple. You retrieve the object via an assessor method, remove it via a parent object’s remove method (sheet.removeRow(hssfrow)) and create objects just as you would if creating a new xls. When you are done modifying cells just call workbook.write(outputstream) just as you did above.
An example of this can be seen in org.apache.poi.hssf.usermodel.examples.HSSFReadWrite.