Install & Config
配置Mysql:
refer to : https://nacos.io/zh-cn/docs/v2/guide/admin/deployment.html
修改Nacos密码
refer to : https://www.cnblogs.com/wangyuanguang/p/17057441.html
启动nacos
sh startup.sh -m standalone
# 以下3个端口,必须都打开
firewall-cmd --add-port=8848/tcp --permanent
firewall-cmd --add-port=9848/tcp --permanent
firewall-cmd --add-port=9849/tcp --permanent

firewall-cmd --reload
Best Practise
在SpringBoot 2.4.x的版本之后,如果需要使用bootstrap的方式,去连接配置中心(nacos config server),那么需要增加spring-cloud-starter-bootstrap 这个Jar包
配置方式如下:
 <dependency>
   <groupId>org.springframework.cloud</groupId>
   <artifactId>spring-cloud-starter-bootstrap</artifactId>
   <version>3.0.6</version>
</dependency>
接下来,在bootstrap.yaml中,指定nacos config server的地址
bootstrap.yml
# Spring配置
spring:
  application:
    name: iot-manage
  profiles:
    active: dev

nacos:
  config:
    server-addr: 221.181.222.135:8848
    # 重要!和nacos控制台Data-Id一致
    data-id: iot-manage-dev.yml
    # 重要!和nacos控制台group一致
    group: DEFAULT_GROUP
    type: yaml
    context-path: /nacos
    username: nacos
    password: long123456
    auto-refresh: true
    bootstrap:
      enable: true
      log-enable: true
这里需要注意的是,nacos.config.bootstrap.enable=true
Nacos Config Client 源码分析
nacos 是怎么在项目启动时,拉取远程配置文件的呢?
从源头抓起
// org.springframework.boot.SpringApplication#run(java.lang.String...)

public ConfigurableApplicationContext run(String... args) {
		StopWatch stopWatch = new StopWatch();
		stopWatch.start();
		DefaultBootstrapContext bootstrapContext = createBootstrapContext();
		ConfigurableApplicationContext context = null;
		configureHeadlessProperty();
		SpringApplicationRunListeners listeners = getRunListeners(args);
		listeners.starting(bootstrapContext, this.mainApplicationClass);
		try {
			ApplicationArguments applicationArguments = new DefaultApplicationArguments(args);
            // 准备环境信息,即获取到 配置的环境信息

			ConfigurableEnvironment environment = prepareEnvironment(listeners, bootstrapContext, applicationArguments);
			configureIgnoreBeanInfo(environment);
			Banner printedBanner = printBanner(environment);
			context = createApplicationContext();
			context.setApplicationStartup(this.applicationStartup);
            // 准备好上下文信息
			prepareContext(bootstrapContext, context, environment, listeners, applicationArguments, printedBanner);
            // 刷新上下文
			refreshContext(context);
			....
            ...
上面的代码中,步骤如下:
- 准备环境信息,即获取到 配置的环境信息
- 准备好上下文信息
- 刷新上下文
其中,我们重点要谈的就是,准备环境信息,即获取到 配置的环境信息,即prepareEnvironment方法
// org.springframework.boot.SpringApplication#prepareEnvironment

private ConfigurableEnvironment prepareEnvironment(SpringApplicationRunListeners listeners,
			DefaultBootstrapContext bootstrapContext, ApplicationArguments applicationArguments) {
		// Create and configure the environment
        // 首先是创建了一个环境对象
		ConfigurableEnvironment environment = getOrCreateEnvironment();

        // 将命令行参数,放入环境中
		configureEnvironment(environment, applicationArguments.getSourceArgs());
		ConfigurationPropertySources.attach(environment);

       // 调用所有的监听器,让监听器,可以开始去进行配置环境信息了
		listeners.environmentPrepared(bootstrapContext, environment);
		DefaultPropertiesPropertySource.moveToEnd(environment);
		Assert.state(!environment.containsProperty("spring.main.environment-prefix"),
				"Environment prefix cannot be set via properties.");
		bindToSpringApplication(environment);
		if (!this.isCustomEnvironment) {
			environment = convertEnvironment(environment);
		}
		ConfigurationPropertySources.attach(environment);
		return environment;
	}
在这里我们可以看到,首先是创建了一个环境对象,接下来,将命令行参数,放入环境中,然后,调用所有的监听器,让监听器,可以开始去进行配置环境信息了。
流程图如下:
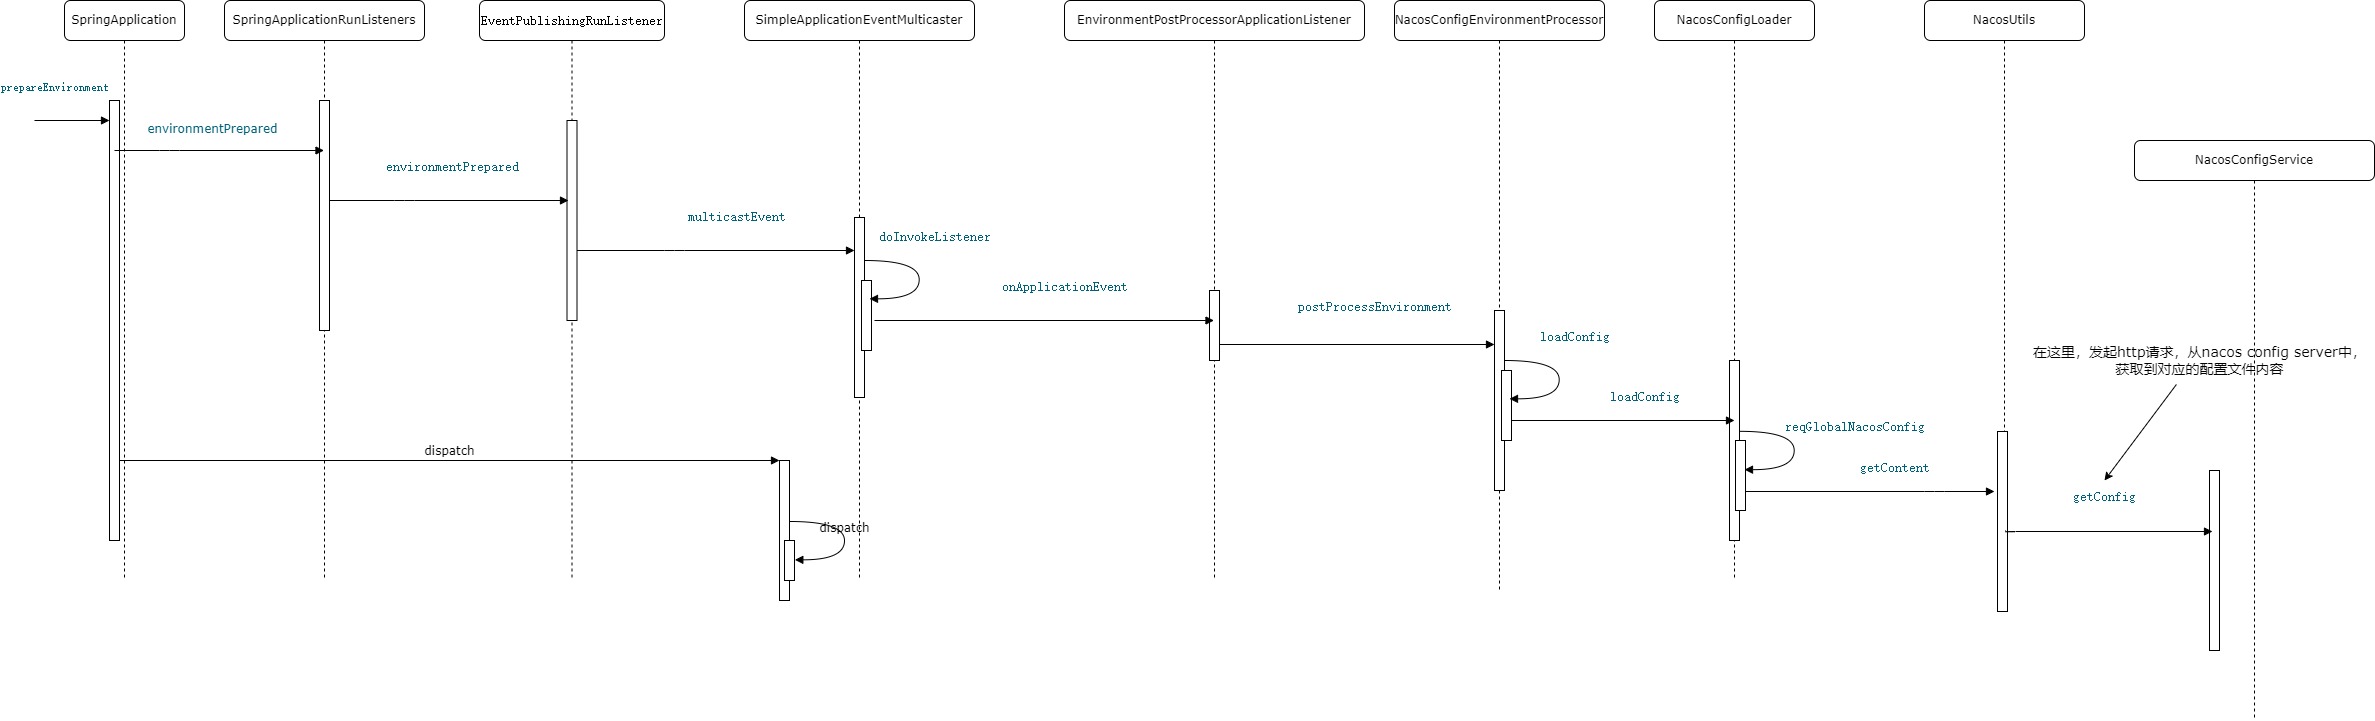
从上面的流程图,可以看出,NacosConfigEnvironmentProcessor是关键类。
下面,围绕着NacosConfigEnvironmentProcessor,详细说下
NacosConfigEnvironmentProcessor
NacosConfigEnvironmentProcessor利用的EnvironmentPostProcessor接口的postProcessEnvironment
// com.alibaba.boot.nacos.config.autoconfigure.NacosConfigEnvironmentProcessor#postProcessEnvironment

@Override
	public void postProcessEnvironment(ConfigurableEnvironment environment,
			SpringApplication application) {
		application.addInitializers(new NacosConfigApplicationContextInitializer(this));
		nacosConfigProperties = NacosConfigPropertiesUtils
				.buildNacosConfigProperties(environment);
		if (enable()) {
			System.out.println(
					"[Nacos Config Boot] : The preload log configuration is enabled");
			loadConfig(environment);
			NacosConfigLoader nacosConfigLoader = NacosConfigLoaderFactory.getSingleton(nacosConfigProperties, environment, builder);
			LogAutoFreshProcess.build(environment, nacosConfigProperties, nacosConfigLoader, builder).process();
		}
	}
在postProcessEnvironment主要完成了以下几件事:
- 首先为SpringApplication加入一个初始化监听器NacosConfigApplicationContextInitializer,
- 随后构建一个全局的NacosConfigProperties,
- 最后如果Bootstrap开启了logEnable,则立即开始加载远程的配置文件。
首先NacosConfigProperties,就是一个实体类,与bootstrap.yaml中配置项,一一对应,代码如下:
@ConfigurationProperties(NacosConfigConstants.PREFIX)
public class NacosConfigProperties {

	private String serverAddr = "127.0.0.1:8848";

	private String contextPath;

	private String encode;

	private String endpoint;

	private String namespace;

	private String accessKey;

	private String secretKey;

	private String ramRoleName;

	private boolean autoRefresh = false;

	private String dataId;

	private String dataIds;

	private String group = Constants.DEFAULT_GROUP;

	private ConfigType type = ConfigType.PROPERTIES;
这块很容易理解,暂时不深入讨论了。
主要看下loadConfig方法。这个loadConfig,主要作用就是,拉取远程配置文件的内容。
具体来说,利用NacosConfigLoader完成的。在NacosConfigLoader的loadConfig函数中,我们可以比较清晰的看到配置文件的加载过程
public void loadConfig() {
		MutablePropertySources mutablePropertySources = environment.getPropertySources();

        // 在这一步,发起http请求,获取远程配置文件的内容
		List<NacosPropertySource> sources = reqGlobalNacosConfig(globalProperties,
				nacosConfigProperties.getType());
		for (NacosConfigProperties.Config config : nacosConfigProperties.getExtConfig()) {
			List<NacosPropertySource> elements = reqSubNacosConfig(config,
					globalProperties, config.getType());
			sources.addAll(elements);
		}
		if (nacosConfigProperties.isRemoteFirst()) {
			for (ListIterator<NacosPropertySource> itr = sources.listIterator(sources.size()); itr.hasPrevious();) {
				mutablePropertySources.addAfter(
						StandardEnvironment.SYSTEM_ENVIRONMENT_PROPERTY_SOURCE_NAME, itr.previous());
			}
		} else {
			for (NacosPropertySource propertySource : sources) {
				mutablePropertySources.addLast(propertySource);
			}
		}
	}
NacosConfigAutoConfiguration
说完了NacosConfigEnvironmentProcessor,我们再来,从宏观的角度,看下nacos config client是怎么自动配置的.
这个自动配置类,就是NacosConfigAutoConfiguration
@ConditionalOnProperty(name = NacosConfigConstants.ENABLED, matchIfMissing = true)
@ConditionalOnMissingBean(name = CONFIG_GLOBAL_NACOS_PROPERTIES_BEAN_NAME)
@EnableConfigurationProperties(value = NacosConfigProperties.class)
@ConditionalOnClass(name = "org.springframework.boot.context.properties.bind.Binder")
@Import(value = { NacosConfigBootBeanDefinitionRegistrar.class })
@EnableNacosConfig
public class NacosConfigAutoConfiguration {

}
NacosConfigAutoConfiguration做了以下几件事:
-
首先NacosConfigAutoConfiguration会根据配置属性nacos.config.enabled来决定是否要开启Nacos,如果已经定义了全局的Nacos配置也不会继续配置。
-
随后会开启NacosConfigProperties,定义了Nacos配置的基本配置属性,例如远端Server地址serverAddr、明明空间namespace等等。特别的是NacosConfigProperties里面定义了extConfig属性,用于在应用中加载多个配置属性。bootstrap属性定义了Nacos启动时的加载行为配置。
-
最后引入了NacosConfigBootBeanDefinitionRegistrar,在NacosConfigBootBeanDefinitionRegistrar中定义了NacosBootConfigurationPropertiesBinder。
下面介绍下NacosBootConfigurationPropertiesBinder
NacosConfigurationPropertiesBinder & NacosBootConfigurationPropertiesBinder
在Spring Boot项目中我们可以利用@ConfigurationProperties来将应用的配置属性自动的绑定到配置类的属性字段上,在@ConfigurationProperties注解上设置属性的前缀
@ConfigurationProperties(prefix = "test")
public Test{
		private String host;
}
如相面的代码所示,即可直接将test.host属性注入到host字段中。
@NacosConfigurationProperties注解实现的也是同样的功能,额外提供了从远程配置文件上注入属性的功能。
@NacosConfigurationProperties(prefix = "test", dataId = "user.info", groupId = "springbootvue", autoRefreshed = true)
public Test{
		private String host;
}
@NacosConfigurationProperties这个注解,具体是怎么实现这个功能的呢?
主要是利用了postProcessBeforeInitialization接口,在Bean完成初始化时获取到对应Bean的NacosConfigurationProperties注解,然后利用NacosConfigurationPropertiesBinder完成属性的绑定
NacosBootConfigurationPropertiesBinder, 是在NacosConfigurationPropertiesBinder基础上,做了功能上的增强
public class NacosBootConfigurationPropertiesBinder
		extends NacosConfigurationPropertiesBinder {

	private final ConfigurableApplicationContext applicationContext;

	private final StandardEnvironment environment = new StandardEnvironment();

	public NacosBootConfigurationPropertiesBinder(
			ConfigurableApplicationContext applicationContext) {
		super(applicationContext);
		this.applicationContext = applicationContext;
	}

	@Override
	protected void doBind(Object bean, String beanName, String dataId, String groupId,
			String configType, NacosConfigurationProperties properties, String content,
			ConfigService configService) {
		synchronized (this) {
			String name = "nacos-bootstrap-" + beanName;
			NacosPropertySource propertySource = new NacosPropertySource(dataId, groupId, name, content, configType);
			environment.getPropertySources().addLast(propertySource);
			ObjectUtils.cleanMapOrCollectionField(bean);
			Binder binder = Binder.get(environment);
			ResolvableType type = getBeanType(bean, beanName);
			Bindable<?> target = Bindable.of(type).withExistingValue(bean);
			binder.bind(properties.prefix(), target);
			publishBoundEvent(bean, beanName, dataId, groupId, properties, content, configService);
			publishMetadataEvent(bean, beanName, dataId, groupId, properties);
			environment.getPropertySources().remove(name);
		}
	}
在NacosConfigurationPropertiesBinder中,属性的解析仅依赖于注解本身配置的配置文件,而在NacosBootConfigurationPropertiesBinder中的做法是将注解配置的配置文件临时加入到默认的StandardEnvironment中(包含jvm属性与系统属性),结合Environment进行属性的注入,解析完成后再移除注入。