虚拟化
https://www.redhat.com/zh/topics/virtualization
Kvm
基础概念
KVM 全称是 基于内核的虚拟机(Kernel-based Virtual Machine)
搭建 KVM 环境主要包括几个部分:
- qemu:用于提供虚拟化服务
- libvirt:提供 libvirtd 服务,用于管理物理机中的虚拟机实例,并提供外部编程接口。
- 页面管理器:webvirtmgr 等,提供页面,操作本地libvirt,对虚拟机进行新建/删除/设置/运行
- vnc服务:页面上控制虚拟机的键盘鼠标,还有显示设备,用来装系统用。
裸金属安装KVM
https://blog.csdn.net/Wsjm666/article/details/127867831
https://linux.cn/article-15843-1.html
http://www.manongjc.com/detail/42-qgswujnpypjutbb.html
https://blog.csdn.net/a13568hki/article/details/103942952
1.硬件是否支持虚拟化
cat /proc/cpuinfo | grep -E "vmx|svm"
该命令探测是否存在 VMX(虚拟机扩展(Virtual Machine Extension)),它是英特尔硬件虚拟化的 CPU 标志,或 SVM,它是 AMD 硬件虚拟化的标志。
从以下输出中,你可以看到我们的系统启用了英特尔硬件虚拟化:

2 查看KVM 驱动是否加载
[root@vlgmomvmeatdpnj ~]# lsmod | grep kvm
kvm_intel             339968  0
kvm                   905216  1 kvm_intel
irqbypass              16384  1 kvm


[root@vlgmomvmeatdpnj ~]# ll /dev/kvm
crw-rw-rw- 1 root kvm 10, 232 Mar 15 09:42 /dev/kvm
3.安装软件包
yum -y install qemu-kvm  libvirt   virt-manager virt-install  virt-viewer

rpm -q qemu-kvm  libvirt virt-manager virt-install  virt-viewer


qemu-kvm-6.2.0-40.module+el8.9.0+1654+f4df84c4.2.x86_64
libvirt-8.0.0-22.module+el8.9.0+1405+b6048078.x86_64
virt-manager-3.2.0-4.el8.noarch
virt-install-3.2.0-4.el8.noarch
virt-viewer-9.0-12.el8.x86_64
4.启动libvirtd服务
systemctl start --now libvirtd

systemctl enable --now libvirtd

systemctl status libvirtd

yum install virt-top libguestfs-tools
5.配置网络,创建bridge
希望vm能表现成一个独立的主机,外网能直接访问这个vm
网桥可以理解为,就是一个交换机,拥有独立的IP,同时能将进行转发报文数据
# yum install bridge-utils

[root@kmbwflqypdyxuza opt]# nmcli connection show
NAME    UUID                                  TYPE      DEVICE
eth0    70cf9472-f303-4978-8b49-0138ffef5ecd  ethernet  eth0
eth1    09752b30-e3c7-48e0-bad1-93f24d19bdff  ethernet  eth1
virbr0  acea23f1-af65-4d01-ad88-394faaa6cbd7  bridge    virbr0


# 创建一个Bridge
# 语法:nmcli connection add type bridge autoconnect yes con-name BRIDGE NAME ifname BRIDGE NAME

nmcli connection add type bridge autoconnect yes con-name kvmbr1 ifname kvmbr1


# 查看网桥状态
[root@kmbwflqypdyxuza opt]# nmcli device status
DEVICE  TYPE      STATE                                  CONNECTION
eth1    ethernet  connected                              eth1
virbr0  bridge    connected (externally)                 virbr0
kvmbr1  bridge    connecting (getting IP configuration)  kvmbr1
eth0    ethernet  disconnected                           --
lo      loopback  unmanaged                              --


# 为网桥分配现有连接配置集
# https://access.redhat.com/documentation/zh-cn/red_hat_enterprise_linux/8/html/configuring_and_managing_networking/configuring-a-network-bridge_configuring-and-managing-networking

nmcli connection modify eth1 master kvmbr1

# 为网桥配置IP 、子网掩码、网关和 DNS
nmcli connection modify kvmbr1 ipv4.addresses 192.168.28.5/24 --- 宿主机所在局域网的地址
nmcli connection modify kvmbr1 ipv4.gateway 192.168.28.1
nmcli connection modify kvmbr1 ipv4.dns 8.8.8.8 +ipv4.dns 8.8.4.4
nmcli connection modify kvmbr1 ipv4.method manual

# 激活
nmcli connection up kvmbr1

# 验证
ip addr


nmcli connection modify kvmbr1 connection.autoconnect-slaves 1

nmcli device
ip addr
6.创建vm
http://www.manongjc.com/detail/42-qgswujnpypjutbb.html
# 查询vm可以安装哪些类型的操作系统
yum -y install libosinfo
osinfo-query os | grep rocky
默认情况下,系统管理仅限于 root 用户,如果要启用常规用户,那么必须按以下步骤操作。
打开 /etc/libvirt/libvirtd.conf 进行编辑:
sudo vi /etc/libvirt/libvirtd.conf
将 UNIX 域套接字组所有者设置为 libvirt:
unix_sock_group = "libvirt"
调整 UNIX 域套接字的读写权限:
unix_sock_rw_perms = "0770"
# 启动并启用 libvirtd 服务
systemctl start libvirtd
systemctl enable libvirtd
cat /etc/group
adduser wpkvm
usermod -a -G libvirt wpkvm
su wpkvm
virt-manager
FAQ
KVM/QEMU/qemu-kvm/libvirt 概念全解
https://www.cnblogs.com/88223100/p/KVM_QEMU_qemu-kvm_libvirt.html
virt-manager & virt-viewer
https://www.jianshu.com/p/b894ca1abd51
https://sspai.com/post/80638#!
virt-manager,是一个虚拟机管理软件,是虚拟机的桌面管理器,类似于vmware客户端
virt-manager 并不是一个完整的虚拟机管理软件,而是 Libvirt 的一个图形化前端,安装时除了要安装 virt-manager,也需要安装并配置好 Libvirt
virt-manager 工具提供了虚拟机管理的基本功能,如开机,挂起,重启,关机,强制关机/重启,迁移等,并且可以进入虚拟机图形界面进行操作。该工具还可以管理各种存储以及网络方面。
virsh 是用于管理 虚拟化环境中的客户机和 Hypervisor 的命令行工具,与 virt-manager 等工具类似,它也是通过 libvirt API 来实现虚拟化的管理。virsh 是完全在命令行文本模式下运行的用户态工具,它是系统管理员通过脚本程序实现虚拟化自动部署和管理的理想工具之一。
virt-install 用来创建虚拟机的命令行工具
virt-viewer 是一个最小化的虚拟机图形界面展示工具,支持VNC 和SPICE两种远程协议。
Linux 虚拟网络设备详解之 Bridge 网桥
https://cloud.tencent.com/developer/article/1432484
同 tap/tun、veth-pair 一样,Bridge 也是一种虚拟网络设备,所以具备虚拟网络设备的所有特性,比如可以配置 IP、MAC 等。
除此之外,Bridge 还是一个交换机,具有交换机所有的功能。
对于普通的网络设备,就像一个管道,只有两端,数据从一端进,从另一端出。而 Bridge 有多个端口,数据可以从多个端口进,从多个端口出。
Bridge 的这个特性让它可以接入其他的网络设备,比如物理设备、虚拟设备、VLAN 设备等。Bridge 通常充当主设备,其他设备为从设备,这样的效果就等同于物理交换机的端口连接了一根网线。比如下面这幅图通过 Bridge 连接两个 VM 的 tap 虚拟网卡和物理网卡 eth0。
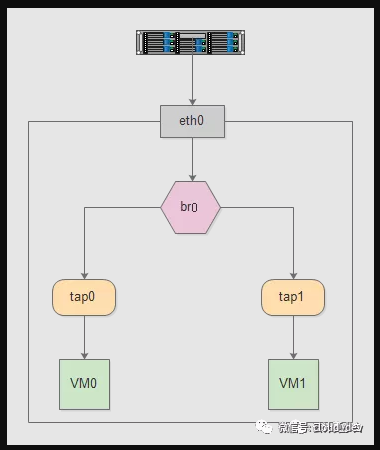
virbr0 是 KVM 默认创建的一个 Bridge,其作用是为连接其上的虚机网卡提供 NAT 访问外网的功能。
virbr0 默认分配了一个IP 192.168.122.1,并为连接其上的其他虚拟网卡提供 DHCP 服务。
Linux Bridge 是虚拟交换机,功能和物理交换机一样,用于连接虚拟机和容器。
libguestfs
https://cloud.tencent.com/developer/article/2017457
libguestfs是用于访问及修改磁盘映像的C语言库和配套工具
libguestfs is a set of tools for accessing and modifying virtual machine (VM) disk images. You can use this for viewing and editing files inside guests, scripting changes to VMs, monitoring disk used/free statistics, creating guests, P2V, V2V, performing backups, cloning VMs, building VMs, formatting disks, resizing disks, and much more.
nmcli命令中的device和connection有何含义
- device叫网络接口,是物理设备。
例
nmcli device show   查看所有网卡设备信息
show 后面跟网卡名是查看某个网卡的详细地址
- connection是连接,偏重于逻辑设置
例
nmcli connection show 查看所有连接
show 后面跟上连接名可以查看连接的详细信息
connection show 后跟上 -a 参数是仅显示活动的连接
- 多个connection可以应用到同一个device,但同一时间只能启用其中一个connection。
- 这样的好处是针对一个网络接口,我们可以设置多个网络连接,比如静态IP和动态IP,再根据需要up相应的connection。
nmcli 创建网桥
https://zhuanlan.zhihu.com/p/387800391
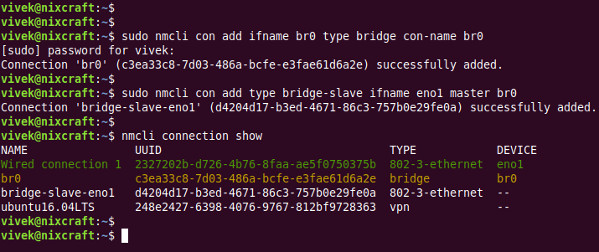
我有一个使用网卡 eno1 的 “有线连接”。我的系统还有一个 VPN 接口。我将要创建一个名为 br0 的网桥,并连接到 eno1。
$ sudo nmcli con add ifname br0 type bridge con-name br0
$ sudo nmcli con add type bridge-slave ifname eno1 master br0
$ nmcli connection show
virt-install命令---详解
https://www.cnblogs.com/saryli/p/11827903.html
开启X11 Forwarding,实现无桌面环境运行GUI软件
https://blog.csdn.net/qq_35158197/article/details/123302824
https://blog.csdn.net/hbuxiaofei/article/details/118726404
yum install xorg-x11-xauth xorg-x11-fonts-* xorg-x11-font-utils xorg-x11-fonts-Type1 xterm
这一堆安装的,实际上是X Client。其中最后的 xterm 是用来测试X11Forwarding功能的。
修改sshd的配置
# vi /etc/ssh/sshd_config
X11Forwarding Yes
# systemctl restart sshd
测试 X11-forwarding 效果
运行以下命令测试效果,正常情况下会出现一个xterm界面。
xterm
Virt-Manager
https://techviewleo.com/install-kvm-with-virtualization-manager-on-rocky-linux/
https://www.cnblogs.com/whjblog/p/17213359.html
About virt-manager’s supporting tools
- virt-install is a command line tool which provides an easy way to provision operating systems into virtual machines.
- virt-viewer is a lightweight UI interface for interacting with the graphical display of virtualized guest OS. It can display VNC or SPICE, and uses libvirt to lookup the graphical connection details.
- virt-clone is a command line tool for cloning existing inactive guests. It copies the disk images, and defines a config with new name, UUID and MAC address pointing to the copied disks.
- virt-xml is a command line tool for easily editing libvirt domain XML using virt-install’s command line options.
- virt-bootstrap is a command line tool providing an easy way to setup the root file system for libvirt-based containers.
网桥
网桥是什么
https://cloud.tencent.com/developer/article/1432484
同 tap/tun、veth-pair 一样,Bridge 也是一种虚拟网络设备,所以具备虚拟网络设备的所有特性,比如可以配置 IP、MAC 等。
除此之外,Bridge 还是一个交换机,具有交换机所有的功能。
对于普通的网络设备,就像一个管道,只有两端,数据从一端进,从另一端出。而 Bridge 有多个端口,数据可以从多个端口进,从多个端口出。
Bridge 的这个特性让它可以接入其他的网络设备,比如物理设备、虚拟设备、VLAN 设备等。Bridge 通常充当主设备,其他设备为从设备,这样的效果就等同于物理交换机的端口连接了一根网线。比如下面这幅图通过 Bridge 连接两个 VM 的 tap 虚拟网卡和物理网卡 eth0。
virbr0 是 KVM 默认创建的一个 Bridge,其作用是为连接其上的虚机网卡提供 NAT 访问外网的功能。
virbr0 默认分配了一个IP 192.168.122.1,并为连接其上的其他虚拟网卡提供 DHCP 服务。
Linux Bridge 是虚拟交换机,功能和物理交换机一样,用于连接虚拟机和容器。
Bridging Network Interfaces in Linux
https://www.baeldung.com/linux/bridging-network-interfaces
1. Introduction
In Linux, bridging network interfaces is a common practice for combining two or more network interfaces into a single virtual interface. Bridging is useful for various reasons, such as improving network performance, redundancy, and load balancing.
In this article, we’ll explain what network bridging is, how to set it up, and provide some examples of how it can be used in practice.
2. What Is Network Bridging?
A network bridge is a software component that connects two or more network interfaces together to create a virtual network. When bridging network interfaces, they function as a single network interface, seamlessly allowing data to flow between them. To achieve this, we create a logical bridge interface that acts as a layer 2 switch, forwarding packets between the physical interfaces.
We can bridge network interfaces, such as Ethernet, wireless, and virtual. Bridging can be helpful in a variety of scenarios, such as:
- Combining two or more network interfaces to increase bandwidth and improve network performance
- Creating a redundant network interface to ensure high availability in case of failure
- Load-balancing network traffic across multiple interfaces to distribute network load
- Creating a virtual network between virtual machines running on the same physical host
3. How to Bridge Network Interfaces
In Linux, the most common tool used for network bridging is the *bridge-utils* package, which provides the *brctl* command-line tool for configuring and managing bridges.
Before creating a bridge, it’s important to identify the network interfaces that we want to bridge. We can do this by using the ip command to list all available network interfaces on the system. The ip command is a powerful tool for configuring and managing network interfaces in Linux.
3.1. ip link show
To list all available network interfaces, we can use the ip link show command in a terminal or shell:
$ ip link show
Copy
This command will display a list of all network interfaces and their status and configuration. Let’s see an example output:
1: lo: <LOOPBACK,UP,LOWER_UP> mtu 65536 qdisc noqueue state UNKNOWN mode DEFAULT group default qlen 1000
    link/loopback 00:00:00:00:00:00 brd 00:00:00:00:00:00

2: eth0: <BROADCAST,MULTICAST,UP,LOWER_UP> mtu 1500 qdisc mq state UP mode DEFAULT group default qlen 1000
    link/ether 00:11:22:33:44:55 brd ff:ff:ff:ff:ff:ff

3: eth1: <BROADCAST,MULTICAST> mtu 1500 qdisc noop state DOWN mode DEFAULT group default qlen 1000
    link/ether 66:77:88:99:aa:bb brd ff:ff:ff:ff:ff:ff

4: wlan0: <BROADCAST,MULTICAST> mtu 1500 qdisc mq state DOWN mode DORMANT group default qlen 1000
    link/ether dd:ee:ff:00:11:22 brd ff:ff:ff:ff:ff:ff
Copy
In this example output, we can see that there are four network interfaces: lo, eth0, eth1, and wlan0. We use the lo interface as the loopback interface, which is used for local network communication. The eth0 and eth1 interfaces are Ethernet interfaces, while the wlan0 interface is a wireless interface.
To bridge two or more network interfaces, we need to identify their names or interface identifiers. In this example, we could bridge the eth0 and eth1 interfaces by creating a bridge interface named br0 and adding eth0 and eth1, as shown in the examples later.
3.2. ifconfig
To create a bridge interface, we must ensure that we haven’t already configured the network interfaces we want to bridge with IP addresses or other network settings. We can use the ifconfig command to check the configuration of an interface and disable it if necessary.
For example, to limit the configuration of the eth0 interface and disable it, we can run:
$ sudo ifconfig eth0
$ sudo ifconfig eth0 down
Copy
The first command will display detailed information about the current configuration of the eth0 interface. The second command will set the eth0 interface to the down state, temporarily disabling it and allowing us to reconfigure it without conflicts.
We can repeat this process for any other interfaces we want to bridge, making sure that they’re also in the down state before proceeding. Once we have prepared the interfaces, we can move on to creating the bridge interface and adding the interfaces to it.
Here’s an example output of running the ifconfig command on the eth0 interface:
$ sudo ifconfig eth0
eth0: flags=4163<UP,BROADCAST,RUNNING,MULTICAST>  mtu 1500
        inet 192.168.1.100  netmask 255.255.255.0  broadcast 192.168.1.255
        inet6 fe80::a00:27ff:fefc:e856  prefixlen 64  scopeid 0x20<link>
        ether 08:00:27:fc:e8:56  txqueuelen 1000  (Ethernet)
        RX packets 317  bytes 33996 (33.1 KiB)
        RX errors 0  dropped 0  overruns 0  frame 0
        TX packets 103  bytes 10998 (10.7 KiB)
        TX errors 0  dropped 0 overruns 0  carrier 0  collisions 0
Copy
This output shows that the eth0 interface is currently configured with an IP address of 192.168.1.100 and a netmask of 255.255.255.0. To prepare this interface for bridging, we would need to disable it using the ifconfig command as described above.
3.3. brctl addbr
After identifying the network interfaces we want to bridge, we can create the bridge interface using the brctl command. The *brctl* command is a command-line utility that is used to configure Ethernet bridge interfaces in Linux.
To create a new bridge interface, we can use the brctl addbr command followed by the name of the bridge interface we want to create. For example, let’s create a new bridge interface named br0:
$ sudo brctl addbr br0
Copy
This command creates a new bridge interface named br0. The sudo command runs the brctl command with administrative privileges, as creating a bridge interface requires root-level access.
3.4. brctl addif
Once the bridge interface has been created, we can add the network interfaces we want to bridge to it. This is done using the brctl addif command, followed by the name of the bridge interface and the names of the network interfaces we want to add. For example, let’s add the eth0 and eth1 interfaces to our newly-created br0 bridge interface:
$ sudo brctl addif br0 eth0
$ sudo brctl addif br0 eth1Copy
We can confirm that the network interfaces have been added to the bridge interface by running the brctl show command:
$ sudo brctl show
bridge name  bridge id          STP enabled  interfaces
br0          8000.000000000000  no           eth0
                                             eth1
Copy
After adding the network interfaces to the bridge interface, we can configure the bridge interface as we would any other network interface. This includes assigning an IP address to the bridge interface and configuring any necessary network settings, such as DNS servers or routing tables.
Finally, we need to bring up the bridge interface and the physical interfaces:
$ sudo ifconfig br0 up
$ sudo ifconfig eth0 up
$ sudo ifconfig eth1 up
Copy
This command brings up the br0 interface and the physical interfaces, making them ready for use. Let’s run the ifconfig command to check the status of the network interfaces:
$ ifconfig br0
br0: flags=4163<UP,BROADCAST,RUNNING,MULTICAST>  mtu 1500
        inet 192.168.0.10  netmask 255.255.255.0  broadcast 192.168.0.255
        inet6 fe80::c72:83ff:fe1c:88c6  prefixlen 64  scopeid 0x20<link>
        ether c6:72:83:1c:88:c6  txqueuelen 1000  (Ethernet)
        RX packets 0  bytes 0 (0.0 B)
        RX errors 0  dropped 0  overruns 0  frame 0
        TX packets 100  bytes 10370 (10.3 KB)
        TX errors 0  dropped 0 overruns 0  carrier 0  collisions 0

$ ifconfig eth0
eth0: flags=4163<UP,BROADCAST,RUNNING,MULTICAST>  mtu 1500
        ether 00:11:22:33:44:55  txqueuelen 1000  (Ethernet)
        RX packets 0  bytes 0 (0.0 B)
        RX errors 0  dropped 0  overruns 0  frame 0
        TX packets 100  bytes 10370 (10.3 KB)
        TX errors 0  dropped 0 overruns 0  carrier 0  collisions 0

$ ifconfig eth1
eth1: flags=4163<UP,BROADCAST,RUNNING,MULTICAST>  mtu 1500
        ether 00:11:22:33:44:56  txqueuelen 1000  (Ethernet)
        RX packets 0  bytes 0 (0.0 B)
        RX errors 0  dropped 0  overruns 0  frame 0
        TX packets 100  bytes 10370 (10.3 KB)
        TX errors 0  dropped 0 overruns 0  carrier 0  collisions 0
Copy
This output shows that the br0, eth0, and eth1 interfaces are all up and running. The inet field displays the IP address assigned to each interface, while the ether field displays the interface’s MAC address. The TX and RX fields display the number of packets and bytes transmitted and received by the interface, respectively.
4. Practical Examples
Let’s look at some practical examples of how network bridging can be used in Linux.
4.1. Improving Network Performance
One of the primary use cases for network bridging is to combine two or more network interfaces to increase bandwidth and improve network performance. By bridging the interfaces, we create a single virtual interface to handle more network traffic and improve overall network throughput.
For example, we have two Ethernet interfaces, eth0 and eth1, each with a maximum throughput of 1 Gbps. If we bridge these interfaces into a single virtual interface, we can achieve a maximum throughput of 2 Gbps. This can be useful in scenarios where we need to transfer large amounts of data quickly or support high-bandwidth applications.
4.2. Creating a Redundant Network Interface
Another use case for network bridging is to create a redundant network interface to ensure high availability in case of failure. By bridging two or more network interfaces, we create a failover mechanism that automatically switches to a backup interface if the primary interface fails.
For example, if we bridge eth0 and eth1 into a single virtual interface, we can configure the system to use eth0 as the primary interface and eth1 as the backup interface. If eth0 fails, the system will automatically switch to eth1 to maintain network connectivity.
4.3. Load Balancing Network Traffic
Another use case for network bridging is to load-balance network traffic across multiple interfaces to distribute network load. By distributing network traffic across multiple interfaces, we can avoid bottlenecks and ensure that no single interface becomes overloaded.
For example, if we bridge eth0 and eth1 into a single virtual interface, we can configure the system to distribute network traffic evenly across both interfaces. This can be useful in scenarios where multiple clients are accessing a server simultaneously or where we need to support high-bandwidth applications.
4.4. Creating a Virtual Network
Another use case for network bridging is to create a virtual network between virtual machines running on the same physical host. By bridging the virtual network interfaces of the virtual machines, we can create a virtual network that allows them to communicate with each other as if they were connected to the same physical network.
For example, if we have two virtual machines running on the same physical host, we can bridge their virtual network interfaces into a single virtual interface. This will allow the virtual machines to communicate with each other directly without going through the physical network.
5. Conclusion
Network bridging is a valuable technique for combining two or more network interfaces into a single virtual interface. We used the bridge for various purposes, such as improving network performance, redundancy, and load balancing.
In Linux, network bridging can be easily set up using the bridge-utils package and the brctl command-line tool. By bridging network interfaces, we can create more flexible and robust network configurations that adapt to changing network requirements.
如何使用 nmcli ,配置网桥Bridge
https://manpages.org/nmcli-examples/5
https://www.networkmanager.dev/docs/api/latest/nmcli.html
https://blog.csdn.net/weixin_42300866/article/details/119513083
https://www.cnblogs.com/whjblog/p/17213359.html
Adding a bridge and two slave profiles
$ nmcli con add type bridge con-name TowerBridge ifname TowerBridge
$ nmcli con add type bridge-slave con-name br-slave-1 ifname ens3 master TowerBridge
$ nmcli con add type bridge-slave con-name br-slave-2 ifname ens4 master TowerBridge
$ nmcli con modify TowerBridge bridge.stp no
This example demonstrates adding a bridge master connection and two slaves.
The first command adds a master bridge connection, naming the bridge interface and the profile as TowerBridge.
The next two commands add slaves profiles, both will be enslaved to TowerBridge. The first slave will be tied to ens3 interface, the second to ens4.
The last command will disable 802.1D STP for the TowerBridge profile.
完整安装---NAT
1.硬件是否支持虚拟化
cat /proc/cpuinfo | grep -E "vmx|svm"
该命令探测是否存在 VMX(虚拟机扩展(Virtual Machine Extension)),它是英特尔硬件虚拟化的 CPU 标志,或 SVM,它是 AMD 硬件虚拟化的标志。
从以下输出中,你可以看到我们的系统启用了英特尔硬件虚拟化:
2 查看KVM 驱动是否加载
[root@vlgmomvmeatdpnj ~]# lsmod | grep kvm
kvm_intel             339968  0
kvm                   905216  1 kvm_intel
irqbypass              16384  1 kvm


[root@vlgmomvmeatdpnj ~]# ll /dev/kvm
crw-rw-rw- 1 root kvm 10, 232 Mar 15 09:42 /dev/kvm
3.安装软件包
cd /etc/yum.repos.d/
ls CentOS-*
rm -rf CentOS-*
yum clean all

yum makecache


yum -y install qemu-kvm  libvirt   virt-manager


qemu-kvm-6.2.0-40.module+el8.9.0+1654+f4df84c4.2.x86_64
libvirt-8.0.0-22.module+el8.9.0+1405+b6048078.x86_64
virt-manager-3.2.0-4.el8.noarch
virt-install-3.2.0-4.el8.noarch
virt-viewer-9.0-12.el8.x86_64
4.启动libvirtd服务
systemctl start libvirtd

systemctl enable libvirtd

systemctl status libvirtd
5.启动virt-manager,创建vm
# 启动图形化界面
virt-manager

# 查询vm可以安装哪些类型的操作系统
yum -y install libosinfo
osinfo-query os | grep rocky

cd /opt

wget https://dl.rockylinux.org/pub/rocky/8/isos/x86_64/Rocky-8.9-x86_64-minimal.iso
完整安装---nmcli 桥接(未验证)
# 创建一个主 bridge conn,配置文件 和 网卡名称 都叫做 kvmbr2
nmcli connection add type bridge con-name kvmbr2 ifname kvmbr2 autoconnect yes


会发现,在/etc/sysconfig/network-scripts下,多了一个配置文件ifcfg-kvmbr2

Connection 'kvmbr2' (0a5ae600-3e16-47a4-ad07-46d30c7965c3) successfully added.
[root@fmoliicpanrgxtn network-scripts]# ls
ifcfg-eth0  ifcfg-eth1  ifcfg-kvmbr2


[root@fmoliicpanrgxtn network-scripts]# cat ifcfg-kvmbr2
STP=yes
BRIDGING_OPTS=priority=32768
TYPE=Bridge
PROXY_METHOD=none
BROWSER_ONLY=no
BOOTPROTO=dhcp
DEFROUTE=yes
IPV4_FAILURE_FATAL=no
IPV6INIT=yes
IPV6_AUTOCONF=yes
IPV6_DEFROUTE=yes
IPV6_FAILURE_FATAL=no
IPV6_ADDR_GEN_MODE=stable-privacy
NAME=kvmbr2
UUID=0a5ae600-3e16-47a4-ad07-46d30c7965c3
DEVICE=kvmbr2
ONBOOT=yes
# 给kvmbr2网桥,添加了一个从配置文件,这个从配置文件,将会被用于eth1
nmcli connection add type bridge-slave ifname eth1 master kvmbr2


会发现,在/etc/sysconfig/network-scripts下,多了一个配置文件ifcfg-bridge-slave-eth1
[root@fmoliicpanrgxtn network-scripts]# ls
ifcfg-bridge-slave-eth1  ifcfg-eth0  ifcfg-eth1  ifcfg-kvmbr2


[root@fmoliicpanrgxtn network-scripts]# cat ifcfg-bridge-slave-eth1
TYPE=Ethernet
NAME=bridge-slave-eth1
UUID=47a9579f-1810-4e06-9c50-fe4d6ab7a489
DEVICE=eth1
ONBOOT=yes
BRIDGE=kvmbr2
# 设置网桥的IP 、Gatway、DNS
nmcli connection modify kvmbr2 ipv4.addresses 10.6.171.80/24 ipv4.method manual
nmcli connection modify kvmbr2 ipv4.gateway 218.6.171.1
nmcli connection modify kvmbr2 ipv4.dns 8.8.8.8 +ipv4.dns 8.8.4.4
# 因为同一个device中,只能有一个connection处于active的状态,现在,eth1这个device中有2个connection,一个是原来的eth1,另一个是我们刚刚创建的kvmbr2,
# 此时,需要将kvmbr2这个connetion激活,所以就需要将原来的eth1 connection 关闭
nmcli connection down   eth1
nmcli connection show --active
nmcli device status
完整安装---nmtui桥接(已验证)
1.硬件是否支持虚拟化
cat /proc/cpuinfo | grep -E "vmx|svm"
该命令探测是否存在 VMX(虚拟机扩展(Virtual Machine Extension)),它是英特尔硬件虚拟化的 CPU 标志,或 SVM,它是 AMD 硬件虚拟化的标志。
从以下输出中,你可以看到我们的系统启用了英特尔硬件虚拟化:
2 查看KVM 驱动是否加载
[root@vlgmomvmeatdpnj ~]# lsmod | grep kvm
kvm_intel             339968  0
kvm                   905216  1 kvm_intel
irqbypass              16384  1 kvm


[root@vlgmomvmeatdpnj ~]# ll /dev/kvm
crw-rw-rw- 1 root kvm 10, 232 Mar 15 09:42 /dev/kvm
3.安装软件包
cd /etc/yum.repos.d/
ls CentOS-*
rm -rf CentOS-*
yum clean all

yum makecache


yum -y install qemu-kvm  libvirt   virt-manager


qemu-kvm-6.2.0-40.module+el8.9.0+1654+f4df84c4.2.x86_64
libvirt-8.0.0-22.module+el8.9.0+1405+b6048078.x86_64
virt-manager-3.2.0-4.el8.noarch
virt-install-3.2.0-4.el8.noarch
virt-viewer-9.0-12.el8.x86_64
4.启动libvirtd服务
systemctl start libvirtd

systemctl enable libvirtd

systemctl status libvirtd
安装bridge
在安装之前,先查看下,当前connection
[root@localhost ~]# nmcli c show
NAME    UUID                                  TYPE      DEVICE
eno1    64f64946-c728-46fa-aef0-75c05b846aa0  ethernet  eno1
virbr0  4c284990-f97e-4925-ae6d-5c991432de76  bridge    virbr0
eno2    b706caf7-a159-40ba-a628-9c4d97df6cb5  ethernet  --
eno3    dc3aedae-7ece-452b-b645-0ba35a306fee  ethernet  --
eno4    4609c571-2aed-4c17-9db2-812fdfd87756  ethernet  --

[root@localhost ~]# nmcli c show --active
NAME    UUID                                  TYPE      DEVICE
eno1    64f64946-c728-46fa-aef0-75c05b846aa0  ethernet  eno1
virbr0  4c284990-f97e-4925-ae6d-5c991432de76  bridge    virbr0
什么是bridge?他和物理网卡的关系是什么?
我们先看下图:
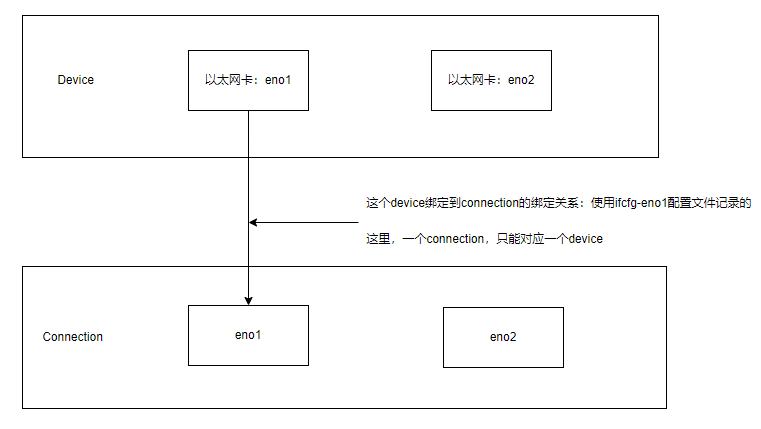
这个device绑定到connection的绑定关系:使用ifcfg-eno1配置文件记录的
这里,一个connection,只能对应一个device
接下来,我们再看一下bridge
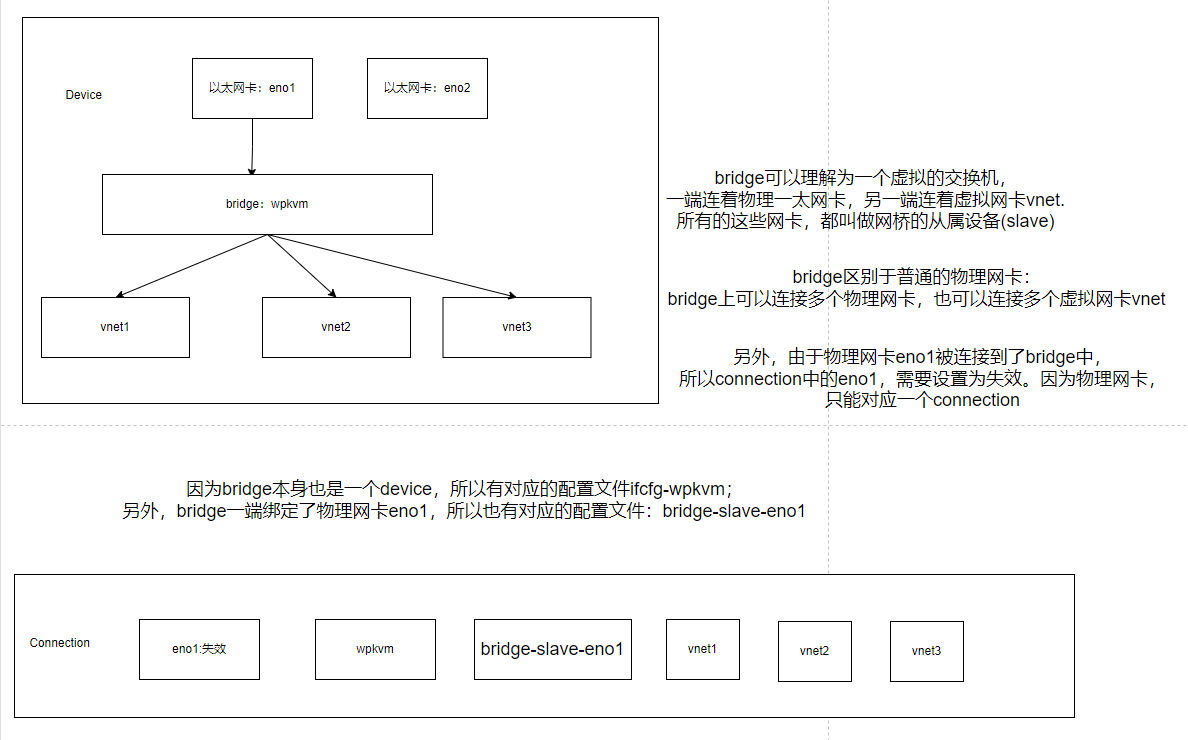
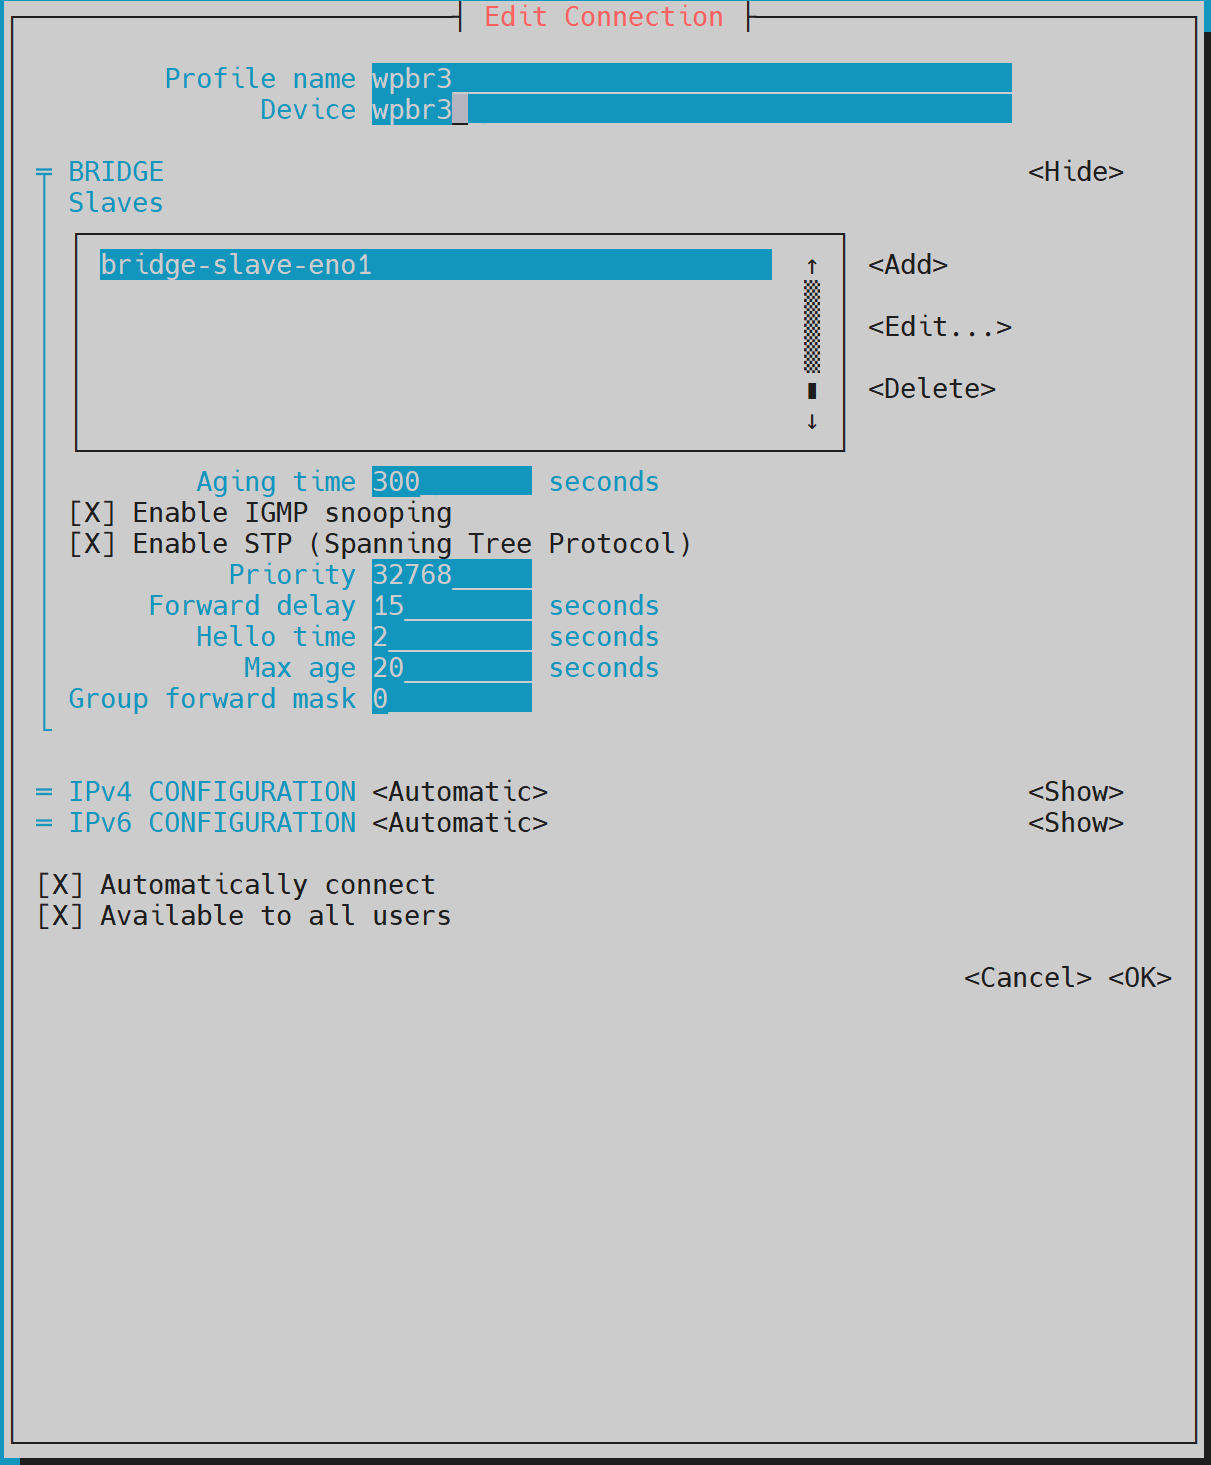
上面的ifcfg-wpkvm,后面统一改成了ifcfg-wpbr3,因为bridge的名称,改成了wpbr3
bridge可以理解为一个虚拟的交换机,一端连着物理一太网卡,另一端连着虚拟网卡vnet。
所有的这些网卡,包括物理网卡和 虚拟网卡,都叫做网桥的从属设备(slave)
bridge区别于普通的物理网卡:
bridge上可以同时 连接多个物理网卡 和 多个虚拟网卡vnet
另外,由于物理网卡eno1被连接到了bridge中,所以connection中的eno1,需要设置为失效。因为物理网卡,只能对应一个connection
因为bridge本身也是一个device,所以有对应的配置文件ifcfg-wpbr3;
另外,bridge一端绑定了物理网卡eno1,所以也有对应的配置文件:bridge-slave-eno1
在Bridge创建成功后,宿主机上的原来的eno1-connection就失效了,转而使用bridge:wpbr3 来表示宿主机
比如原来eno1-connection的ip是192.168.10.99,而创建的bridge:wpbr3 的ip是192.168.10.90
那么想使用ssh登录到宿主机上,就需要使用ssh root@192.168.10.90,因为原来的eno1-connection失效了,也即10.99的ip地址无用了
这里使用nmtui来创建Bridge:
yum install NetworkManager-tui

# systemctl start NetworkManager

nmtui
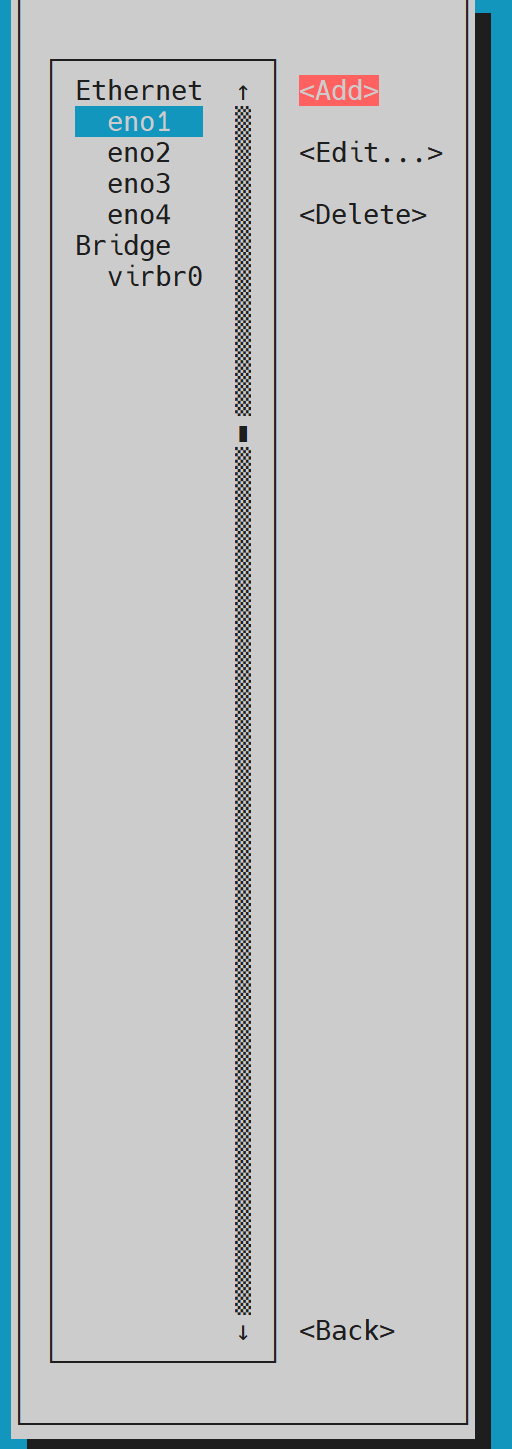
选择Add,然后选择Bridge
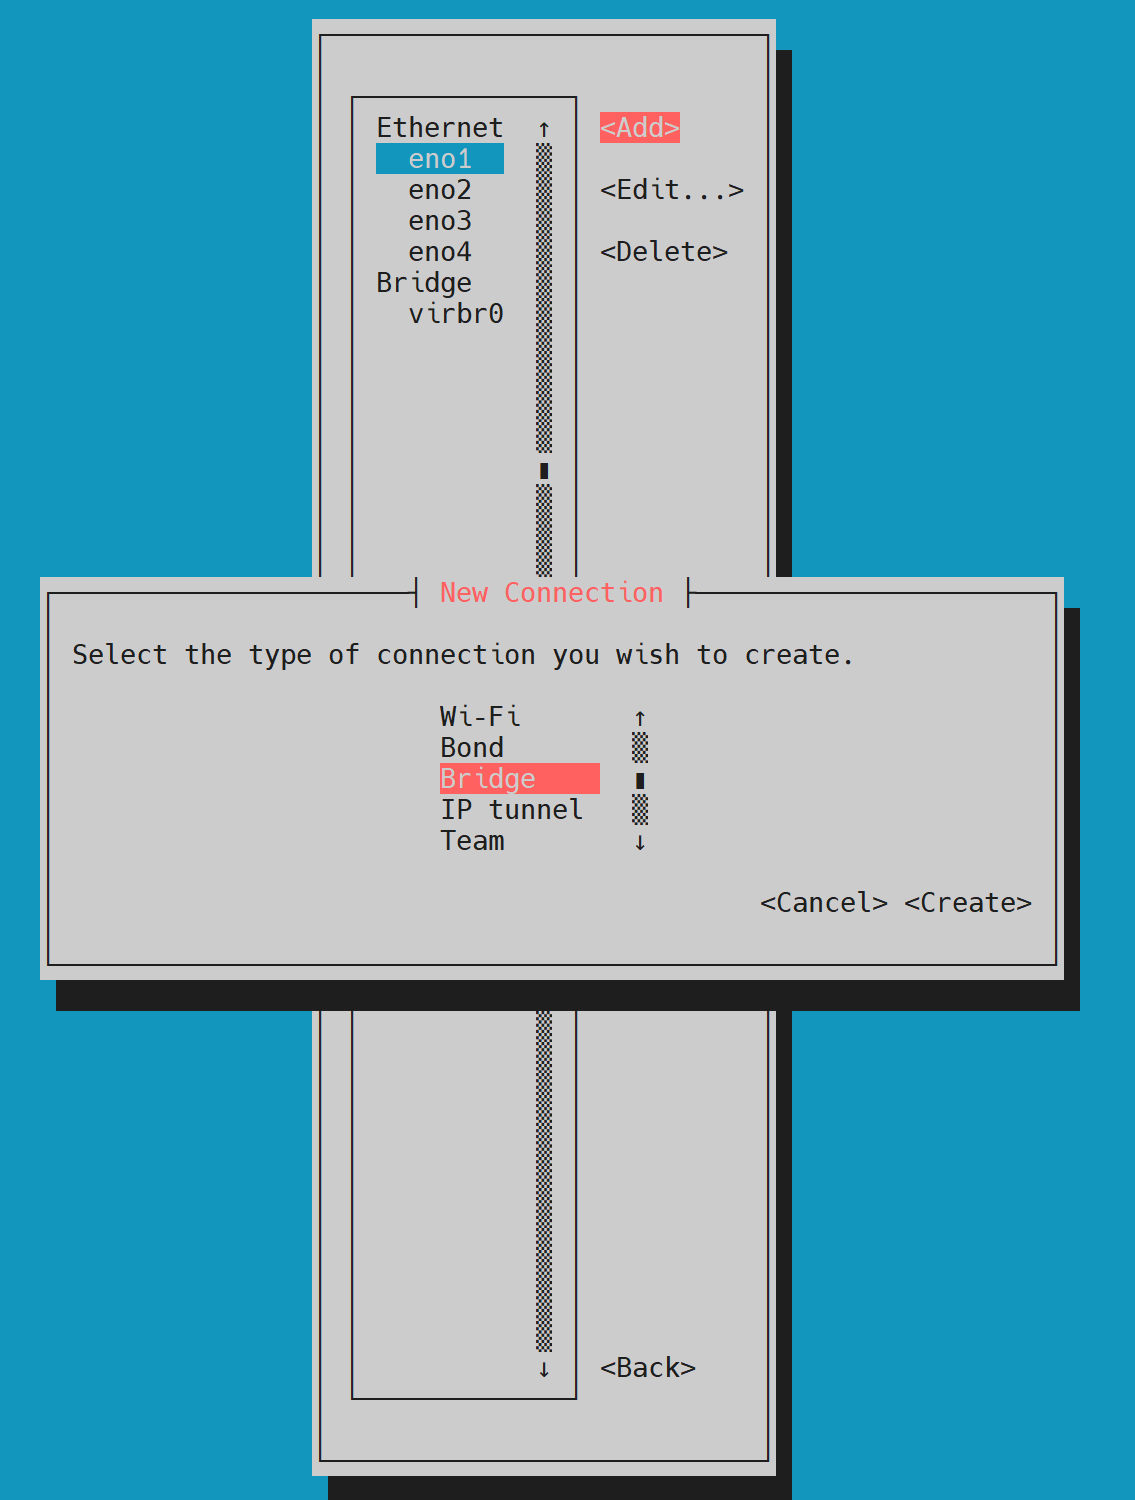
profile name和 device name填写的都是wpbr3,表示新创建的网桥名称 和 对应的配置文件
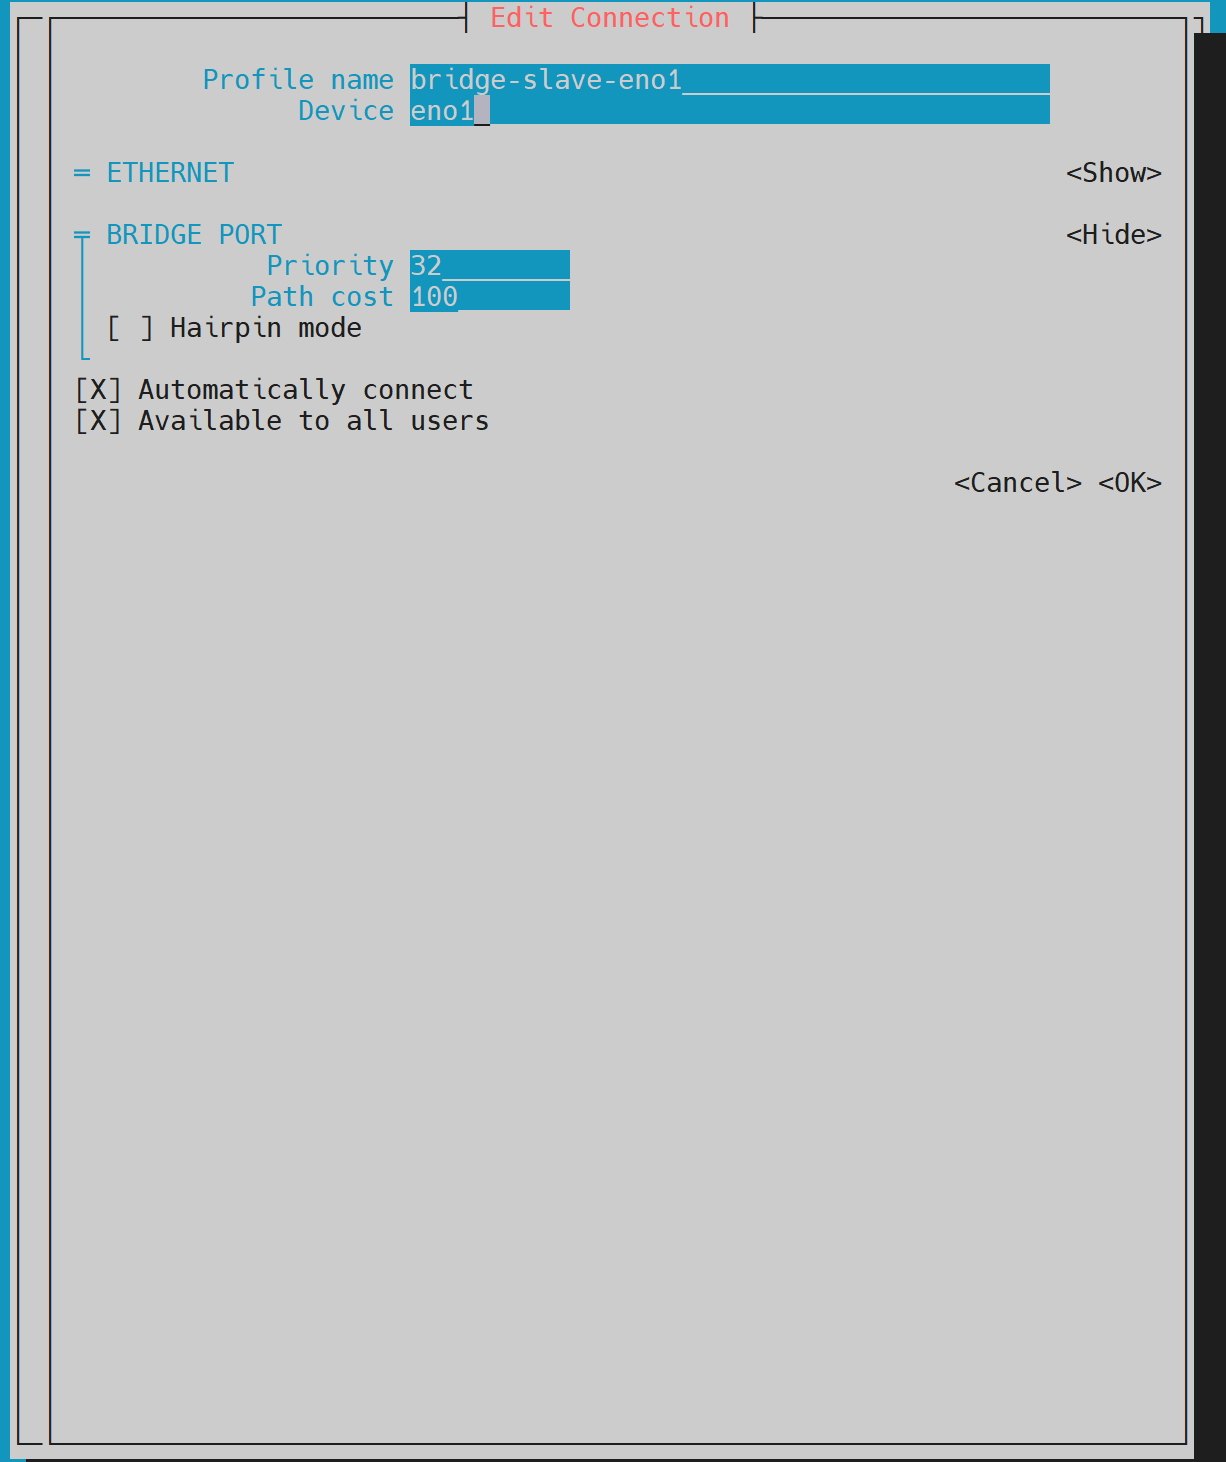
接下来,在bridge slave中,将物理网卡eno1作为从属设备,添加到bridge中,如下图:
设置profile name为bridge-slave-eno1,device为eno1
最后,再配置网桥对应的 ipv4地址、网关、dns等,就填写宿主机同一网段的其他地址即可。
这里,需要将IPV4 Configuration 设置为Manual
当前宿主机的ip是192.168.10.141,给当前网桥设置的ip是192.168.10.131
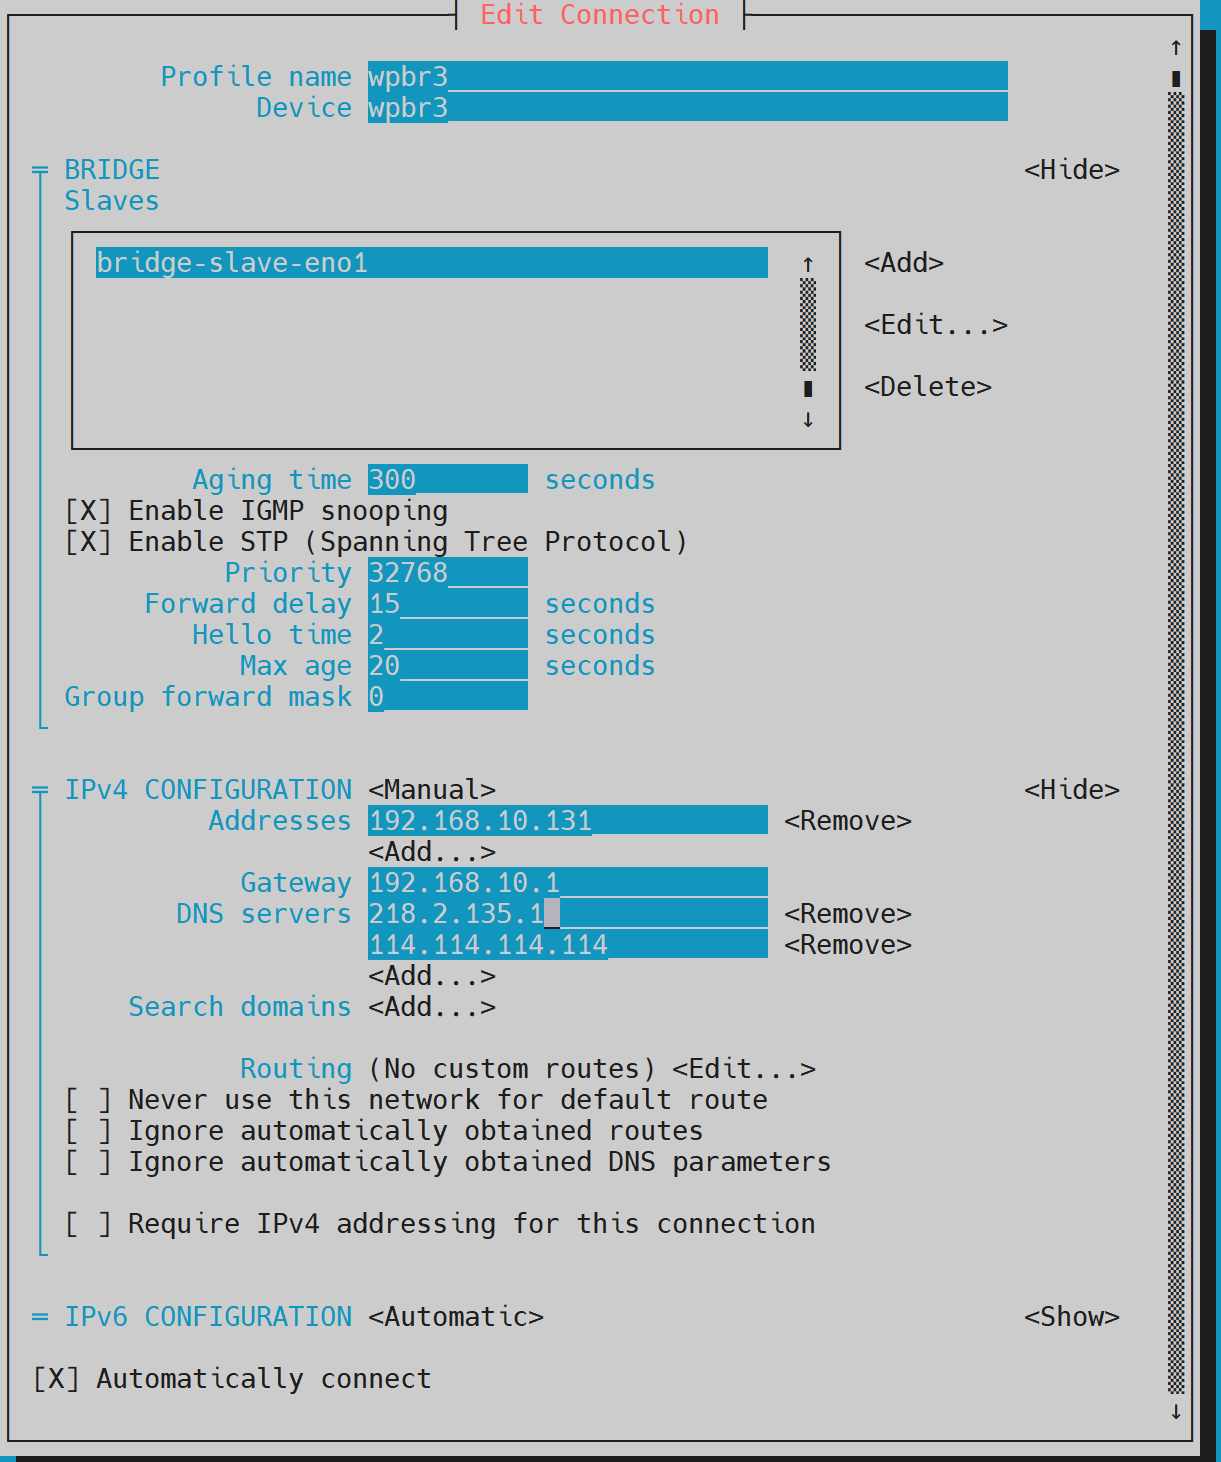
继续下一步,保存,即可
接下来,我们看下/etc/sysconfig/network-scripts/的文件:
可以看到,多了2个文件:ifcfg-wpbr3 和 ifcfg-bridge-slave-eno1
我们看下 这2个文件的内容:
[root@localhost network-scripts]# cat ifcfg-wpbr3
STP=yes
BRIDGING_OPTS=priority=32768
TYPE=Bridge
HWADDR=
PROXY_METHOD=none
BROWSER_ONLY=no
BOOTPROTO=none
IPADDR=192.168.10.131
PREFIX=24
GATEWAY=192.168.10.1
DNS1=218.2.135.1
DNS2=114.114.114.114
DEFROUTE=yes
IPV4_FAILURE_FATAL=no
IPV6INIT=yes
IPV6_AUTOCONF=yes
IPV6_DEFROUTE=yes
IPV6_FAILURE_FATAL=no
IPV6_ADDR_GEN_MODE=default
NAME=wpbr3
UUID=af94baf9-d69d-48e5-a59e-f1025f252fdf
DEVICE=wpbr3
ONBOOT=yes


[root@localhost network-scripts]# cat ifcfg-bridge-slave-eno1
TYPE=Ethernet
NAME=bridge-slave-eno1
UUID=ad76283d-d307-4eed-b74f-00e0c648007e
DEVICE=eno1
ONBOOT=yes
BRIDGE=wpbr3
BRIDGE_UUID=af94baf9-d69d-48e5-a59e-f1025f252fdf
接下来,我们查询下connection的情况:
[root@localhost network-scripts]# nmcli c show
NAME               UUID                                  TYPE      DEVICE
eno1               64f64946-c728-46fa-aef0-75c05b846aa0  ethernet  eno1
virbr0             4c284990-f97e-4925-ae6d-5c991432de76  bridge    virbr0
wpbr3              af94baf9-d69d-48e5-a59e-f1025f252fdf  bridge    wpbr3
bridge-slave-eno1  ad76283d-d307-4eed-b74f-00e0c648007e  ethernet  --
eno2               b706caf7-a159-40ba-a628-9c4d97df6cb5  ethernet  --
eno3               dc3aedae-7ece-452b-b645-0ba35a306fee  ethernet  --
eno4               4609c571-2aed-4c17-9db2-812fdfd87756  ethernet  --
[root@localhost network-scripts]#
[root@localhost network-scripts]#
[root@localhost network-scripts]# nmcli c show --active
NAME    UUID                                  TYPE      DEVICE
eno1    64f64946-c728-46fa-aef0-75c05b846aa0  ethernet  eno1
virbr0  4c284990-f97e-4925-ae6d-5c991432de76  bridge    virbr0
wpbr3   af94baf9-d69d-48e5-a59e-f1025f252fdf  bridge    wpbr3
可以看到,eno1这个device,目前应用的还是eno1这个connection
我们之前设置的bridge-slave-eno1 这个connection,还没有生效。
因为同一个物理网卡device,只能有一个connection生效,所以,我们需要让eno1这个connection失效,这样bridge-slave-eno1 这个connection,才能启用。
接下来,我们需要将原来的eno1 connection设置为失效:
这一步很重要,如果不执行的话,那么bridge创建后无法正常使用
nmcli connection down eno1
接下来,我们查询下connection的情况:
[root@localhost ~]# nmcli c show
NAME               UUID                                  TYPE      DEVICE
wpbr3              af94baf9-d69d-48e5-a59e-f1025f252fdf  bridge    wpbr3
virbr0             4c284990-f97e-4925-ae6d-5c991432de76  bridge    virbr0
bridge-slave-eno1  ad76283d-d307-4eed-b74f-00e0c648007e  ethernet  eno1
eno1               64f64946-c728-46fa-aef0-75c05b846aa0  ethernet  --
eno2               b706caf7-a159-40ba-a628-9c4d97df6cb5  ethernet  --
eno3               dc3aedae-7ece-452b-b645-0ba35a306fee  ethernet  --
eno4               4609c571-2aed-4c17-9db2-812fdfd87756  ethernet  --
[root@localhost ~]#
[root@localhost ~]#
[root@localhost ~]# nmcli c show --active
NAME               UUID                                  TYPE      DEVICE
wpbr3              af94baf9-d69d-48e5-a59e-f1025f252fdf  bridge    wpbr3
virbr0             4c284990-f97e-4925-ae6d-5c991432de76  bridge    virbr0
bridge-slave-eno1  ad76283d-d307-4eed-b74f-00e0c648007e  ethernet  eno1
可以看到,bridge-slave-eno1 这个connection,应用到了eno1 这个device上了。
原来的 eno1 connnection,失效了
持久化:
将原来的eno1 connection中的ONBOOT改为no,防止服务器重启,导致的冲突
vim ifcfg-eno1
[root@localhost network-scripts]# cat ifcfg-eno1
TYPE=Ethernet
PROXY_METHOD=none
BROWSER_ONLY=no
BOOTPROTO=static
DEFROUTE=yes
IPV4_FAILURE_FATAL=no
IPV6INIT=yes
IPV6_AUTOCONF=yes
IPV6_DEFROUTE=yes
IPV6_FAILURE_FATAL=no
IPV6_ADDR_GEN_MODE=eui64
NAME=eno1
UUID=64f64946-c728-46fa-aef0-75c05b846aa0
DEVICE=eno1
ONBOOT=no
IPADDR=192.168.10.141
NETMASK=255.255.255.0
GATEWAY=192.168.10.1
DNS1=223.5.5.5
DNS2=114.114.114.114
开启X11 Forwarding,实现无桌面环境运行GUI软件
https://blog.csdn.net/qq_35158197/article/details/123302824
https://blog.csdn.net/hbuxiaofei/article/details/118726404
X11: 协议
Xorg:是 X11 协议的一个开源实现。 Xorg 作为 X 服务器,提供了服务器端的功能,负责管理硬件资源,如显示器、键盘和鼠标,并处理来自客户端的请求
MobaXterm: X 客户端则是实际运行的图形化应用程序,通过与 X 服务器通信来显示图形界面和响应用户输入。 在这里,MobaXterm就扮演一个类似于google浏览器的角色
Wayland: Xorg 的替代方案和竞争对手
yum install xorg-x11-xauth xorg-x11-fonts-* xorg-x11-font-utils xorg-x11-fonts-Type1 xterm
这一堆安装的,实际上是X Client。其中最后的 xterm 是用来测试X11Forwarding功能的。
关闭mobaXterm后,重新打开mobaXterm
测试 X11-forwarding 效果
运行以下命令测试效果,正常情况下会出现一个xterm界面。
xterm
如果还是不行,看下sshd的配置,是否正确。若不正确,则修改sshd的配置
# vi /etc/ssh/sshd_config
X11Forwarding Yes
# systemctl restart sshd
使用virt-manager 创建虚拟机
5.启动virt-manager,创建vm
# 启动图形化界面
virt-manager

# 查询vm可以安装哪些类型的操作系统
yum -y install libosinfo
osinfo-query os | grep rocky

cd /opt

wget https://dl.rockylinux.org/pub/rocky/8/isos/x86_64/Rocky-8.9-x86_64-minimal.iso
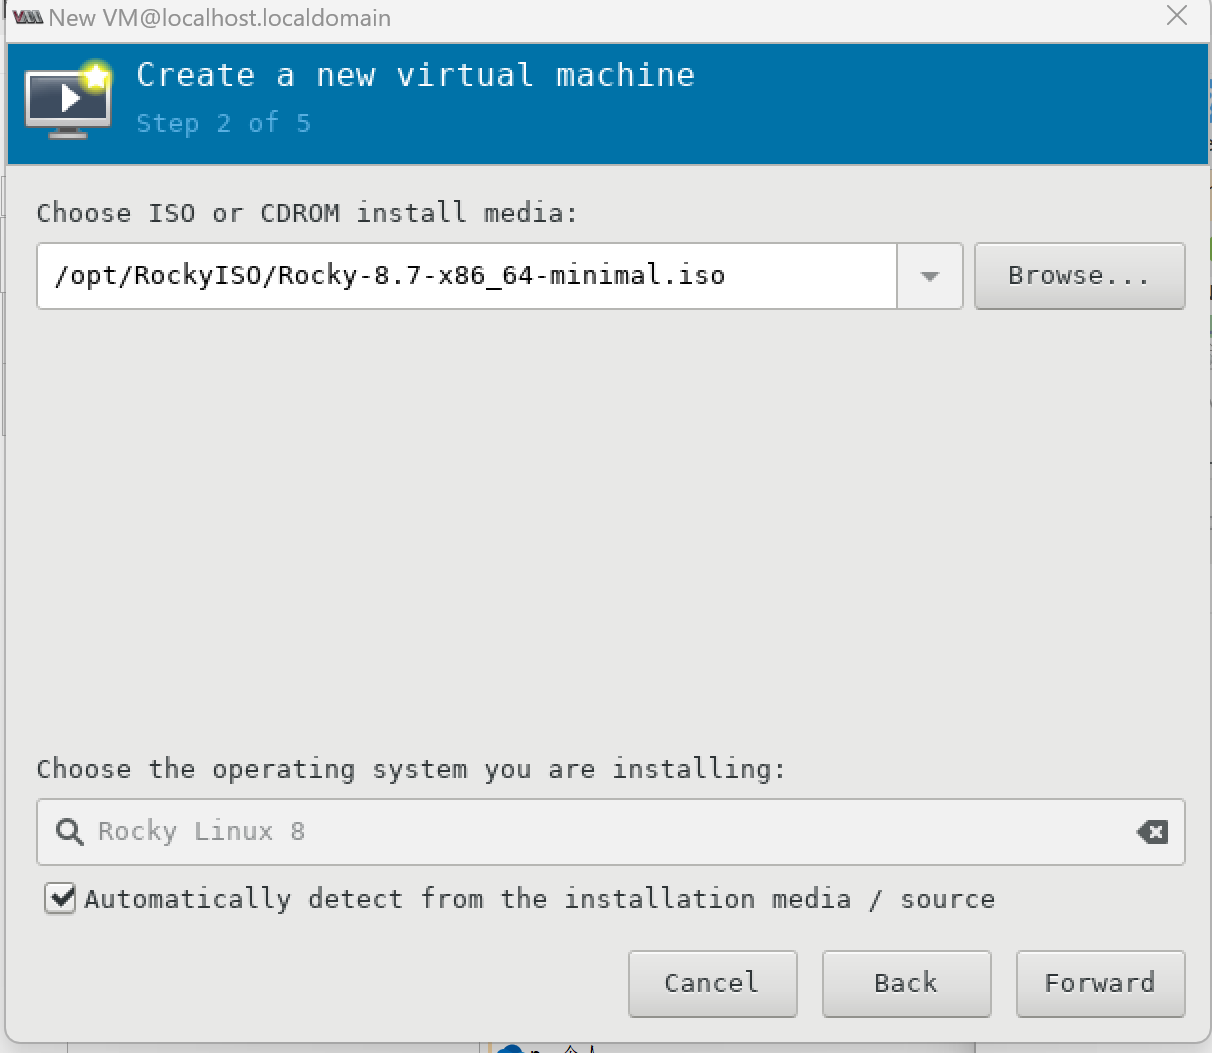
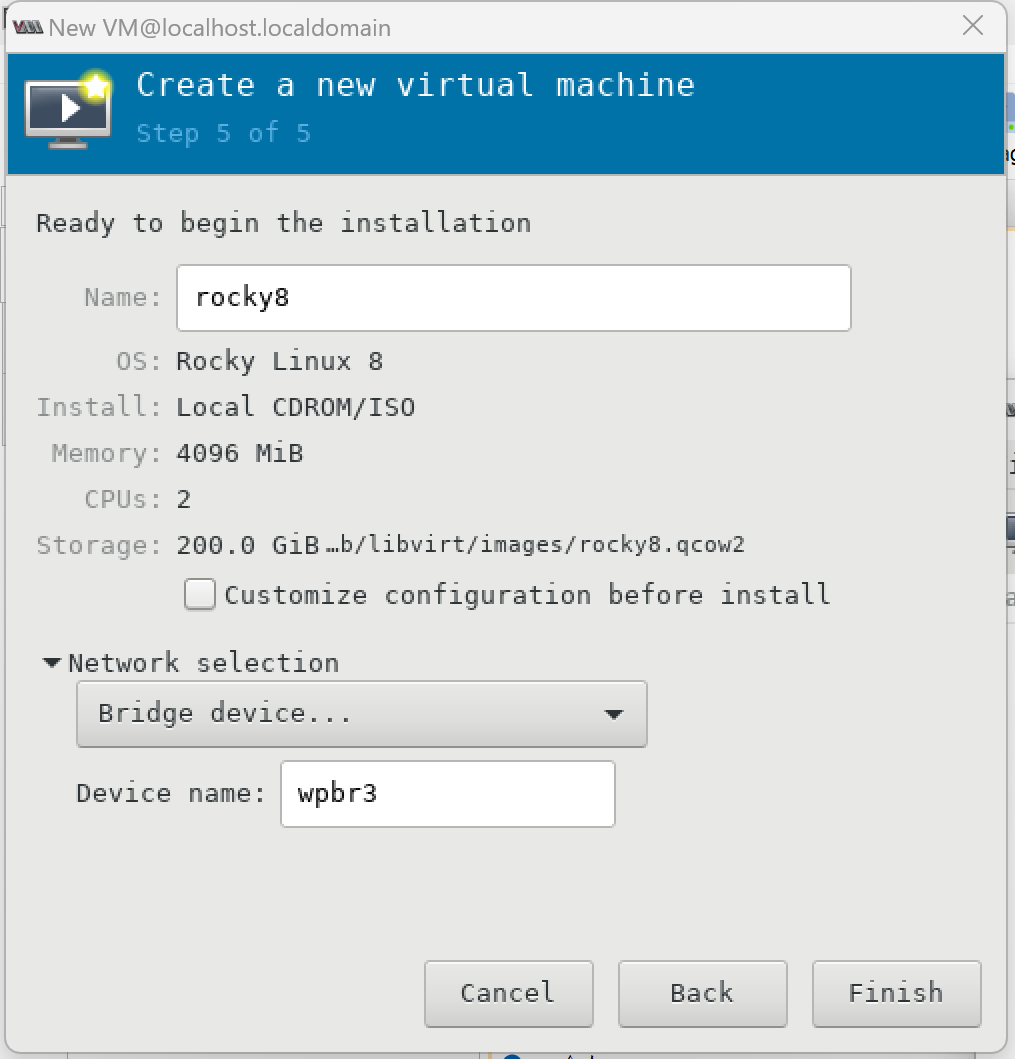
需要注意的是,在Network selection中,默认是NAT,这里选择 Bridge device ,device name 填写wpbr3,如下图:
磁盘扩容
https://blog.csdn.net/qq_25854057/article/details/109813314
https://www.cnblogs.com/zhangyy3/p/12454728.html
先关闭虚拟机
在宿主机上查看磁盘信息
# 查看
[root@localhost ~]# virsh vol-info  /var/lib/libvirt/images/rocky8.qcow2
Name:           rocky8.qcow2
Type:           file
Capacity:       200.00 GiB
Allocation:     3.00 GiB

# 磁盘扩容
virsh vol-resize /var/lib/libvirt/images/rocky8.qcow2 --capacity 300G
在虚拟机上,查看
# 查看物理卷
[root@vm132 ~]# pvs
PV VG Fmt Attr PSize PFree
/dev/vda2 rl lvm2 a-- 198.00g 4.00m
# 查看虚拟卷
[root@vm132 ~]# vgs
VG #PV #LV #SN Attr VSize VFree
rl 1 3 0 wz--n- 198.00g 4.00m
# 查看逻辑卷
[root@vm132 ~]# lvs
LV VG Attr LSize Pool Origin Data% Meta% Move Log Cpy%Sync Convert
home rl -wi-ao---- 10.00g
root rl -wi-ao---- 180.00g
swap rl -wi-ao---- 8.00g
# 查看数据盘和分区
[root@vm132 ~]# lsblk
NAME MAJ:MIN RM SIZE RO TYPE MOUNTPOINT
sr0 11:0 1 1024M 0 rom
vda 252:0 0 300G 0 disk
├─vda1 252:1 0 1G 0 part /boot
└─vda2 252:2 0 198G 0 part
├─rl-root 253:0 0 180G 0 lvm /
├─rl-swap 253:1 0 8G 0 lvm [SWAP]
└─rl-home 253:2 0 10G 0 lvm /home
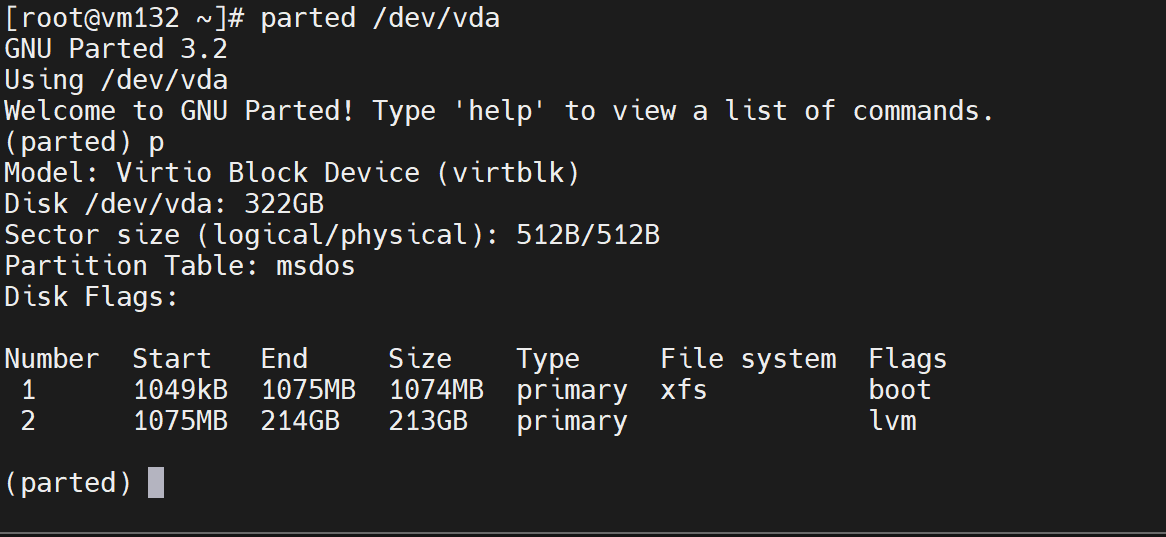
# 查看磁盘分区的格式,是MBR还是GPT
[root@vm132 ~]# parted -l
Model: Virtio Block Device (virtblk)
Disk /dev/vda: 322GB
Sector size (logical/physical): 512B/512B
Partition Table: msdos
Disk Flags:
Number Start End Size Type File system Flags
1 1049kB 1075MB 1074MB primary xfs boot
2 1075MB 214GB 213GB primary lvm
上面的msdos,表示是分区格式是:MBR分区
[root@vm132 ~]# df -Th
Filesystem Type Size Used Avail Use% Mounted on
devtmpfs devtmpfs 3.8G 0 3.8G 0% /dev
tmpfs tmpfs 3.8G 0 3.8G 0% /dev/shm
tmpfs tmpfs 3.8G 8.6M 3.8G 1% /run
tmpfs tmpfs 3.8G 0 3.8G 0% /sys/fs/cgroup
/dev/mapper/rl-root xfs 180G 3.3G 177G 2% /
/dev/vda1 xfs 1014M 191M 824M 19% /boot
/dev/mapper/rl-home xfs 10G 104M 9.9G 2% /home
tmpfs tmpfs 777M 0 777M 0% /run/user/0
逻辑卷的意思就是:D盘、E盘、F盘,所有的逻辑卷共同构成了虚拟卷。
也就是说,虚拟卷可以拆分成多个逻辑卷。
比如上面的rl虚拟卷,拆分成了以下几个逻辑卷:
- rl-root
- rl-home
- rl-swap
创建分区并格式化
上面的p,其实就是print的简写,表示将当前的分区情况,打印到屏幕上
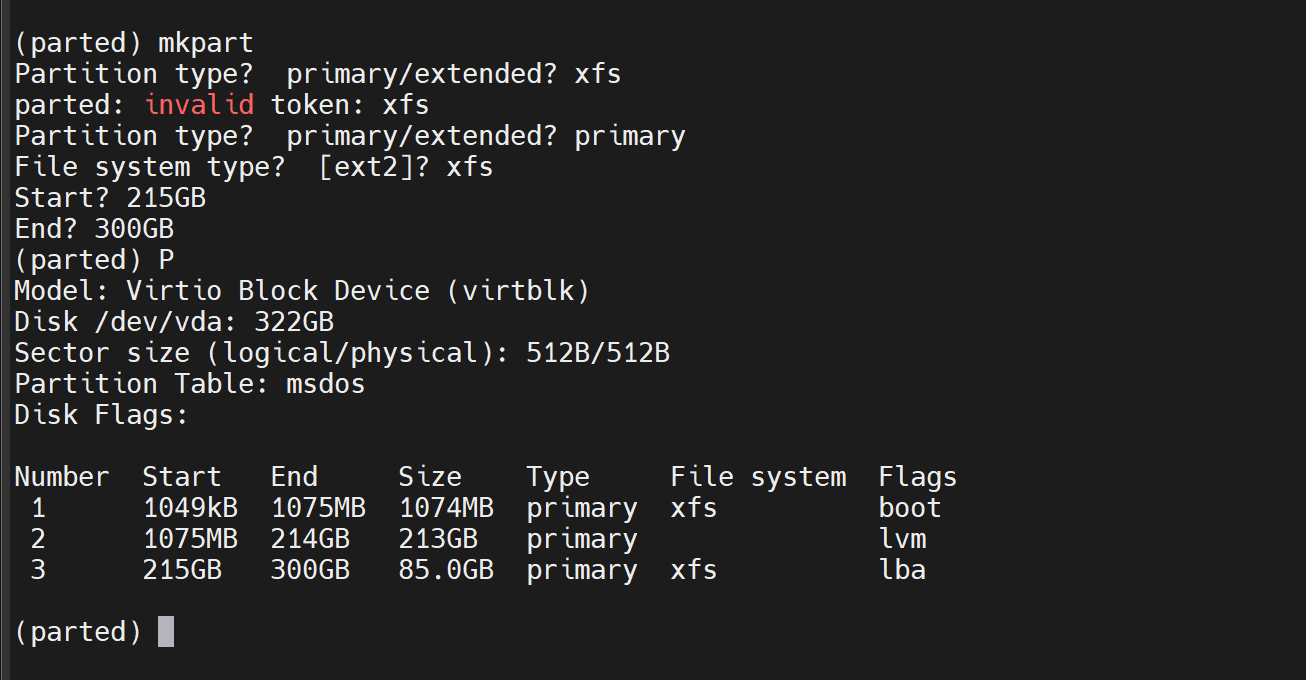
[root@vm132 ~]# lsblk
NAME        MAJ:MIN RM  SIZE RO TYPE MOUNTPOINT
sr0          11:0    1 1024M  0 rom
vda         252:0    0  300G  0 disk
├─vda1      252:1    0    1G  0 part /boot
├─vda2      252:2    0  198G  0 part
│ ├─rl-root 253:0    0  180G  0 lvm  /
│ ├─rl-swap 253:1    0    8G  0 lvm  [SWAP]
│ └─rl-home 253:2    0   10G  0 lvm  /home
└─vda3      252:3    0 79.2G  0 part
可以看到,多出了一个vda3这个分区
将分区/dev/vda3的文件系统格式,设置为xfs格式
[root@vm132 ~]# mkfs -t xfs /dev/vda3
meta-data=/dev/vda3              isize=512    agcount=4, agsize=5187968 blks
         =                       sectsz=512   attr=2, projid32bit=1
         =                       crc=1        finobt=1, sparse=1, rmapbt=0
         =                       reflink=1    bigtime=0 inobtcount=0
data     =                       bsize=4096   blocks=20751872, imaxpct=25
         =                       sunit=0      swidth=0 blks
naming   =version 2              bsize=4096   ascii-ci=0, ftype=1
log      =internal log           bsize=4096   blocks=10132, version=2
         =                       sectsz=512   sunit=0 blks, lazy-count=1
realtime =none                   extsz=4096   blocks=0, rtextents=0
Discarding blocks...Done.
将分区加入到存储卷中
# 创建物理卷
[root@vm132 ~]# pvcreate /dev/vda3
WARNING: xfs signature detected on /dev/vda3 at offset 0. Wipe it? [y/n]: y
  Wiping xfs signature on /dev/vda3.
  Physical volume "/dev/vda3" successfully created.


 # 查看物理卷
[root@vm132 ~]# pvs
  PV         VG Fmt  Attr PSize   PFree
  /dev/vda2  rl lvm2 a--  198.00g  4.00m
  /dev/vda3     lvm2 ---   79.16g 79.16g


# 扩展虚拟卷,vda3加入到rl(这个名字从上面vgs中VG字段获取)
[root@vm132 ~]# vgextend rl /dev/vda3
  Volume group "rl" successfully extended

# 查看虚拟卷
[root@vm132 ~]# vgs
  VG #PV #LV #SN Attr   VSize   VFree
  rl   2   3   0 wz--n- 277.16g 79.16g

 可以看到由原来的200G变成了277G。其中79G是空闲的

# 查看逻辑卷
[root@vm132 ~]# lvs
  LV   VG Attr       LSize   Pool Origin Data%  Meta%  Move Log Cpy%Sync Convert
  home rl -wi-ao----  10.00g
  root rl -wi-ao---- 180.00g
  swap rl -wi-ao----   8.00g


# 查看要扩容的文件系统的位置 ,这里是/dev/mapper/rl-root
[root@vm132 ~]# df -Th
Filesystem          Type      Size  Used Avail Use% Mounted on
devtmpfs            devtmpfs  3.8G     0  3.8G   0% /dev
tmpfs               tmpfs     3.8G     0  3.8G   0% /dev/shm
tmpfs               tmpfs     3.8G  8.6M  3.8G   1% /run
tmpfs               tmpfs     3.8G     0  3.8G   0% /sys/fs/cgroup
/dev/mapper/rl-root xfs       180G  3.3G  177G   2% /
/dev/vda1           xfs      1014M  191M  824M  19% /boot
/dev/mapper/rl-home xfs        10G  104M  9.9G   2% /home
tmpfs               tmpfs     777M     0  777M   0% /run/user/0


[root@vm132 ~]# lvextend -l +100%free /dev/mapper/rl-root
  Size of logical volume rl/root changed from 180.00 GiB (46080 extents) to 259.16 GiB (66346 extents).
  Logical volume rl/root successfully resized.

# 扩容,调整分区
[root@vm132 ~]# xfs_growfs /dev/mapper/rl-root
meta-data=/dev/mapper/rl-root    isize=512    agcount=4, agsize=11796480 blks
         =                       sectsz=512   attr=2, projid32bit=1
         =                       crc=1        finobt=1, sparse=1, rmapbt=0
         =                       reflink=1    bigtime=0 inobtcount=0
data     =                       bsize=4096   blocks=47185920, imaxpct=25
         =                       sunit=0      swidth=0 blks
naming   =version 2              bsize=4096   ascii-ci=0, ftype=1
log      =internal log           bsize=4096   blocks=23040, version=2
         =                       sectsz=512   sunit=0 blks, lazy-count=1
realtime =none                   extsz=4096   blocks=0, rtextents=0
data blocks changed from 47185920 to 67938304


[root@vm132 ~]# df -Th
Filesystem          Type      Size  Used Avail Use% Mounted on
devtmpfs            devtmpfs  3.8G     0  3.8G   0% /dev
tmpfs               tmpfs     3.8G     0  3.8G   0% /dev/shm
tmpfs               tmpfs     3.8G  8.6M  3.8G   1% /run
tmpfs               tmpfs     3.8G     0  3.8G   0% /sys/fs/cgroup
/dev/mapper/rl-root xfs       260G  3.9G  256G   2% /
/dev/vda1           xfs      1014M  191M  824M  19% /boot
/dev/mapper/rl-home xfs        10G  104M  9.9G   2% /home
tmpfs               tmpfs     777M     0  777M   0% /run/user/0