module
get-start
module-info.java
module demo {
}
javac src/module-info.java src/com/wp/VarDemo.java

cd ../

java --module-path demo --module demo/com.wp.VarDemo
require
The exports statement is followed by a package name, whereas requires is followed by a module name.
module-info.java
module demo {
    requires java.desktop;
}
package com.wp;


import javax.swing.JOptionPane;
import java.util.ArrayList;

public class VarDemo {

    public static void main(String[] args) {
        var aa = "greeting";

        System.out.println(aa);


        var listAfter10 = new ArrayList();
        listAfter10.add("aa");
        listAfter10.add("bb");
        listAfter10.add("cc");
        System.out.println(listAfter10);

        JOptionPane.showMessageDialog(null, "Hello, Modular World!");

    }

}
export
The exports statement is followed by a package name, whereas requires is followed by a module name
module-info.java
module com.wp.greet {
    exports com.wp.greet;
}
module-info.java
module com.wp.demo {
    requires com.wp.greet;
}
VarDemo
package com.wp.demo;

import com.wp.greet.Greeter;

public class VarDemo {

    public static void main(String[] args) {
        Greeter greeter = Greeter.newInstance();
        System.out.println(greeter.greet("Modular World"));
    }

}
modular JAR
a module can be deployed by placing all its classes in a JAR file, with a module-info.class in the root. Such a JAR file is called a modular JAR
If you use a build tool such as Maven, Ant, or Gradle, just keep building your JAR file as you always do. As long as module-info.class is included, you get a modular JAR.
module-jar-demo
pom.xml
<?xml version="1.0" encoding="UTF-8"?>
<project xmlns="http://maven.apache.org/POM/4.0.0"
         xmlns:xsi="http://www.w3.org/2001/XMLSchema-instance"
         xsi:schemaLocation="http://maven.apache.org/POM/4.0.0 http://maven.apache.org/xsd/maven-4.0.0.xsd">
    <modelVersion>4.0.0</modelVersion>

    <groupId>com.wp</groupId>
    <artifactId>module-jar-demo</artifactId>
    <version>1.0-SNAPSHOT</version>
    <build>
        <plugins>
            <plugin>
                <groupId>org.apache.maven.plugins</groupId>
                <artifactId>maven-compiler-plugin</artifactId>
                <version>3.8.1</version>
                <configuration>
                    <source>11</source>
                    <target>11</target>
                    <release>11</release>
                </configuration>
            </plugin>
            <plugin>
                <groupId>org.apache.maven.plugins</groupId>
                <artifactId>maven-jar-plugin</artifactId>
                <version>3.2.0</version>
            </plugin>
        </plugins>
    </build>

    <dependencies>
        <dependency>
            <groupId>commons-lang</groupId>
            <artifactId>commons-lang</artifactId>
            <version>2.1</version>
        </dependency>

    </dependencies>

</project>
module-info.java
module com.wp.greet {
    exports com.wp.greet;
}
Greeter
package com.wp.greet;

import com.wp.greet.internal.GreeterImpl;

public interface Greeter {
    static Greeter newInstance(){
        return new GreeterImpl();
    }
    String greet(String subject);
}
GreeterImpl
package com.wp.greet.internal;

import com.wp.greet.Greeter;

public class GreeterImpl implements Greeter{

    public String greet(String subject) {
        return "This is from wp,Hello, " + subject + "!";
    }
}
hello-maven
<?xml version="1.0" encoding="UTF-8"?>
<project xmlns="http://maven.apache.org/POM/4.0.0"
         xmlns:xsi="http://www.w3.org/2001/XMLSchema-instance"
         xsi:schemaLocation="http://maven.apache.org/POM/4.0.0 http://maven.apache.org/xsd/maven-4.0.0.xsd">
    <modelVersion>4.0.0</modelVersion>

    <groupId>com.wp</groupId>
    <artifactId>hello-maven</artifactId>
    <version>1.0-SNAPSHOT</version>

    <dependencies>
        <dependency>
            <groupId>com.wp</groupId>
            <artifactId>module-jar-demo</artifactId>
            <version>1.0-SNAPSHOT</version>
        </dependency>

    </dependencies>

    <build>
        <plugins>
            <plugin>
                <groupId>org.apache.maven.plugins</groupId>
                <artifactId>maven-compiler-plugin</artifactId>
                <version>3.8.1</version>
                <configuration>
                    <source>11</source>
                    <target>11</target>
                    <release>11</release>
                </configuration>
            </plugin>
            <plugin>
                <groupId>org.apache.maven.plugins</groupId>
                <artifactId>maven-jar-plugin</artifactId>
                <version>3.2.0</version>
            </plugin>
        </plugins>
    </build>
</project>
module-info.java
module com.wp.hello {
    requires com.wp.greet;
}
package com.wp.hello;

import com.wp.greet.Greeter;

public class HelloTest {

    public static void main(String[] args) {
        Greeter greeter = Greeter.newInstance();
        System.out.println(greeter.greet("zhangsan"));

    }
}
reflective & opens
通过反射,访问另一个module的属性,会报错。
package com.wp.hello;

import com.wp.greet.Country;

import java.lang.reflect.Field;

public class HelloTest {
	// 这个HelloTest,存在于com.wp.hello这个module中
    public static void main(String[] args) throws NoSuchFieldException, IllegalAccessException {
		// 这个Country是另一个module---com.wp.greet中定义的类
        Country country = new Country();
        country.setName("america");
        country.setArea(33);
        Field field = Country.class.getDeclaredField("name");
        field.setAccessible(true);
        Object o = field.get(country);
        System.out.println(o);
    }
}
也就是说,在com.wp.hello这个module中,利用反射,访问com.wp.greet这个module中定义的类,是会报错的。
报错信息如下:
Exception in thread "main" java.lang.reflect.InaccessibleObjectException: Unable to make field private java.lang.String com.wp.greet.Country.name accessible: module com.wp.greet does not "opens com.wp.greet" to module com.wp.hello
解决方式是:
在com.wp.greet这个module的module-info中,原来是将com.wp.greet这个package导出了,现在,再增加一行opens,表示将com.wp.greet这个package,表示com.wp.greet这个package下的类,可以通过反射进行访问。
module com.wp.greet {
    exports com.wp.greet;
    opens com.wp.greet;
}
opens和exports的区别:

exports:限制某些包,在编译期可用,但在运行期不可用
opens:限制某些包,在编译期不可用,但在运行期可用
A module can be declared as open, such as
open module com.wp.greet {
    exports com.wp.greet;
}
automatic module
For migration purposes, you can turn any JAR file into a module simply byplacing it onto a directory in the module path instead of the class path.
A JAR without a module-info.class on the module path is called an automatic module.
An automatic module has the following properties:

1.The module implicitly has a requires clause for all other modules.

2.All of its packages are exported and opened.

3.If there is an entry with key Automatic-Module-Name in the JAR file manifest
META-INF/MANIFEST.MF, its value becomes the module name.

4.Otherwise the module name is obtained from the JAR file name, dropping
any trailing version number and replacing sequences of non-alphanumeric
characters with a dot.
The first two rules imply that the packages in the automatic module act as if
they were on the class path. The reason for using the module path is for the
benefit of other modules, allowing them to express dependencies on this
module.

Suppose, for example, that you are implementing a module that processes
CSV files and uses the Apache Commons CSV library. You would like
to express in your module-info.java file that your module depends on Apache
Commons CSV.

If you add commons-csv-1.5.jar onto the module path, then your modules can
reference the module. Its name is commons.csv since the trailing version number
-1.5 is removed and the non-alphanumeric character - is replaced by a dot.
示例:commons-lang这个jar包,不是一个module jar,那我们怎么把他作为一个module jar来使用呢?
pom.xml中
 <dependencies>

		<!--添加jar包依赖-->
        <dependency>
            <groupId>commons-lang</groupId>
            <artifactId>commons-lang</artifactId>
            <version>2.1</version>
        </dependency>
    </dependencies>
module-info.java
module com.wp.hello {
    requires commons.lang;
}
接下来,就可以在代码中,使用commons-lang这个jar包中的类了,比如这里使用的StringUtils,就来自于commons-lang这个jar包
package com.wp.hello;


import org.apache.commons.lang.StringUtils;

import java.lang.reflect.Field;

public class HelloTest {

    public static void main(String[] args) {


        String s = "aaa";
        boolean blank = StringUtils.isBlank(s);
        System.out.println(blank);

    }
}
unnamed module
所有在类路径下的jar包,都叫做unnamed module
此时,我们对待这些jar包,有2种方式:
-
在module-info中,使用requires jarName,将这个jar转为automatic module,然后,我们就可以使用这个jar包中的类了
-
我们不做任何额外的处理,只是将这个jar放到classPath下,此时这个jar叫做unamed module。那么我们就不能访问这个jar包中的类了
也就是说:
1.named module 不可以访问 unamed module中的类

2.unamed module之间,可以相互访问

3.auomatic module可以访问unamed module中的类
我觉得,引入unamed module,是为了让jdk9能兼容jdk8以前就构建好的jar包,这些jar包之间的相互调用,就被解决了
而,引入auomatic module,是为了让基于jdk9,开始编写代码的人员,如果要使用以前的jar包,那么强制使用requires,来explict module 。这样,就能让module system快速被使用起来。
当然,最终,我们是希望构建一个带有module-info的module jar,也即是named module
Any class that is not on the module path is part of an unnamed module.
Technically, there may be more than one unnamed module, but all of them together act as if they are a single module which is called the unnamed module.
As with automatic modules, the unnamed module can access all other modules, and all of its packages are exported and opened.
However, no explicit module can access the unnamed module. (An explicit module is a module that is neither automatic nor unnamed—that is, a module with a module-info.class on the module path.)
requires transitive &requires static
在 requires 基础之上还附带 transitive 传递规则。它的作用是:若模块 B requires transitive 另一个模块 A,现有另一模块 C requires 模块 B,则它相当于隐式地声明了 requires A。
// Module B -> module-info.java
module B {
    // 传递导入模块 A
    requires transitive A;
}


// Module C -> module-info.java
module C {
    requires B;
    // 由于 B 传递导入了模块 A,因此
    // 模块 C 相当于隐式地声明了:
    // requires A;
}
在上面的例子当中,即使在模块 C 的规则文件中不主动声明 requires A,它也能够直接访问模块 A 开放的 a2 包。如果模块 B 对模块 A 的导入并不是传递性质的,那么模块 C 就必须主动附加上这条声明。
One compelling use of the requires transitive statement is an aggregator module—a
module with no packages and only transitive requirements. One such module
is the java.se module, declared like this:
module java.se
{
requires transitive java.compiler;
requires transitive java.datatransfer;
requires transitive java.desktop;
. . .
requires transitive java.sql;
requires transitive java.sql.rowset;
requires transitive java.xml;
requires transitive java.xml.crypto;
}
A programmer who isn’t interested in fine-grained module dependencies can
simply require java.se and get all modules of the Java SE platform.
Finally, there is an uncommon requires static variant that declares that a module must be present at compile time but is optional at runtime. There are two use cases:
1.To access an annotation that is processed at compile time and declared in a different module.
2.To use a class in a different module if it is available, and otherwise do something else, such as:
try{
    new oracle.jdbc.driver.OracleDriver();
    . . .
}catch (NoClassDefFoundError er){
	Do something else
}
Qualified Exporting and Opening
In this section, you will see a variant of the exports and opens statement that narrows their scope to a specified set of modules. For example, the javafx.base module contains a statement
exports com.sun.javafx.collections to
javafx.controls, javafx.graphics, javafx.fxml, javafx.swing;
Such a statement is called a qualified export. The listed modules can access the package, but other modules cannot.
Similarly, you can restrict the opens statement to specific modules.
provides & uses & SPI
A service has an interface and one or more possible implementations.
Here is a simple example of an interface:
public interface GreeterService
{
    String greet(String subject);
    Locale getLocale();
}
One or more modules provide implementations, such as
public class FrenchGreeter implements GreeterService
{
    public String greet(String subject) { return "Bonjour " + subject; }
    public Locale getLocale() { return Locale.FRENCH; }
}
The service consumer must pick an implementation among all offered implementations, based on whatever criteria it deems appropriate.
ServiceLoader<GreeterService> greeterLoader = ServiceLoader.load(GreeterService.class);
GreeterService chosenGreeter;
for (GreeterService greeter : greeterLoader)
{
    if (. . .)
    {
        chosenGreeter = greeter;
    }
}
In the past, implementations were offered by placing text files into the META-INF/services directory of the JAR file containing the implementation classes.
The module system provides a better approach. Instead of text files, you can add statements to the module descriptors.
A module providing an implementation of a service adds a provides statement that lists the service interface (which may be defined in any module) and the implementing class (which must be a part of this module).
Here is an example from the jdk.security.auth module:
module jdk.security.auth
{
	. . .
    provides javax.security.auth.spi.LoginModule with
    com.sun.security.auth.module.Krb5LoginModule,
    com.sun.security.auth.module.UnixLoginModule,
    com.sun.security.auth.module.JndiLoginModule,
    com.sun.security.auth.module.KeyStoreLoginModule,
    com.sun.security.auth.module.LdapLoginModule,
    com.sun.security.auth.module.NTLoginModule;
}
This is the equivalent of the META-INF/services file.
A consuming module contains a uses statement.
module java.base
{
    . . .
    uses javax.security.auth.spi.LoginModule;
}
When code in a consuming module calls ServiceLoader.load(ServiceInterface.class), the matching provider classes will be loaded, even though they may not be in accessible packages.
In our code example, we provide implementations for a German and French greeter in the package com.horstmann.greetsvc.internal.
The service module exports the com.horstmann.greetsvc package, but not the package with the implementations.
The provides statement declares the service and its implementing classes in the unexported package:
module com.horstmann.greetsvc
{
	exports com.horstmann.greetsvc;

    provides com.horstmann.greetsvc.GreeterService with
        com.horstmann.greetsvc.internal.FrenchGreeter,
        com.horstmann.greetsvc.internal.GermanGreeterFactory;
}
The v2ch09.useservice module consumes the service. Using the ServiceLoader facility, we iterate over the provided services and pick the one matching the desired language:
package com.horstmann.hello;
import java.util.*;
import com.horstmann.greetsvc.*;
public class HelloWorld
{
    public static void main(String[] args)
    {
        ServiceLoader<GreeterService> greeterLoader
        = ServiceLoader.load(GreeterService.class);
        String desiredLanguage = args.length > 0 ? args[0] : "de";

        GreeterService chosenGreeter = null;
        for (GreeterService greeter : greeterLoader)
        {
            if (greeter.getLocale().getLanguage().equals(desiredLanguage))
            chosenGreeter = greeter;
        }
        if (chosenGreeter == null)
        	System.out.println("No suitable greeter.");
        else
        	System.out.println(chosenGreeter.greet("Modular World"));
        }
}
The module declaration requires the service module and declares that the GreeterService is being used.
module v2ch09.useservice
{
    requires com.horstmann.greetsvc;
    uses com.horstmann.greetsvc.GreeterService;
}
jdeps tools analyzes the dependencies
The jdeps tool analyzes the dependencies of a given set of JAR files. Suppose,
for example, that you want to modularize JUnit 4. Run
jdeps -s junit-4.12.jar hamcrest-core-1.3.jar
The -s flag generates a summary output:
hamcrest-core-1.3.jar -> java.base
junit-4.12.jar -> hamcrest-core-1.3.jar
junit-4.12.jar -> java.base
junit-4.12.jar -> java.management
If you omit the -s flag, you get the module summary followed by a mappingfrom packages to required packages and modules.
If you add the -v flag, the listing maps classes to required packages and modules.
The --generate-module-info option produces module-info files for each analyzed module:
jdeps --generate-module-info /tmp/junit junit-4.12.jar hamcrest-core-1.3.jar
实际测试使用:
jdeps -s hello-maven-1.0-SNAPSHOT.jar module-jar-demo-1.0-SNAPSHOT.jar
打破模块封装
refer to : https://www.cnblogs.com/IcanFixIt/p/7144366.html
在此章节中,主要介绍以下内容:
什么是打破模块的封装
如何使用命令行选项将依赖项(添加需要)添加到模块
如何使用–add-exports命令行选项导出模块的未导出包,并使用可执行JAR的MANIFEST.MF文件
如何使用–add-opens命令行选项并使用可执行JAR的MANIFEST.MF文件打开模块的非开放包
如何使用–add-reads命令行选项增加模块的可读性
一. 什么是打破模块的封装
JDK 9的主要目标之一是将类型和资源封装在模块中,并仅导出其他模块要访问其公共类型的软件包。 有时,可能需要打破模块指定的封装,以启用白盒测试或使用不受支持的JDK内部API或类库。
这可以通过在编译时和运行时使用非标准命令行选项来实现。 具有这些选项的另一个原因是向后兼容性。
并不是所有现有的应用程序将完全迁移到JDK 9并将被模块化。 如果这些应用程序需要使用以前是公开的但已经封装在JDK 9中的库提供的JDK API或API,则这些应用程序有一种方法可以继续工作。
二. 命令行选项
模块声明中的三个模块语句(statement)允许模块封装其类型和资源,并让其他模块使用来自第一个模块的封装类型和资源。 这些语句是exports, opens, 和requires。 每个模块语句都有一个命令行选项。
在以下部分详细描述这些选项。
| Module Statement | Command-Line Option | Manifest Attribute |
|---|---|---|
| exports | –add-exports | Add-Exports |
| opens | –add-opens | Add-Opens |
| requires | –add-reads | 无属性可用 |
Tips
您可以在相同的命令行中多次使用--add-exports,--add-opens和--add-reads命令行选项。
1. --add-modules选项
refer to : https://juejin.cn/post/6847902216590721031
不管是编译时,还是运行时,模块系统首先都要确定一个或者多个根模块(root module),然后从这些根模块开始根据模块依赖关系在模块路径中循环找出所有可观察到的模块(observable module),这些可观察到的模块加上类路径下的 jar 文件最终构成了编译时环境和运行时环境。
那么根模块是如何确定的呢?对于运行时而言,如果应用是通过 -m 方式启动的,那么根模块就是 -m 指定的主模块;如果应用是通过传统方式启动的,那么根模块就是所有的 java.* 模块即 JRE(参见图-2)。回到前面的例子,如果不加 --add-modules 参数,那么运行时环境中除了 JRE 就只有 mod1.jar、mod2a.jar、mod2b.jar,没有 mod3、mod4 模块,就会报 java.lang.ClassNotFoundException 异常。
如你所想,–add-modules 参数的作用就是手动指定额外的根模块,这样应用就可以正常运行了。
java -cp mod1.jar:mod2a.jar:mod2b.jar -p mod3.jar:mod4.jar --add-modules mod3,mod4 mod1.EventCenter
Java 9 引入了一系列新的参数用于编译和运行模块,其中最重要的两个参数是 -p 和 -m。
-p 参数指定模块路径,多个模块之间用 “:”(Mac, Linux)或者 “;”(Windows)分隔,同时适用于 javac 命令和 java 命令,用法和Java 8 中的 -cp 非常类似。
-m 参数指定待运行的模块主函数,输入格式为模块名/主函数所在的类名,仅适用于 java 命令。两个参数的基本用法如下:
javac -p <module_path>
java -p <module_path> -m
2. --add-exports选项
模块声明中的exports语句将模块中的包导出到所有或其他模块,因此这些模块可以使用该包中的公共API。 如果程序包未由模块导出,则可以使用-add-exports的命令行选项导出程序包。 其语法如下:
--add-exports <source-module>/<package>=<target-module-list>
这里,<source-module>是将<package>导出到<target-module-list>的模块,它是以逗号分隔的目标模块名称列表。 相当于向<source-module>的声明添加一个限定的exports语句:
module <source-module> {
    exports <package> to <target-module-list>;
    // More statements go here
}
Tips
如果目标模块列表是特殊值ALL-UNNAMED,对于--add-exports选项,模块的包将导出到所有未命名的模块。--add-exports选项可用于javac和java命令。
以下选项将java.base模块中的sun.util.logging包导出到com.jdojo.test和com.jdojo.prime模块:
--add-exports java.base/sun.util.logging=com.jdojo.test,com.jdojo.prime
以下选项将java.base模块中的sun.util.logging包导出到所有未命名的模块:
--add-exports java.base/sun.util.logging=ALL-UNNAMED
3. --add-opens选项
模块声明中的opens语句使模块里面的包对其他模块开放,因此这些模块可以在运行期使用深层反射访问该程序包中的所有成员类型。 如果一个模块的包未打开,可以使用--add-opens命令行选项打开它。 其语法如下:
--add-opens <source-module>/<package>=<target-module-list>
这里,<source-module>是打开<package>到<target-module-list>的模块,它是以逗号分隔的目标模块名称列表。 相当于向<source-module>的声明添加一个限定的opens语句:
module <source-module> {
    opens <package> to <target-module-list>;
    // More statements go here
}
Tips
如果目标模块列表是特殊值ALL-UNNAMED,对于--add-opened选项,模块的软件包对所有未命名的模块开放。--add-opened选项可用于java命令。 在编译时使用javac命令使用此选项会生成警告,但没有影响。
以下选项将java.base模块中的sun.util.logging包对com.jdojo.test和com.jdojo.prime模块开放:
--add-opens java.base/sun.util.logging=com.jdojo.test,com.jdojo.prime
以下选项将java.base模块中的sun.util.logging包对所有未命名的模块开放:
--add-opens java.base/sun.util.logging=ALL-UNNAMED
4.--add-reads 选项
--add-reads选项不是关于打破封装。 相反,它是关于增加模块的可读性。 在测试和调试过程中,即使第一个模块不依赖于第二个模块,模块有时也需要读取另一个模块。 模块声明中的requires语句用于声明当前模块对另一个模块的依赖关系。 可以使用--add-reads命令行选项将可读性边缘从模块添加到另一个模块。 这对于将第一个模块添加requires语句具有相同的效果。 其语法如下:
--add-reads <source-module>=<target-module-list>
<source-module>是其定义被更新以读取<target-module-list>中指定的模块列表的模块,该目标模块名称是以逗号分隔的列表。 相当于将目标模块列表中每个模块的源模块添加一个requires语句:
module <source-module> {
    requires <target-module1>;
    requires <target-module2>;
    // More statements go here
}
Tips
如果目标模块列表是特殊值ALL-UNNAMED,则对于--add-reads选项,源模块读 有未命名的模块。 这是命名模块可以读取未命名模块的唯一方法。 没有可以在命名模块声明中使用的等效模块语句来读取未命名的模块。 此选项在编译时和运行时可用。
以下选项为com.jdojo.common模块添加了一个读取边界,使其读取jdk.accessibility模块:
--add-reads com.jdojo.common=jdk.accessibility
三. 示例1
我们来看一下打破封装的例子。 我使用一个简单的例子。 它的目的是展示可用于打破封装的所有概念和命令行选项。
使用之前创建com.jdojo.intro模块作为第一个模块。 它在com.jdojo.intro包中包含一个Welcome类。 该模块不导出包,所以Welcome类被封装,不能在模块外部访问。 在这个例子中,从另一个模块com.jdojo.intruder调用Welcome类的main()方法。其声明如下所示。
// module-info.java
module com.jdojo.intruder {
    // No module statements
}
下面显示了此模块中TestNonExported类的代码。
// TestNonExported.java
package com.jdojo.intruder;
import com.jdojo.intro.Welcome;
public class TestNonExported {
    public static void main(String[] args) {
        Welcome.main(new String[]{});
    }
}
TestNonExported类只包含一行代码。 它调用Welcome类的静态方法main()传递一个空的String数组。 如果该类被编译并运行,则在运行Welcome类时打印与第3章中相同的消息:
Welcome to the Module System.
Module Name: com.jdojo.intro
编译com.jdojo.intruder模块的代码:
C:\Java9Revealed>javac --module-path com.jdojo.intro\dist
-d com.jdojo.intruder\build\classes
com.jdojo.intruder\src\module-info.java com.jdojo.intruder\src\com\jdojo\intruder\TestNonExported.java
如果收到如下错误:
com.jdojo.intruder\src\com\jdojo\intruder\TestNonExported.java:4: error: package com.jdojo.intro is not visible
import com.jdojo.intro.Welcome;
                ^
  (package com.jdojo.intro is declared in module com.jdojo.intro, but module com.jdojo.intruder does not read it)
1 error
该命令使用--module-path选项将com.jdojo.intro模块包含在模块路径上。 编译时错误指向导入com.jdojo.intro.Welcome类的import语句。 它声明包com.jdojo.intro对于com.jdojo.intruder模块是不可见的。 也就是说,com.jdojo.intro模块不导出包含Welcome类的com.jdojo.intro包。 要解决此错误,需要使用--add-exports命令行选项将com.jdojo.intro模块的com.jdojo.intro包导出到com.jdojo.intruder模块中:
C:\Java9Revealed>javac --module-path com.jdojo.intro\dist
--add-exports com.jdojo.intro/com.jdojo.intro=com.jdojo.intruder
-d com.jdojo.intruder\build\classes
com.jdojo.intruder\src\module-info.java com.jdojo.intruder\src\com\jdojo\intruder\TestNonExported.java
但是仍然报错:
warning: [options] module name in --add-exports option not found: com.jdojo.intro
com.jdojo.intruder\src\com\jdojo\intruder\TestNonExported.java:4: error: package com.jdojo.intro is not visible
import com.jdojo.intro.Welcome;
                ^
  (package com.jdojo.intro is declared in module com.jdojo.intro, but module com.jdojo.intruder does not read it)
1 error
1 warning
这一次,你会得到警告和错误。 错误与以前相同。 该警告消息指出编译器找不到com.jdojo.intro模块。 因为这个模块没有依赖关系,所以即使在模块路径中也没有解决这个模块。 要解决警告,需要使用–add-modules选项将com.jdojo.intro模块添加到默认的根模块中:
C:\Java9Revealed>javac --module-path com.jdojo.intro\dist
--add-modules com.jdojo.intro
--add-exports com.jdojo.intro/com.jdojo.intro=com.jdojo.intruder
-d com.jdojo.intruder\build\classes
com.jdojo.intruder\src\module-info.java
com.jdojo.intruder\src\com\jdojo\intruder\TestNonExported.java
即使com.jdojo.intruder模块未读取com.jdojo.intro模块,此javac命令仍然成功。 这似乎是一个错误。 如果它不是一个bug,那么没有找到支持这种行为的文档。 稍后,将看到java命令将不适用于相同的模块。 如果此命令出错,并显示一条消息,表示TestNonExported类无法访问Welcome类,请添加以下选项来修复它:
--add-reads com.jdojo.intruder=com.jdojo.intro
尝试使用以下命令重新运行TestNonExported类,该命令包括模块路径上的com.jdojo.intruder模块:
C:\Java9Revealed>java --module-path com.jdojo.intro\dist;com.jdojo.intruder\build\classes
--add-modules com.jdojo.intro
--add-exports com.jdojo.intro/com.jdojo.intro=com.jdojo.intruder
--module com.jdojo.intruder/com.jdojo.intruder.TestNonExported
但是会报出以下错误信息:
Exception in thread "main" java.lang.IllegalAccessError: class com.jdojo.intruder.TestNonExported (in module com.jdojo.intruder) cannot access class com.jdojo.intro.Welcome (in module com.jdojo.intro) because module com.jdojo.intruder does not read module com.jdojo.intro
        at com.jdojo.intruder/com.jdojo.intruder.TestNonExported.main(TestNonExported.java:8)
错误信息已经很清晰。 它声明com.jdojo.intruder模块必须读取com.jdojo.intro模块,以便前者使用后者的Welcome类。 可以使用--add-reads选项来修复错误,该选项将在com.jdojo.intruder模块中添加一个读取边界(等同于requires语句)以读取com.jdojo.intro模块。 以下命令执行此操作:
C:\Java9Revealed>java --module-path com.jdojo.intro\dist;com.jdojo.intruder\build\classes
--add-modules com.jdojo.intro
--add-exports com.jdojo.intro/com.jdojo.intro=com.jdojo.intruder
--add-reads com.jdojo.intruder=com.jdojo.intro
--module com.jdojo.intruder/com.jdojo.intruder.TestNonExported
输出结果为:
Welcome to the Module System.
Module Name: com.jdojo.intro
这一次,你会收到所期望的输出。 下图显示了运行此命令时创建的模块图。
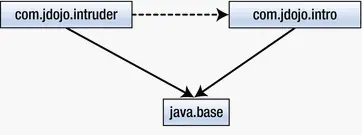
com.jdojo.intruder和com.jdojo.intro模块都是根模块。 com.jdojo.intruder模块被添加到默认的根模块中,因为正在运行的主类在此模块中。 com.jdojo.intro模块通过--add-modules选项添加到默认的根模块集中。 通过--add-reads选项从com.jdojo.intruder模块将一个读取边界添加到com.jdojo.intro模块。 模块图中,使用虚线显示了从前者到后者的读取,以便在构建模块图之后作为--add-reads选项的结果添加它。 使用此命令使用-Xdiag:resolver选项来查看模块的解决方法。
四. 示例2
来看看另一个例子,它将展示如何使用--add-opens命令行选项打开一个包到另一个模块。 在第4章中,有一个com.jdojo.address模块,其中包含com.jdojo.address包中的Address类。 该模块导出com.jdojo.address包。 该类包含一个名为line1的私有字段, 有一个public getLine1()方法返回line1字段的值。
如下代码所示,TestNonOpen类尝试加载Address类,创建类的实例,并访问其公共和私有成员。 TestNonOpen类是com.jdojo.intruder模块的成员。 在main()方法的throws子句中添加了一些异常,以保持逻辑简单。 在实际的程序中,在try-catch块中处理它们。
// TestNonOpen.java
package com.jdojo.intruder;
import java.lang.reflect.Constructor;
import java.lang.reflect.Field;
import java.lang.reflect.InvocationTargetException;
import java.lang.reflect.Method;
public class TestNonOpen {
    public static void main(String[] args)
            throws IllegalAccessException, IllegalArgumentException,
            NoSuchMethodException, ClassNotFoundException,
            InvocationTargetException, InstantiationException,
            NoSuchFieldException {
        String className = "com.jdojo.address.Address";
        // Get the class reference
		Class cls = Class.forName(className);
        // Get the no-args constructor
        Constructor constructor = cls.getConstructor();
        // Create an Object of the Address class
        Object address = constructor.newInstance();
        // Call the getLine1() method to get the line1 value
        Method getLine1Ref = cls.getMethod("getLine1");
        String line1 = (String)getLine1Ref.invoke(address);
        System.out.println("Using method reference, Line1: " + line1);
        // Use the private line1 instance variable to read its value
        Field line1Field = cls.getDeclaredField("line1");
        line1Field.setAccessible(true);
        String line11 = (String)line1Field.get(address);
        System.out.println("Using private field reference, Line1: " + line11);
    }
}
使用以下命令编译TestNonOpen类:
C:Java9revealed> javac -d com.jdojo.intruder\build\classes
com.jdojo.intruder\src\com\jdojo\intruder\TestNonOpen.java
TestNonOpen类编译正常。 请注意,它使用深层反射访问Address类,编译器不知道此类不允许读取Address类及其私有字段。 现在尝试运行TestNonOpen类:
C:Java9revealed> java --module-path com.jdojo.address\dist;com.jdojo.intruder\build\classes
--add-modules com.jdojo.address
--module com.jdojo.intruder/com.jdojo.intruder.TestNonOpen
会出现以下错误信息:
Using method reference, Line 1: 1111 Main Blvd.
Exception in thread "main" java.lang.reflect.InaccessibleObjectException: Unable to make field private java.lang.String com.jdojo.address.Address.line1 accessible: module com.jdojo.address does not "opens com.jdojo.address" to module com.jdojo.intruder
        at java.base/java.lang.reflect.AccessibleObject.checkCanSetAccessible(AccessibleObject.java:207)
        at java.base/java.lang.reflect.Field.checkCanSetAccessible(Field.java:171)
        at java.base/java.lang.reflect.Field.setAccessible(Field.java:165)
        at com.jdojo.intruder/com.jdojo.intruder.TestNonOpen.main(TestNonOpen.java:35)
使用--add-modules选项将com.jdojo.address模块添加到默认的根模块中。 即使com.jdojo.intruder模块没有读取com.jdojo.address模块,也可以实例化Address类。 有两个原因:
- com.jdojo.address模块导出包含
Address类的com.jdojo.address包。 因此,其他模块可访问Address类,只要其他模块读取com.jdojo.address模块即可。 - Java 反射 API假定所有反射操作都是可读性的。 该规则假设com.jdojo.intruder模块读取com.jdojo.address模块,即使在其模块声明中,com.jdojo.intruder模块未读取com.jdojo.address模块。 如果要在编译时使用com.jdojo.address包中的类型,例如,声明
Address类类型的变量,则com.jdojo.intruder模块必须在它声明或命令行中读取com.jdojo.address模块。
输出显示TestNonOpen类能够调用Address类的public getLine1()方法。 但是,当它尝试访问私有line1字段时,抛出异常。 回想一下,如果模块导出了类型,其他模块可以使用反射来访问该类型的公共成员。 对于其他模块访问类型的私有成员,包含该类型的包必须是打开的。 com.jdojo.address包未打开。 因此,com.jdojo.intruder模块无法访问Address类的私有line1字段。 为此,可以使用--add-opens选项将com.jdojo.address包打开到com.jdojo.intruder模块中:
C:Java9revealed> java --module-path com.jdojo.address\dist;com.jdojo.intruder\build\classes
--add-modules com.jdojo.address
--add-opens com.jdojo.address/com.jdojo.address=com.jdojo.intruder
--module com.jdojo.intruder/com.jdojo.intruder.TestNonOpen
输出结果为:
Using method reference, Line1: 1111 Main Blvd.
Using private field reference, Line1: 1111 Main Blvd.
现在是时候使用--permit-illegal-access选项了。 我们试试从类路径运行TestNonOpen类,如下所示:
C:\Java9Revealed>java --module-path com.jdojo.address\dist
--class-path com.jdojo.intruder\build\classes
--add-modules com.jdojo.address com.jdojo.intruder.TestNonOpen
输出结果为:
Using method reference, Line1: 1111 Main Blvd.
Exception in thread "main" java.lang.reflect.InaccessibleObjectException: Unable to make field private java.lang.String com.jdojo.address.Address.line1 accessible: module com.jdojo.address does not "opens com.jdojo.address" to unnamed module @9f70c54
        at java.base/java.lang.reflect.AccessibleObject.checkCanSetAccessible(AccessibleObject.java:337)
        at java.base/java.lang.reflect.AccessibleObject.checkCanSetAccessible(AccessibleObject.java:281)
        at java.base/java.lang.reflect.Field.checkCanSetAccessible(Field.java:175)
        at java.base/java.lang.reflect.Field.setAccessible(Field.java:169)
        at com.jdojo.intruder.TestNonOpen.main(TestNonOpen.java:34)
从输出可以看出,由于它位于类路径上,加载到未命名模块中的TestNonOpen类能够在com.jdojo.address模块中读取导出的类型及其公共方法。 但是,它无法访问私有实例变量。 可以使用--permit-illegal-access选项修复此问题,如下所示:
C:\Java9Revealed>java --module-path com.jdojo.address\dist
--class-path com.jdojo.intruder\build\classes
--add-modules com.jdojo.address
--permit-illegal-access com.jdojo.intruder.TestNonOpen
输出结果为:
WARNING: --permit-illegal-access will be removed in the next major release
Using method reference, Line1: 1111 Main Blvd.
WARNING: Illegal access by com.jdojo.intruder.TestNonOpen (file:/C:/Java9Revealed/com.jdojo.intruder/build/classes/) to field com.jdojo.address.Address.line1 (permitted by --permit-illegal-access)
Using private field reference, Line1: 1111 Main Blvd.
请注意,由于--permit-illegal-access选项的警告和TestNonOpen类的消息的都会混合在输出中。
Tips
--permit-illegal-access选项在JDK 9中可用,并将在JDK 10中删除。使用此选项会在标准错误流上打印警告。 一个警告打印一个消息,规定此选项将在将来的版本中被删除。 其他警告报告了授予非法访问的代码的详细信息,授予非法访问的代码以及授予访问权限的选项。
五. 总结
JDK 9的主要目标之一是将类型和资源封装在模块中,并仅导出其他模块要访问其公共类型的软件包。 有时,可能需要打破模块指定的封装,以启用白盒测试或使用不受支持的JDK内部API或库。
这可以通过在编译时和运行时使用非标准命令行选项来实现。 具有这些选项的另一个原因是向后兼容性。
JDK 9提供了两个命令行选项--add-exports和-add-opened,可以在模块声明中定义封装。
--add-exports选项允许在模块中将未导出的包导出到编译时和运行时的其他模块。
--add-opened选项允许在模块中打开一个非开放的软件包到其他模块,以便在运行时进行深度反射。
这些选项的值为/=,其中<source-module>是导出或打开<package>到<target-module-list>,它是以逗号分隔的目标模块名称列表。 可以使用ALL-UNNAMED作为将所有未命名模块导出或打开的目标模块列表的特殊值。
有两个名为Add-Exports和Add-Opens的新属性可用于可执行JAR的manifest 文件的主要部分。
使用这些属性的效果与使用类似命名的命令行选项相同,只是这些属性将指定的包导出或打开到所有未命名的模块。
这些属性的值是以空格分隔的斜体分隔的module-name/package-name对列表。 例如,可执行JAR的manifest文件的主要部分中的Add-Opens:java.base/java.lang条目将为java.base模块中的所有未命名模块打开java.lang包。
在测试和调试过程中,有时需要一个模块读取另一个模块,其中第一个模块在其声明中不使用requires语句来读取第二个模块。
这可以使用--add-reads命令行选项来实现,该选项的值以<source-module>=<target-module-list>的形式指定。<source-module>是其定义被更新以读取在<target-module-list>中指定的模块列表的模块,该模块是目标模块名称的逗号分隔列表。
目标模块列表的ALL-UNNAMED的特殊值使得源模块读取所有未命名的模块。
Maven
如果使用Jdk11,那么Maven选择3.6.3,maven-compiler-plugin使用3.9.0
其中,针对maven-compiler-plugin插件,在打破模块封装时,可以采用以下方式:
<build>
    <plugins>
      <plugin>
        <artifactId>maven-compiler-plugin</artifactId>
        <version>3.9.0</version>
        <configuration>
          <source>11</source>
          <target>11</target>
          <encoding>${project.build.sourceEncoding}</encoding>
          <forceJavacCompilerUse>true</forceJavacCompilerUse>
          <showWarnings>true</showWarnings>
          <compilerArgs>
            <arg>--add-exports=jdk.compiler/com.sun.tools.javac.api=ALL-UNNAMED</arg>
            <arg>--add-exports=jdk.compiler/com.sun.tools.javac.code=ALL-UNNAMED</arg>
            <arg>--add-exports=jdk.compiler/com.sun.tools.javac.comp=ALL-UNNAMED</arg>
            <arg>--add-exports=jdk.compiler/com.sun.tools.javac.file=ALL-UNNAMED</arg>
            <arg>--add-exports=jdk.compiler/com.sun.tools.javac.main=ALL-UNNAMED</arg>
            <arg>--add-exports=jdk.compiler/com.sun.tools.javac.model=ALL-UNNAMED</arg>
            <arg>--add-exports=jdk.compiler/com.sun.tools.javac.parser=ALL-UNNAMED</arg>
            <arg>--add-exports=jdk.compiler/com.sun.tools.javac.processing=ALL-UNNAMED</arg>
            <arg>--add-exports=jdk.compiler/com.sun.tools.javac.tree=ALL-UNNAMED</arg>
            <arg>--add-exports=jdk.compiler/com.sun.tools.javac.util=ALL-UNNAMED</arg>
          </compilerArgs>
或者:
<plugin>
    <groupId>org.apache.maven.plugins</groupId>
    <artifactId>maven-compiler-plugin</artifactId>
    <version>3.8.0</version>
    <configuration>
        <source>9</source>
        <target>9</target>
        <compilerArgs>
            <arg>--add-modules</arg>
            <arg>java.xml.bind</arg>
        </compilerArgs>
    </configuration>
</plugin>
或者:
<plugin>
                <groupId>org.apache.maven.plugins</groupId>
                <artifactId>maven-compiler-plugin</artifactId>
                <version>3.8.0</version>
                <configuration>
                    <release>11</release>
                    <compilerArgs>--add-opens java.base/jdk.internal.reflect=ALL-UNNAMED --add-exports java.base/jdk.internal.reflect=ALL-UNNAMED --add-exports java.base/jdk.internal.misc=ALL-UNNAMED</compilerArgs>
                </configuration>
            </plugin>
Module & Package的关系
Jar中有很多package,package中,还可以内嵌另一个package。
一般来说,每一个Jar,对应一个Module,而Module中可以包含很多package。
而在module-info.java文件中,export指令,后面跟的其实是package path,而不是module path。
这个要注意,示例如下:
module-info.java:
   module com.jshxhb.iot2manage {
    exports com.jshxhb.iot2manage.controller;
    exports com.jshxhb.iot2manage.service.impl;

    opens com.jshxhb.iot2manage;
    opens com.jshxhb.iot2manage.controller;

    requires spring.web;
    requires spring.boot.autoconfigure;
    requires spring.boot;
    requires spring.context;
    requires spring.core;
    requires spring.beans;

}
可以看到,controller 和 service层,需要写2个exports语句。