boot 整合quartz
特点
-
支持分布式高可用,我们需要某个定时任务在多个节点中只有某个节点可以执行时,就需要Quartz来实现,否则使用@Scheduled等方式会造成所有节点都执行一遍。
-
支持持久化,Quartz有专门的数据表来实现定时任务的持久化。
-
支持多任务调度和管理,Quartz可以在数据库中存储多个定时任务进行作业调度,可以实现定时任务的增删改查等管理。
pom.xml
<?xml version="1.0" encoding="UTF-8"?>
<project xmlns="http://maven.apache.org/POM/4.0.0" xmlns:xsi="http://www.w3.org/2001/XMLSchema-instance"
         xsi:schemaLocation="http://maven.apache.org/POM/4.0.0 https://maven.apache.org/xsd/maven-4.0.0.xsd">
    <modelVersion>4.0.0</modelVersion>
    <parent>
        <groupId>org.springframework.boot</groupId>
        <artifactId>spring-boot-starter-parent</artifactId>
        <version>2.5.14</version>
        <relativePath/> <!-- lookup parent from repository -->
    </parent>
    <groupId>com.wp</groupId>
    <artifactId>quartz-simple-demo</artifactId>
    <version>0.0.1-SNAPSHOT</version>
    <name>quartz-simple-demo</name>
    <description>quartz-simple-demo</description>
    <properties>
        <java.version>1.8</java.version>
    </properties>
    <dependencies>

        <!-- 引入 Quartz 依赖-->
        <dependency>
            <groupId>org.springframework.boot</groupId>
            <artifactId>spring-boot-starter-quartz</artifactId>
        </dependency>
        <dependency>
            <groupId>org.springframework.boot</groupId>
            <artifactId>spring-boot-starter-web</artifactId>
        </dependency>

        <dependency>
            <groupId>org.springframework.boot</groupId>
            <artifactId>spring-boot-starter-test</artifactId>
            <scope>test</scope>
        </dependency>
    </dependencies>

    <build>
        <plugins>
            <plugin>
                <groupId>org.springframework.boot</groupId>
                <artifactId>spring-boot-maven-plugin</artifactId>
            </plugin>
        </plugins>
    </build>

</project>
// 这里,不需要添加任何注解,不需要@Component类似的注解
public class ClearDataTask extends QuartzJobBean {
    @Override
    protected void executeInternal(JobExecutionContext context) throws JobExecutionException {

        System.out.println("-----ClearDataTask start-------");

        try {
            TimeUnit.SECONDS.sleep(2);
        } catch (InterruptedException e) {
            e.printStackTrace();
        }

        System.out.println("-----ClearDataTask end-------");

    }
}
任务的SimpleTrigger
package com.wp.quartzsimpledemo.config;

import com.wp.quartzsimpledemo.task.ClearDataTask;
import org.quartz.*;
import org.springframework.context.annotation.Bean;
import org.springframework.context.annotation.Configuration;

@Configuration
public class WpQuartzConfiguration {

    @Bean
    public JobDetail jobDetail(){
        JobDetail jobDetail = JobBuilder.newJob(ClearDataTask.class).withIdentity("clear-data-task", "clear-group")
                .storeDurably()
//                .requestRecovery();
                .usingJobData("city", "nanjing")
                .withDescription("清除数据")
                .build();
        return jobDetail;
    }

    @Bean
    public Trigger trigger(){
        SimpleTrigger simpleTrigger = TriggerBuilder.newTrigger()
                .withIdentity("clear-data-trigger", "clear-group")
                .forJob(jobDetail()) // 绑定工作任务
                .startNow()
                .withSchedule(SimpleScheduleBuilder.simpleSchedule()
                        .withIntervalInSeconds(5).repeatForever())
                .build();
        return simpleTrigger;
    }


}
这个地方注意下,启动时,会报错:nested exception is org.quartz.SchedulerException: Jobs added with no trigger must be durable.
原因是:没有trigger 指向的job,默认情况下,应该自动删除的。
但是在项目启动时,先实例化jobDetail ,再实例化trigger。所以,jobDetail 在实例化时,trigger还没有实例化,那么就没有trigger 指向的job了,所以会报这个错。
解决方式:
将jobDetail 设置为存储持久化,表示,即使没有trigger指向这个job,这个job仍然保留,不会被删除
任务的CronTrigger
package com.wp.quartzsimpledemo.config;

import com.wp.quartzsimpledemo.task.ClearDataTask;
import org.quartz.*;
import org.springframework.context.annotation.Bean;
import org.springframework.context.annotation.Configuration;

@Configuration
public class WpQuartzConfiguration {

    @Bean
    public JobDetail jobDetail(){
        JobDetail jobDetail = JobBuilder.newJob(ClearDataTask.class).withIdentity("clear-data-task", "clear-group")
                .storeDurably()
//                .requestRecovery();
                .usingJobData("city", "nanjing")
                .withDescription("清除数据")
                .build();
        return jobDetail;
    }

    @Bean
    public Trigger trigger(){
        CronTrigger cronTrigger = TriggerBuilder.newTrigger()
                .withIdentity("clear-data-trigger", "clear-group")
                .forJob(jobDetail()) // 绑定工作任务
                .startNow()
                .withSchedule(CronScheduleBuilder.cronSchedule("0/5 * * * * ?"))
                .build();
        return cronTrigger;
    }
}
任务的Concurrency
假设说,一个任务执行,耗时是10s,但是我们给任务设定的是,每隔5秒就执行一次。
那么就很有可能出现:任务实例1 还没有执行完成,任务实例2就开始执行了,也就是说,会导致 多个 任务实例并发执行。
为了避免这种情况,这里介绍了一个注解@DisallowConcurrentExecution
package com.wp.quartzsimpledemo.task;

import org.quartz.DisallowConcurrentExecution;
import org.quartz.JobExecutionContext;
import org.quartz.JobExecutionException;
import org.springframework.scheduling.quartz.QuartzJobBean;

import java.util.concurrent.TimeUnit;

/**
 * @DisallowConcurrentExecution is an annotation that can be added to the Job class that
 * tells Quartz not to execute multiple instances of a given job definition (that refers to the given job class) concurrently.
 *
 * 也就是说,有了这个DisallowConcurrentExecution注解,如果当前这个job没有执行完成,即使到了下一次触发时间了,也会被推迟,推迟到当前job执行完成
 */
@DisallowConcurrentExecution
// 这里,不需要添加任何注解,不需要@Component类似的注解
public class ClearDataTask extends QuartzJobBean {
    @Override
    protected void executeInternal(JobExecutionContext context) throws JobExecutionException {

        System.out.println("-----ClearDataTask start-------");

        try {
            TimeUnit.SECONDS.sleep(10);
        } catch (InterruptedException e) {
            e.printStackTrace();
        }

        System.out.println("-----ClearDataTask end-------");

    }
}
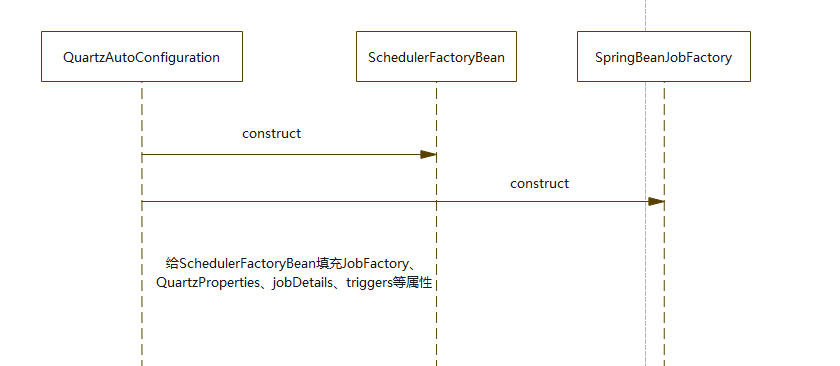
自动配置—QuartzAutoConfiguration
SpringBoot 和 Quartz,整合,是通过QuartzAutoConfiguration这个自动配置类,实现的。
SchedulerFactoryBean
在这个配置类中,首先,创建了一个SchedulerFactoryBean,顾名思义,这个SchedulerFactoryBean是一个FactoryBean,用于创建org.quartz.Scheduler实例的。
我们首先看下SchedulerFactoryBean的afterPropertiesSet方法:
@Override
	public void afterPropertiesSet() throws Exception {
		if (this.dataSource == null && this.nonTransactionalDataSource != null) {
			this.dataSource = this.nonTransactionalDataSource;
		}

		if (this.applicationContext != null && this.resourceLoader == null) {
			this.resourceLoader = this.applicationContext;
		}

         // 注意:在这里创建了org.quartz.Scheduler实例
		// Initialize the Scheduler instance...
		this.scheduler = prepareScheduler(prepareSchedulerFactory());
		try {
			registerListeners();
			registerJobsAndTriggers();
		}
		catch (Exception ex) {
			try {
				this.scheduler.shutdown(true);
			}
			catch (Exception ex2) {
				logger.debug("Scheduler shutdown exception after registration failure", ex2);
			}
			throw ex;
		}
	}
也就是说,在SchedulerFactoryBean的afterPropertiesSet方法中,创建了一个org.quartz.Scheduler实例。
接下来,我们再看下SchedulerFactoryBean的getObject方法:
@Override
	@Nullable
	public Scheduler getObject() {
		return this.scheduler;
	}
getObject方法中,返回的就是刚刚的org.quartz.Scheduler实例。
接下来,我们再看看,在创建SchedulerFactoryBean时,指定了哪些属性
@Bean
	@ConditionalOnMissingBean
	public SchedulerFactoryBean quartzScheduler(QuartzProperties properties,
			ObjectProvider<SchedulerFactoryBeanCustomizer> customizers, ObjectProvider<JobDetail> jobDetails,
			Map<String, Calendar> calendars, ObjectProvider<Trigger> triggers, ApplicationContext applicationContext) {
		SchedulerFactoryBean schedulerFactoryBean = new SchedulerFactoryBean();
		SpringBeanJobFactory jobFactory = new SpringBeanJobFactory();
		jobFactory.setApplicationContext(applicationContext);
		schedulerFactoryBean.setJobFactory(jobFactory);
		if (properties.getSchedulerName() != null) {
			schedulerFactoryBean.setSchedulerName(properties.getSchedulerName());
		}
		schedulerFactoryBean.setAutoStartup(properties.isAutoStartup());
		schedulerFactoryBean.setStartupDelay((int) properties.getStartupDelay().getSeconds());
		schedulerFactoryBean.setWaitForJobsToCompleteOnShutdown(properties.isWaitForJobsToCompleteOnShutdown());
		schedulerFactoryBean.setOverwriteExistingJobs(properties.isOverwriteExistingJobs());
		if (!properties.getProperties().isEmpty()) {
			schedulerFactoryBean.setQuartzProperties(asProperties(properties.getProperties()));
		}
		schedulerFactoryBean.setJobDetails(jobDetails.orderedStream().toArray(JobDetail[]::new));
		schedulerFactoryBean.setCalendars(calendars);
		schedulerFactoryBean.setTriggers(triggers.orderedStream().toArray(Trigger[]::new));
		customizers.orderedStream().forEach((customizer) -> customizer.customize(schedulerFactoryBean));
		return schedulerFactoryBean;
	}
指定了以下几个属性:
- jobFactory
- schedulerName
- autoStartup
- startupDelay
- quartzProperties
- jobDetails
- Calendars
- triggers
- SchedulerFactoryBeanCustomizer
QuartzProperties—配置项
@ConfigurationProperties("spring.quartz")
public class QuartzProperties {
JobDataMap—多个job Instance 传递数据
首先,查看数据,demo如下:
 @Bean
    public JobDetail jobDetail(){
        JobDetail jobDetail = JobBuilder.newJob(ClearDataTask.class).withIdentity("clear-data-task", "clear-group")
                .storeDurably()
//                .requestRecovery();
                .usingJobData("city", "nanjing")
                .withDescription("清除数据")
                .build();
        return jobDetail;
    }


-------------------------------


public class ClearDataTask extends QuartzJobBean {
    @Override
    protected void executeInternal(JobExecutionContext context) throws JobExecutionException {

        System.out.println("-----ClearDataTask start-------");

        try {
            // 这个是获取jobDataMap,从而可以在多个job instance之间共享数据
            JobDataMap jobDataMap = context.getJobDetail().getJobDataMap();
            String city = jobDataMap.getString("city");
            System.out.println("city:"+city);

            TimeUnit.SECONDS.sleep(3);
        } catch (InterruptedException e) {
            e.printStackTrace();
        }

        System.out.println("-----ClearDataTask end-------");

    }
}
接下来,我们再看下,设置数据,demo如下:
Quartz,每次执行job,job永远是全新的对象。默认情况下,job是无状态的(statefulness),因此JobDetail的JobDataMap也是全新的。
如果想实现,多个job之间,传递数据,即JobDetail的JobDataMap,变成一个共享一个对象,那么需要一个注解@PersistJobDataAfterExecution
@PersistJobDataAfterExecution is an annotation that can be added to the Job class that tells Quartz to update the stored copy of the JobDetail’s JobDataMap after the execute() method completes successfully (without throwing an exception), such that the next execution of the same job (JobDetail) receives the updated values rather than the originally stored values. Like the @DisallowConcurrentExecution annotation, this applies to a job definition instance, not a job class instance, though it was decided to have the job class carry the attribute because it does often make a difference to how the class is coded (e.g. the ‘statefulness’ will need to be explicitly ‘understood’ by the code within the execute method).
下面看下具体的demo
package com.wp.quartzsimpledemo.task;

import org.quartz.*;
import org.springframework.scheduling.quartz.QuartzJobBean;

import java.util.concurrent.TimeUnit;


/**
 * @DisallowConcurrentExecution is an annotation that can be added to the Job class that
 * tells Quartz not to execute multiple instances of a given job definition (that refers to the given job class) concurrently.
 *
 * 也就是说,有了这个DisallowConcurrentExecution注解,如果当前这个job没有执行完成,即使到了下一次触发时间了,也会被推迟,推迟到当前job执行完成
 */
@DisallowConcurrentExecution
@PersistJobDataAfterExecution
// 这里,不需要添加任何注解,不需要@Component类似的注解
public class ClearDataTask extends QuartzJobBean {
    @Override
    protected void executeInternal(JobExecutionContext context) throws JobExecutionException {

        System.out.println("-----ClearDataTask start-------");

        try {
            // 这个是获取jobDataMap,从而可以在多个job instance之间共享数据
            JobDataMap jobDataMap = context.getJobDetail().getJobDataMap();
            int  recurCount = 0;
            if (jobDataMap.containsKey("recurCount")) {
                recurCount = jobDataMap.getIntegerFromString("recurCount");
            }
            System.out.println("recurCount:"+recurCount);
            recurCount++;
            jobDataMap.putAsString("recurCount", recurCount);


            TimeUnit.SECONDS.sleep(3);
        } catch (InterruptedException e) {
            e.printStackTrace();
        }

        System.out.println("-----ClearDataTask end-------");

    }
}
可以看到,上面的类,添加了@PersistJobDataAfterExecution注解。
JdbcStore
需要先建表,建表语句存在哪里呢?
其实很简单,我们通过idea打开quartz-xxx.jar,按照以下路径,就能找到建表的sql了
/org/quartz/impl/jdbcjobstore/tables_mysql_innodb.sql
tables_mysql_innodb.sql的具体内容如下:
#
# In your Quartz properties file, you'll need to set
# org.quartz.jobStore.driverDelegateClass = org.quartz.impl.jdbcjobstore.StdJDBCDelegate
#
#
# By: Ron Cordell - roncordell
#  I didn't see this anywhere, so I thought I'd post it here. This is the script from Quartz to create the tables in a MySQL database, modified to use INNODB instead of MYISAM.

DROP TABLE IF EXISTS QRTZ_FIRED_TRIGGERS;
DROP TABLE IF EXISTS QRTZ_PAUSED_TRIGGER_GRPS;
DROP TABLE IF EXISTS QRTZ_SCHEDULER_STATE;
DROP TABLE IF EXISTS QRTZ_LOCKS;
DROP TABLE IF EXISTS QRTZ_SIMPLE_TRIGGERS;
DROP TABLE IF EXISTS QRTZ_SIMPROP_TRIGGERS;
DROP TABLE IF EXISTS QRTZ_CRON_TRIGGERS;
DROP TABLE IF EXISTS QRTZ_BLOB_TRIGGERS;
DROP TABLE IF EXISTS QRTZ_TRIGGERS;
DROP TABLE IF EXISTS QRTZ_JOB_DETAILS;
DROP TABLE IF EXISTS QRTZ_CALENDARS;

CREATE TABLE QRTZ_JOB_DETAILS(
SCHED_NAME VARCHAR(120) NOT NULL,
JOB_NAME VARCHAR(190) NOT NULL,
JOB_GROUP VARCHAR(190) NOT NULL,
DESCRIPTION VARCHAR(250) NULL,
JOB_CLASS_NAME VARCHAR(250) NOT NULL,
IS_DURABLE VARCHAR(1) NOT NULL,
IS_NONCONCURRENT VARCHAR(1) NOT NULL,
IS_UPDATE_DATA VARCHAR(1) NOT NULL,
REQUESTS_RECOVERY VARCHAR(1) NOT NULL,
JOB_DATA BLOB NULL,
PRIMARY KEY (SCHED_NAME,JOB_NAME,JOB_GROUP))
ENGINE=InnoDB;

CREATE TABLE QRTZ_TRIGGERS (
SCHED_NAME VARCHAR(120) NOT NULL,
TRIGGER_NAME VARCHAR(190) NOT NULL,
TRIGGER_GROUP VARCHAR(190) NOT NULL,
JOB_NAME VARCHAR(190) NOT NULL,
JOB_GROUP VARCHAR(190) NOT NULL,
DESCRIPTION VARCHAR(250) NULL,
NEXT_FIRE_TIME BIGINT(13) NULL,
PREV_FIRE_TIME BIGINT(13) NULL,
PRIORITY INTEGER NULL,
TRIGGER_STATE VARCHAR(16) NOT NULL,
TRIGGER_TYPE VARCHAR(8) NOT NULL,
START_TIME BIGINT(13) NOT NULL,
END_TIME BIGINT(13) NULL,
CALENDAR_NAME VARCHAR(190) NULL,
MISFIRE_INSTR SMALLINT(2) NULL,
JOB_DATA BLOB NULL,
PRIMARY KEY (SCHED_NAME,TRIGGER_NAME,TRIGGER_GROUP),
FOREIGN KEY (SCHED_NAME,JOB_NAME,JOB_GROUP)
REFERENCES QRTZ_JOB_DETAILS(SCHED_NAME,JOB_NAME,JOB_GROUP))
ENGINE=InnoDB;

CREATE TABLE QRTZ_SIMPLE_TRIGGERS (
SCHED_NAME VARCHAR(120) NOT NULL,
TRIGGER_NAME VARCHAR(190) NOT NULL,
TRIGGER_GROUP VARCHAR(190) NOT NULL,
REPEAT_COUNT BIGINT(7) NOT NULL,
REPEAT_INTERVAL BIGINT(12) NOT NULL,
TIMES_TRIGGERED BIGINT(10) NOT NULL,
PRIMARY KEY (SCHED_NAME,TRIGGER_NAME,TRIGGER_GROUP),
FOREIGN KEY (SCHED_NAME,TRIGGER_NAME,TRIGGER_GROUP)
REFERENCES QRTZ_TRIGGERS(SCHED_NAME,TRIGGER_NAME,TRIGGER_GROUP))
ENGINE=InnoDB;

CREATE TABLE QRTZ_CRON_TRIGGERS (
SCHED_NAME VARCHAR(120) NOT NULL,
TRIGGER_NAME VARCHAR(190) NOT NULL,
TRIGGER_GROUP VARCHAR(190) NOT NULL,
CRON_EXPRESSION VARCHAR(120) NOT NULL,
TIME_ZONE_ID VARCHAR(80),
PRIMARY KEY (SCHED_NAME,TRIGGER_NAME,TRIGGER_GROUP),
FOREIGN KEY (SCHED_NAME,TRIGGER_NAME,TRIGGER_GROUP)
REFERENCES QRTZ_TRIGGERS(SCHED_NAME,TRIGGER_NAME,TRIGGER_GROUP))
ENGINE=InnoDB;

CREATE TABLE QRTZ_SIMPROP_TRIGGERS
  (
    SCHED_NAME VARCHAR(120) NOT NULL,
    TRIGGER_NAME VARCHAR(190) NOT NULL,
    TRIGGER_GROUP VARCHAR(190) NOT NULL,
    STR_PROP_1 VARCHAR(512) NULL,
    STR_PROP_2 VARCHAR(512) NULL,
    STR_PROP_3 VARCHAR(512) NULL,
    INT_PROP_1 INT NULL,
    INT_PROP_2 INT NULL,
    LONG_PROP_1 BIGINT NULL,
    LONG_PROP_2 BIGINT NULL,
    DEC_PROP_1 NUMERIC(13,4) NULL,
    DEC_PROP_2 NUMERIC(13,4) NULL,
    BOOL_PROP_1 VARCHAR(1) NULL,
    BOOL_PROP_2 VARCHAR(1) NULL,
    PRIMARY KEY (SCHED_NAME,TRIGGER_NAME,TRIGGER_GROUP),
    FOREIGN KEY (SCHED_NAME,TRIGGER_NAME,TRIGGER_GROUP)
    REFERENCES QRTZ_TRIGGERS(SCHED_NAME,TRIGGER_NAME,TRIGGER_GROUP))
ENGINE=InnoDB;

CREATE TABLE QRTZ_BLOB_TRIGGERS (
SCHED_NAME VARCHAR(120) NOT NULL,
TRIGGER_NAME VARCHAR(190) NOT NULL,
TRIGGER_GROUP VARCHAR(190) NOT NULL,
BLOB_DATA BLOB NULL,
PRIMARY KEY (SCHED_NAME,TRIGGER_NAME,TRIGGER_GROUP),
INDEX (SCHED_NAME,TRIGGER_NAME, TRIGGER_GROUP),
FOREIGN KEY (SCHED_NAME,TRIGGER_NAME,TRIGGER_GROUP)
REFERENCES QRTZ_TRIGGERS(SCHED_NAME,TRIGGER_NAME,TRIGGER_GROUP))
ENGINE=InnoDB;

CREATE TABLE QRTZ_CALENDARS (
SCHED_NAME VARCHAR(120) NOT NULL,
CALENDAR_NAME VARCHAR(190) NOT NULL,
CALENDAR BLOB NOT NULL,
PRIMARY KEY (SCHED_NAME,CALENDAR_NAME))
ENGINE=InnoDB;

CREATE TABLE QRTZ_PAUSED_TRIGGER_GRPS (
SCHED_NAME VARCHAR(120) NOT NULL,
TRIGGER_GROUP VARCHAR(190) NOT NULL,
PRIMARY KEY (SCHED_NAME,TRIGGER_GROUP))
ENGINE=InnoDB;

CREATE TABLE QRTZ_FIRED_TRIGGERS (
SCHED_NAME VARCHAR(120) NOT NULL,
ENTRY_ID VARCHAR(95) NOT NULL,
TRIGGER_NAME VARCHAR(190) NOT NULL,
TRIGGER_GROUP VARCHAR(190) NOT NULL,
INSTANCE_NAME VARCHAR(190) NOT NULL,
FIRED_TIME BIGINT(13) NOT NULL,
SCHED_TIME BIGINT(13) NOT NULL,
PRIORITY INTEGER NOT NULL,
STATE VARCHAR(16) NOT NULL,
JOB_NAME VARCHAR(190) NULL,
JOB_GROUP VARCHAR(190) NULL,
IS_NONCONCURRENT VARCHAR(1) NULL,
REQUESTS_RECOVERY VARCHAR(1) NULL,
PRIMARY KEY (SCHED_NAME,ENTRY_ID))
ENGINE=InnoDB;

CREATE TABLE QRTZ_SCHEDULER_STATE (
SCHED_NAME VARCHAR(120) NOT NULL,
INSTANCE_NAME VARCHAR(190) NOT NULL,
LAST_CHECKIN_TIME BIGINT(13) NOT NULL,
CHECKIN_INTERVAL BIGINT(13) NOT NULL,
PRIMARY KEY (SCHED_NAME,INSTANCE_NAME))
ENGINE=InnoDB;

CREATE TABLE QRTZ_LOCKS (
SCHED_NAME VARCHAR(120) NOT NULL,
LOCK_NAME VARCHAR(40) NOT NULL,
PRIMARY KEY (SCHED_NAME,LOCK_NAME))
ENGINE=InnoDB;

CREATE INDEX IDX_QRTZ_J_REQ_RECOVERY ON QRTZ_JOB_DETAILS(SCHED_NAME,REQUESTS_RECOVERY);
CREATE INDEX IDX_QRTZ_J_GRP ON QRTZ_JOB_DETAILS(SCHED_NAME,JOB_GROUP);

CREATE INDEX IDX_QRTZ_T_J ON QRTZ_TRIGGERS(SCHED_NAME,JOB_NAME,JOB_GROUP);
CREATE INDEX IDX_QRTZ_T_JG ON QRTZ_TRIGGERS(SCHED_NAME,JOB_GROUP);
CREATE INDEX IDX_QRTZ_T_C ON QRTZ_TRIGGERS(SCHED_NAME,CALENDAR_NAME);
CREATE INDEX IDX_QRTZ_T_G ON QRTZ_TRIGGERS(SCHED_NAME,TRIGGER_GROUP);
CREATE INDEX IDX_QRTZ_T_STATE ON QRTZ_TRIGGERS(SCHED_NAME,TRIGGER_STATE);
CREATE INDEX IDX_QRTZ_T_N_STATE ON QRTZ_TRIGGERS(SCHED_NAME,TRIGGER_NAME,TRIGGER_GROUP,TRIGGER_STATE);
CREATE INDEX IDX_QRTZ_T_N_G_STATE ON QRTZ_TRIGGERS(SCHED_NAME,TRIGGER_GROUP,TRIGGER_STATE);
CREATE INDEX IDX_QRTZ_T_NEXT_FIRE_TIME ON QRTZ_TRIGGERS(SCHED_NAME,NEXT_FIRE_TIME);
CREATE INDEX IDX_QRTZ_T_NFT_ST ON QRTZ_TRIGGERS(SCHED_NAME,TRIGGER_STATE,NEXT_FIRE_TIME);
CREATE INDEX IDX_QRTZ_T_NFT_MISFIRE ON QRTZ_TRIGGERS(SCHED_NAME,MISFIRE_INSTR,NEXT_FIRE_TIME);
CREATE INDEX IDX_QRTZ_T_NFT_ST_MISFIRE ON QRTZ_TRIGGERS(SCHED_NAME,MISFIRE_INSTR,NEXT_FIRE_TIME,TRIGGER_STATE);
CREATE INDEX IDX_QRTZ_T_NFT_ST_MISFIRE_GRP ON QRTZ_TRIGGERS(SCHED_NAME,MISFIRE_INSTR,NEXT_FIRE_TIME,TRIGGER_GROUP,TRIGGER_STATE);

CREATE INDEX IDX_QRTZ_FT_TRIG_INST_NAME ON QRTZ_FIRED_TRIGGERS(SCHED_NAME,INSTANCE_NAME);
CREATE INDEX IDX_QRTZ_FT_INST_JOB_REQ_RCVRY ON QRTZ_FIRED_TRIGGERS(SCHED_NAME,INSTANCE_NAME,REQUESTS_RECOVERY);
CREATE INDEX IDX_QRTZ_FT_J_G ON QRTZ_FIRED_TRIGGERS(SCHED_NAME,JOB_NAME,JOB_GROUP);
CREATE INDEX IDX_QRTZ_FT_JG ON QRTZ_FIRED_TRIGGERS(SCHED_NAME,JOB_GROUP);
CREATE INDEX IDX_QRTZ_FT_T_G ON QRTZ_FIRED_TRIGGERS(SCHED_NAME,TRIGGER_NAME,TRIGGER_GROUP);
CREATE INDEX IDX_QRTZ_FT_TG ON QRTZ_FIRED_TRIGGERS(SCHED_NAME,TRIGGER_GROUP);

commit;
Spring-boot-quartz-doc
refer to : https://docs.spring.io/spring-boot/docs/2.1.x/reference/html/boot-features-quartz.html
Spring Boot offers several conveniences for working with the Quartz scheduler, including the spring-boot-starter-quartz “Starter”. If Quartz is available, a Scheduler is auto-configured (through the SchedulerFactoryBean abstraction).
Beans of the following types are automatically picked up and associated with the Scheduler:
JobDetail: defines a particular Job. JobDetail instances can be built with the JobBuilder API.
Calendar.
Trigger: defines when a particular job is triggered.
By default, an in-memory JobStore is used. However, it is possible to configure a JDBC-based store if a DataSource bean is available in your application and if the spring.quartz.job-store-type property is configured accordingly, as shown in the following example:
spring.quartz.job-store-type=jdbc
When the JDBC store is used, the schema can be initialized on startup, as shown in the following example:
spring.quartz.jdbc.initialize-schema=always
[Warning]
By default, the database is detected and initialized by using the standard scripts provided with the Quartz library. These scripts drop existing tables, deleting all triggers on every restart. It is also possible to provide a custom script by setting the spring.quartz.jdbc.schema property.
To have Quartz use a DataSource other than the application’s main DataSource, declare a DataSource bean, annotating its @Bean method with @QuartzDataSource. Doing so ensures that the Quartz-specific DataSource is used by both the SchedulerFactoryBean and for schema initialization.
By default, jobs created by configuration will not overwrite already registered jobs that have been read from a persistent job store. To enable overwriting existing job definitions set the spring.quartz.overwrite-existing-jobs property.
Quartz Scheduler configuration can be customized using spring.quartz properties and SchedulerFactoryBeanCustomizer beans, which allow programmatic SchedulerFactoryBean customization. Advanced Quartz configuration properties can be customized using spring.quartz.properties.*.
jdbc-quartz-demo
pom.xml
<?xml version="1.0" encoding="UTF-8"?>
<project xmlns="http://maven.apache.org/POM/4.0.0" xmlns:xsi="http://www.w3.org/2001/XMLSchema-instance"
         xsi:schemaLocation="http://maven.apache.org/POM/4.0.0 https://maven.apache.org/xsd/maven-4.0.0.xsd">
    <modelVersion>4.0.0</modelVersion>
    <parent>
        <groupId>org.springframework.boot</groupId>
        <artifactId>spring-boot-starter-parent</artifactId>
        <version>2.5.14</version>
        <relativePath/> <!-- lookup parent from repository -->
    </parent>
    <groupId>com.wp</groupId>
    <artifactId>quartz-jdbc-demo</artifactId>
    <version>0.0.1-SNAPSHOT</version>
    <name>quartz-jdbc-demo</name>
    <description>quartz-jdbc-demo</description>
    <properties>
        <java.version>1.8</java.version>
    </properties>
    <dependencies>
        <!-- Mysql驱动包 -->
        <dependency>
            <groupId>mysql</groupId>
            <artifactId>mysql-connector-java</artifactId>
        </dependency>
        <dependency>
            <groupId>org.springframework.boot</groupId>
            <artifactId>spring-boot-starter-jdbc</artifactId>
        </dependency>
        <!-- 引入 Quartz 依赖-->
        <dependency>
            <groupId>org.springframework.boot</groupId>
            <artifactId>spring-boot-starter-quartz</artifactId>
        </dependency>
        <dependency>
            <groupId>org.springframework.boot</groupId>
            <artifactId>spring-boot-starter-web</artifactId>
        </dependency>

        <dependency>
            <groupId>org.springframework.boot</groupId>
            <artifactId>spring-boot-starter-test</artifactId>
            <scope>test</scope>
        </dependency>
    </dependencies>

    <build>
        <plugins>
            <plugin>
                <groupId>org.springframework.boot</groupId>
                <artifactId>spring-boot-maven-plugin</artifactId>
            </plugin>
        </plugins>
    </build>

</project>
application.yml
server:
  port: 8081
spring:
  # datasource 数据源配置内容,对应 DataSourceProperties 配置属性类
  datasource:
    url: jdbc:mysql://43.137.38.66:3306/test?useUnicode=true&characterEncoding=UTF-8&useSSL=false&autoReconnect=true&failOverReadOnly=false&serverTimezone=GMT%2B8
    driver-class-name: com.mysql.cj.jdbc.Driver
    username: root # 数据库账号
    password: es0s1oJvm@
    # HikariCP 自定义配置,对应 HikariConfig 配置属性类
    hikari:
      minimum-idle: 10 # 池中维护的最小空闲连接数,默认为 10 个。
      maximum-pool-size: 10 # 池中最大连接数,包括闲置和使用中的连接,默认为 10 个

  quartz:
    job-store-type: jdbc
#    overwrite-existing-jobs: true #这个属性,要注释掉,如果设置为true,那么之间保存到数据库的jobDataMap,就会被重置了
其他的配置,和原来一样,如下:
package com.wp.quartzjdbcdemo.config;

import com.wp.quartzjdbcdemo.task.ClearDataTask;
import org.quartz.*;
import org.springframework.context.annotation.Bean;
import org.springframework.context.annotation.Configuration;

@Configuration
public class WpQuartzConfiguration {

    @Bean
    public JobDetail jobDetail() {
        JobDetail jobDetail = JobBuilder.newJob(ClearDataTask.class).withIdentity("clear-data-task", "clear-group")
                .storeDurably()
//                .requestRecovery();
                .usingJobData("city", "nanjing")
                .withDescription("清除数据")
                .build();
        return jobDetail;
    }

    @Bean
    public Trigger trigger(){
        CronTrigger cronTrigger = TriggerBuilder.newTrigger()
                .withIdentity("clear-data-trigger", "clear-group")
                .forJob(jobDetail()) // 绑定工作任务
                .startNow()
                .withSchedule(CronScheduleBuilder.cronSchedule("0/5 * * * * ?"))
                .build();
        return cronTrigger;
    }


}


------------------------------------------------

package com.wp.quartzjdbcdemo.task;

import org.quartz.*;
import org.springframework.scheduling.quartz.QuartzJobBean;

import java.util.concurrent.TimeUnit;


/**
 * @DisallowConcurrentExecution is an annotation that can be added to the Job class that
 * tells Quartz not to execute multiple instances of a given job definition (that refers to the given job class) concurrently.
 *
 * 也就是说,有了这个DisallowConcurrentExecution注解,如果当前这个job没有执行完成,即使到了下一次触发时间了,也会被推迟,推迟到当前job执行完成
 */
@DisallowConcurrentExecution
@PersistJobDataAfterExecution
// 这里,不需要添加任何注解,不需要@Component类似的注解
public class ClearDataTask extends QuartzJobBean {
    @Override
    protected void executeInternal(JobExecutionContext context) throws JobExecutionException {

        System.out.println("-----ClearDataTask start-------");

        try {
            // 这个是获取jobDataMap,从而可以在多个job instance之间共享数据
            JobDataMap jobDataMap = context.getJobDetail().getJobDataMap();
            int  recurCount = 0;
            if (jobDataMap.containsKey("recurCount")) {
                recurCount = jobDataMap.getIntegerFromString("recurCount");
            }
            System.out.println("recurCount:"+recurCount);
            recurCount++;
            jobDataMap.putAsString("recurCount", recurCount);


            TimeUnit.SECONDS.sleep(3);
        } catch (InterruptedException e) {
            e.printStackTrace();
        }

        System.out.println("-----ClearDataTask end-------");

    }
}
通过接口,实时调度任务
pom.xml
<?xml version="1.0" encoding="UTF-8"?>
<project xmlns="http://maven.apache.org/POM/4.0.0" xmlns:xsi="http://www.w3.org/2001/XMLSchema-instance"
         xsi:schemaLocation="http://maven.apache.org/POM/4.0.0 https://maven.apache.org/xsd/maven-4.0.0.xsd">
    <modelVersion>4.0.0</modelVersion>
    <parent>
        <groupId>org.springframework.boot</groupId>
        <artifactId>spring-boot-starter-parent</artifactId>
        <version>2.5.14</version>
        <relativePath/> <!-- lookup parent from repository -->
    </parent>
    <groupId>com.wp</groupId>
    <artifactId>quartz-jdbc-demo</artifactId>
    <version>0.0.1-SNAPSHOT</version>
    <name>quartz-jdbc-demo</name>
    <description>quartz-jdbc-demo</description>
    <properties>
        <java.version>1.8</java.version>
    </properties>
    <dependencies>
        <!-- collections工具类 -->
        <dependency>
            <groupId>commons-collections</groupId>
            <artifactId>commons-collections</artifactId>
            <version>3.2.2</version>
        </dependency>
        <!--常用工具类 -->
        <dependency>
            <groupId>org.apache.commons</groupId>
            <artifactId>commons-lang3</artifactId>
        </dependency>
        <!-- Mysql驱动包 -->
        <dependency>
            <groupId>mysql</groupId>
            <artifactId>mysql-connector-java</artifactId>
        </dependency>
        <dependency>
            <groupId>org.springframework.boot</groupId>
            <artifactId>spring-boot-starter-jdbc</artifactId>
        </dependency>
        <!-- 引入 Quartz 依赖-->
        <dependency>
            <groupId>org.springframework.boot</groupId>
            <artifactId>spring-boot-starter-quartz</artifactId>
        </dependency>
        <dependency>
            <groupId>org.springframework.boot</groupId>
            <artifactId>spring-boot-starter-web</artifactId>
        </dependency>

        <dependency>
            <groupId>org.springframework.boot</groupId>
            <artifactId>spring-boot-starter-test</artifactId>
            <scope>test</scope>
        </dependency>
    </dependencies>

    <build>
        <plugins>
            <plugin>
                <groupId>org.springframework.boot</groupId>
                <artifactId>spring-boot-maven-plugin</artifactId>
            </plugin>
        </plugins>
    </build>

</project>
application.yml
server:
  port: 8081
spring:
  # datasource 数据源配置内容,对应 DataSourceProperties 配置属性类
  datasource:
    url: jdbc:mysql://43.137.38.66:3306/test?useUnicode=true&characterEncoding=UTF-8&useSSL=false&autoReconnect=true&failOverReadOnly=false&serverTimezone=GMT%2B8
    driver-class-name: com.mysql.cj.jdbc.Driver
    username: root # 数据库账号
    password: es0s1oJvm@
    # HikariCP 自定义配置,对应 HikariConfig 配置属性类
    hikari:
      minimum-idle: 10 # 池中维护的最小空闲连接数,默认为 10 个。
      maximum-pool-size: 10 # 池中最大连接数,包括闲置和使用中的连接,默认为 10 个

  quartz:
    job-store-type: jdbc
#    overwrite-existing-jobs: true
接口如下:
package com.wp.quartzjdbcdemo.service;

import org.springframework.scheduling.quartz.QuartzJobBean;

import java.util.List;
import java.util.Map;

public interface QuartzService {
    /**
     * 增加一个任务job
     * @param jobClass  任务job实现类
     * @param jobName   任务job名称(保证唯一性)
     * @param jobGroupName  任务job组名
     * @param cronJobTime   任务时间的cron表达式
     * @param jobData   任务参数
     */
    void addJob(Class<? extends QuartzJobBean> jobClass, String jobName, String jobGroupName, String cronJobTime, Map<String,Object> jobData);

    /**
     * 修改一个任务job
     * @param jobName 任务名称
     * @param jobGroupName  任务组名
     * @param cronJobTime   任务时间的cron表达式
     */
    void updateJob(String jobName, String jobGroupName, String cronJobTime);

    /**
     * 删除一个任务job
     * @param jobName
     * @param jobGroupName
     */
    void deleteJob(String jobName, String jobGroupName);

    /**
     * 暂停一个任务job
     * @param jobName
     * @param jobGroupName
     */
    void pauseJob(String jobName, String jobGroupName);

    /**
     * 恢复一个任务job
     * @param jobName
     * @param jobGroupName
     */
    void resumeJob(String jobName, String jobGroupName);

    /**
     * 获取所有job的触发列表
     * @return
     */
    List<Map<String, Object>> queryTriggerForAllJob();

    /**
     * 获取正在运行的任务job
     * @return
     */
    List<Map<String, Object>> queryRunJob();


}
实现类如下:
package com.wp.quartzjdbcdemo.service;

import org.apache.commons.collections.MapUtils;
import org.quartz.*;
import org.springframework.beans.factory.annotation.Autowired;
import org.springframework.scheduling.quartz.QuartzJobBean;
import org.springframework.stereotype.Service;

import java.util.List;
import java.util.Map;

@Service
public class QuartzServiceImpl implements QuartzService{

    @Autowired
    private Scheduler scheduler;  // 这个其实就是StdScheduler,调用的就是QuartzScheduler

    @Override
    public void addJob(Class<? extends QuartzJobBean> jobClass, String jobName, String jobGroupName, String cronJobTime, Map<String, Object> jobData) {
        // 创建一个jobDetail 和 cronTrigger即可

        JobDetail jobDetail = JobBuilder.newJob(jobClass).withIdentity(jobName, jobGroupName)
                .storeDurably()
                .build();
        if (MapUtils.isNotEmpty(jobData)) {
            jobDetail.getJobDataMap().putAll(jobData);
        }

        CronTrigger cronTrigger = TriggerBuilder.newTrigger()
                .withIdentity(jobName, jobGroupName)
                .startNow()
                .withSchedule(CronScheduleBuilder.cronSchedule(cronJobTime))
                .build();

        try {
            /**
             * Add the given JobDetail to the Scheduler, and associate the given Trigger with it.
             * If the given Trigger does not reference any Job, then it will be set to reference the Job passed with it into this method.
             */
            scheduler.scheduleJob(jobDetail, cronTrigger);
        } catch (SchedulerException e) {
            e.printStackTrace();
        }
    }

    @Override
    public void updateJob(String jobName, String jobGroupName, String cronJobTime) {
        TriggerKey triggerKey = TriggerKey.triggerKey(jobName, jobGroupName);
        CronTrigger updatedCronTrigger = TriggerBuilder.newTrigger()
                .withIdentity(jobName, jobGroupName)
                .startNow()
                .withSchedule(CronScheduleBuilder.cronSchedule(cronJobTime))
                .build();
        try {
            /**
             * Remove (delete) the Trigger with the given key, and store the new given one
             */
            scheduler.rescheduleJob(triggerKey,updatedCronTrigger);
        } catch (SchedulerException e) {
            e.printStackTrace();
        }

    }

    @Override
    public void deleteJob(String jobName, String jobGroupName) {
        try {
            /**
             * Delete the identified Job from the Scheduler - and any associated Triggers.
             */
            scheduler.deleteJob(JobKey.jobKey(jobName, jobGroupName));
        } catch (SchedulerException e) {
            e.printStackTrace();
        }
    }

    @Override
    public void pauseJob(String jobName, String jobGroupName) {

    }

    @Override
    public void resumeJob(String jobName, String jobGroupName) {

    }

    /**
    * 获取所有job的触发列表
    */
    @Override
    public List<Map<String, Object>> queryTriggerForAllJob() {
        return null;
    }

    @Override
    public List<Map<String, Object>> queryRunJob() {
        return null;
    }
}
controller如下:
package com.wp.quartzjdbcdemo.controller;


import com.wp.quartzjdbcdemo.service.QuartzService;
import com.wp.quartzjdbcdemo.task.ClearDataTask;
import org.springframework.beans.factory.annotation.Autowired;
import org.springframework.web.bind.annotation.RequestMapping;
import org.springframework.web.bind.annotation.RestController;

import java.util.HashMap;
import java.util.Map;

@RequestMapping("/test")
@RestController
public class TestQuartzController {

    @Autowired
    private QuartzService quartzService;

    @RequestMapping("/add")
    public String addJob(String jobName){
        Map<String, Object> jobData = new HashMap<>();
        jobData.put("recurCount",100);
        quartzService.addJob(ClearDataTask.class,jobName,jobName+"-group","0/5 * * * * ?",jobData);
        return "OK";
    }


    @RequestMapping("/update")
    public String updateJob(String jobName){
        quartzService.updateJob(jobName,jobName+"-group","0/15 * * * * ?");
        return "OK";
    }

    @RequestMapping("/delete")
    public String deleteJob(String jobName){
        quartzService.deleteJob(jobName,jobName+"-group");
        return "OK";
    }

}
测试如下:
localhost:8081/test/add?jobName=aaa


localhost:8081/test/update?jobName=aaa


localhost:8081/test/delete?jobName=aaa
Job查询
获取所有job的触发列表
// com.wp.quartzjdbcdemo.service.QuartzServiceImpl#queryAllJob

  /**
    * 获取所有job的触发列表
    */
@Override
    public List<Map<String, Object>> queryTriggerForAllJob() {
        List<Map<String, Object>> jobList = null;
        try {
            GroupMatcher<JobKey> matcher = GroupMatcher.anyJobGroup();
            Set<JobKey> jobKeys = scheduler.getJobKeys(matcher);
            jobList = new ArrayList<Map<String, Object>>();
            for (JobKey jobKey : jobKeys) {
                List<? extends Trigger> triggers = scheduler.getTriggersOfJob(jobKey);
                for (Trigger trigger : triggers) {
                    Map<String, Object> map = new HashMap<>();
                    map.put("jobName", jobKey.getName());
                    map.put("jobGroupName", jobKey.getGroup());
                    map.put("trigger name group" ,trigger.getKey());
                    Trigger.TriggerState triggerState = scheduler.getTriggerState(trigger.getKey());
                    map.put("jobStatus", triggerState.name());
                    if (trigger instanceof CronTrigger) {
                        CronTrigger cronTrigger = (CronTrigger) trigger;
                        String cronExpression = cronTrigger.getCronExpression();
                        map.put("cronJobTime", cronExpression);
                    }
                    jobList.add(map);
                }
            }
        } catch (SchedulerException e) {
            e.printStackTrace();

        }
        return jobList;
    }
测试如下:
localhost:8081/test/queryTriggerForAllJob


[{"jobName":"aaa","jobGroupName":"aaa-group","jobStatus":"NORMAL","trigger name group":{"name":"aaa","group":"aaa-group"},"cronJobTime":"0/5 * * * * ?"}]
查询所有正在运行的Job
什么叫正在运行的Job?
就是job instance从开始execute,到execute结束,中间的时间段内,是处于运行中的。一旦执行完成了,那么这个job就不是正在运行的Job了。
举个例子,假如cronExpression是0/30 * * * * ?,每次job执行耗时10s,那么只有当第30秒到40秒之间,这段时间内,这个job是正在运行的Job;当第40s后,因为job已经执行完了,此时这个job就不是正在运行的Job了。
 /**
     * 获取正在运行的任务job
     * @return
     */
    @Override
    public List<Map<String, Object>> queryRunJob() {
        try {
            List<JobExecutionContext> currentlyExecutingJobs = scheduler.getCurrentlyExecutingJobs();
            if (CollectionUtils.isEmpty(currentlyExecutingJobs)) {
                return null;
            }
            List<Map<String, Object>> runningJobInfos = new ArrayList<>();
            for (JobExecutionContext currentlyExecutingJob : currentlyExecutingJobs) {
                JobDetail jobDetail = currentlyExecutingJob.getJobDetail();
                Trigger trigger = currentlyExecutingJob.getTrigger();
                JobKey jobKey = jobDetail.getKey();
                Map<String, Object> map = new HashMap<String, Object>();
                map.put("jobName", jobKey.getName());
                map.put("jobGroupName", jobKey.getGroup());
                map.put("trigger name group", trigger.getKey());

                Trigger.TriggerState triggerState = scheduler.getTriggerState(trigger.getKey());
                map.put("jobStatus", triggerState.name());
                if (trigger instanceof CronTrigger) {
                    CronTrigger cronTrigger = (CronTrigger) trigger;
                    String cronExpression = cronTrigger.getCronExpression();
                    map.put("cronJobTime", cronExpression);
                }
                runningJobInfos.add(map);

            }
            return runningJobInfos;
        } catch (SchedulerException e) {
            e.printStackTrace();
            return null;
        }

    }
测试如下:
localhost:8081/test/queryRunJob


[{"jobName":"aaa","jobGroupName":"aaa-group","jobStatus":"BLOCKED","trigger name group":{"name":"aaa","group":"aaa-group"},"cronJobTime":"0/55 * * * * ?"}]
JdbcJobStore深入
配置方式:
spring:
  datasource:
    #jdbc配置
    url: jdbc:mysql://121.36.3.214:3306/wptest?useUnicode=true&characterEncoding=UTF-8&useSSL=false&autoReconnect=true&failOverReadOnly=false&serverTimezone=GMT%2B8
    username: root
    password: 123456Wp!
    driver-class-name: com.mysql.cj.jdbc.Driver
  quartz:
    job-store-type: jdbc #数据库方式
    jdbc:
      initialize-schema: never #不初始化表结构 never always
    properties:
      org:
        quartz:
          scheduler:
            instanceId: AUTO #默认主机名和时间戳生成实例ID,可以是任何字符串,但对于所有调度程序来说,必须是唯一的 对应qrtz_scheduler_state INSTANCE_NAME字段
            #instanceName: clusteredScheduler #quartzScheduler
          jobStore:
            class: org.quartz.impl.jdbcjobstore.JobStoreTX #持久化配置
            driverDelegateClass: org.quartz.impl.jdbcjobstore.StdJDBCDelegate #我们仅为数据库制作了特定于数据库的代理
            useProperties: false #以指示JDBCJobStore将JobDataMaps中的所有值都作为字符串,因此可以作为名称 - 值对存储而不是在BLOB列中以其序列化形式存储更多复杂的对象。从长远来看,这是更安全的,因为您避免了将非String类序列化为BLOB的类版本问题。
            tablePrefix: QRTZ_  #数据库表前缀
          threadPool: #连接池
            class: org.quartz.simpl.SimpleThreadPool
            threadCount: 3
            threadPriority: 5
            threadsInheritContextClassLoaderOfInitializingThread: true
org.quartz.jobStore.selectWithLockSQL的作用
| Property Name | Required | Type | Default Value |
|---|---|---|---|
| org.quartz.jobStore.selectWithLockSQL | no | string | “SELECT * FROM {0}LOCKS WHERE SCHED_NAME = {1} AND LOCK_NAME = ? FOR UPDATE” |
selectWithLockSQL有什么作用呢?
拥有这个行锁的目的是什么?
最佳答案
在集群模式下部署时,quartz 使用锁表来协调多个调度程序。在集群中,只有一个节点应该触发触发器,因此使用锁来避免多个节点获取相同的触发器。
如果2个机器,每个机器的spring.quartz.properties.org.quartz.scheduler.instanceName都不相同,那么这2个机器互不影响
看下图:
SCHED_NAME的值不相同
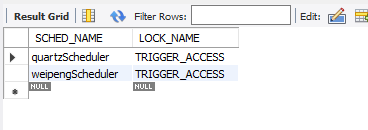
但是,如果2个机器的instanceName相同,那么同一个trigger,只有一个机器能获取到,另一个机器获取不到。这里的原理,就是使用了selectWithLockSQL
配置项
refer to : http://www.quartz-scheduler.org/documentation/2.4.0-SNAPSHOT/configuration.html
这个文档,很重要,主要覆盖了:
- 调度器相关配置
- 数据源类型相关配置
- 线程池相关配置
- 监听器相关配置
| Property Name | Req’d | Type | Default Value |
|---|---|---|---|
| org.quartz.scheduler.instanceName | no | string | ‘QuartzScheduler’ |
| org.quartz.scheduler.instanceId | no | string | ‘NON_CLUSTERED’ |
| org.quartz.scheduler.instanceIdGenerator.class | no | string (class name) | org.quartz.simpl .SimpleInstanceIdGenerator |
| org.quartz.scheduler.threadName | no | string | instanceName + ‘_QuartzSchedulerThread’ |
| Property Name | Required | Type | Default Value |
|---|---|---|---|
| org.quartz.threadPool.class | yes | string (class name) | null |
| org.quartz.threadPool.threadCount | yes | int | -1 |
| org.quartz.threadPool.threadPriority | no | int | Thread.NORM_PRIORITY (5) |
JDBCJobStore is used to store scheduling information (job, triggers and calendars) within a relational database. There are actually two seperate JDBCJobStore classes that you can select between, depending on the transactional behaviour you need.
The JobStoreTX is selected by setting the ‘org.quartz.jobStore.class’ property as such:
Setting The Scheduler’s JobStore to JobStoreTX
org.quartz.jobStore.class = org.quartz.impl.jdbcjobstore.JobStoreTX
JobStoreTX can be tuned with the following properties:
| Property Name | Required | Type | Default Value |
|---|---|---|---|
| org.quartz.jobStore.driverDelegateClass | yes | string | null |
| org.quartz.jobStore.dataSource | yes | string | null |
| org.quartz.jobStore.tablePrefix | no | string | “QRTZ_” |
| org.quartz.jobStore.useProperties | no | boolean | false |
| org.quartz.jobStore.misfireThreshold | no | int | 60000 |
| org.quartz.jobStore.isClustered | no | boolean | false |
| org.quartz.jobStore.clusterCheckinInterval | no | long | 15000 |
| org.quartz.jobStore.maxMisfiresToHandleAtATime | no | int | 20 |
| org.quartz.jobStore.dontSetAutoCommitFalse | no | boolean | false |
| org.quartz.jobStore.selectWithLockSQL | no | string | “SELECT * FROM {0}LOCKS WHERE SCHED_NAME = {1} AND LOCK_NAME = ? FOR UPDATE” |
其中:
org.quartz.jobStore.selectWithLockSQL
Must be a SQL string that selects a row in the “LOCKS” table and places a lock on the row. If not set, the default is “SELECT * FROM {0}LOCKS WHERE SCHED_NAME = {1} AND LOCK_NAME = ? FOR UPDATE”, which works for most databases. The “{0}” is replaced during run-time with the TABLE_PREFIX that you configured above. The “{1}” is replaced with the scheduler’s name.
org.quartz.jobStore.driverDelegateClass
Driver delegates understand the particular ‘dialects’ of varies database systems. Possible choices include:
- org.quartz.impl.jdbcjobstore.StdJDBCDelegate (for fully JDBC-compliant drivers)
- org.quartz.impl.jdbcjobstore.MSSQLDelegate (for Microsoft SQL Server, and Sybase)
Configure DataSources
| Property Name | Required | Type | Default Value |
|---|---|---|---|
| org.quartz.dataSource.NAME.driver | yes | String | null |
| org.quartz.dataSource.NAME.URL | yes | String | null |
| org.quartz.dataSource.NAME.user | no | String | “” |
| org.quartz.dataSource.NAME.password | no | String | “” |
| org.quartz.dataSource.NAME.maxConnections | no | int | 10 |
| org.quartz.dataSource.NAME.validationQuery | no | String | null |
| org.quartz.dataSource.NAME.idleConnectionValidationSeconds | no | int | 50 |
| org.quartz.dataSource.NAME.validateOnCheckout | no | boolean | false |
| org.quartz.dataSource.NAME.discardIdleConnectionsSeconds | no | int | 0 (disabled) |
Example of a Quartz-defined DataSource
org.quartz.dataSource.myDS.driver = oracle.jdbc.driver.OracleDriver
org.quartz.dataSource.myDS.URL = jdbc:oracle:thin:@10.0.1.23:1521:demodb
org.quartz.dataSource.myDS.user = myUser
org.quartz.dataSource.myDS.password = myPassword
org.quartz.dataSource.myDS.maxConnections = 30
整合quartz源码分析
参考:https://blog.csdn.net/guo_xl/article/details/85068719
Quartz 在使用过程中,有两个关键概念,一个是JobDetail(要做的事情),另一个是触发器(什么时候做),要定义 JobDetail,需要先定义 Job
利用starter的原理在
spring.factories里有
org.springframework.boot.autoconfigure.quartz.QuartzAutoConfiguration
1
则启动的时候就会加载QuartzAutoConfiguration,下面看下QuartzAutoConfiguration
@Configuration
@ConditionalOnClass({ Scheduler.class, SchedulerFactoryBean.class,
		PlatformTransactionManager.class })
		//加入QuartzProperties.class
@EnableConfigurationProperties(QuartzProperties.class)
@AutoConfigureAfter({ DataSourceAutoConfiguration.class,
		HibernateJpaAutoConfiguration.class })
public class QuartzAutoConfiguration {

private final QuartzProperties properties;

//构造器注入QuartzProperties
public QuartzAutoConfiguration(QuartzProperties properties,
			ObjectProvider<SchedulerFactoryBeanCustomizer> customizers,
			ObjectProvider<JobDetail[]> jobDetails,
			ObjectProvider<Map<String, Calendar>> calendars,
			ObjectProvider<Trigger[]> triggers, ApplicationContext applicationContext) {
		this.properties = properties;
		this.customizers = customizers;
		this.jobDetails = jobDetails.getIfAvailable();
		this.calendars = calendars.getIfAvailable();
		this.triggers = triggers.getIfAvailable();
		this.applicationContext = applicationContext;
	}

//定义一个SchedulerFactoryBean,前提是没有SchedulerFactoryBean
@Bean
	@ConditionalOnMissingBean
	public SchedulerFactoryBean quartzScheduler() {
	//new 了一个SchedulerFactoryBean
		SchedulerFactoryBean schedulerFactoryBean = new SchedulerFactoryBean();
		SpringBeanJobFactory jobFactory = new SpringBeanJobFactory();
		jobFactory.setApplicationContext(this.applicationContext);
		schedulerFactoryBean.setJobFactory(jobFactory);

		//这里可以定义很多quartz.properteis里的属性
		if (this.properties.getSchedulerName() != null) {
			schedulerFactoryBean.setSchedulerName(this.properties.getSchedulerName());
		}
		schedulerFactoryBean.setAutoStartup(this.properties.isAutoStartup());
		schedulerFactoryBean
				.setStartupDelay((int) this.properties.getStartupDelay().getSeconds());
		schedulerFactoryBean.setWaitForJobsToCompleteOnShutdown(
				this.properties.isWaitForJobsToCompleteOnShutdown());
		schedulerFactoryBean
				.setOverwriteExistingJobs(this.properties.isOverwriteExistingJobs());
		if (!this.properties.getProperties().isEmpty()) {
			schedulerFactoryBean
					.setQuartzProperties(asProperties(this.properties.getProperties()));
		}
		if (this.jobDetails != null && this.jobDetails.length > 0) {
			schedulerFactoryBean.setJobDetails(this.jobDetails);
		}
		if (this.calendars != null && !this.calendars.isEmpty()) {
			schedulerFactoryBean.setCalendars(this.calendars);
		}
		if (this.triggers != null && this.triggers.length > 0) {
			schedulerFactoryBean.setTriggers(this.triggers);
		}
		customize(schedulerFactoryBean);
		return schedulerFactoryBean;
	}


}
以下是SchedulerFactoryBean,可以看到是
implements FactoryBean,也就是这是Scheduler 这个定义的生成者
public class SchedulerFactoryBean extends SchedulerAccessor implements FactoryBean<Scheduler>,
		BeanNameAware, ApplicationContextAware, InitializingBean, DisposableBean, SmartLifecycle {
	//getObject() 是FactoryBean<Scheduler>的接口方法
	public Scheduler getObject() {
		return this.scheduler;
	}
}
BeanFactory会根据name为Scheduler来获取Scheduler,最终会通过SchedulerFactoryBean.getObject()来得到Scheduler。
通过分析得出FactoryBean.getObject()里得到的是this.scheduler.
public class SchedulerFactoryBean extends SchedulerAccessor implements FactoryBean<Scheduler>,
		BeanNameAware, ApplicationContextAware, InitializingBean, DisposableBean, SmartLifecycle {
	private Scheduler scheduler;
	public Scheduler getObject() {
			return this.scheduler;
		}
}
但这个Scheduler 在哪里被构造处理呢?
SchedulerFactoryBean implements InitializingBean,在InitializingBean里有afterPropertiesSet()
public class SchedulerFactoryBean extends SchedulerAccessor implements FactoryBean<Scheduler>,
		BeanNameAware, ApplicationContextAware, InitializingBean, DisposableBean, SmartLifecycle {

		public void afterPropertiesSet() throws Exception {
        ...
		// Initialize the Scheduler instance...
		//这里初始化了Scheduler
		this.scheduler = prepareScheduler(prepareSchedulerFactory());
		try {
			registerListeners();
			registerJobsAndTriggers();
		}
		catch (Exception ex) {
			...
		}
	}

}
bean 生命周期简单理解如下,注意InitializingBean#afterPropertiesSet()所处的位置
->construcor
->initialization(各种autowired)
->BeanPostProcessor#postProcessBeforeInitialization
->@postConsruct 或 InitializingBean#afterPropertiesSet() 或 @Bean(initMethod="xxx")
->BeanPostProcessor#postProcessAfterInitialization
->@PreDestroy
看prepareSchedulerFactory()方法,最后返回了SchedulerFactory,赋值给了SchedulerFactoryBean的scheduler
public class SchedulerFactoryBean{

	private Class<? extends SchedulerFactory> schedulerFactoryClass =
	StdSchedulerFactory.class;

    private SchedulerFactory prepareSchedulerFactory() throws SchedulerException, IOException {
        	private SchedulerFactory schedulerFactory;
        //这里这个SchedulerFactory肯定为空,当然有办法可以让它不为空,通过定义SchedulerFactoryBeanCustomizer来实现
		SchedulerFactory schedulerFactory = this.schedulerFactory;
		if (schedulerFactory == null) {
			// Create local SchedulerFactory instance (typically a StdSchedulerFactory)
			//这里也写了这里是实例化出StdSchedulerFactory
			schedulerFactory = BeanUtils.instantiateClass(this.schedulerFactoryClass);
			if (schedulerFactory instanceof StdSchedulerFactory) {
			//调用initSchedulerFactory来填充StdSchedulerFactory)
			//看过Quartz的官方demo,就知道StdSchedulerFactory用来生产出sheduler
			initSchedulerFactory((StdSchedulerFactory) schedulerFactory);
			}
			else if (this.configLocation != null || this.quartzProperties != null ||
					this.taskExecutor != null || this.dataSource != null) {
				throw new IllegalArgumentException(
						"StdSchedulerFactory required for applying Quartz properties: " + schedulerFactory);
			}
			// Otherwise, no local settings to be applied via StdSchedulerFactory.initialize(Properties)
		}
		// Otherwise, assume that externally provided factory has been initialized with appropriate settings
		return schedulerFactory;
	}
}
initSchedulerFactory主要是将配置信息配置到schedulerFactory里
private void initSchedulerFactory(StdSchedulerFactory schedulerFactory) throws SchedulerException, IOException {
		Properties mergedProps = new Properties();
        ...
		CollectionUtils.mergePropertiesIntoMap(this.quartzProperties, mergedProps);
        ...
        //这里很重要,
        //可以直接通过 application.properties里的配置来配置quartz.properties里的配置spring.quartz.properties.xxx
		schedulerFactory.initialize(mergedProps);
	}
只所以看这里,是由于springboot的quartz整合官方文档实在是太过简单,只有寥寥数语
Quartz Scheduler configuration can be customized using spring.quartz properties and SchedulerFactoryBeanCustomizer beans,
which allow programmatic SchedulerFactoryBean customization.
Advanced Quartz configuration properties can be customized using spring.quartz.properties.*.
翻译过来就是
Quartz Scheduler可以通过使用spring.quartz 的properties 和写SchedulerFactoryBeanCustomizer这个类来达到客户化SchedulerFactoryBean 的配置。更进一步的配置可以通过spring.quartz.properties.*
这样写连例子都没有,未免太过简略了。没有看源码根本不知道说的什么
prepareScheduler(prepareSchedulerFactory()) 在一些列的调用后会到StdSchedulerFactory的
private Scheduler instantiate()。这是个很长的方法
,但逻辑还算简单,各种初始化,下面只列出jobStore的配置
private Scheduler instantiate() throws SchedulerException {
  //cfg 就是上个代码片段里的mergedProps
        if (cfg == null) {
            initialize();
        }
        //jobstore,如果不配,默认是RAMJobStore
        //在application.properties里可以配置为
        //spring.quartz.properties.org.quartz.jobStore.class=org.quartz.impl.jdbcjobstore.JobStoreTX
           String jsClass = cfg.getStringProperty(PROP_JOB_STORE_CLASS,
                RAMJobStore.class.getName());

    try {
            js = (JobStore) loadHelper.loadClass(jsClass).newInstance();
        } catch (Exception e) {
            initException = new SchedulerException("JobStore class '" + jsClass
                    + "' could not be instantiated.", e);
            throw initException;
        }

        SchedulerDetailsSetter.setDetails(js, schedName, schedInstId);

    //这里可以获取到spring.quartz.properties.org.quartz.jobStore.xxx
    //xxx是jobStore这个类的里属性,比如isClustered,clusterCheckinInterval等
    //在applicaiton.properties配置成spring.quartz.properties.org.quartz.jobStore.isClustered = true
        tProps = cfg.getPropertyGroup(PROP_JOB_STORE_PREFIX, true, new String[] {PROP_JOB_STORE_LOCK_HANDLER_PREFIX});
        try {
            setBeanProps(js, tProps);
        } catch (Exception e) {
            initException = new SchedulerException("JobStore class '" + jsClass
                    + "' props could not be configured.", e);
            throw initException;
        }


}
因此我们要配置集群就可以在application.properties配置成如下:
spring.quartz.properties.org.quartz.jobStore.class=org.springframework.scheduling.quartz.LocalDataSourceJobStore
spring.quartz.properties.org.quartz.jobStore.isClustered = true
spring.quartz.properties.org.quartz.jobStore.clusterCheckinInterval = 10000
spring.quartz.properties.org.quartz.scheduler.instanceId = AUTO
逻辑梳理
1.自动配置类,干了什么?
自动配置类是QuartzAutoConfiguration。他主要是创建了一个SchedulerFactoryBean,并且给SchedulerFactoryBean配置了一些列属性,包括JobFactory、QuartzProperties、jobDetails、triggers
2.SchedulerFactoryBean依赖于哪些组件?
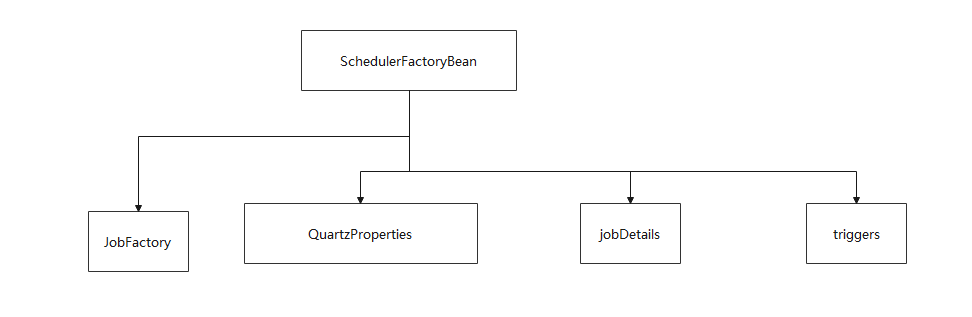
JobFactory的作用是:将自定义的job类,进行实例化
QuartzProperties的作用是:设置SchedulerName、StartupDelay等属性,这个QuartzProperties最终会传入到StdSchedulerFactory中,然后在StdSchedulerFactory#instantiate()方法中被解析
3.Schedulers什么时候被创建的?是如何创建的?
在SchedulerFactoryBean 的afterPropertiesSet方法中,创建了scheduler
SchedulerFactoryBean implements InitializingBean,在InitializingBean里有afterPropertiesSet()

public class SchedulerFactoryBean extends SchedulerAccessor implements FactoryBean<Scheduler>,
		BeanNameAware, ApplicationContextAware, InitializingBean, DisposableBean, SmartLifecycle {

		public void afterPropertiesSet() throws Exception {
        ...
		// Initialize the Scheduler instance...
		//这里初始化了Scheduler
		this.scheduler = prepareScheduler(prepareSchedulerFactory());
		try {
			registerListeners();
			registerJobsAndTriggers();
		}
		catch (Exception ex) {
			...
		}
	}

}
Schedulers是如何创建的呢?
