Reference
https://books.sonatype.com/mvnref-book/reference/index.html
# Chapter 3.The Project Object Model
POM --- Project Object Model
3.2. The POM
https://books.sonatype.com/mvnref-book/reference/pom-relationships-sect-pom.html
Maven projects, dependencies, builds, artifacts: all of these are objects to be modeled and described. These objects are described by an XML file called a Project Object Model. The POM tells Maven what sort of project it is dealing with and how to modify default behavior to generate output from source. In the same way a Java web application has a web.xml that describes, configures, and customizes the application, a Maven project is defined by the presence of a pom.xml. It is a descriptive declaration of a project for Maven; it is the figurative “map” that Maven needs to understand what it is looking at when it builds your project.
You could also think of the pom.xml as analogous to a Makefile or an Ant build.xml. When you are using GNU make to build something like MySQL, you’ll usually have a file named Makefile that contains explicit instructions for building a binary from source. When you are using Apache Ant, you likely have a file named build.xml that contains explicit instructions for cleaning, compiling, packaging, and deploying an application. make, Ant, and Maven are similar in that they rely on the presence of a commonly named file such as Makefile, build.xml, or pom.xml, but that is where the similarities end. If you look at a Maven pom.xml, the majority of the POM is going to deal with descriptions: Where is the source code? Where are the resources? What is the packaging? If you look at an Ant build.xml file, you’ll see something entirely different. You’ll see explicit instructions for tasks such as compiling a set of Java classes. The Maven POM is declarative, and although you can certainly choose to include some procedural customizations via the Maven Ant plugin, for the most part you will not need to get into the gritty procedural details of your project’s build.
We’ve established that the POM describes and declares, it is unlike Ant or Make in that it doesn’t provide explicit instructions, and we’ve noted that POM concepts are not specific to Java. Diving into more specifics, take a look at Figure 3.1, “The Project Object Model” for a survey of the contents of a POM.
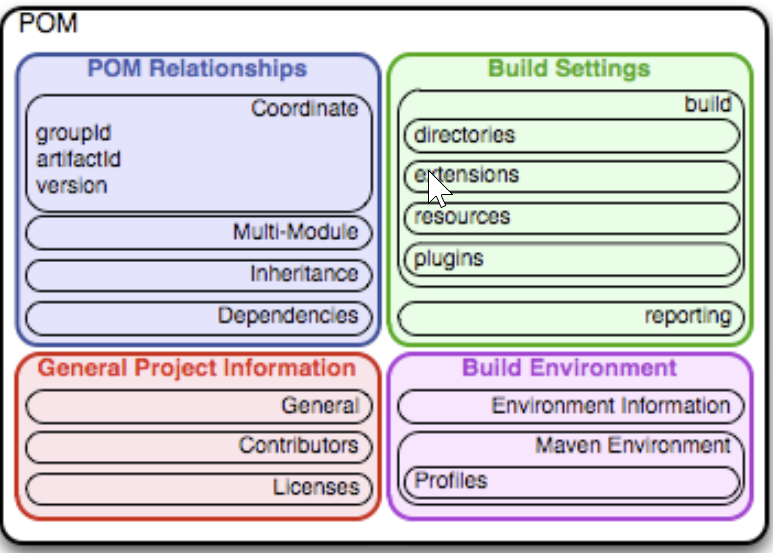
The POM contains four categories of description and configuration:
General project information
This includes a project’s name, the URL for a project, the sponsoring organization, and a list of developers and contributors along with the license for a project.
Build settings
In this section, we customize the behavior of the default Maven build. We can change the location of source and tests, we can add new plugins, we can attach plugin goals to the lifecycle, and we can customize the site generation parameters.
Build environment
The build environment consists of profiles that can be activated for use in different environments. For example, during development you may want to deploy to a development server, whereas in production you want to deploy to a production server. The build environment customizes the build settings for specific environments and is often supplemented by a custom settings.xml in ~/.m2. This settings file is discussed in Chapter 5, Build Profiles and in the section Section 15.2, “Settings Details”.
POM relationships
A project rarely stands alone; it depends on other projects, inherits POM settings from parent projects, defines its own coordinates, and may include submodules.
3.2.1. The Super POM
Before we dive into some examples of POMs, let’s take a quick look at the Super POM. All Maven project POMs extend the Super POM, which defines a set of defaults shared by all projects.
Tip: An analogy to how the Super POM is the parent for all Maven POM files, would be how java.lang.Object is the top of the class hierarchy for all Java classes.
The Super POM.
<project>
    <modelVersion>4.0.0</modelVersion>
    <name>Maven Default Project</name>

    <repositories>
        <repository>
            <id>central</id> (1)
                <name>Maven Repository Switchboard</name>
                <layout>default</layout>
                <url>http://repo1.maven.org/maven2</url>
                <snapshots>
                    <enabled>false</enabled>
                </snapshots>
        </repository>
    </repositories>

    <pluginRepositories>
        <pluginRepository>
            <id>central</id> (2)
                <name>Maven Plugin Repository</name>
                <url>http://repo1.maven.org/maven2</url>
                <layout>default</layout>
                <snapshots>
                    <enabled>false</enabled>
                </snapshots>
                <releases>
                    <updatePolicy>never</updatePolicy>
                </releases>
        </pluginRepository>
    </pluginRepositories>

    <build> (3)
            <directory>${project.basedir}/target</directory>
            <outputDirectory>
                ${project.build.directory}/classes
            </outputDirectory>
            <finalName>${project.artifactId}-${project.version}</finalName>
            <testOutputDirectory>
                ${project.build.directory}/test-classes
            </testOutputDirectory>
            <sourceDirectory>
                ${project.basedir}/src/main/java
            </sourceDirectory>
            <scriptSourceDirectory>src/main/scripts</scriptSourceDirectory>
            <testSourceDirectory>
                ${project.basedir}/src/test/java
            </testSourceDirectory>
            <resources>
                <resource>
                    <directory>${project.basedir}/src/main/resources</directory>
                </resource>
            </resources>
            <testResources>
                <testResource>
                    <directory>${project.basedir}/src/test/resources</directory>
                </testResource>
            </testResources>


            <pluginManagement> (4)
                    <plugins>
                        <plugin>
                            <artifactId>maven-antrun-plugin</artifactId>
                            <version>1.3</version>
                        </plugin>
                        <plugin>
                            <artifactId>maven-assembly-plugin</artifactId>
                            <version>2.2-beta-2</version>
                        </plugin>
                        <plugin>
                            <artifactId>maven-clean-plugin</artifactId>
                            <version>2.2</version>
                        </plugin>
                        <plugin>
                            <artifactId>maven-compiler-plugin</artifactId>
                            <version>2.0.2</version>
                        </plugin>
                        <plugin>
                            <artifactId>maven-dependency-plugin</artifactId>
                            <version>2.0</version>
                        </plugin>
                        <plugin>
                            <artifactId>maven-deploy-plugin</artifactId>
                            <version>2.4</version>
                        </plugin>
                        <plugin>
                            <artifactId>maven-ear-plugin</artifactId>
                            <version>2.3.1</version>
                        </plugin>
                        <plugin>
                            <artifactId>maven-ejb-plugin</artifactId>
                            <version>2.1</version>
                        </plugin>
                        <plugin>
                            <artifactId>maven-install-plugin</artifactId>
                            <version>2.2</version>
                        </plugin>
                        <plugin>
                            <artifactId>maven-jar-plugin</artifactId>
                            <version>2.2</version>
                        </plugin>
                        <plugin>
                            <artifactId>maven-javadoc-plugin</artifactId>
                            <version>2.5</version>
                        </plugin>
                        <plugin>
                            <artifactId>maven-plugin-plugin</artifactId>
                            <version>2.4.3</version>
                        </plugin>
                        <plugin>
                            <artifactId>maven-rar-plugin</artifactId>
                            <version>2.2</version>
                        </plugin>
                        <plugin>
                            <artifactId>maven-release-plugin</artifactId>
                            <version>2.0-beta-8</version>
                        </plugin>
                        <plugin>
                            <artifactId>maven-resources-plugin</artifactId>
                            <version>2.3</version>
                        </plugin>
                        <plugin>
                            <artifactId>maven-site-plugin</artifactId>
                            <version>2.0-beta-7</version>
                        </plugin>
                        <plugin>
                            <artifactId>maven-source-plugin</artifactId>
                            <version>2.0.4</version>
                        </plugin>
                        <plugin>
                            <artifactId>maven-surefire-plugin</artifactId>
                            <version>2.4.3</version>
                        </plugin>
                        <plugin>
                            <artifactId>maven-war-plugin</artifactId>
                            <version>2.1-alpha-2</version>
                        </plugin>
                    </plugins>
            </pluginManagement>

            <reporting>
                <outputDirectory>target/site</outputDirectory>
            </reporting>
</project>
The Super POM defines some standard configuration variables that are inherited by all projects. Those values are captured in the annotated sections:
(1)
The default Super POM defines a single remote Maven repository with an ID of central. This is the Central Repository that all Maven clients are configured to read from by default. This setting can be overridden by a custom settings.xml file. Note that the default Super POM has disabled snapshot artifacts on the Central Repository. If you need to use a snapshot repository, you will need to customize repository settings in your pom.xml or in your settings.xml. Settings and profiles are covered in Chapter 5, Build Profiles and in Section 15.2, “Settings Details”.
(2)
The Central Repository also contains Maven plugins. The default plugin repository is the central Maven repository. Snapshots are disabled, and the update policy is set to “never,” which means that Maven will never automatically update a plugin if a new version is released.
(3)
The build element sets the default values for directories in the Maven Standard Directory layout.
(4)
Starting in Maven 2.0.9, default versions of core plugins have been provided in the Super POM. This was done to provide some stability for users that are not specifying versions in their POMs. In newer versions some of this has been migrated out of the file. However you can still see the versions that will be used in your project using mvn help:effective-pom.
3.2.2. The Simplest POM
All Maven POMs inherit defaults from the Super POM (introduced earlier in the section Section 3.2.1, “The Super POM”). If you are just writing a simple project that produces a JAR from some source in src/main/java, want to run your JUnit tests in src/test/java, and want to build a project site using mvn site, you don’t have to customize anything. All you would need, in this case, is the simplest possible POM shown in The Simplest POM. This POM defines a groupId, artifactId, and version: the three required coordinates for every project.
The Simplest POM.
<project>
    <modelVersion>4.0.0</modelVersion>
    <groupId>org.sonatype.mavenbook.ch08</groupId>
    <artifactId>simplest-project</artifactId>
    <version>1</version>
</project>
Such a simple POM would be more than adequate for a simple project—e.g., a Java library that produces a JAR file. It isn’t related to any other projects, it has no dependencies, and it lacks basic information such as a name and a URL. If you were to create this file and then create the subdirectory src/main/java with some source code, running mvn package would produce a JAR in target/simple-project-1.jar.
3.3. POM Syntax
The POM is always in a file named pom.xml in the base directory of a Maven project. This XML document can start with the XML declaration, or you can choose to omit it. All values in a POM are captured as XML elements.
3.3.1. Project Versions
A project’s version number is used to group and order releases. Maven versions contain the following parts: major version, minor version, incremental version, and qualifier. In a version, these parts correspond to the following format:
<major version>.<minor version>.<incremental version>-<qualifier>For example, the version "1.3.5" has a major version of 1, a minor version of 3, and an incremental version of 5. The version "5" has a major version of 5 and no minor or incremental version. The qualifier exists to capture milestone builds: alpha and beta releases, and the qualifier is separated from the major, minor, and incremental versions by a hyphen. For example, the version "1.3-beta-01" has a major version of 1, a minor version of 3, no incremental version and a qualifier of "beta-01".
Keeping your version numbers aligned with this standard will become very important when you want to start using version ranges in your POMs. Version ranges, introduced in Section 3.4.3, “Dependency Version Ranges”, allow you to specify a dependency on a range of versions, and they are only supported because Maven has the ability to sort versions based on the version release number format introduced in this section.
SNAPSHOT Versions
Maven versions can contain a string literal to signify that a project is currently under active development. If a version contains the string “-SNAPSHOT,” then Maven will expand this token to a date and time value converted to UTC (Coordinated Universal Time) when you install or release this component. For example, if your project has a version of “1.0-SNAPSHOT” and you deploy this project’s artifacts to a Maven repository, Maven would expand this version to “1.0-20080207-230803-1” if you were to deploy a release at 11:08 PM on February 7th, 2008 UTC. In other words, when you deploy a snapshot, you are not making a release of a software component; you are releasing a snapshot of a component at a specific time.
Why would you use this? SNAPSHOT versions are used for projects under active development. If your project depends on a software component that is under active development, you can depend on a SNAPSHOT release, and Maven will periodically attempt to download the latest snapshot from a repository when you run a build. Similarly, if the next release of your system is going to have a version "1.4", your project would have a version "1.4-SNAPSHOT" until it was formally released.
As a default setting, Maven will not check for SNAPSHOT releases on remote repositories. To depend on SNAPSHOT releases, users must explicitly enable the ability to download snapshots using a repository or pluginRepository element in the POM.
When releasing a project, you should resolve all dependencies on SNAPSHOT versions to dependencies on released versions. If a project depends on a SNAPSHOT, it is not stable as the dependencies may change over time. Artifacts published to non-snapshot Maven repositories such as http://repo1.maven.org/maven2 cannot depend on SNAPSHOT versions, as Maven’s Super POM has snapshot’s disabled from the Central repository. SNAPSHOT versions are for development only.
3.3.2. Property References
The syntax for using a property in Maven is to surround the property name with two curly braces and precede it with a dollar symbol. For example, consider the following POM:
<project>
    <modelVersion>4.0.0</modelVersion>
    <groupId>org.sonatype.mavenbook</groupId>
    <artifactId>project-a</artifactId>
    <version>1.0-SNAPSHOT</version>
    <packaging>jar</packaging>
    <build>
        <finalName>${project.groupId}-${project.artifactId}</finalName>
    </build>
</project>
If you put this XML in a pom.xml and run mvn help:effective-pom, you will see that the output contains the line:
...
<finalName>org.sonatype.mavenbook-project-a</finalName>
...
When Maven reads a POM, it replaces references to properties when it loads the POM XML. Maven properties occur frequently in advanced Maven usage, and are similar to properties in other systems such as Ant or Velocity. They are simply variables delimited by ${...}. Maven provides three implicit variables which can be used to access environment variables, POM information, and Maven Settings:
env
The env variable exposes environment variables exposed by your operating system or shell. For example, a reference to ${env.PATH} in a Maven POM would be replaced by the ${PATH} environment variable (or %PATH% in Windows).
project
The project variable exposes the POM. You can use a dot-notated (.) path to reference the value of a POM element. For example, in this section we used the groupId and artifactId to set the finalName element in the build configuration. The syntax for this property reference was: {project.groupId}-{project.artifactId}.
settings
The settings variable exposes Maven settings information. You can use a dot-notated (.) path to reference the value of an element in a settings.xml file. For example, ${settings.offline} would reference the value of the offline element in ~/.m2/settings.xml.
In addition to the three implicit variables, you can reference system properties and any custom properties set in the Maven POM or in a build profile:
Java System Properties
All properties accessible via getProperties() on java.lang.System are exposed as POM properties. Some examples of system properties are: ${user.name}, ${user.home}, ${java.home}, and ${os.name}. A full list of system properties can be found in the Javadoc for the System class.
x
Arbitrary properties can be set with a properties element in a pom.xml or settings.xml, or properties can be loaded from external files. If you set a property named fooBar in your pom.xml, that same property is referenced with ${fooBar}. Custom properties come in handy when you are building a system that filters resources and targets different deployment platforms. Here is the syntax for setting ${foo}=bar in a POM:
<properties>
    <foo>bar</foo>
</properties>
For a more comprehensive list of available properties, see Chapter 9, Properties and Resource Filtering.
3.4. Project Dependencies
Maven can manage both internal and external dependencies. An external dependency for a Java project might be a library such as Plexus, the Spring Framework, or Log4J. An internal dependency is illustrated by a web application project depending on another project that contains service classes, model objects, or persistence logic. Project Dependencies shows some examples of project dependencies.
Project Dependencies.
<project>
    ...
    <dependencies>
        <dependency>
            <groupId>org.codehaus.xfire</groupId>
            <artifactId>xfire-java5</artifactId>
            <version>1.2.5</version>
        </dependency>
        <dependency>
            <groupId>junit</groupId>
            <artifactId>junit</artifactId>
            <version>3.8.1</version>
            <scope>test</scope>
        </dependency>
        <dependency>
            <groupId>javax.servlet</groupId>
            <artifactId>servlet-api</artifactId>
            <version>2.4</version>
            <scope>provided</scope>
        </dependency>
    </dependencies>
    ...
</project>
The first dependency is a compile dependency on the XFire SOAP library from Codehaus. You would use this type of dependency if your project depended on this library for compilation, testing, and during execution. The second dependency is a test-scoped dependency on JUnit. You would use a test-scoped dependency when you need to reference this library only during testing. The last dependency in Project Dependencies is a dependency on the Servlet 2.4 API. The last dependency is scoped as a provided dependency. You would use a provided scope when the application you are developing needs a library for compilation and testing, but this library is supplied by a container at runtime.
3.4.1. Dependency Scope
Project Dependencies briefly introduced three of the five dependency scopes: compile, test, and provided. Scope controls which dependencies are available in which classpath, and which dependencies are included with an application. Let’s explore each scope in detail:
compile
compile is the default scope; all dependencies are compile-scoped if a scope is not supplied. compile dependencies are available in all classpaths, and they are packaged.
provided
provided dependencies are used when you expect the JDK or a container to provide them. For example, if you were developing a web application, you would need the Servlet API available on the compile classpath to compile a servlet, but you wouldn’t want to include the Servlet API in the packaged WAR; the Servlet API JAR is supplied by your application server or servlet container. provided dependencies are available on the compilation classpath (not runtime). They are not transitive, nor are they packaged.
runtime
runtime dependencies are required to execute and test the system, but they are not required for compilation. For example, you may need a JDBC API JAR at compile time and the JDBC driver implementation only at runtime.
test
test-scoped dependencies are not required during the normal operation of an application, and they are available only during test compilation and execution phases.
system
The system scope is similar to provided except that you have to provide an explicit path to the JAR on the local file system. This is intended to allow compilation against native objects that may be part of the system libraries. The artifact is assumed to always be available and is not looked up in a repository. If you declare the scope to be system, you must also provide the systemPath element. Note that this scope is not recommended (you should always try to reference dependencies in a public or custom Maven repository).
Maven: The Complete Reference
- 3.4. Project Dependencies
3.4. Project Dependencies
Maven can manage both internal and external dependencies. An external dependency for a Java project might be a library such as Plexus, the Spring Framework, or Log4J. An internal dependency is illustrated by a web application project depending on another project that contains service classes, model objects, or persistence logic. Project Dependencies shows some examples of project dependencies.Project Dependencies.
... org.codehaus.xfirexfire-java51.2.5junitjunit3.8.1testjavax.servletservlet-api2.4provided ...
The first dependency is a compile dependency on the XFire SOAP library from Codehaus. You would use this type of dependency if your project depended on this library for compilation, testing, and during execution. The second dependency is a test-scoped dependency on JUnit. You would use a test-scoped dependency when you need to reference this library only during testing. The last dependency in Project Dependencies is a dependency on the Servlet 2.4 API. The last dependency is scoped as a provided dependency. You would use a provided scope when the application you are developing needs a library for compilation and testing, but this library is supplied by a container at runtime.
3.4.1. Dependency Scope
Project Dependencies briefly introduced three of the five dependency scopes: compile, test, and provided. Scope controls which dependencies are available in which classpath, and which dependencies are included with an application. Let’s explore each scope in detail:
compile
compile is the default scope; all dependencies are compile-scoped if a scope is not supplied. compile dependencies are available in all classpaths, and they are packaged.
provided
provided dependencies are used when you expect the JDK or a container to provide them. For example, if you were developing a web application, you would need the Servlet API available on the compile classpath to compile a servlet, but you wouldn’t want to include the Servlet API in the packaged WAR; the Servlet API JAR is supplied by your application server or servlet container. provided dependencies are available on the compilation classpath (not runtime). They are not transitive, nor are they packaged.
runtime
runtime dependencies are required to execute and test the system, but they are not required for compilation. For example, you may need a JDBC API JAR at compile time and the JDBC driver implementation only at runtime.
test
test-scoped dependencies are not required during the normal operation of an application, and they are available only during test compilation and execution phases.
system
The system scope is similar to provided except that you have to provide an explicit path to the JAR on the local file system. This is intended to allow compilation against native objects that may be part of the system libraries. The artifact is assumed to always be available and is not looked up in a repository. If you declare the scope to be system, you must also provide the systemPath element. Note that this scope is not recommended (you should always try to reference dependencies in a public or custom Maven repository).
available in compile classpath | packaged | whether transitive | |
compile | 1 | 1 | 1 |
provided | 1 | 0 | 0 |
runtime | 0 | 1 | 1 |
test | 0 | 0 | 0 |
3.4.2. Optional Dependencies
Assume that you are working on a library that provides caching behavior. Instead of writing a caching system from scratch, you want to use some of the existing libraries that provide caching on the file system and distributed caches. Also assume that you want to give the end user an option to cache on the file system or to use an in-memory distributed cache. To cache on the file system, you’ll want to use a freely available library called EHCache (http://ehcache.sourceforge.net/), and to cache in a distributed in-memory cache, you want to use another freely available caching library named SwarmCache ( http://swarmcache.sourceforge.net/ ). You’ll code an interface and create a library that can be configured to use either EHCache or SwarmCache, but you want to avoid adding a dependency on both caching libraries to any project that depends on your library.In other words, you need both libraries to compile this library project, but you don’t want both libraries to show up as transitive runtime dependencies for the project that uses your library. You can accomplish this by using optional dependencies as shown in Declaring Optional Dependencies.Declaring Optional Dependencies.
<project>
    <modelVersion>4.0.0</modelVersion>
    <groupId>org.sonatype.mavenbook</groupId>
    <artifactId>my-project</artifactId>
    <version>1.0.0</version>
    <dependencies>
        <dependency>
            <groupId>net.sf.ehcache</groupId>
            <artifactId>ehcache</artifactId>
            <version>1.4.1</version>
            <optional>true</optional>
        </dependency>
        <dependency>
            <groupId>swarmcache</groupId>
            <artifactId>swarmcache</artifactId>
            <version>1.0RC2</version>
            <optional>true</optional>
        </dependency>
        <dependency>
            <groupId>log4j</groupId>
            <artifactId>log4j</artifactId>
            <version>1.2.13</version>
        </dependency>
    </dependencies>
</project>
Since you’ve declared these dependencies as optional in my-project, if you’ve defined a project that depends on my-project which needs those dependencies, you’ll have to include them explicitly in the project that depends on my-project. For example, if you were writing an application which depended on my-project and wanted to use the EHCache implementation, you would need to add the following dependency element to your project.
<project>
    <modelVersion>4.0.0</modelVersion>
    <groupId>org.sonatype.mavenbook</groupId>
    <artifactId>my-application</artifactId>
    <version>1.0.0</version>
    <dependencies>
        <dependency>
            <groupId>org.sonatype.mavenbook</groupId>
            <artifactId>my-project</artifactId>
            <version>1.0.0</version>
        </dependency>
        <dependency>
            <groupId>net.sf.ehcache</groupId>
            <artifactId>ehcache</artifactId>
            <version>1.4.1</version>
        </dependency>
    </dependencies>
</project>
In an ideal world, you wouldn’t have to use optional dependencies. Instead of having one large project with a series of optional dependencies, you would separate the EHCache-specific code to a my-project-ehcache submodule and the SwarmCache-specific code to a my-project-swarmcache submodule. This way, instead of requiring projects that reference my-project to specifically add a dependency, projects can just reference a particular implementation project and benefit from the transitive dependency.
3.4.4. Transitive Dependencies
project-a depends on project-b, which in turn depends on project-c, then project-c is considered a transitive dependency of project-a. If project-c depended on project-d, then project-d would also be considered a transitive dependency of project-a. Part of Maven’s appeal is that it can manage transitive dependencies and shield the developer from having to keep track of all of the dependencies required to compile and run an application. You can just depend on something like the Spring Framework and not have to worry about tracking down every last dependency of the Spring Framework.
Maven accomplishes this by building a graph of dependencies and dealing with any conflicts and overlaps that might occur. For example, if Maven sees that two projects depend on the same groupId and artifactId, it will sort out which dependency to use automatically, always favoring the more recent version of a dependency. Although this sounds convenient, there are some edge cases where transitive dependencies can cause some configuration issues. For these scenarios, you can use a dependency exclusion.
Transitive Dependencies and Scope
Each of the scopes outlined earlier in the section Section 3.4.1, “Dependency Scope” affects not just the scope of the dependency in the declaring project, but also how it acts as a transitive dependency. The easiest way to convey this information is through a table, as in Table 3.1, “How Scope Affects Transitive Dependencies”. Scopes in the top row represent the scope of a transitive dependency. Scopes in the leftmost column represent the scope of a direct dependency. The intersection of the row and column is the scope that is assigned to a transitive dependency. A blank cell in this table means that the transitive dependency will be omitted.
Table 3.1. How Scope Affects Transitive Dependencies
Direct Scope | vs. Transitive Scope | |||
|---|---|---|---|---|
compile | provided | runtime | test | |
compile | compile | - | runtime | - |
provided | provided | - | provided | - |
runtime | runtime | - | runtime | - |
test | test | - | test | - |
To illustrate the relationship of transitive dependency scope to direct dependency scope, consider the following example. If project-a contains a test scoped dependency on project-b which contains a compile scoped dependency on project-c. project-c would be a test-scoped transitive dependency of project-a.
You can think of this as a transitive boundary which acts as a filter on dependency scope. Transitive dependencies which are provided and test scope usually do not affect a project. Transitive dependencies which are compile and runtime scoped usually affect a project regardless of the scope of a direct dependency. Transitive dependencies which are compile scoped will have the same scope of the direct dependency . Transitive dependencies which are runtime scoped will generally have the same scope of the direct dependency except when the direct dependency has a scope of compile. When a transitive dependency is runtime scoped and the direct dependency is compile scoped, the transitive dependency will have an effective scope of runtime.
available in compile classpath | packaged | whether transitive | |
compile | 1 | 1 | 1 |
provided | 1 | 0 | 0 |
runtime | 0 | 1 | 1 |
test | 0 | 0 | 0 |
对于Transitive Scope,首先判断,whether transitive是否为1:
如果whether transitive是0,那么就相当于没有这个依赖;
如果whether transitive是1,那么接下来是,对available in compile classpath 和 packaged,分别做相与操作。
3.4.5. Conflict Resolution
There will be times when you need to exclude a transitive dependency, such as when you are depending on a project that depends on another project, but you would like to either exclude the dependency altogether or replace the transitive dependency with another dependency that provides the same functionality. Excluding a Transitive Dependency shows an example of a dependency element that adds a dependency on project-a, but excludes the transitive dependency project-b.
Excluding a Transitive Dependency.
<dependency>
    <groupId>org.sonatype.mavenbook</groupId>
    <artifactId>project-a</artifactId>
    <version>1.0</version>
    <exclusions>
        <exclusion>
            <groupId>org.sonatype.mavenbook</groupId>
            <artifactId>project-b</artifactId>
        </exclusion>
    </exclusions>
</dependency>
Often, you will want to replace a transitive dependency with another implementation. For example, if you are depending on a library that depends on the Sun JTA API, you may want to replace the declared transitive dependency. Hibernate is one example. Hibernate depends on the Sun JTA API JAR, which is not available in the central Maven repository because it cannot be freely redistributed. Fortunately, the Apache Geronimo project has created an independent implementation of this library that can be freely redistributed. To replace a transitive dependency with another dependency, you would exclude the transitive dependency and declare a dependency on the project you wanted instead. Excluding and Replacing a Transitive Dependency shows an example of a such replacement.
Excluding and Replacing a Transitive Dependency.
<dependencies>
    <dependency>
        <groupId>org.hibernate</groupId>
        <artifactId>hibernate</artifactId>
        <version>3.2.5.ga</version>
        <exclusions>
            <exclusion>
                <groupId>javax.transaction</groupId>
                <artifactId>jta</artifactId>
            </exclusion>
        </exclusions>
    </dependency>
    <dependency>
        <groupId>org.apache.geronimo.specs</groupId>
        <artifactId>geronimo-jta_1.1_spec</artifactId>
        <version>1.1</version>
    </dependency>
</dependencies>
In Excluding and Replacing a Transitive Dependency, there is nothing marking the dependency on geronimo-jta_1.1_spec as a replacement, it just happens to be a library which provides the same API as the original JTA dependency.
Luckily, Maven provides a way for you to consolidate dependency version numbers in the dependencyManagement element. You’ll usually see the dependencyManagement element in a top-level parent POM for an organization or project. Using the dependencyManagement element in a pom.xml allows you to reference a dependency in a child project without having to explicitly list the version. Maven will walk up the parent-child hierarchy until it finds a project with a dependencyManagement element, it will then use the version specified in this dependencyManagement element.
For example, if you have a large set of projects which make use of the MySQL Java connector version 5.1.2, you could define the following dependencyManagement element in your multi-module project’s top-level POM.
Defining Dependency Versions in a Top-level POM.
<project>
    <modelVersion>4.0.0</modelVersion>
    <groupId>org.sonatype.mavenbook</groupId>
    <artifactId>a-parent</artifactId>
    <version>1.0.0</version>
    ...
    <dependencyManagement>
        <dependencies>
            <dependency>
                <groupId>mysql</groupId>
                <artifactId>mysql-connector-java</artifactId>
                <version>5.1.2</version>
                <scope>runtime</scope>
            </dependency>
            ...
            <dependencies>
    </dependencyManagement>
Then, in a child project, you can add a dependency to the MySQL Java Connector using the following dependency XML:
<project>
    <modelVersion>4.0.0</modelVersion>
    <parent>
        <groupId>org.sonatype.mavenbook</groupId>
        <artifactId>a-parent</artifactId>
        <version>1.0.0</version>
    </parent>
    <artifactId>project-a</artifactId>
    ...
    <dependencies>
        <dependency>
            <groupId>mysql</groupId>
            <artifactId>mysql-connector-java</artifactId>
        </dependency>
    </dependencies>
</project>
You should notice that the child project did not have to explicitly list the version of the mysql-connector-java dependency. Because this dependency was defined in the top-level POM’s dependencyManagement element, the version number is going to propagate to the child project’s dependency on mysql-connector-java. Note that if this child project did define a version, it would override the version listed in the top-level POM’s dependencyManagement section. That is, the dependencyManagement version is only used when the child does not declare a version directly.
Dependency management in a top-level POM is different from just defining a dependency on a widely shared parent POM. For starters, all dependencies are inherited. If mysql-connector-java were listed as a dependency of the top-level parent project, every single project in the hierarchy would have a reference to this dependency. Instead of adding in unnecessary dependencies, using dependencyManagement allows you to consolidate and centralize the management of dependency versions without adding dependencies which are inherited by all children. In other words, the dependencyManagement element is equivalent to an environment variable which allows you to declare a dependency anywhere below a project without specifying a version number.
3.5. Project Relationships
3.5.1. More on Coordinates
Coordinates define a unique location for a project. Projects are related to one another using Maven Coordinates. project-a doesn’t just depend on project-b; a project with a groupId, artifactId, and version depends on another project with a groupId, artifactId, and version. To review, a Maven Coordinate is made up of three components:
groupId
A groupId groups a set of related artifacts. Group identifiers generally resemble a Java package name. For example, the groupId org.apache.maven is the base groupId for all artifacts produced by the Apache Maven project. Group identifiers are translated into paths in the Maven Repository; for example, the org.apache.maven groupId can be found in /maven2/org/apache/maven on repo1.maven.org.
artifactId
The artifactId is the project’s main identifier. When you generate an artifact, this artifact is going to be named with the artifactId. When you refer to a project, you are going to refer to it using the artifactId. The artifactId, groupId combination must be unique. In other words, you can’t have two separate projects with the same artifactId and groupId; artifactId s are unique within a particular groupId.
Note: While '.'s are commonly used in groupId s, you should try to avoid using them in artifactId s. This can cause issues when trying to parse a fully qualified name down into the subcomponents.
version
When an artifact is released, it is released with a version number. This version number is a numeric identifier such as "1.0", "1.1.1", or "1.1.2-alpha-01". You can also use what is known as a snapshot version. A snapshot version is a version for a component which is under development, snapshot version numbers always end in SNAPSHOT; for example, "1.0-SNAPSHOT", "1.1.1-SNAPSHOT", and "1-SNAPSHOT". the section called “Version Build Numbers” introduces versions and version ranges.
There is a fourth, less-used qualifier:
classifier
You would use a classifier if you were releasing the same code but needed to produce two separate artifacts for technical reasons. For example, if you wanted to build two separate artifacts of a JAR, one compiled with the Java 1.4 compiler and another compiled with the Java 6 compiler, you might use the classifier to produce two separate JAR artifacts under the same groupId:artifactId:version combination. If your project uses native extensions, you might use the classifier to produce an artifact for each target platform. Classifiers are commonly used to package up an artifact’s sources, JavaDocs or binary assemblies.
When we talk of dependencies in this book, we often use the following shorthand notation to describe a dependency: groupId:artifactId:version. To refer to the 2.5 release of the Spring Framework, we would refer to it as org.springframework:spring:2.5
3.5.2. Project Inheritance
There are going to be times when you want a project to inherit values from a parent POM. You might be building a large system, and you don’t want to have to repeat the same dependency elements over and over again. You can avoid repeating yourself if your projects make use of inheritance via the parent element. When a project specifies a parent, it inherits the information in the parent project’s POM. It can then override and add to the values specified in this parent POM.
All Maven POMs inherit values from a parent POM. If a POM does not specify a direct parent using the parent element, that POM will inherit values from the Super POM. Project Inheritance shows the parent element of project-a which inherits the POM defined by the a-parent project.
Project Inheritance.
<project>
    <parent>
        <groupId>com.training.killerapp</groupId>
        <artifactId>a-parent</artifactId>
        <version>1.0-SNAPSHOT</version>
    </parent>
    <artifactId>project-a</artifactId>
    ...
</project>
When a project specifies a parent project, Maven uses that parent POM as a starting point before it reads the current project’s POM. It inherits everything, including the groupId and version number. You’ll notice that project-a does not specify either, both groupId and version are inherited from a-parent. With a parent element, all a POM really needs to define is an artifactId. This isn’t mandatory, project-a could have a different groupId and version, but by not providing values, Maven will use the values specified in the parent POM. If you start using Maven to manage and build large multi-module projects, you will often be creating many projects which share a common groupId and version.
When you inherit a POM, you can choose to live with the inherited POM information or to selectively override it. The following is a list of items a Maven POM inherits from its parent POM:
identifiers (at least one of
groupIdorartifactIdmust be overridden.)dependencies
developers and contributors
plugin lists
reports lists
plugin executions (executions with matching ids are merged)
plugin configuration
When Maven inherits dependencies, it will add dependencies of child projects to the dependencies defined in parent projects. You can use this feature of Maven to specify widely used dependencies across all projects which inherit from a top-level POM. For example, if your system makes universal use of the Log4J logging framework, you can list this dependency in your top-level POM. Any projects which inherit POM information from this project will automatically have Log4J as a dependency. Similarly, if you need to make sure that every project is using the same version of a Maven plugin, you can list this Maven plugin version explicitly in a top-level parent POM’s pluginManagement section.
Maven assumes that the parent POM is available from the local repository, or available in the parent directory (../pom.xml) of the current project. If neither location is valid this default behavior may be overridden via the relativePath element. For example, some organizations prefer a flat project structure where a parent project’s pom.xml isn’t in the parent directory of a child project. It might be in a sibling directory to the project. If your child project were in a directory ./project-a and the parent project were in a directory named ./a-parent, you could specify the relative location of parent-a's POM with the following configuration:
<project>
    <parent>
        <groupId>org.sonatype.mavenbook</groupId>
        <artifactId>a-parent</artifactId>
        <version>1.0-SNAPSHOT</version>
        <relativePath>../a-parent/pom.xml</relativePath>
    </parent>
    <artifactId>project-a</artifactId>
</project>
3.6. POM Best Practices
Maven can be used to manage everything from simple, single-project systems to builds that involve hundreds of inter-related submodules. Part of the learning process with Maven isn’t just figuring out the syntax for configuring Maven, it is learning the "Maven Way"—the current set of best practices for organizing and building projects using Maven. This section attempts to distill some of this knowledge to help you adopt best practices from the start without having to wade through years of discussions on the Maven mailing lists.
3.6.1. Grouping Dependencies
If you have a set of dependencies which are logically grouped together. You can create a project with pom packaging that groups dependencies together. For example, let’s assume that your application uses Hibernate, a popular Object-Relational mapping framework. Every project which uses Hibernate might also have a dependency on the Spring Framework and a MySQL JDBC driver. Instead of having to include these dependencies in every project that uses Hibernate, Spring, and MySQL you could create a special POM that does nothing more than declare a set of common dependencies. You could create a project called persistence-deps (short for Persistence Dependencies), and have every project that needs to do persistence depend on this convenience project:
Consolidating Dependencies in a Single POM Project.
<project>
    <groupId>org.sonatype.mavenbook</groupId>
    <artifactId>persistence-deps</artifactId>
    <version>1.0</version>
    <packaging>pom</packaging>
    <dependencies>
        <dependency>
            <groupId>org.hibernate</groupId>
            <artifactId>hibernate</artifactId>
            <version>${hibernateVersion}</version>
        </dependency>
        <dependency>
            <groupId>org.hibernate</groupId>
            <artifactId>hibernate-annotations</artifactId>
            <version>${hibernateAnnotationsVersion}</version>
        </dependency>
        <dependency>
            <groupId>org.springframework</groupId>
            <artifactId>spring-hibernate3</artifactId>
            <version>${springVersion}</version>
        </dependency>
        <dependency>
            <groupId>mysql</groupId>
            <artifactId>mysql-connector-java</artifactId>
            <version>${mysqlVersion}</version>
        </dependency>
    </dependencies>
    <properties>
        <mysqlVersion>(5.1,)</mysqlVersion>
        <springVersion>(2.0.6,)</springVersion>
        <hibernateVersion>3.2.5.ga</hibernateVersion>
        <hibernateAnnotationsVersion>3.3.0.ga</hibernateAnnotationsVersion>
    </properties>
</project>
If you create this project in a directory named persistence-deps, all you need to do is create this pom.xml and run mvn install. Since the packaging type is pom, this POM is installed in your local repository. You can now add this project as a dependency and all of its dependencies will be added as transitive dependencies to your project. When you declare a dependency on this persistence-deps project, don’t forget to specify the dependency type as pom.
Declaring a Dependency on a POM.
<project>
    <description>This is a project requiring JDBC</description>
    ...
    <dependencies>
        ...
        <dependency>
            <groupId>org.sonatype.mavenbook</groupId>
            <artifactId>persistence-deps</artifactId>
            <version>1.0</version>
            <type>pom</type>
        </dependency>
    </dependencies>
</project>
Consolidating related dependencies is a good way to cut down on the length of pom.xml files that start having to depend on a large number of dependencies. If you need to share a large number of dependencies between projects, you could also just establish parent-child relationships between projects and refactor all common dependencies to the parent project, but the disadvantage of the parent-child approach is that a project can have only one parent. Sometimes it makes more sense to group similar dependencies together and reference a pom dependency. This way, your project can reference as many of these consolidated dependency POMs as it needs.
3.6.2. Multi-module vs. Inheritance
There is a difference between inheriting from a parent project and being managed by a multimodule project. A parent project is one that passes its values to its children. A multimodule project simply manages a group of other subprojects or modules. The multimodule relationship is defined from the topmost level downwards. When setting up a multimodule project, you are simply telling a project that its build should include the specified modules. Multimodule builds are to be used to group modules together in a single build. The parent-child relationship is defined from the leaf node upwards. The parent-child relationship deals more with the definition of a particular project. When you associate a child with its parent, you are telling Maven that a project’s POM is derived from another.
To illustrate the decision process that goes into choosing a design that uses inheritance vs. multi-module or both approaches consider the following two examples: the Maven project used to generate this book and a hypothetical project that contains a number of logically grouped modules.
Simple Project
First, let’s take a look at the maven-book project. The inheritance and multi-module relationships are shown in Figure 3.4, “maven-book Multi-module vs. Inheritance”.
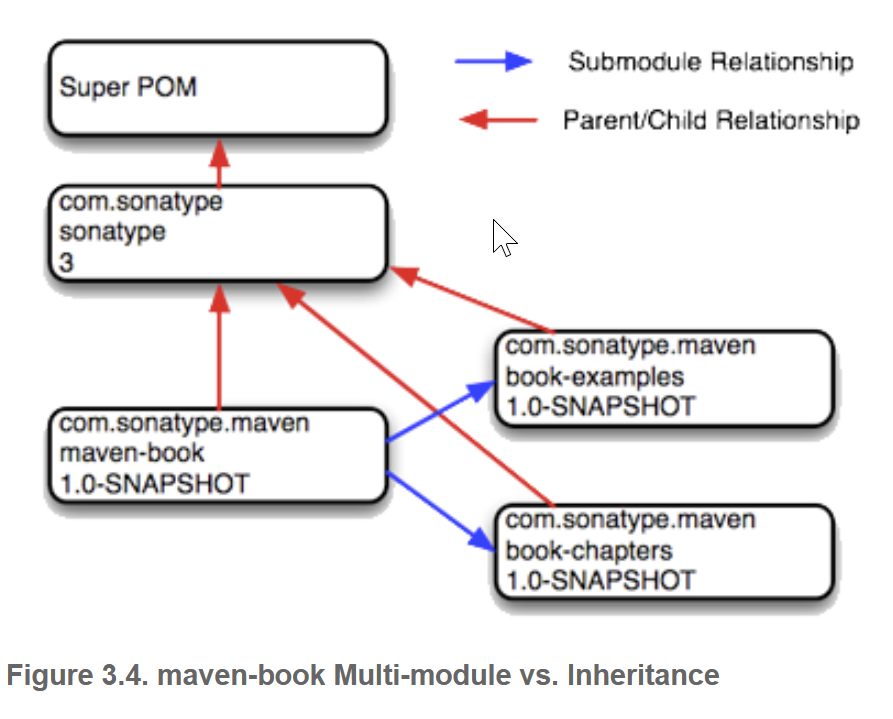
When we build this Maven book you are reading, we run mvn package in a multi-module project named maven-book. This multi-module project includes two submodules: book-examples and book-chapters. Neither of these projects share the same parent, they are related only in that they are modules in the maven-book project. book-examples builds the ZIP and TGZ archives you downloaded to get this book’s example. When we run the book-examples build from book-examples/ directory with mvn package, it has no knowledge that it is a part of the larger maven-book project. book-examples doesn’t really care about maven-book, all it knows in life is that its parent is the top-most sonatype POM and that it creates an archive of examples. In this case, the maven-book project exists only as a convenience and as an aggregator of modules.
Each of the three projects: maven-book, book-examples, and book-chapters all list a shared "corporate" parent — sonatype. This is a common practice in organizations which have adopted Maven, instead of having every project extend the Super POM by default, some organizations define a top-level corporate POM that serves as the default parent when a project doesn’t have any good reason to depend on another.
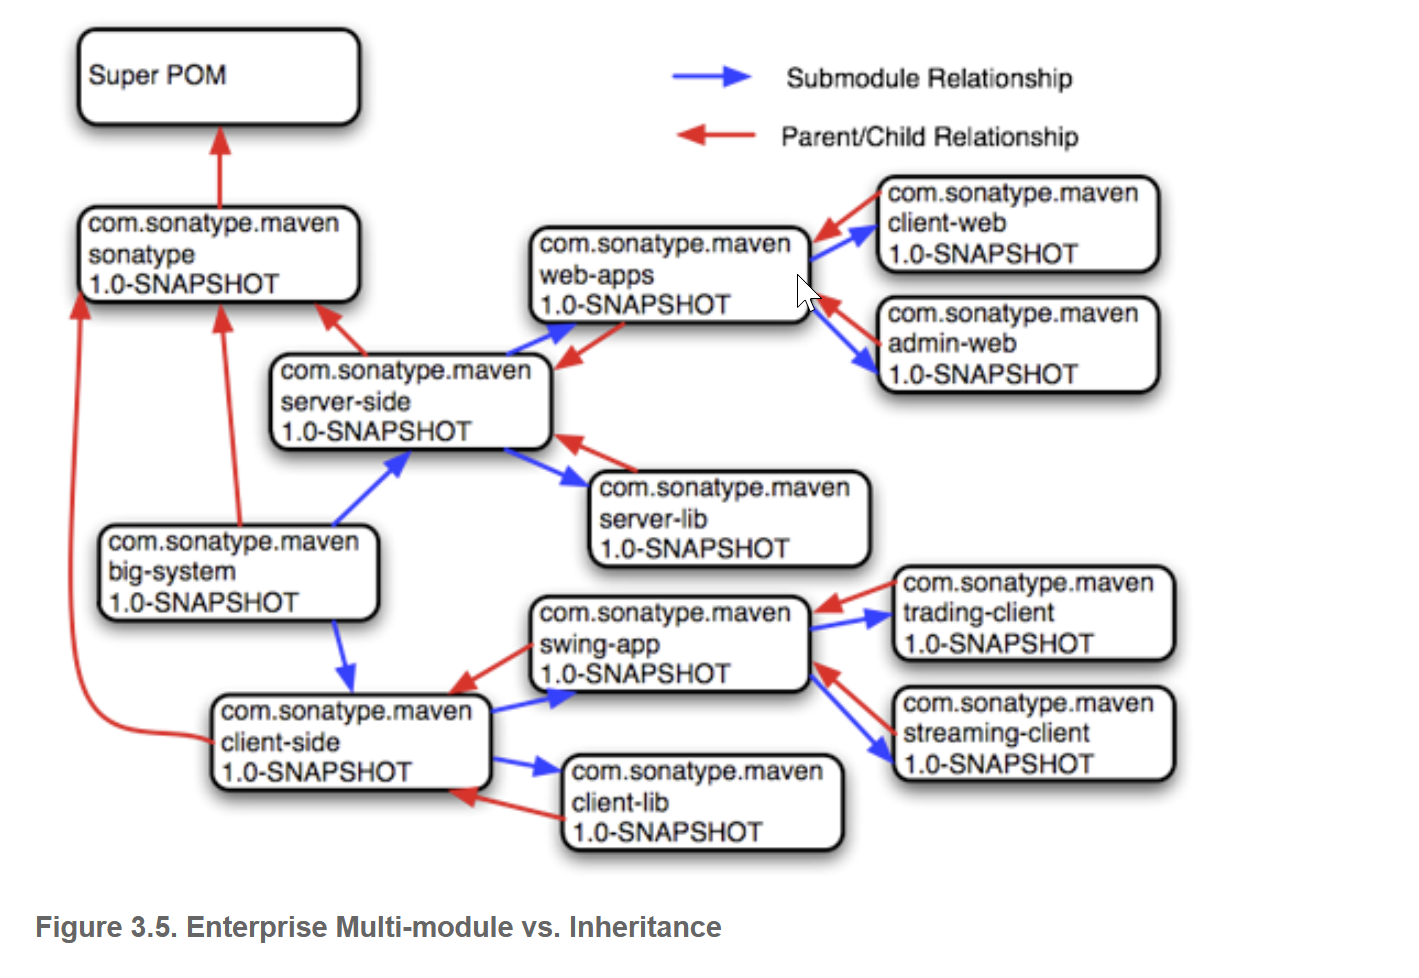
Multi-module Enterprise Project
Let’s take a look at an example that provides a more accurate picture of a real-world project where inheritance and multi-module relationships exist side by side. Figure 3.5, “Enterprise Multi-module vs. Inheritance” shows a collection of projects that resemble a typical set of projects in an enterprise application. There is a top-level POM for the corporation with an artifactId of sonatype. There is a multi-module project named big-system which references sub-modules server-side and client-side.
Chapter 4. The Build Lifecycle
https://books.sonatype.com/mvnref-book/reference/lifecycle-sect-structure.html
4.1. Introduction
Maven models projects as nouns which are described by a POM. The POM captures the identity of a project: What does a project contain? What type of packaging a project needs? Does the project have a parent? What are the dependencies? We’ve explored the idea of describing a project in the previous chapters, but we haven’t introduced the mechanism that allows Maven to act upon these objects. In Maven the "verbs" are goals packaged in Maven plugins which are tied to a phases in a build lifecycle. A Maven lifecycle consists of a sequence of named phases: prepare-resources, compile, package, and install among other. There is phase that captures compilation and a phase that captures packaging. There are pre- and post- phases which can be used to register goals which must run prior to compilation, or tasks which must be run after a particular phase. When you tell Maven to build a project, you are telling Maven to step through a defined sequence of phases and execute any goals which may have been registered with each phase.
A build lifecycle is an organized sequence of phases that exist to give order to a set of goals. Those goals are chosen and bound by the packaging type of the project being acted upon.
There are three standard lifecycles in Maven: clean, default (sometimes called build) and site.
In this chapter, you are going to learn how Maven ties goals to lifecycle phases and how the lifecycle can be customized. You will also learn about the default lifecycle phases.
4.1.1. Clean Lifecycle (clean)
The first lifecycle you’ll be interested in is the simplest lifecycle in Maven. Running mvn clean invokes the clean lifecycle which consists of three lifecycle phases:
pre-cleancleanpost-clean
The interesting phase in the clean lifecycle is the clean phase. The Clean plugin’s clean goal (clean:clean) is bound to the clean phase in the clean lifecycle. The clean:clean goal deletes the output of a build by deleting the build directory. If you haven’t customized the location of the build directory it will be the ${basedir}/target directory as defined by the Super POM. When you execute the clean:clean goal you do not do so by executing the goal directly with mvn clean:clean, you do so by executing the clean phase of the clean lifecycle. Executing the clean phase gives Maven an opportunity to execute any other goals which may be bound to the pre-clean phase.
For example, suppose you wanted to trigger an antrun:run goal task to echo a notification on pre-clean, or to make an archive of a project’s build directory before it is deleted. Simply running the clean:clean goal will not execute the lifecycle at all, but specifying the clean phase will use the clean lifecycle and advance through the three lifecycle phases until it reaches the clean phase. Triggering a Goal on pre-clean shows an example of build configuration which binds the antrun:run goal to the pre-clean phase to echo an alert that the project artifact is about to be deleted. In this example, the antrun:run goal is being used to execute some arbitrary Ant commands to check for an existing project artifact. If the project’s artifact is about to be deleted it will print this to the screen
Triggering a Goal on pre-clean.
<project>
    ...
    <build>
        <plugins>... <plugin>
                <artifactId>maven-antrun-plugin</artifactId>
                <executions>
                    <execution>
                        <id>file-exists</id>
                        <phase>pre-clean</phase>
                        <goals>
                            <goal>run</goal>
                        </goals>
                        <configuration>
                            <tasks>
                                <!-- adds the ant-contrib tasks (if/then/else used below) -->
                                <taskdef resource="net/sf/antcontrib/antcontrib.properties" />
                                <available
                                     file="${project.build.directory}/${project.build.finalName}.${project.packaging}"
                                     property="file.exists" value="true" />

                                <if>
                                    <not>
                                        <isset property="file.exists" />
                                    </not>
                                    <then>
                                        <echo>No
                                            ${project.build.finalName}.${project.packaging} to
                                            delete</echo>
                                    </then>
                                    <else>
                                        <echo>Deleting
                                            ${project.build.finalName}.${project.packaging}</echo>
                                    </else>
                                </if>
                            </tasks>
                        </configuration>
                    </execution>
                </executions>
                <dependencies>
                    <dependency>
                        <groupId>ant-contrib</groupId>
                        <artifactId>ant-contrib</artifactId>
                        <version>1.0b2</version>
                    </dependency>
                </dependencies>
            </plugin>
        </plugins>
    </build>
</project>
Running mvn clean on a project with this build configuration will produce output similar to the following:
[INFO] Scanning for projects...
[INFO] ----------------------------------------------------------------------
[INFO] Building Your Project
[INFO]task-segment: [clean]
[INFO] ----------------------------------------------------------------------
[INFO] [antrun:run {execution: file-exists}]
[INFO] Executing tasks
[echo] Deleting your-project-1.0-SNAPSHOT.jar
[INFO] Executed tasks
[INFO] [clean:clean]
[INFO] Deleting directory ~/corp/your-project/target
[INFO] Deleting directory ~/corp/your-project/target/classes
[INFO] Deleting directory ~/corp/your-project/target/test-classes
[INFO] ------------------------------------------------------------------------
[INFO] BUILD SUCCESSFUL
[INFO] ------------------------------------------------------------------------
[INFO] Total time: 1 second
[INFO] Finished at: Wed Nov 08 11:46:26 CST 2006
[INFO] Final Memory: 2M/5M
[INFO] ------------------------------------------------------------------------
In addition to configuring Maven to run a goal during the pre-clean phase, you can also customize the Clean plugin to delete files in addition to the build output directory. You can configure the plugin to remove specific files in a fileSet. The example below configures clean to remove all .class files in a directory named target-other/ using standard Ant file wildcards: * and \**.
Customizing Behavior of the Clean Plugin.
<project>
    <modelVersion>4.0.0</modelVersion>
    ...
    <build>
        <plugins>
            <plugin>
                <artifactId>maven-clean-plugin</artifactId>
                <configuration>
                    <filesets>
                        <fileset>
                            <directory>target-other</directory>
                            <includes>
                                <include>*.class</include>
                            </includes>
                        </fileset>
                    </filesets>
                </configuration>
            </plugin>
        </plugins>
    </build>
</project>
4.1.2. Default Lifecycle (default)
Most Maven users will be familiar with the default lifecycle. It is a general model of a build process for a software application. The first phase is validate and the last phase is deploy. The phases in the default Maven lifecycle are shown in Table 4.1, “Maven Lifecycle Phases”.
Table 4.1. Maven Lifecycle Phases
Lifecycle Phase | Description |
|---|---|
validate | Validate the project is correct and all necessary information is available to complete a build |
generate-sources | Generate any source code for inclusion in compilation |
process-sources | Process the source code, for example to filter any values |
generate-resources | Generate resources for inclusion in the package |
process-resources | Copy and process the resources into the destination directory, ready for packaging |
compile | Compile the source code of the project |
process-classes | Post-process the generated files from compilation, for example to do bytecode enhancement on Java classes |
generate-test-sources | Generate any test source code for inclusion in compilation |
process-test-sources | Process the test source code, for example to filter any values |
generate-test-resources | Create resources for testing |
process-test-resources | Copy and process the resources into the test destination directory |
test-compile | Compile the test source code into the test destination directory |
test | Run tests using a suitable unit testing framework. These tests should not require the code be packaged or deployed |
prepare-package | Perform any operations necessary to prepare a package before the actual packaging. This often results in an unpacked, processed version of the package (coming in Maven 2.1+) |
package | Take the compiled code and package it in its distributable format, such as a JAR, WAR, or EAR |
pre-integration-test | Perform actions required before integration tests are executed. This may involve things such as setting up the required environment |
integration-test | Process and deploy the package if necessary into an environment where integration tests can be run |
post-integration-test | Perform actions required after integration tests have been executed. This may include cleaning up the environment |
verify | Run any checks to verify the package is valid and meets quality criteria |
install | Install the package into the local repository, for use as a dependency in other projects locally |
deploy | Copies the final package to the remote repository for sharing with other developers and projects (usually only relevant during a formal release) |
4.1.3. Site Lifecycle (site)
Maven does more than build software artifacts from project, it can also generate project documentation and reports about the project, or a collection of projects. Project documentation and site generation have a dedicated lifecycle which contains four phases:
pre-site
site
post-site
site-deploy
The default goals bound to the site lifecycle is:
site - site:site
site-deploy -site:deploy
The packaging type does not usually alter this lifecycle since packaging types are concerned primarily with artifact creation, not with the type of site generated. The Site plugin kicks off the execution of Doxia document generation and other report generation plugins. You can generate a site from a Maven project by running the following command:
$ mvn siteFor more information about Maven Site generation, see Chapter 10, Site Generation.
4.2. Package-specific Lifecycles
The specific goals bound to each phase default to a set of goals specific to a project’s packaging. A project with packaging jar has a different set of default goals from a project with a packaging of war. The packaging element affects the steps required to build a project. For an example of how the packaging affects the build, consider two projects: one with pom packaging and the other with jar packaging. The project with pom packaging will run the site:attach-descriptor goal during the package phase, and the project with jar packaging will run the jar:jar goal instead.
The following sections describe the lifecycle for all built-in packaging types in Maven. Use these sections to find out what default goals are mapped to default lifecycle phases.
4.2.1. JAR
JAR is the default packaging type, the most common, and thus the most commonly encountered lifecycle configuration. The default goals for the JAR lifecycle are shown in Table 4.2, “Default Goals for JAR Packaging”.
Table 4.2. Default Goals for JAR Packaging
Lifecycle Phase | Goal |
process-resources | resources:resources |
compile | compiler:compile |
process-test-resources | resources:testResources |
test-compile | compiler:testCompile |
test | surefire:test |
package | jar:jar |
install | install:install |
deploy | deploy:deploy |
4.2.2. POM
POM is the simplest packaging type. The artifact that it generates is itself only, rather than a JAR, SAR, or EAR. There is no code to test or compile, and there are no resources the process. The default goals for projects with POM packaging are shown in Table 4.3, “Default Goals for POM Packaging”.
Table 4.3. Default Goals for POM Packaging
Lifecycle Phase | Goal |
package | site:attach-descriptor |
install | install:install |
deploy | deploy:deploy |
4.2.3. Maven Plugin
This packaging type is similar to JAR packaging type with three additions: plugin:descriptor, plugin:addPluginArtifactMetadata, and plugin:updateRegistry. These goals generate a descriptor file and perform some modifications to the repository data. The default goals for projects with plugin packaging are shown in Table 4.4, “Default Goals for Plugin Packaging”.
Table 4.4. Default Goals for Plugin Packaging
Lifecycle Phase | Goal |
generate-resources | plugin:descriptor |
process-resources | resources:resources |
compile | compiler:compile |
process-test-resources | resources:testResources |
test-compile | compiler:testCompile |
test | surefire:test |
package | jar:jar, plugin:addPluginArtifactMetadata |
install | install:install, plugin:updateRegistry |
deploy | deploy:deploy |
4.2.5. WAR
The WAR packaging type is similar to the JAR and EJB types. The exception being the package goal of war:war. Note that the war:war goal requires a web.xml configuration in your src/main/webapp/WEB-INF directory. The default goals for projects with WAR packaging are shown in Table 4.6, “Default Goals for WAR Packaging”.
Table 4.6. Default Goals for WAR Packaging
Lifecycle Phase | Goal |
process-resources | resources:resources |
compile | compiler:compile |
process-test-resources | resources:testResources |
test-compile | compiler:testCompile |
test | surefire:test |
package | war:war |
install | install:install |
deploy | deploy:deploy |
4.3. Common Lifecycle Goals
Many of the packaging lifecycles have similar goals. If you look at the goals bound to the WAR and JAR lifecycles, you’ll see that they differ only in the package phase. The package phase of the WAR lifecycle calls war:war and the package phase of the JAR lifecycle calls jar:jar. Most of the lifecycles you will come into contact with share some common lifecycle goals for managing resources, running tests, and compiling source code. In this section, we’ll explore some of these common lifecycle goals in detail.
4.3.1. Process Resources
The process-resources phase "processes" resources and copies them to the output directory. If you haven’t customized the default directory locations defined in the Super POM, this means that Maven will copy the files from ${basedir}/src/main/resources to ${basedir}/target/classes or the directory defined in ${project.build.outputDirectory}. In addition to copying the resources to the output directory, Maven can also apply a filter to the resources that allows you to replace tokens within resource file. Just like variables are referenced in a POM using ${...} notation, you can reference variables in your project’s resources using the same syntax. Coupled with build profiles, such a facility can be used to produce build artifacts which target different deployment platforms. This is something that is common in environments which need to produce output for development, testing, staging, and production platforms from the same project. For more information about build profiles, see Chapter 5, Build Profiles.
To illustrate resource filtering, assume that you have a project with an XML file in src/main/resources/META-INF/service.xml. You want to externalize some configuration variables to a properties file. In other words, you might want to reference a JDBC URL, username, and password for your database, and you don’t want to put these values directly into the service.xml file. Instead, you would like to use a properties file to capture all of the configuration points for your program. Doing this will allow you to consolidate all configuration into a single properties file and make it easier to change configuration values when you need to target a new deployment environment. First, take a look at the contents of service.xml in src/main/resources/META-INF.
Using Properties in Project Resources.
<service>
    <!-- This URL was set by project version ${project.version} -->
    <url>${jdbc.url}</url>
    <user>${jdbc.username}</user>
    <password>${jdbc.password}</password>
</service>
This XML file uses the same property reference syntax you can use in the POM. In fact, the first variable referenced is the project variable which is also an implicit variable made available in the POM. The project variable provides access to POM information. The next three variable references are jdbc.url, jdbc.username, and jdbc.password. These custom variables are defined in a properties file src/main/filters/default.properties.
default.properties in src/main/filters.
jdbc.url=jdbc:hsqldb:mem:mydb
jdbc.username=sa
jdbc.password=
To configure resource filtering with this default.properties file, we need to specify two things in a project’s POM: a list of properties files in the filters element of the build configuration, and a flag to Maven that the resources directory is to be filtered. The default Maven behavior is to skip filtering and just copy the resources to the output directory; you’ll need to explicitly configure resource filter, or Maven will skip the step altogether. This default ensures that Maven’s resource filtering feature doesn’t surprise you out of nowhere and clobbering any ${...} references you didn’t want it to replace.
Filter Resources (Replacing Properties).
<build>
    <filters>
        <filter>src/main/filters/default.properties</filter>
    </filters>
    <resources>
        <resource>
            <directory>src/main/resources</directory>
            <filtering>true</filtering>
        </resource>
    </resources>
</build>
As with all directories in Maven, the resources directory does not need to be in src/main/resources. This is just the default value defined in the Super POM. You should also note that you don’t need to consolidate all of your resources into a single directory. You can always separate resources into separate directories under src/main. Assume that you have a project which contains hundreds of XML documents and hundreds of images. Instead of mixing the resources in the src/main/resources directory, you might want to create two directories src/main/xml and src/main/images to hold this content. To add directories to the list of resource directories, you would add the following resource elements to your build configuration.
Configuring Additional Resource Directories.
<build>
    ...
    <resources>
        <resource>
            <directory>src/main/resources</directory>
        </resource>
        <resource>
            <directory>src/main/xml</directory>
        </resource>
        <resource>
            <directory>src/main/images</directory>
        </resource>
    </resources>
    ...
</build>
When you are building a project that produces a console application or a command-line tool, you’ll often find yourself writing simple shell scripts that need to reference the JAR produced by a build. When you are using the assembly plugin to produce a distribution for an application as a ZIP or TAR, you might place all of your scripts in a directory like src/main/command. In the following POM resource configuration, you’ll see how we can use resource filtering and a reference to the project variable to capture the final output name of the JAR. For more information about the Maven Assembly plugin, see Chapter 8, Maven Assemblies.
Filtering Script Resources.
<build>
    <groupId>org.sonatype.mavenbook</groupId>
    <artifactId>simple-cmd</artifactId>
    <version>2.3.1</version>
    ...
    <resources>
        <resource>
            <filtering>true</filtering>
            <directory>${basedir}/src/main/command</directory>
            <includes>
                <include>run.bat</include>
                <include>run.sh</include>
            </includes>
            <targetPath>${basedir}</targetPath>
        </resource>
        <resource>
            <directory>${basedir}/src/main/resources</directory>
        </resource>
    </resources>
    ...
</build>
If you run mvn process-resources in this project, you will end up with two files, run.sh and run.bat, in ${basedir}. We’ve singled out these two files in a resource element, configuring filtering, and set the targetPath to be ${basedir}. In a second resource element, we’ve configured the default resources path to be copied to the default output directory without any filtering. Filtering Script Resources shows you how to declare two resource directories and supply them with different filtering and target directory preferences. The project from Filtering Script Resources would contain a run.bat file in src/main/command with the following content:
@echo off
java -jar ${project.build.finalName}.jar %*
After running mvn process-resources, a file named run.bat would appear in ${basedir} with the following content:
@echo off
java -jar simple-cmd-2.3.1.jar %*
The ability to customize filtering for specific subsets of resources is another reason why complex projects with many different kinds of resources often find it advantageous to separate resources into multiple directories. The alternative to storing different kinds of resources with different filtering requirements in different directories is to use a more complex set of include and exclude patterns to match all resource files which match a certain pattern.
4.3.2. Compile
Most lifecycles bind the Compiler plugin’s compile goal to the compile phase. This phase calls out to compile:compile which is configured to compile all of the source code and copy the bytecode to the build output directory. If you haven’t customized the values defined in the Super POM, compile:compile is going to compile everything from src/main/java to target/classes. The Compiler plugin calls out to javac and uses default source and target settings of 1.3 and 1.1. In other words, the compiler plugin assumes that your Java source conforms to Java 1.3 and that you are targeting a Java 1.1 JVM. If you would like to change these settings, you’ll need to supply the target and source configuration to the Compiler plugin in your project’s POM as shown in Setting the Source and Target Versions for the Compiler Plugin.
Setting the Source and Target Versions for the Compiler Plugin.
<project>
    ...
    <build>
        ...
        <plugins>
            <plugin>
                <artifactId>maven-compiler-plugin</artifactId>
                <configuration>
                    <source>1.5</source>
                    <target>1.5</target>
                </configuration>
            </plugin>
        </plugins>
        ...
    </build>
    ...
</project>
Notice we are configuring the Compiler plugin, and not the specific compile:compile goal. If we were going to configure the source and target for just the compile:compile goal, we would place the configuration element below an execution element for the compile:compile goal. We’ve configured the target and source for the plugin because compile:compile isn’t the only goal we’re interested in configuring. The Compiler plugin is reused when Maven compiles tests using the compile:testCompile goal, and configuring target and source at the plugin level allows us to define it once for all goals in a plugin.
If you need to customize the location of the source code, you can do so by changing the build configuration. If you wanted to store your project’s source code in src/java instead of src/main/java and if you wanted build output to go to classes instead of target/classes, you could always override the default sourceDirectory defined by the Super POM.
Overriding the Default Source Directory.
<build>
    ...
    <sourceDirectory>src/java</sourceDirectory>
    <outputDirectory>classes</outputDirectory>
    ...
</build>
4.3.3. Process Test Resources
The process-test-resources phase is almost indistinguishable from the process-resources phase. There are some trivial differences in the POM, but most everything the same. You can filter test resources just as you filter regular resources. The default location for test resources is defined in the Super POM as src/test/resources, and the default output directory for test resources is target/test-classes as defined in ${project.build.testOutputDirectory}.
4.3.4. Test Compile
The test-compile phase is almost identical to the compile phase. The only difference is that test-compile is going to invoke compile:testCompile to compile source from the test source directory to the test build output directory. If you haven’t customized the default directories from the Super POM, compile:testCompile is going to compile the source in src/test/java to the target/test-classes directory.
As with the source code directory, if you want to customize the location of the test source code and the output of test compilation, you can do so by overriding the testSourceDirectory and the testOutputDirectory. If you wanted to store test source in src-test/ instead of src/test/java and you wanted to save test bytecode to classes-test/ instead of target/test-classes, you would use the following configuration.
Overriding the Location of Test Source and Output.
<build>
    ...
    <testSourceDirectory>src-test</testSourceDirectory>
    <testOutputDirectory>classes-test</testOutputDirectory>
    ...
</build>
4.3.5. Test
Most lifecycles bind the test goal of the Surefire plugin to the test phase. The Surefire plugin is Maven’s unit testing plugin, the default behavior of Surefire is to look for all classes ending in *Test in the test source directory and to run them as JUnit tests. The Surefire plugin can also be configured to run TestNG unit tests.
After running mvn test, you should also notice that the Surefire produces a number of reports in target/surefire-reports. This reports directory will have two files for each test executed by the Surefire plugin: an XML document containing execution information for the test, and a text file containing the output of the unit test. If there is a problem during the test phase and a unit test has failed, you can use the output of Maven and the contents of this directory to track down the cause of a test failure. This surefire-reports/ directory is also used during site generation to create an easy to read summary of all the unit tests in a project.
If you are working on a project that has some failing unit tests, but you want the project to produce output, you’ll need to configure the Surefire plugin to continue a build even if it encounters a failure. The default behavior is to stop a build whenever a unit test failure is encountered. To override this behavior, you’ll need to set the testFailureIgnore configuration property on the Surefire plugin to true.
Configuring Surefire to Ignore Test Failures.
<build>
    <plugins>
        <plugin>
            <groupId>org.apache.maven.plugins</groupId>
            <artifactId>maven-surefire-plugin</artifactId>
            <configuration>
                <testFailureIgnore>true</testFailureIgnore>
            </configuration>
        </plugin>
        ...
    </plugins>
</build>
If you would like to skip tests altogether, you can do so by executing the following command:
$ mvn install -Dmaven.test.skip=trueThe maven.test.skip variable controls both the Compiler and the Surefire plugin, if you pass in maven.test.skip you’ve told Maven to ignore tests altogether.
4.3.6. Install
The install goal of the Install plugin is almost always bound to the install lifecycle phase. This install:install goal simply installs a project’s main artifact to the local repository. If you have a project with a groupId of org.sonatype.mavenbook, an artifactId of simple-test, and a version of 1.0.2, the install:install goal is going to copy the JAR file from target/simple-test-1.0.2.jar to ~/.m2/repository/org/sonatype/mavenbook/simple-test/1.0.2/simple-test-1.0.2.jar. If the project has POM packaging, this goal will copy the POM to the local repository.
4.3.7. Deploy
The deploy goal of the Deploy plugin is usually bound to the deploy lifecycle phase. This phase is used to deploy an artifact to a remote Maven repository, this is usually required to update a remote repository when you are performing a release. The deployment procedure can be as simple as copying a file to another directory or as complex as transferring a file over SCP using a public key. Deployment settings usually involve credentials to a remote repository, and, as such, deployment settings are usually not stored in a pom.xml. Instead, deployment settings are more frequently found in an individual user’s ~/.m2/settings.xml. For now, all you need to know is that the deploy:deploy goal is bound to the deploy phase and it takes care of transporting an artifact to a published repository and updating any repository information which might be affected by such a deployment.
Chapter 6. Running Maven
https://books.sonatype.com/mvnref-book/reference/running.html
6.1. Maven Command Line Options
The following sections detail Maven’s command line options.
6.1.1. Defining Properties
To define a property use the following option on the command line:
-D, --define
Defines a system property
This is the option most frequently used to customized the behavior of Maven plugins. Some examples of using the -D command line argument:
$ mvn help:describe -Dcmd=compiler:compile
$ mvn install -Dmaven.test.skip=true
Properties defined on the command line are also available as properties to be used in a Maven POM or Maven Plugin. Form more information about referencing Maven properties, see Chapter 9, Properties and Resource Filtering.
Properties can also be used to activate build profiles. For more information about Maven build profiles, see Chapter 5, Build Profiles.
6.1.2. Getting Help
To list the available command line parameters, use the following command line option:
-h, --help
Display help information
Executing Maven with this option produces the following output:
$ mvn --help

usage: mvn [options] [<goal(s)>] [<phase(s)>]

Options:
-am,--also-makeIf project list is specified, also
build projects required by the
list
-amd,--also-make-dependentsIf project list is specified, also
build projects that depend on
projects on the list
-B,--batch-modeRun in non-interactive (batch)
mode
...
If you are looking for information about the goals and parameters available from a specific Maven plugin, see Section 6.3, “Using the Maven Help Plugin”.
6.1.3. Using Build Profiles
To activate one or more build profiles from the command line, use the following option:
-P, --activate-profiles
Comma-delimited list of profiles to activate
For more information about build profiles, see Chapter 5, Build Profiles.
6.1.4. Displaying Version Information
To display Maven version information, use one of the following options on the command line:
-V, --show-version
Display version information WITHOUT stopping build
-v, --version
Display version information
Both of these options produce the same version information output, but the -v option will terminate the Maven process after printing out the version. You would use the -V option if you wanted to have the Maven version information present at the beginning of your build’s output. This can come in handy if you are running Maven in a continuous build environment and you need to know what version of Maven was used for a particular build.
Maven Version Information.
$ mvn -v
Apache Maven 2.2.1 (r801777; 2009-08-06 14:16:01-0500)
Java version: 1.6.0_15
Java home: /System/Library/Frameworks/JavaVM.framework/Versions/1.6.0/Home
Default locale: en_US, platform encoding: MacRoman
OS name: "mac os x" version: "10.6.1" arch: "x86_64" Family: "mac"
6.3. Using the Maven Help Plugin
Throughout this book, we introduce Maven plugins, talking about Maven Project Object Model (POM) files, settings files, and profiles. There are going to be times when you need a tool to help you make sense of some of the models that Maven is using and what goals are available on a specific plugin. The Maven Help plugin allows you to list active Maven profiles, display an effective POM, print the effective settings, or list the attributes of a Maven plugin.
The Maven Help plugin has four goals. The first three goals — active-profiles, effective-pom, and effective-settings — describe a particular project and must be run in the base directory of a project. The last goal — describe — is slightly more complex, showing you information about a plugin or a plugin goal. The following commands provide some general information about the four goals:
help:active-profiles
Lists the profiles (project, user, global) which are active for the build.
help:effective-pom
Displays the effective POM for the current build, with the active profiles factored in.
help:effective-settings
Prints out the calculated settings for the project, given any profile enhancement and the inheritance of the global settings into the user-level settings.
help:describe
Describes the attributes of a plugin. This need not run under an existing project directory. You must at least give the groupId and artifactId of the plugin you wish to describe.
6.3.1. Describing a Maven Plugin
Once you start using Maven, you’ll spend most of your time trying to get more information about Maven Plugins: How do plugins work? What are the configuration parameters? What are the goals? The help:describe goal is something you’ll be using very frequently to retrieve this information. With the plugin parameter you can specify a plugin you wish to investigate, passing in either the plugin prefix (e.g. maven-help-plugin as help) or the groupId:artifact[:version], where version is optional. For example, the following command uses the Help plugin’s describe goal to print out information about the Maven Help plugin.
$ mvn help:describe -Dplugin=help
...
Group Id:  org.apache.maven.plugins
Artifact Id: maven-help-plugin
Version: 2.0.1
Goal Prefix: help
Description:

The Maven Help plugin provides goals aimed at helping to make sense
out of the build environment. It includes the ability to view the
effective POM and settings files, after inheritance and active
profiles have been applied, as well as a describe a particular plugin
goal to give usage information.  ...
Executing the describe goal with the plugin parameter printed out the Maven coordinates for the plugin, the goal prefix, and a brief description of the plugin. While this information is helpful, you’ll usually be looking for more detail than this. If you want the Help plugin to print a full list of goals with parameters, execute the help:describe goal with the parameter full as follows:
$ mvn help:describe -Dplugin=help -Dfull
...
Group Id:  org.apache.maven.plugins
Artifact Id: maven-help-plugin
Version: 2.0.1
Goal Prefix: help
Description:

The Maven Help plugin provides goals aimed at helping to make sense
out of the build environment. It includes the ability to view the
effective POM and settings files, after inheritance and active
profiles have been applied, as well as a describe a particular plugin
goal to give usage information.

Mojos:

Goal: 'active-profiles'
Description:

Lists the profiles which are currently active for this build.

Implementation: org.apache.maven.plugins.help.ActiveProfilesMojo
Language: java

Parameters:

[0] Name: output
Type: java.io.File
Required: false
Directly editable: true
Description:

This is an optional parameter for a file destination for the output of
this mojo...the listing of active profiles per project.


[1] Name: projects
Type: java.util.List
Required: true
Directly editable: false
Description:

This is the list of projects currently slated to be built by Maven.


This mojo doesn't have any component requirements.

... removed the other goals ...
This option is great for discovering all of a plugin’s goals as well as their parameters. But sometimes this is far more information than necessary. To get information about a single goal, set the mojo parameter as well as the plugin parameter. The following command lists all of the information about the Compiler plugin’s compile goal.
$ mvn help:describe -Dplugin=compiler -Dmojo=compile -DfullChapter 7. Maven Configuration
7.1. Configuring Maven Plugins
To customize the behavior of a Maven Plugin, you will need to configure the plugin in a project’s POM. The following sections outline the various methods available for customizing a Maven plugin’s configuration.
7.1.1. Plugin Configuration Parameters
Maven plugins are configured using properties that are defined by goals within a plugin. If you look at a goal like the compile goal in the Maven Compiler Plugin you will see a list of configuration parameters like source, target, compilerArgument, fork, optimize, and many others. If you look at the testCompile goal you will see a different list of configuration parameters for the testCompile goal. If you are looking for details on the available plugin goal configuration parameters, you can use the Maven Help Plugin to describe a particular plugin or a particular plugin goal.
To describe a particular plugin, use the help:describe goal from the command line as follows:
$ mvn help:describe -Dcmd=compiler:compile
[INFO] [help:describe {execution: default-cli}]
[INFO] 'compiler:compile' is a plugin goal (aka mojo).
Mojo: 'compiler:compile'
compiler:compile
Description: Compiles application sources
Deprecated. No reason given
For more information about the available configuration parameters, run the same command with the -Ddetail argument:
$ mvn help:describe -Dcmd=compiler:compile -Ddetail
[INFO] [help:describe {execution: default-cli}]
[INFO] 'compiler:compile' is a plugin goal (aka mojo).
Mojo: 'compiler:compile'
compiler:compile
Description: Compiles application sources
Deprecated. No reason given
Implementation: org.apache.maven.plugin.CompilerMojo
Language: java
Bound to phase: compile

Available parameters:

compilerArgument
Sets the unformatted argument string to be passed to the compiler if fork
is set to true.

This is because the list of valid arguments passed to a Java compiler
varies based on the compiler version.
Deprecated. No reason given

compilerArguments
Sets the arguments to be passed to the compiler (prepending a dash) if
fork is set to true.

This is because the list of valid arguments passed to a Java compiler
varies based on the compiler version.
Deprecated. No reason given

compilerId (Default: javac)
The compiler id of the compiler to use. See this guide for more
information.
Deprecated. No reason given

compilerVersion
Version of the compiler to use, ex. '1.3', '1.5', if fork is set to true.
Deprecated. No reason given

debug (Default: true)
Set to true to include debugging information in the compiled class files.
Deprecated. No reason given

encoding
The -encoding argument for the Java compiler.
Deprecated. No reason given
If you need to get a list of plugin goals which are contained in a plugin, you can run the help:describe goal and pass in the plugin parameter. The plugin parameter accepts a plugin prefix or a groupId and an artifactId for a plugin as shown in the following examples:
$ mvn help:describe -Dplugin=compiler
[INFO] [help:describe {execution: default-cli}]
[INFO] org.apache.maven.plugins:maven-compiler-plugin:2.0.2

Name: Maven Compiler Plugin
Description: Maven Plugins
Group Id: org.apache.maven.plugins
Artifact Id: maven-compiler-plugin
Version: 2.0.2
Goal Prefix: compiler

This plugin has 2 goals:

compiler:compile
Description: Compiles application sources
Deprecated. No reason given

compiler:testCompile
Description: Compiles application test sources
Deprecated. No reason given
You can use the groupId and the artifactId of the plugin and get the same list of plugin goals.
$ mvn help:describe -Dplugin=org.apache.maven.plugins:maven-compiler-pluginPassing the -Ddetail argument to the help:describe goal with the plugin parameter will cause Maven to print out all of the goals and all of the goal parameters for the entire plugin.
7.1.3. Setting Global Plugin Parameters
To set a value for a plugin configuration parameter in a particular project, use the XML shown in Configuring a Maven Plugin. Unless this configuration is overridden by a more specific plugin parameter configuration, Maven will use the values defined directly under the plugin element for all goals which are executed in this plugin.
Configuring a Maven Plugin.
<plugin>
    <groupId>org.apache.maven.plugins</groupId>
    <artifactId>maven-compiler-plugin</artifactId>
    <configuration>
        <source>1.5</source>
        <target>1.5</target>
    </configuration>
</plugin>
7.1.4. Setting Execution Specific Parameters
You can configure plugin parameters for specific executions of a plugin goal. Setting Configuration Parameters in an Execution shows an example of configuration parameters being passed to the execution of the run goal of the AntRun plugin during the validate phase. This specific execution will inherit the configuration parameters from the plugin’s configuration element and merge them with the values defined for this particular execution.
Setting Configuration Parameters in an Execution.
<plugin>
    <artifactId>maven-antrun-plugin</artifactId>
    <executions>
        <execution>
            <phase>validate</phase>
            <goals>
                <goal>run</goal>
            </goals>
            <configuration>
                <tasks>
                    <echo>${PATH}=${env.PATH}</echo>
                    <echo>User's Home Directory: ${user.home}</echo>
                    <echo>Project's Base Director: ${basedir}</echo>
                </tasks>
            </configuration>
        </execution>
    </executions>
</plugin>
7.1.5. Setting Default Command Line Execution Parameters
Starting with Maven 2.2.0, you can now supply configuration parameters for goals which are executed from the command-line. To do this, use the special execution id value of "default-cli". Configuring Plugin Parameters for Command Line Execution shows an example that binds the single goal to the package phase of the lifecycle which produces a binary distribution. This example also configures the default-cli execution for the assembly plugin to use the jar-with-dependencies assembly descriptor. The bin.xml descriptor will be used during the lifecycle, and jar-with-dependencies will be used when you execute mvn assembly:assembly from the command line.
Configuring Plugin Parameters for Command Line Execution.
<plugin>
    <artifactId>maven-assembly-plugin</artifactId>
    <configuration>
        <appendAssemblyId>false</appendAssemblyId>
    </configuration>
    <executions>
        <execution>
            <id>assemble-binary</id>
            <phase>package</phase>
            <goals>
                <goal>single</goal>
            </goals>
            <configuration>
                <descriptors>
                    <descriptor>src/main/assembly/bin.xml</descriptor>
                </descriptors>
            </configuration>
        </execution>
        <execution>
            <id>default-cli</id>
            <configuration>
                <descriptorRefs>
                    <descriptorRef>jar-with-dependencies</descriptorRef>
                </descriptorRefs>
            </configuration>
        </execution>
    </executions>
</plugin>
pom.xml 中的 execution 是什么?
概述
在 Maven 的 [pom.xml](https://zhida.zhihu.com/search?content_id=231721270&content_type=Article&match_order=1&q=pom.xml&zd_token=eyJhbGciOiJIUzI1NiIsInR5cCI6IkpXVCJ9.eyJpc3MiOiJ6aGlkYV9zZXJ2ZXIiLCJleHAiOjE3NDUwNTA5NjMsInEiOiJwb20ueG1sIiwiemhpZGFfc291cmNlIjoiZW50aXR5IiwiY29udGVudF9pZCI6MjMxNzIxMjcwLCJjb250ZW50X3R5cGUiOiJBcnRpY2xlIiwibWF0Y2hfb3JkZXIiOjEsInpkX3Rva2VuIjpudWxsfQ.6ft-7I5m6tQxxP5z-dVcwVylemRsf3g3KwlEwMjjtBY&zhida_source=entity) 文件中,<execution> 元素是一个关键组成部分,用于定义特定插件目标(goal)的执行方式和配置。
简单地说,当 Maven 运行某个生命周期阶段时,它会检查是否有与该阶段关联的插件目标。<execution> 元素就是告诉 Maven 在特定的生命周期阶段执行特定的插件目标,并提供所需的配置。
以下是 execution 元素的一些关键组成部分:
id:唯一标识这个特定的执行。这主要用于在需要的地方引用或区分多个执行。
phase:定义应该在哪个生命周期阶段执行该插件的目标。
goals:列出应该执行的目标。
configuration:为插件目标提供特定的配置。
在 Maven 的生命周期中,每个插件都可以定义多个目标。通过 <execution>,你可以控制哪些目标在哪些阶段执行,以及如何配置它们。
简单地说,<execution> 元素允许你定制 Maven 的默认行为,确保在构建过程的正确时机执行正确的任务,并使用正确的配置。
需求场景
场景:开发一个 Web 应用程序
假设你是一个开发者,正在为一个企业开发一个 Web 应用程序。这个应用程序需要将 Java 类编译成字节码,复制资源文件,并打包成一个 WAR 文件,以便部署到某个 Servlet 容器,如 Tomcat。
你选择 Maven 作为构建和项目管理工具,因为它提供了一系列插件来简化构建过程。
现在,你有以下特殊需求:
在编译源代码之前,你希望生成一些源代码,这些代码基于项目中的某些定义来自动生成。
你希望在打包应用程序之前执行单元测试,并确保所有测试都通过。
在打包 WAR 文件时,你希望对一些资源进行特定的处理,例如替换一些占位符。
这就是 <execution> 元素发挥作用的地方。
pom.xml 的片段:
<build>
    <plugins>
        <!-- 自动生成源代码插件 -->
        <plugin>
            <groupId>com.example.plugins</groupId>
            <artifactId>auto-generate-source-plugin</artifactId>
            <version>1.0.0</version>
            <executions>
                <execution>
                    <id>generate-sources</id>
                    <phase>generate-sources</phase>
                    <goals>
                        <goal>generate</goal>
                    </goals>
                </execution>
            </executions>
        </plugin>

        <!-- Maven 编译插件 -->
        <plugin>
            <groupId>org.apache.maven.plugins</groupId>
            <artifactId>maven-compiler-plugin</artifactId>
            <version>3.8.0</version>
            <executions>
                <execution>
                    <id>default-compile</id>
                    <phase>compile</phase>
                    <goals>
                        <goal>compile</goal>
                    </goals>
                </execution>
            </executions>
        </plugin>

        <!-- Maven 资源插件,用于处理资源文件 -->
        <plugin>
            <groupId>org.apache.maven.plugins</groupId>
            <artifactId>maven-resources-plugin</artifactId>
            <version>3.1.0</version>
            <executions>
                <execution>
                    <id>copy-resources</id>
                    <phase>process-resources</phase>
                    <goals>
                        <goal>copy-resources</goal>
                    </goals>
                    <configuration>
                        <!-- 一些配置,例如资源过滤 -->
                    </configuration>
                </execution>
            </executions>
        </plugin>
    </plugins>
</build>
在上述配置中:
auto-generate-source-plugin在generate-sources阶段执行,自动生成源代码。maven-compiler-plugin在compile阶段执行,编译源代码。maven-resources-plugin在process-resources阶段执行,处理资源文件。
通过 <execution> 元素,你可以为 Maven 插件指定何时(哪个阶段)和如何(使用哪些配置)执行,从而满足项目的特定需求。
详细示例
当我们谈论 Maven 和其 pom.xml 文件时,execution 是一个非常重要的元素,尤其是在插件配置中。execution 元素允许我们为插件的特定目标定义配置,并为它们指定绑定的生命周期阶段。
以下是一个具体示例,说明如何在 pom.xml 中使用 execution。在这个示例中,我们将配置 Maven 插件 maven-antrun-plugin,该插件允许我们在 Maven 构建过程中运行 Ant 任务。我们将为此插件的 run 目标设置一个特定的执行,该执行将在 compile 生命周期阶段绑定,并打印一个简单的消息。
<project>
    <!-- ... 其他 POM 元素 ... -->

    <build>
        <plugins>
            <plugin>
                <groupId>org.apache.maven.plugins</groupId>
                <artifactId>maven-antrun-plugin</artifactId>
                <version>1.8</version>
                <executions>
                    <!-- 这是一个 execution 定义 -->
                    <execution>
                        <id>say-hello</id> <!-- 这是该执行的唯一标识 -->
                        <phase>compile</phase> <!-- 在哪个生命周期阶段运行此执行 -->
                        <goals>
                            <goal>run</goal> <!-- 指定要运行的目标 -->
                        </goals>
                        <configuration>
                            <!-- 这是为此特定执行配置的 Ant 任务 -->
                            <target>
                                <echo message="Hello from maven-antrun-plugin!" />
                            </target>
                        </configuration>
                    </execution>
                </executions>
            </plugin>
        </plugins>
    </build>

    <!-- ... 其他 POM 元素 ... -->
</project>
在上面的示例中,我们为 maven-antrun-plugin 定义了一个执行。这个执行在 compile 生命周期阶段触发,并执行插件的 run 目标。对于这个特定的执行,我们配置了一个 Ant 任务,它只是简单地打印出一条消息。
每当您运行 mvn compile(或任何后续的生命周期阶段,如 mvn package 或 mvn install)时,都会看到这条消息。
这只是 execution 元素的一个简单示例,但它展示了如何为特定的插件目标定义配置,并如何将其绑定到 Maven 的生命周期阶段。
FAQ & Accomplish
Dependency Scope
https://maven.apache.org/guides/introduction/introduction-to-dependency-mechanism.html
Dependency scope is used to limit the transitivity of a dependency and to determine when a dependency is included in a classpath.
There are 6 scopes:
compile
This is the default scope, used if none is specified. Compile dependencies are available in all classpaths of a project. Furthermore, those dependencies are propagated to dependent projects.provided
This is much likecompile, but indicates you expect the JDK or a container to provide the dependency at runtime. For example, when building a web application for the Java Enterprise Edition, you would set the dependency on the Servlet API and related Java EE APIs to scopeprovidedbecause the web container provides those classes. A dependency with this scope is added to the classpath used for compilation and test, but not the runtime classpath. It is not transitive.runtime
This scope indicates that the dependency is not required for compilation, but is for execution. Maven includes a dependency with this scope in the runtime and test classpaths, but not the compile classpath.test
This scope indicates that the dependency is not required for normal use of the application, and is only available for the test compilation and execution phases. This scope is not transitive. Typically this scope is used for test libraries such as JUnit and Mockito. It is also used for non-test libraries such as Apache Commons IO if those libraries are used in unit tests (src/test/java) but not in the model code (src/main/java).system
This scope indicates that the dependency is required for compilation and execution. However, Maven will not download the dependency from the repository system. Instead it looks for a jar in the local file system at a specified path.import
This scope is only supported on a dependency of typepomin the<dependencyManagement>section. It indicates the dependency is to be replaced with the effective list of dependencies in the specified POM's<dependencyManagement>section. Since they are replaced, dependencies with a scope ofimportdo not actually participate in limiting the transitivity of a dependency.
Importing Dependencies
https://maven.apache.org/guides/introduction/introduction-to-dependency-mechanism.html
https://www.baeldung.com/spring-maven-bom
The examples in the previous section describe how to specify managed dependencies through inheritance. However, in larger projects it may be impossible to accomplish this since a project can only inherit from a single parent. To accommodate this, projects can import managed dependencies from other projects. This is accomplished by declaring a POM artifact as a dependency with a scope of "import".
Project B:
<project>
  <modelVersion>4.0.0</modelVersion>
  <groupId>maven</groupId>
  <artifactId>B</artifactId>
  <packaging>pom</packaging>
  <name>B</name>
  <version>1.0</version>
  <dependencyManagement>
    <dependencies>
      <dependency>
        <groupId>maven</groupId>
        <artifactId>A</artifactId>
        <version>1.0</version>
        <type>pom</type>
        <scope>import</scope>
      </dependency>
      <dependency>
        <groupId>test</groupId>
        <artifactId>d</artifactId>
        <version>1.0</version>
      </dependency>
    </dependencies>
  </dependencyManagement>
  <dependencies>
    <dependency>
      <groupId>test</groupId>
      <artifactId>a</artifactId>
      <version>1.0</version>
      <scope>runtime</scope>
    </dependency>
    <dependency>
      <groupId>test</groupId>
      <artifactId>c</artifactId>
      <scope>runtime</scope>
    </dependency>
  </dependencies>
</project>
Assuming A is the POM defined in the preceding example, the end result would be the same. All of A's managed dependencies would be incorporated into B except for d since it is defined in this POM.
Project X:
<project>
 <modelVersion>4.0.0</modelVersion>
 <groupId>maven</groupId>
 <artifactId>X</artifactId>
 <packaging>pom</packaging>
 <name>X</name>
 <version>1.0</version>
 <dependencyManagement>
   <dependencies>
     <dependency>
       <groupId>test</groupId>
       <artifactId>a</artifactId>
       <version>1.1</version>
     </dependency>
     <dependency>
       <groupId>test</groupId>
       <artifactId>b</artifactId>
       <version>1.0</version>
       <scope>compile</scope>
     </dependency>
   </dependencies>
 </dependencyManagement>
</project>
Project Y:
<project>
 <modelVersion>4.0.0</modelVersion>
 <groupId>maven</groupId>
 <artifactId>Y</artifactId>
 <packaging>pom</packaging>
 <name>Y</name>
 <version>1.0</version>
 <dependencyManagement>
   <dependencies>
     <dependency>
       <groupId>test</groupId>
       <artifactId>a</artifactId>
       <version>1.2</version>
     </dependency>
     <dependency>
       <groupId>test</groupId>
       <artifactId>c</artifactId>
       <version>1.0</version>
       <scope>compile</scope>
     </dependency>
   </dependencies>
 </dependencyManagement>
</project>
Project Z:
<project>
  <modelVersion>4.0.0</modelVersion>
  <groupId>maven</groupId>
  <artifactId>Z</artifactId>
  <packaging>pom</packaging>
  <name>Z</name>
  <version>1.0</version>

  <dependencyManagement>
    <dependencies>
      <dependency>
        <groupId>maven</groupId>
        <artifactId>X</artifactId>
        <version>1.0</version>
        <type>pom</type>
        <scope>import</scope>
      </dependency>
      <dependency>
        <groupId>maven</groupId>
        <artifactId>Y</artifactId>
        <version>1.0</version>
        <type>pom</type>
        <scope>import</scope>
      </dependency>
    </dependencies>
  </dependencyManagement>
</project>
In the example above Z imports the managed dependencies from both X and Y. However, both X and Y contain dependency a. Here, version 1.1 of a would be used since X is declared first and a is not declared in Z's dependencyManagement.
Bill of Materials (BOM) POMs
https://github.com/anliksim/maven-template-bom
https://maven.apache.org/guides/introduction/introduction-to-dependency-mechanism.html
Imports are most effective when used for defining a "library" of related artifacts that are generally part of a multiproject build. It is fairly common for one project to use one or more artifacts from these libraries. However, it has sometimes been difficult to keep the versions in the project using the artifacts in synch with the versions distributed in the library. The pattern below illustrates how a "bill of materials" (BOM) can be created for use by other projects.
parent 和 modules,有什么区别?
parent的主要作用,不是表示2个项目的目录路径,存在父子关系,而是表示,子项目会继承父项目定义好的依赖;
而modules的主要作用,是表示2个项目的目录路径,存在父子关系,不是表示子项目会继承父项目定义好的依赖;
在multi module项目中,必然存在一个parent 和 多个submodule---project1,project2;
而为了使用bom功能,必然会在parent项目中,有一个dependencyManagement,这个dependencyManagement里面,引用了bom scope是import
这样后面project1、project2直接继承parent项目,就可以实现统一使用bom中归定的依赖版本号了,达到统一管理依赖的目的
为了让submodule---project1,project2,也纳入bom管理中,必然要求bom本身 和 submodule,他们之间最好不要有 父子关系 或者 module关系,只是单纯的dependencyManagement关系
因此,项目结构如下:
maven-template-bom
├── bom
│   └── pom.xml (no parent)
├── module1
│   ├── pom.xml
│   └── src
├── module2
│   ├── pom.xml
│   └── src
├── pom.xml (aggregator   他扮演一个parent角色,这样后面project1、project2直接继承他,就可以实现统一管理依赖了)
parent pom
In Maven, a parent POM (Project Object Model) is a POM file that serves as a template for other POM files, known as child POMs. The parent POM typically contains shared configurations, dependencies, plugin definitions, and properties that can be inherited by its child projects. This promotes consistency and reduces redundancy across multiple projects.
Key Features of a Parent POM:
Dependency Management: The parent POM can define dependency versions in one place, which child POMs can inherit. This makes it easier to manage and update dependencies across multiple projects.
Plugin Management: Similar to dependencies, plugin versions and configurations can be specified in the parent POM, allowing child projects to use the same plugins without redefining them.
Properties: Common properties (like version numbers, project names, etc.) can be defined in the parent POM, making it easier to maintain and update.
Inheritance: Child POMs automatically inherit configurations from the parent POM. This includes dependencies, build settings, and other configurations, making it easier to manage large projects or multi-module projects.
Aggregation: A parent POM can also act as an aggregator for multiple child modules, allowing you to build and manage them together in a single command.
Example Structure
Here's a simple example of a parent POM:
<project xmlns="http://maven.apache.org/POM/4.0.0"
         xmlns:xsi="http://www.w3.org/2001/XMLSchema-instance"
         xsi:schemaLocation="http://maven.apache.org/POM/4.0.0 http://maven.apache.org/xsd/maven-4.0.0.xsd">
    <modelVersion>4.0.0</modelVersion>
    <groupId>com.example</groupId>
    <artifactId>parent-project</artifactId>
    <version>1.0-SNAPSHOT</version>
    <packaging>pom</packaging>

    <dependencyManagement>
        <dependencies>
            <dependency>
                <groupId>org.springframework</groupId>
                <artifactId>spring-core</artifactId>
                <version>5.3.10</version>
            </dependency>
        </dependencies>
    </dependencyManagement>

    <build>
        <plugins>
            <plugin>
                <groupId>org.apache.maven.plugins</groupId>
                <artifactId>maven-compiler-plugin</artifactId>
                <version>3.8.1</version>
                <configuration>
                    <source>1.8</source>
                    <target>1.8</target>
                </configuration>
            </plugin>
        </plugins>
    </build>
</project>
How to Use a Parent POM
In a child project, you can specify the parent POM like this:
<project xmlns="http://maven.apache.org/POM/4.0.0"
         xmlns:xsi="http://www.w3.org/2001/XMLSchema-instance"
         xsi:schemaLocation="http://maven.apache.org/POM/4.0.0 http://maven.apache.org/xsd/maven-4.0.0.xsd">
    <modelVersion>4.0.0</modelVersion>
    <parent>
        <groupId>com.example</groupId>
        <artifactId>parent-project</artifactId>
        <version>1.0-SNAPSHOT</version>
    </parent>
    <artifactId>child-project</artifactId>
</project>
This setup allows the child project to inherit the dependencies and plugin configurations defined in the parent POM, simplifying project management.