Reference
https://docs.spring.io/spring-framework/reference/6.1/web/webflux/new-framework.html
Concepts
Reactive Streams & Reactor
Reactive Streams is specification
Reactor is reactive library ,is a concrete achieve
Reactive Streams
Reactive Streams 是一种用于异步流式数据处理的标准化规范,旨在解决传统异步编程中的背压管理、资源消耗及响应速度等问题。以下是其核心概念、设计目标及实际价值的综合解析:
一、核心概念与设计目标
基本模型
Reactive Streams 定义了四个核心接口,构成异步流处理的基础:
Publisher(发布者):负责生成数据流(如文件读取、实时数据源),通过
subscribe()方法将数据推送给订阅者。Subscriber(订阅者):接收并处理数据,通过
onNext()、onError()、onComplete()方法响应数据流事件。Subscription(订阅关系):作为发布者和订阅者之间的契约,通过
request(n)和cancel()方法实现背压控制和订阅管理。Processor(处理器):兼具发布者和订阅者双重角色,用于中间数据转换(如过滤、聚合)。
核心目标
背压(Backpressure):订阅者通过
request(n)动态控制数据流速,避免因生产者速率过快导致消费者资源耗尽。例如,订阅者可初始请求少量数据,处理完成后再请求更多。异步非阻塞:数据生产与消费解耦,支持跨线程或网络的高效协作,减少线程阻塞和资源浪费。
标准化互操作性:提供统一的接口规范,确保不同框架(如 Reactor、RxJava)之间的兼容性。
二、解决的问题与设计背景
传统异步编程的痛点
资源耗尽:无界队列可能导致内存溢出(如传统“推”模式下的队列缓冲)。
响应延迟:同步阻塞操作(如线程等待)降低系统吞吐量。
缺乏统一标准:不同框架的异步流处理逻辑碎片化,难以复用和扩展。
Reactive Streams 的解决方案
动态请求机制:订阅者通过
request(n)主动声明处理能力,生产者按需推送数据,实现“拉-推”混合模式。异步边界:数据流处理与线程调度分离(如 Reactor 的
publishOn指定执行线程)。统一接口规范:标准化
Publisher、Subscriber等接口,促进框架间互操作(如 Reactor 与 Akka Streams 的集成)。
三、典型应用场景
高吞吐实时数据处理
场景:社交媒体实时推文分析、物联网设备数据流处理。
实现:通过背压控制和异步 I/O(如 Kafka 流处理)保障低延迟和高吞吐。
微服务通信
场景:服务间异步消息传递(如 RSocket 协议)。
实现:结合熔断机制,避免服务雪崩和资源竞争。
响应式 Web 服务
场景:高并发 HTTP 请求处理(如 Spring WebFlux)。
实现:基于非阻塞服务器(Netty)和响应式编程模型提升并发性能。
资源敏感型任务
场景:文件或数据库的流式读写。
实现:分批次拉取数据,减少内存占用(如 R2DBC 响应式数据库驱动)。
四、主流实现框架
框架 | 核心特性 | 适用场景 |
|---|---|---|
Reactor | 深度集成 Spring 生态,支持 | 高并发 Web 服务、微服务通信 |
RxJava | 提供 300+ 操作符,兼容 Java 6+ 和 Android | 复杂事件流处理、移动端应用 |
Akka Streams | 基于 Actor 模型,支持分布式容错和自动背压传播 | 分布式数据管道、金融风控 |
Java Flow API | JDK 9 原生支持,轻量级背压控制 | 轻量级工具开发、兼容性适配 |
RSocket | 支持 TCP/WebSocket 协议,提供四种交互模式(如双向流) | 跨语言微服务通信、IoT 控制 |
五、优势与局限性
优势
高效性:非阻塞 I/O 和背压机制提升资源利用率。
弹性设计:动态调整数据流速,适应负载波动。
生态丰富:覆盖 Web 服务、大数据、物联网等多个领域。
局限性
学习曲线高:需理解响应式编程范式和背压机制。
调试困难:异步流处理的问题难以追踪和复现。
生态碎片化:不同框架的实现细节差异可能增加集成复杂度。
总结
Reactive Streams 通过标准化接口和背压机制,为异步流式数据处理提供了高效、弹性的解决方案。其广泛应用于高并发、实时性要求高的场景(如微服务、IoT),并依托 Reactor、RxJava 等框架形成成熟的技术生态。尽管存在学习成本和调试难度,但其在资源利用率和系统稳定性上的优势,使其成为现代分布式系统设计的核心工具之一。
Publisher
The publisher emits a sequence of events to subscribers according to the demand received from its subscribers. A publisher can serve multiple subscribers.
Publisher.java
public interface Publisher<T> {
  public void subscribe(Subscriber<? super T> s);
}
Subscriber
Receives and processes events emitted by a Publisher. Please note that no notifications will be received until Subscription#request(long) is called to signal the demand. It has four methods to handle various kinds of responses received.
Subscriber.java
public interface Subscriber<T> {

  public void onSubscribe(Subscription s);
  public void onNext(T t);
  public void onError(Throwable t);
  public void onComplete();
}
Subscription
Defines a one-to-one relationship between a Publisher and a Subscriber. It can only be used once by a single Subscriber. It is used to both signal desire for data and cancels demand (and allow resource cleanup).
Subscription.java
public interface Subscription<T> {
  public void request(long n);
  public void cancel();
}
Processor
Represents a processing stage consisting of both a Subscriber and a Publisher and obeys both contracts.
Processor.java
public interface Processor<T, R> extends Subscriber<T>, Publisher<R> {
}
Reactor
Reactor is the reactive library of choice for Spring WebFlux. It provides the Mono and Flux API types to work on data sequences of 0..1 (Mono) and 0..N (Flux) through a rich set of operators aligned with the ReactiveX vocabulary of operators. Reactor is a Reactive Streams library and, therefore, all of its operators support non-blocking back pressure. Reactor has a strong focus on server-side Java. It is developed in close collaboration with Spring.
传统的spring-boot-starter-web,它的架构组合【spring-webmvc + Servlet + Tomcat】命令式的、同步阻塞的
响应式spring-boot-starter-webflux框架,它的架构组合【spring-webflux + Reactor + Netty】响应式的、异步非阻塞的
Invoking a Blocking API
What if you do need to use a blocking library? Both Reactor and RxJava provide the publishOn operator to continue processing on a different thread. That means there is an easy escape hatch. Keep in mind, however, that blocking APIs are not a good fit for this concurrency model.
Mutable State
In Reactor and RxJava, you declare logic through operators. At runtime, a reactive pipeline is formed where data is processed sequentially, in distinct stages. A key benefit of this is that it frees applications from having to protect mutable state because application code within that pipeline is never invoked concurrently.
Threading Model
What threads should you expect to see on a server running with Spring WebFlux?
On a “vanilla” Spring WebFlux server (for example, no data access or other optional dependencies), you can expect one thread for the server and several others for request processing (typically as many as the number of CPU cores). Servlet containers, however, may start with more threads (for example, 10 on Tomcat), in support of both servlet (blocking) I/O and servlet 3.1 (non-blocking) I/O usage.
The reactive
WebClientoperates in event loop style. So you can see a small, fixed number of processing threads related to that (for example,reactor-http-nio-with the Reactor Netty connector). However, if Reactor Netty is used for both client and server, the two share event loop resources by default.Reactor and RxJava provide thread pool abstractions, called schedulers, to use with the
publishOnoperator that is used to switch processing to a different thread pool. The schedulers have names that suggest a specific concurrency strategy — for example, “parallel” (for CPU-bound work with a limited number of threads) or “elastic” (for I/O-bound work with a large number of threads). If you see such threads, it means some code is using a specific thread poolSchedulerstrategy.Data access libraries and other third party dependencies can also create and use threads of their own.
Reactive Core
The spring-web module contains the following foundational support for reactive web applications:
For server request processing there are two levels of support.
HttpHandler: Basic contract for HTTP request handling with non-blocking I/O and Reactive Streams back pressure, along with adapters for Reactor Netty, Undertow, Tomcat, Jetty, and any Servlet container.
WebHandlerAPI: Slightly higher level, general-purpose web API for request handling, on top of which concrete programming models such as annotated controllers and functional endpoints are built.
For the client side, there is a basic
ClientHttpConnectorcontract to perform HTTP requests with non-blocking I/O and Reactive Streams back pressure, along with adapters for Reactor Netty, reactive Jetty HttpClient and Apache HttpComponents. The higher level WebClient used in applications builds on this basic contract.For client and server, codecs for serialization and deserialization of HTTP request and response content.
Annotated Controllers
Method Arguments
| For access to query parameters. Parameter values are converted to the declared method argument type. See |
|---|---|
| For access to request headers. Header values are converted to the declared method argument type. See |
| For access to cookies. Cookie values are converted to the declared method argument type. See |
| For access to the HTTP request body. Body content is converted to the declared method argument type by using |
| For access to request headers and body. The body is converted with |
| For access to a part in a |
CORS
https://developer.mozilla.org/en-US/docs/Web/HTTP/Guides/CORS
https://docs.spring.io/spring-framework/reference/6.1/web/webflux-cors.html
Cross-Origin Resource Sharing
The Cross-Origin Resource Sharing standard works by adding new HTTP headers that let servers describe which origins are permitted to read that information from a web browser.
Simple requests
For example, suppose web content at https://foo.example wishes to fetch JSON content from domain https://bar.other. Code of this sort might be used in JavaScript deployed on foo.example:
jsCopy to Clipboard
const fetchPromise = fetch("https://bar.other");

fetchPromise
  .then((response) => response.json())
  .then((data) => {
    console.log(data);
  });
This operation performs a simple exchange between the client and the server, using CORS headers to handle the privileges:
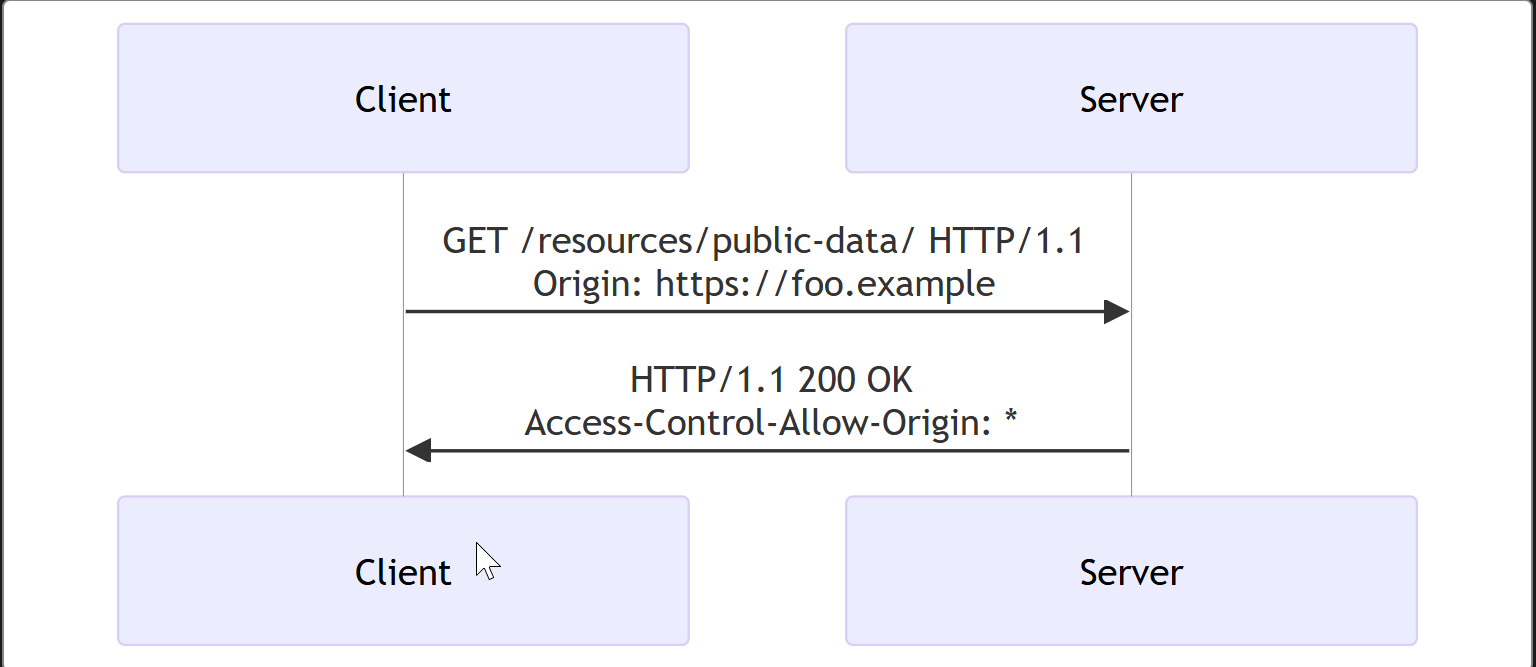
Let's look at what the browser will send to the server in this case:
httpCopy to Clipboard
GET /resources/public-data/ HTTP/1.1
Host: bar.other
User-Agent: Mozilla/5.0 (Macintosh; Intel Mac OS X 10.14; rv:71.0) Gecko/20100101 Firefox/71.0
Accept: text/html,application/xhtml+xml,application/xml;q=0.9,*/*;q=0.8
Accept-Language: en-us,en;q=0.5
Accept-Encoding: gzip,deflate
Connection: keep-alive
Origin: https://foo.example
The request header of note is Origin, which shows that the invocation is coming from https://foo.example.
Now let's see how the server responds:
httpCopy to Clipboard
HTTP/1.1 200 OK
Date: Mon, 01 Dec 2008 00:23:53 GMT
Server: Apache/2
Access-Control-Allow-Origin: *
Keep-Alive: timeout=2, max=100
Connection: Keep-Alive
Transfer-Encoding: chunked
Content-Type: application/xml

[…XML Data…]
In response, the server returns a Access-Control-Allow-Origin header with Access-Control-Allow-Origin: *, which means that the resource can be accessed by any origin.
httpCopy to Clipboard
Access-Control-Allow-Origin: *This pattern of the Origin and Access-Control-Allow-Origin headers is the simplest use of the access control protocol. If the resource owners at https://bar.other wished to restrict access to the resource to requests only from https://foo.example (i.e., no domain other than https://foo.example can access the resource in a cross-origin manner), they would send:
httpCopy to Clipboard
Access-Control-Allow-Origin: https://foo.exampleNote: When responding to a credentialed requests request, the server must specify an origin in the value of the Access-Control-Allow-Origin header, instead of specifying the * wildcard.
Preflighted requests
Unlike simple requests, for "preflighted" requests the browser first sends an HTTP request using the OPTIONS method to the resource on the other origin, in order to determine if the actual request is safe to send. Such cross-origin requests are preflighted since they may have implications for user data.
The following is an example of a request that will be preflighted:
jsCopy to Clipboard
const fetchPromise = fetch("https://bar.other/doc", {
  method: "POST",
  mode: "cors",
  headers: {
    "Content-Type": "text/xml",
    "X-PINGOTHER": "pingpong",
  },
  body: "<person><name>Arun</name></person>",
});

fetchPromise.then((response) => {
  console.log(response.status);
});
The example above creates an XML body to send with the POST request. Also, a non-standard HTTP X-PINGOTHER request header is set. Such headers are not part of HTTP/1.1, but are generally useful to web applications. Since the request uses a Content-Type of text/xml, and since a custom header is set, this request is preflighted.

Note: As described below, the actual POST request does not include the Access-Control-Request-* headers; they are needed only for the OPTIONS request.
Let's look at the full exchange between client and server. The first exchange is the preflight request/response:
httpCopy to Clipboard
OPTIONS /doc HTTP/1.1
Host: bar.other
User-Agent: Mozilla/5.0 (Macintosh; Intel Mac OS X 10.14; rv:71.0) Gecko/20100101 Firefox/71.0
Accept: text/html,application/xhtml+xml,application/xml;q=0.9,*/*;q=0.8
Accept-Language: en-us,en;q=0.5
Accept-Encoding: gzip,deflate
Connection: keep-alive
Origin: https://foo.example
Access-Control-Request-Method: POST
Access-Control-Request-Headers: content-type,x-pingother

HTTP/1.1 204 No Content
Date: Mon, 01 Dec 2008 01:15:39 GMT
Server: Apache/2
Access-Control-Allow-Origin: https://foo.example
Access-Control-Allow-Methods: POST, GET, OPTIONS
Access-Control-Allow-Headers: X-PINGOTHER, Content-Type
Access-Control-Max-Age: 86400
Vary: Accept-Encoding, Origin
Keep-Alive: timeout=2, max=100
Connection: Keep-Alive
The first block above represents the preflight request with the OPTIONS method. The browser determines that it needs to send this based on the request parameters that the JavaScript code snippet above was using, so that the server can respond whether it is acceptable to send the request with the actual request parameters. OPTIONS is an HTTP/1.1 method that is used to determine further information from servers, and is a safe method, meaning that it can't be used to change the resource. Note that along with the OPTIONS request, two other request headers are sent:
httpCopy to Clipboard
Access-Control-Request-Method: POST
Access-Control-Request-Headers: content-type,x-pingother
The Access-Control-Request-Method header notifies the server as part of a preflight request that when the actual request is sent, it will do so with a POST request method. The Access-Control-Request-Headers header notifies the server that when the actual request is sent, it will do so with X-PINGOTHER and Content-Type custom headers. Now the server has an opportunity to determine whether it can accept a request under these conditions.
The second block above is the response that the server returns, which indicate that the request method (POST) and request headers (X-PINGOTHER) are acceptable. Let's have a closer look at the following lines:
httpCopy to Clipboard
Access-Control-Allow-Origin: https://foo.example
Access-Control-Allow-Methods: POST, GET, OPTIONS
Access-Control-Allow-Headers: X-PINGOTHER, Content-Type
Access-Control-Max-Age: 86400
The server responds with Access-Control-Allow-Origin: https://foo.example, restricting access to the requesting origin domain only. It also responds with Access-Control-Allow-Methods, which says that POST and GET are valid methods to query the resource in question (this header is similar to the Allow response header, but used strictly within the context of access control).
The server also sends Access-Control-Allow-Headers with a value of X-PINGOTHER, Content-Type, confirming that these are permitted headers to be used with the actual request. Like Access-Control-Allow-Methods, Access-Control-Allow-Headers is a comma-separated list of acceptable headers.
Finally, Access-Control-Max-Age gives the value in seconds for how long the response to the preflight request can be cached without sending another preflight request. The default value is 5 seconds. In the present case, the max age is 86400 seconds (= 24 hours). Note that each browser has a maximum internal value that takes precedence when the Access-Control-Max-Age exceeds it.
Once the preflight request is complete, the real request is sent:
httpCopy to Clipboard
POST /doc HTTP/1.1
Host: bar.other
User-Agent: Mozilla/5.0 (Macintosh; Intel Mac OS X 10.14; rv:71.0) Gecko/20100101 Firefox/71.0
Accept: text/html,application/xhtml+xml,application/xml;q=0.9,*/*;q=0.8
Accept-Language: en-us,en;q=0.5
Accept-Encoding: gzip,deflate
Connection: keep-alive
X-PINGOTHER: pingpong
Content-Type: text/xml; charset=UTF-8
Referer: https://foo.example/examples/preflightInvocation.html
Content-Length: 55
Origin: https://foo.example
Pragma: no-cache
Cache-Control: no-cache

<person><name>Arun</name></person>

HTTP/1.1 200 OK
Date: Mon, 01 Dec 2008 01:15:40 GMT
Server: Apache/2
Access-Control-Allow-Origin: https://foo.example
Vary: Accept-Encoding, Origin
Content-Encoding: gzip
Content-Length: 235
Keep-Alive: timeout=2, max=99
Connection: Keep-Alive
Content-Type: text/plain

[Some XML content]
Requests with credentials
Note: When making credentialed requests to a different domain, third-party cookie policies will still apply. The policy is always enforced regardless of any setup on the server and the client as described in this chapter.
The most interesting capability exposed by both fetch() or XMLHttpRequest and CORS is the ability to make "credentialed" requests that are aware of HTTP cookies and HTTP Authentication information. By default, in cross-origin fetch() or XMLHttpRequest calls, browsers will not send credentials.
To ask for a fetch() request to include credentials, set the credentials option to "include".
To ask for an XMLHttpRequest request to include credentials, set the XMLHttpRequest.withCredentials property to true.
In this example, content originally loaded from https://foo.example makes a GET request to a resource on https://bar.other which sets Cookies. Content on foo.example might contain JavaScript like this:
jsCopy to Clipboard
const url = "https://bar.other/resources/credentialed-content/";

const request = new Request(url, { credentials: "include" });

const fetchPromise = fetch(request);
fetchPromise.then((response) => console.log(response));
This code creates a Request object, setting the credentials option to "include" in the constructor, then passes this request into fetch(). Since this is a simple GET request, it is not preflighted but the browser will reject any response that does not have the Access-Control-Allow-Credentials: true header, and not make the response available to the invoking web content.
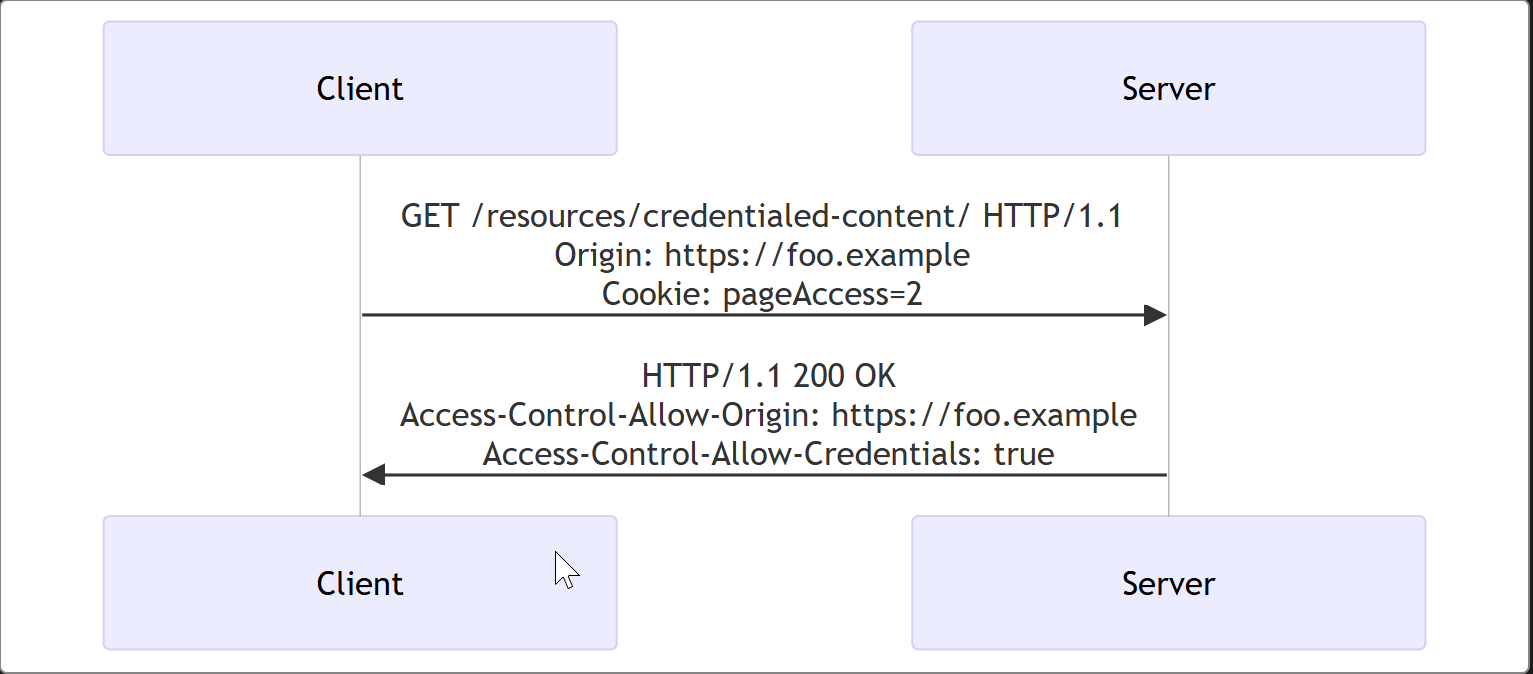
Here is a sample exchange between client and server:
httpCopy to Clipboard
GET /resources/credentialed-content/ HTTP/1.1
Host: bar.other
User-Agent: Mozilla/5.0 (Macintosh; Intel Mac OS X 10.14; rv:71.0) Gecko/20100101 Firefox/71.0
Accept: text/html,application/xhtml+xml,application/xml;q=0.9,*/*;q=0.8
Accept-Language: en-us,en;q=0.5
Accept-Encoding: gzip,deflate
Connection: keep-alive
Referer: https://foo.example/examples/credential.html
Origin: https://foo.example
Cookie: pageAccess=2

HTTP/1.1 200 OK
Date: Mon, 01 Dec 2008 01:34:52 GMT
Server: Apache/2
Access-Control-Allow-Origin: https://foo.example
Access-Control-Allow-Credentials: true
Cache-Control: no-cache
Pragma: no-cache
Set-Cookie: pageAccess=3; expires=Wed, 31-Dec-2008 01:34:53 GMT
Vary: Accept-Encoding, Origin
Content-Encoding: gzip
Content-Length: 106
Keep-Alive: timeout=2, max=100
Connection: Keep-Alive
Content-Type: text/plain

[text/plain content]
Although the request's Cookie header contains the cookie destined for the content on https://bar.other, if bar.other did not respond with an Access-Control-Allow-Credentials with value true, as demonstrated in this example, the response would be ignored and not made available to the web content.
Preflight requests and credentials
CORS-preflight requests must never include credentials. The response to a preflight request must specify Access-Control-Allow-Credentials: true to indicate that the actual request can be made with credentials.
Credentialed requests and wildcards
When responding to a credentialed request:
The server must not specify the
*wildcard for theAccess-Control-Allow-Originresponse-header value, but must instead specify an explicit origin; for example:Access-Control-Allow-Origin: https://example.comThe server must not specify the
*wildcard for theAccess-Control-Allow-Headersresponse-header value, but must instead specify an explicit list of header names; for example,Access-Control-Allow-Headers: X-PINGOTHER, Content-TypeThe server must not specify the
*wildcard for theAccess-Control-Allow-Methodsresponse-header value, but must instead specify an explicit list of method names; for example,Access-Control-Allow-Methods: POST, GETThe server must not specify the
*wildcard for theAccess-Control-Expose-Headersresponse-header value, but must instead specify an explicit list of header names; for example,Access-Control-Expose-Headers: Content-Encoding, Kuma-Revision
If a request includes a credential (most commonly a Cookie header) and the response includes an Access-Control-Allow-Origin: * header (that is, with the wildcard), the browser will block access to the response, and report a CORS error in the devtools console.
But if a request does include a credential (like the Cookie header) and the response includes an actual origin rather than the wildcard (like, for example, Access-Control-Allow-Origin: https://example.com), then the browser will allow access to the response from the specified origin.
Also note that any Set-Cookie response header in a response would not set a cookie if the Access-Control-Allow-Origin value in that response is the * wildcard rather an actual origin.
Mono & Flux
data sequences of 0..1 (Mono) and 0..N (Flux)
The difference between Mono and Flux.
Mono is a special type of Publisher. A Mono object represents a single or empty value. This means it can emit only one value at most for the onNext() request and then terminates with the onComplete() signal. In case of failure, it only emits a single onError() signal.
Let’s see an example of Mono with a completion signal:
@Test
public void givenMonoPublisher_whenSubscribeThenReturnSingleValue() {
    Mono<String> helloMono = Mono.just("Hello");
    StepVerifier.create(helloMono)
      .expectNext("Hello")
      .expectComplete()
      .verify();
}
We can see here that when helloMono is subscribed, it emits only one value and then sends the signal of completion.
Flux is a standard Publisher that represents 0 to N asynchronous sequence values. This means that it can emit 0 to many values, possibly infinite values for onNext() requests, and then terminates with either a completion or an error signal.
Let’s see an example of Flux with a completion signal:
@Test
public void givenFluxPublisher_whenSubscribedThenReturnMultipleValues() {
    Flux<String> stringFlux = Flux.just("Hello", "Baeldung");
    StepVerifier.create(stringFlux)
      .expectNext("Hello")
      .expectNext("Baeldung")
      .expectComplete()
      .verify();
}
Now, let’s see an example of Flux with an error signal:
@Test
public void givenFluxPublisher_whenSubscribeThenReturnMultipleValuesWithError() {
    Flux<String> stringFlux = Flux.just("Hello", "Baeldung", "Error")
      .map(str -> {
          if (str.equals("Error"))
              throw new RuntimeException("Throwing Error");
          return str;
      });
    StepVerifier.create(stringFlux)
      .expectNext("Hello")
      .expectNext("Baeldung")
      .expectError()
      .verify();
}
We can see here that after getting two values from the Flux, we get an error.
Mono and Flux are both implementations of the Publisher interface. In simple terms, we can say that when we’re doing something like a computation or making a request to a database or an external service, and expecting a maximum of one result, then we should use Mono.
When we’re expecting multiple results from our computation, database, or external service call, then we should use Flux.
Mono is more relatable to the Optional class in Java since it contains 0 or 1 value, and Flux is more relatable to List since it can have N number of values.
import org.springframework.beans.factory.annotation.Autowired;
import org.springframework.stereotype.Service;
import reactor.core.publisher.Flux;
import reactor.core.publisher.Mono;

@Service
public class ReactiveUserService {
    @Autowired
    private UserRepository userRepository;
    public Flux<User> getAllUsers() {
        return userRepository.findAll();
    }
    public Mono<User> getUserById(String id) {
        return userRepository.findById(id);
    }
    public Mono<User> createUser(User user) {
        return userRepository.save(user);
    }
    public Mono<User> updateUser(String id, User user) {
        return userRepository.findById(id)
                .flatMap(existingUser -> {
                    existingUser.setName(user.getName());
                    existingUser.setEmail(user.getEmail());
                    return userRepository.save(existingUser);
                });
    }
    public Mono<Void> deleteUser(String id) {
        return userRepository.deleteById(id);
    }
}
Spring WebFlux heavily uses two publishers :
Mono: Returns 0 or 1 element.
Mono<String> mono = Mono.just("Alex");
Mono<String> mono = Mono.empty();Flux: Returns 0…N elements. A Flux can be endless, meaning that it can keep emitting elements forever. Also it can return a sequence of elements and then send a completion notification when it has returned all of its elements.
Flux<String> flux = Flux.just("A", "B", "C");
Flux<String> flux = Flux.fromArray(new String[]{"A", "B", "C"});
Flux<String> flux = Flux.fromIterable(Arrays.asList("A", "B", "C"));

//To subscribe call method

flux.subscribe();
常用方法
https://projectreactor.io/docs/core/release/api/
https://www.cnblogs.com/crazymakercircle/p/16127013.html#autoid-h2-5-2-0
https://skyao.io/learning-reactor/docs/concept/operator/buffer.html
Flux 和 Mono 都是数据流的发布者,使用 Flux 和 Mono 都可以发出三种数据信号:元素值,错误信号,完成信号;错误信号和完成信号都代表终止信号,终止信号用于告诉订阅者数据流结束了,错误信号终止数据流同时把错误信息传递给订阅者。
三种信号的特点:
错误信号和完成信号都是终止信号,不能共存
如果没有发送任何元素值,而是直接发送错误或者完成信号,表示是空数据流
如果没有错误信号,也没有完成信号,表示是无限数据流
 <dependency>
      <groupId>io.projectreactor</groupId>
      <artifactId>reactor-core</artifactId>
      <version>3.6.15</version>
    </dependency>ncy>
The Flow of Elements
just():创建Flux序列,并声明指定数据流
subscribe():订阅Flux序列,只有进行订阅后才回触发数据流,不订阅就什么都不会发生
public static void main(String[] args) {
        List<Integer> elements = new ArrayList<>();
        Flux.just(1, 2, 3, 4)
                .log()
                .subscribe(new Subscriber<Integer>() {
                    @Override
                    public void onSubscribe(Subscription s) {
                        s.request(Long.MAX_VALUE);
                    }

                    @Override
                    public void onNext(Integer integer) {
                        elements.add(integer);
                        System.out.println(integer);
                    }

                    @Override
                    public void onError(Throwable t) {}

                    @Override
                    public void onComplete() {}
                });

        System.out.println(elements);
    }
fromArray()、fromIterable()、fromStream()方法:可以从一个数组、Iterable 对象或Stream 对象中创建Flux序列
public class TestReactor {
    public static void main(String[] args) {
        //just():创建Flux序列,并声明数据流,
        Flux<Integer> integerFlux = Flux.just(1, 2, 3, 4);//整形
        //subscribe():订阅Flux序列,只有进行订阅后才回触发数据流,不订阅就什么都不会发生
        integerFlux.subscribe(System.out::println);

        Flux<String> stringFlux = Flux.just("hello", "world");//字符串
        stringFlux.subscribe(System.out::println);

        //fromArray(),fromIterable()和fromStream():可以从一个数组、Iterable 对象或Stream 对象中创建Flux序列
        Integer[] array = {1,2,3,4};
        Flux.fromArray(array).subscribe(System.out::println);

        List<Integer> integers = Arrays.asList(array);
        Flux.fromIterable(integers).subscribe(System.out::println);

        Stream<Integer> stream = integers.stream();
        Flux.fromStream(stream).subscribe(System.out::println);
    }
}
range(int start, int count):
创建包含从start起始的count个数量的Integer对象的序列
interval(Duration period)和interval(Duration delay, Duration period):
创建一个包含了从0开始递增的Long对象的序列。其中包含的元素按照指定的间隔来发布。除了间隔时间之外,还可以指定起始元素发布之前的延迟时间
intervalMillis(long period)和intervalMillis(long delay, long period):
与interval()方法相同,但该方法通过毫秒数来指定时间间隔和延迟时间
Flux.just("Hello", "World").subscribe(System.out::println);
Flux.fromArray(new Integer[]{1, 2, 3}).subscribe(System.out::println);
Flux.empty().subscribe(System.out::println);
Flux.range(1, 10).subscribe(System.out::println);
Flux.interval(Duration.of(10, ChronoUnit.SECONDS)).subscribe(System.out::println);
Flux.intervalMillis(1000).subscirbe(System.out::println);
除此之外,Mono还有一些独有的静态方法:
fromCallable(),fromCompletionStage(),fromFuture(),fromRunnable()和fromSupplier():分别从Callable,CompletionStage,CompletableFuture,Runnable和Supplier中创建Mono
delay(Duration duration)和delayMillis(long duration):创建一个Mono序列,在指定的延迟时间之后,产生数字0作为唯一值
ignoreElements(Publisher source):创建一个Mono序列,忽略作为源的Publisher中的所有元素,只产生消息
justOrEmpty(Optional<? extends T> data)和justOrEmpty(T data):从一个Optional对象或可能为null的对象中创建Mono。只有Optional对象中包含之或对象不为null时,Mono序列才产生对应的元素
Mono.fromSupplier(() -> "Hello").subscribe(System.out::println);
Mono.justOrEmpty(Optional.of("Hello")).subscribe(System.out::println);
Mono.create(sink -> sink.success("Hello")).subscribte(System.out::println);
generate & create
https://skyao.io/learning-reactor/docs/concept/mono/create.html
generate() 方法通过同步和逐一的方式来产生 Flux 序列。
同步是指序列的产生是通过调用所提供的 SynchronousSink 对象的 next(),complete()和 error(Throwable)方法来完成的。
逐一生成的含义是在具体的生成逻辑中,next() 方法只能最多被调用一次。
Flux.generate(sink -> {
    sink.next("Hello");
    sink.complete();
}).subscribe(System.out::println);
在有些情况下,序列的生成可能是有状态的,需要用到某些状态对象。此时可以使用 generate() 方法的另外一种形式 generate(Callable<S> stateSupplier, BiFunction<S,SynchronousSink<T>,S> generator),其中 stateSupplier 用来提供初始的状态对象。在进行序列生成时,状态对象会作为 generator 使用的第一个参数传入,可以在对应的逻辑中对该状态对象进行修改以供下一次生成时使用。
final Random random = new Random();
Flux.generate(ArrayList::new, (list, sink) -> {
    int value = random.nextInt(100);
    list.add(value);
    sink.next(value);
    if (list.size() == 10) {
        sink.complete();
    }
    return list;
}).subscribe(System.out::println);
create()方法与 generate()方法的不同之处在于所使用的是 FluxSink 对象。
FluxSink 支持同步和异步的消息产生,并且可以在一次调用中产生多个元素。下面的代码在一次调用中就产生了全部的 10 个元素:
Flux.create(sink -> {
    for (int i = 0; i < 10; i++) {
        sink.next(i);
    }
    sink.complete();
}).subscribe(System.out::println);
Backpressure
The next thing we should consider is backpressure. In our example, the subscriber is telling the producer to push every single element at once. This could end up becoming overwhelming for the subscriber, consuming all of its resources.
Backpressure is when a downstream can tell an upstream to send it less data in order to prevent it from being overwhelmed.
We can modify our Subscriber implementation to apply backpressure. Let’s tell the upstream to only send two elements at a time by using request():
Flux.just(1, 2, 3, 4)
  .log()
  .subscribe(new Subscriber<Integer>() {
    private Subscription s;
    int onNextAmount;

    @Override
    public void onSubscribe(Subscription s) {
        this.s = s;
        s.request(2);
    }

    @Override
    public void onNext(Integer integer) {
        elements.add(integer);
        onNextAmount++;
        if (onNextAmount % 2 == 0) {
            s.request(2);
        }
    }

    @Override
    public void onError(Throwable t) {}

    @Override
    public void onComplete() {}
});
Now if we run our code again, we’ll see the request(2) is called, followed by two onNext() calls, then request(2) again.
23:31:15.395 [main] INFO  reactor.Flux.Array.1 - | onSubscribe([Synchronous Fuseable] FluxArray.ArraySubscription)
23:31:15.397 [main] INFO  reactor.Flux.Array.1 - | request(2)
23:31:15.397 [main] INFO  reactor.Flux.Array.1 - | onNext(1)
23:31:15.398 [main] INFO  reactor.Flux.Array.1 - | onNext(2)
23:31:15.398 [main] INFO  reactor.Flux.Array.1 - | request(2)
23:31:15.398 [main] INFO  reactor.Flux.Array.1 - | onNext(3)
23:31:15.398 [main] INFO  reactor.Flux.Array.1 - | onNext(4)
23:31:15.398 [main] INFO  reactor.Flux.Array.1 - | request(2)
23:31:15.398 [main] INFO  reactor.Flux.Array.1 - | onComplete()
Mapping Data in a Stream
A simple operation that we can perform is applying a transformation. In this case, let’s just double all the numbers in our stream:
public static void main(String[] args) {
        List<Integer> elements = new ArrayList<>();
        Flux.just(1, 2, 3, 4)
                .log()
                .map(i -> {
                    System.out.println(i+","+Thread.currentThread());
                    return i * 2;
                })
                .subscribe(elements::add);

        System.out.println(elements);
    }
map() will be applied when onNext() is called.
Combining Two Streams
We can then make things more interesting by combining another stream with this one. Let’s try this by using zip() function*:*
Flux.just(1, 2, 3, 4)
                .log()
                .map(i -> i * 2)
                .zipWith(Flux.range(0, Integer.MAX_VALUE),
                        (one, two) -> String.format("First Flux: %d, Second Flux: %d", one, two))
                .subscribe(System.out::println);
Filter
对流中包含的元素进行过滤,只留下满足Predicate指定条件的元素。
Flux.range(1, 10).filter(i -> i%2 == 0).subscribe(System.out::println);map、flatMap、concatMap的区别
https://www.cnblogs.com/daydreamer-fs/p/17587371.html
flatMap、map和concatMap都是在Flux中用于进行数据转换和处理的方法,但它们在处理元素和顺序上有一些区别:
map方法:map方法用于对Flux中的每个元素进行一对一的转换。对于每个元素,
map方法都会应用一个转换函数,并将转换后的结果作为新的元素放入新的Flux中。转换函数的返回值类型可以与原始元素的类型不同。
map方法不会改变元素的顺序,并且是并行执行的,即它不会等待前一个元素的转换完成再处理下一个元素。
@Test public void test() { Flux.just("a", "b", "c") .map(s -> { String str = s + s; System.out.println("map to :" + str); return str; }).subscribe(); }flatMap方法:flatMap方法用于将Flux中的每个元素进行一对多的转换。对于每个元素,
flatMap方法会应用一个转换函数,该函数返回一个新的Flux。flatMap方法会将每个转换后的Flux合并成一个新的Flux,并且不保证转换后的元素的顺序。转换函数的返回值必须是一个Flux。
@Test public void test(){ String a = "abcdefghijklmnopqrstuvwxyzABCDEFGHIJKLMNOPQRSTUVWXYZ1234567890"; String[] split = a.split("(?!^)"); Flux.just(split) .flatMap(s->{ String str = s + s; System.out.println("flatmap to :" + str); return Flux.just(str); }) .subscribe(); }concatMap方法:concatMap方法类似于flatMap,也是用于一对多的转换。与
flatMap不同的是,concatMap方法保证转换后的元素的顺序与原始Flux中的元素顺序一致。转换函数的返回值必须是一个Flux。
@Test
public void test(){
   String a = "abcdefghijklmnopqrstuvwxyzABCDEFGHIJKLMNOPQRSTUVWXYZ1234567890";
   String[] split = a.split("(?!^)");
   Flux.just(split)
           .concatMap(s->{
               String str = s + s;
               System.out.println("flatmap to :" + str);
               return Flux.just(str);
           })
           .subscribe();
}
switchMap
类似于 flatMap 操作符,它也会将每个元素映射成一个新的数据流。但是它只会处理最近的数据流,而忽略之前未完成的数据流。如果在处理最近的数据流时,又来了一个新的数据流,它会放弃之前的数据流并处理最新的数据流。switchMap 操作符是异步执行的,会涉及到线程切换。总结:
map:用于一对一的转换,返回一个新的Flux,元素顺序不变。flatMap:用于一对多的转换,返回一个新的Flux,元素顺序可能发生变化。concatMap:用于一对多的转换,返回一个新的Flux,元素顺序与原始Flux中的元素顺序保持一致。
选择使用哪种方法取决于具体的业务需求和对元素顺序的要求。如果不关心元素顺序,可以考虑使用flatMap,它的并行执行可以提高性能。如果要保持元素顺序,可以使用concatMap,但要注意可能会影响性能。而map适用于简单的一对一转换场景。
buffer
https://skyao.io/learning-reactor/docs/concept/operator/buffer.html
buffer
buffer 操作符的作用是把当前流中的元素收集到集合中,并把集合对象作为流中的新元素。
在进行收集时可以指定不同的条件:所包含的元素的最大数量或收集的时间间隔。
方法 buffer()仅使用一个条件,而 bufferTimeout()可以同时指定两个条件。
// 输出的是 5 个包含 20 个元素的数组
Flux.range(1, 100).buffer(20).subscribe(System.out::println);
bufferTimeout
指定时间间隔时可以使用 Duration 对象或毫秒数,即使用 bufferMillis()或 bufferTimeoutMillis()两个方法。
// 输出的是 2 个包含了 10 个元素的数组
Flux.intervalMillis(100).bufferMillis(1001).take(2).toStream().forEach(System.out::println);
需要注意的是,这里的代码首先通过 toStream()方法把 Flux 序列转换成 Java 8 中的 Stream 对象,再通过 forEach()方法来进行输出。这是因为序列的生成是异步的,而转换成 Stream 对象可以保证主线程在序列生成完成之前不会退出,从而可以正确地输出序列中的所有元素。
bufferUntil 和 bufferWhile
除了元素数量和时间间隔之外,还可以通过 bufferUntil 和 bufferWhile 操作符来进行收集。
这两个操作符的参数是表示每个集合中的元素所要满足的条件的 Predicate 对象:
bufferUntil 会一直收集直到 Predicate 返回为 true。使得 Predicate 返回 true 的那个元素可以选择添加到当前集合或下一个集合中;
// 输出的是 5 个包含 2 个元素的数组
// 每当遇到一个偶数就会结束当前的收集
 Flux.range(1, 10).bufferUntil(i -> i % 2 == 0).subscribe(System.out::println);
bufferWhile 则只有当 Predicate 返回 true 时才会收集。一旦值为 false,会立即开始下一次收集。
// 第四行语句输出的是 5 个包含 1 个元素的数组
// 数组里面包含的只有偶数。
 Flux.range(1, 10).bufferWhile(i -> i % 2 == 0).subscribe(System.out::println);
delayElements
public final Flux<T> delayElements(java.time.Duration delay)
Delay each of this Flux elements (Subscriber.onNext(T) signals) by a given Duration. Signals are delayed and continue on the parallel default Scheduler, but empty sequences or immediate error signals are not delayed.
blockFirst & blockLast
https://projectreactor.io/docs/core/release/api/reactor/core/publisher/Flux.html#blockFirst--
Sometimes you can only migrate part of your code to be reactive, and you need to reuse reactive sequences in more imperative code.
Thus if you need to block until the value from a Mono is available, use Mono#block() method. It will throw an Exception if the onError event is triggered.
Similarly, you can block for the first or last value in a Flux with blockFirst()/blockLast(). You can also transform a Flux to an Iterable with toIterable. Same restrictions as above still apply.
public final T blockFirst()
Subscribe to this Flux and block indefinitely until the upstream signals its first value or completes. Returns that value, or null if the Flux completes empty. In case the Flux errors, the original exception is thrown (wrapped in a RuntimeException if it was a checked exception).
public final T blockLast()
Subscribe to this Flux and block indefinitely until the upstream signals its last value or completes. Returns that value, or null if the Flux completes empty. In case the Flux errors, the original exception is thrown (wrapped in a RuntimeException if it was a checked exception).
以下是 Reactor 中 blockFirst() 和 blockLast() 方法的使用示例:
1. blockFirst() 方法
作用:阻塞当前线程,直到 Flux 发出第一个元素,然后返回该元素。
示例 1:基本使用
Flux<String> flux = Flux.just("Apple", "Banana", "Cherry");
String firstElement = flux.blockFirst();
System.out.println("First element: " + firstElement); // 输出: Apple
示例 2:带延迟的 Flux
Flux<Integer> delayedFlux = Flux.just(10, 20, 30)
    .delayElements(Duration.ofSeconds(1)); // 每个元素延迟 1 秒

// 阻塞 1 秒后返回第一个元素
Integer firstNumber = delayedFlux.blockFirst();
System.out.println("First element after delay: " + firstNumber); // 输出: 102. blockLast() 方法
作用:阻塞当前线程,直到 Flux 完成,并返回最后一个元素。
示例 1:基本使用
Flux<Integer> numbers = Flux.range(1, 5); // 1, 2, 3, 4, 5
Integer lastElement = numbers.blockLast();
System.out.println("Last element: " + lastElement); // 输出: 5
示例 2:带延迟的 Flux
Flux<String> delayedFlux = Flux.just("Hello", "Reactor", "World")
    .delayElements(Duration.ofMillis(500)); // 每个元素延迟 500ms

// 阻塞约 1 秒后返回最后一个元素
String lastWord = delayedFlux.blockLast();
System.out.println("Last element after delay: " + lastWord); // 输出: World注意事项:
避免在主线程滥用:这两个方法会阻塞当前线程,可能破坏响应式编程的非阻塞特性,建议仅在测试或特定场景(如
main方法)中使用。空 Flux 会抛异常:如果 Flux 为空,调用
blockFirst()或blockLast()会抛出IllegalStateException。无限流问题:若 Flux 是无限的(如
Flux.interval),blockLast()会导致无限阻塞。
错误处理示例:
Flux<Integer> errorFlux = Flux.error(new RuntimeException("Oops!"));
try {
    errorFlux.blockLast(); // 抛出异常
} catch (RuntimeException e) {
    System.out.println("Caught error: " + e.getMessage()); // 输出: Oops!
}
通过这些示例,可以直观地理解 blockFirst() 和 blockLast() 的阻塞行为和适用场景。
事件感知 API--- doOnXxx
https://blog.csdn.net/u014390502/article/details/143271402
doOnXxx 系列方法是 Reactor 提供的一组用于在流操作过程中执行副作用的 API。它们不会改变流的内容或数据流本身,而是允许我们在特定的生命周期事件发生时进行操作(如日志记录、调试、监控等)。
这些 API 名称中的 Xxx 代表不同的事件类型,比如:
doOnNext(): 当下一个元素被发出时执行操作。 doOnError(): 当流中出现错误时执行操作。 doOnComplete(): 当流完成时执行操作。 doOnSubscribe(): 当订阅发生时执行操作。 这些方法非常适合用于监控、调试或者记录流的行为。
doOnNext()
doOnNext() 方法允许你在每个元素被发布时执行操作,通常用于对每个数据元素进行日志记录、调试或者进行某种副作用操作。
示例:
        Flux<String> flux = Flux.just("Spring", "Boot", "3","Reactor")
                .doOnNext(value -> System.out.println("Processing value: " + value))
                .map(String::toUpperCase);

        flux.subscribe(System.out::println);
doOnError()
doOnError() 方法允许你在流中出现异常时执行操作,通常用于记录异常信息、执行错误处理逻辑等。
        Flux<Integer> fluxWithError = Flux.just(1, 2, 0)
                .map(i -> 10 / i)  // 这里会抛出 ArithmeticException: / by zero
                .doOnError(e -> System.err.println("Error occurred: " + e.getMessage()));

        fluxWithError.subscribe(
                System.out::println,
                error -> System.err.println("Subscriber received error: " + error)
        );
生产者异常捕获:
在生产者端,可以使用 doOnError 方法来捕获并处理异常,这个方法会在数据流中发生错误时被调用。 doOnError 可以用于记录日志或执行一些清理操作,它不会改变数据流的行为,但数据流会被终止。
消费者异常捕获:
在消费者端,可以通过 subscribe 方法的第二个参数(错误处理回调)来捕获并处理异常。 这个错误处理回调会在数据流中发生错误时被调用,可以用于记录日志或执行其他错误处理逻辑。
doOnComplete()
doOnComplete() 方法在流完成时(即没有更多元素发出)执行操作。你可以利用它在流结束时执行一些收尾工作,比如关闭资源、统计处理结果等。
示例:
        Flux<String> flux = Flux.just("Spring", "Boot", "3","Reactor")
                .doOnComplete(() -> System.out.println("Stream completed"));

        flux.subscribe(System.out::println);
doOnSubscribe()
doOnSubscribe() 允许你在流被订阅时执行操作。它通常用于监控订阅事件,适合用于统计订阅数或进行相关的初始化操作。
        Flux<String> flux = Flux.just("A", "B", "C")
                .doOnSubscribe(subscription -> System.out.println("Subscription started"));

        flux.subscribe(System.out::println);
doOnCancel()
doOnCancel() 方法在取消订阅时执行操作。取消订阅通常是在消费者不再需要流数据时发生的(例如手动取消订阅或者发生超时等情况),可以用于处理一些资源释放的操作。
Flux<String> flux = Flux.just("A", "B", "C")
    .doOnCancel(() -> System.out.println("Subscription canceled"))
    .take(2);  // 只取前两个元素,第三个元素将被跳过(取消)

flux.subscribe(System.out::println);
doFinally()
doFinally() 是一个非常有用的方法,它在流结束时始终会被调用(无论是正常完成、错误还是取消订阅)。它类似于 try-finally 语句中的 finally,适合做一些无论流如何结束都需要执行的操作,如清理资源等。
        Flux<String> flux = Flux.just("A", "B", "C")
                .doFinally(signalType -> System.out.println("Stream ended with signal: " + signalType));

        flux.subscribe(System.out::println);
doOnTerminate()
doOnTerminate() 在流完成或出错时执行操作。它是 doOnComplete() 和 doOnError() 的组合,但不区分流是正常完成还是出现错误,只要流结束了,它就会被调用。
        Flux<String> flux = Flux.just("A", "B", "C")
                .doOnTerminate(() -> System.out.println("Stream terminated"));

        flux.subscribe(System.out::println);
doOnEach()
doOnEach() 是一个非常通用的事件感知 API,它允许对流中的每一个信号(包括 onNext、onError、onComplete 和 onSubscribe)进行统一处理。这个方法会接收一个 Signal 对象,表示当前发生的事件类型,从而可以处理不同的信号类型。
        Flux<String> flux = Flux.just("Spring", "Boot", "3", "Reactor")
                .doOnEach(signal -> {
                    if (signal.isOnNext()) {
                        System.out.println("Element received: " + signal.get());
                    } else if (signal.isOnError()) {
                        System.err.println("Error occurred: " + signal.getThrowable().getMessage());
                    } else if (signal.isOnComplete()) {
                        System.out.println("Stream completed");
                    }
                });

        flux.subscribe(System.out::println);
doOnDiscard()
doOnDiscard() 方法用于处理被 丢弃的元素。当某些元素由于某种原因(例如 filter() 操作或上游取消)没有被使用时,可以通过 doOnDiscard() 来感知这些元素的丢弃,并执行相关的操作(如清理资源、记录日志等)。
可能使用 doOnDiscard 钩子的例子包括以下情况:
filter: 不符合过滤器的项被视为 “丢弃”。 skip:跳过的项将被丢弃。 buffer(maxSize, skip) 与 maxSize < skip:“丢弃的缓冲区” — 缓冲区之间的元素被丢弃。
        Flux<String> flux = Flux.just("AA", "BB", "C", "D", "E")
                .filter(s -> s.length() > 1)
                .doOnDiscard(String.class, discardedValue ->
                        System.out.println("Discarded: " + discardedValue));

        flux.subscribe(System.out::println);
doOnRequest()
doOnRequest() 是一个用于处理 背压请求(request signals) 的 API,它允许你在下游请求元素时执行操作。响应式流中上游发送元素的数量通常由下游通过请求背压机制控制,因此 doOnRequest() 可以帮助我们监控下游对元素的需求。
        Flux<Integer> flux = Flux.range(1, 5)
                .doOnRequest(request ->
                        System.out.println("Request for: " + request + " elements"));

        flux.subscribe(new Subscriber<Integer>() {
            @Override
            public void onSubscribe(Subscription s) {
                s.request(3);
            }

            @Override
            public void onNext(Integer integer) {
                System.out.println("Received: " + integer);
            }

            @Override
            public void onError(Throwable t) {

            }

            @Override
            public void onComplete() {

            }
        });  // 请求 3 个元素
doOnXxx 的应用场景
日志记录与调试:在流的不同阶段插入 doOnXxx,帮助我们记录每个阶段的状态变化或异常情况,从而更好地调试响应式流。 监控和统计:我们可以使用 doOnSubscribe() 和 doOnComplete() 结合监控系统来统计订阅的数量、完成的流数量,分析流的性能。 资源管理:使用 doFinally() 进行资源释放和清理,确保无论流如何结束都能进行相应的收尾工作。 错误处理:使用 doOnError() 可以在发生错误时记录日志、发送通知或者做出其他相应的处理。
Threading and Schedulers
https://projectreactor.io/docs/core/release/reference/coreFeatures/schedulers.html
https://www.cnblogs.com/crazymakercircle/p/16127013.html#autoid-h2-5-2-0
Threading
Obtaining a Flux or a Mono does not necessarily mean that it runs in a dedicated Thread. Instead, most operators continue working in the Thread on which the previous operator executed. Unless specified, the topmost operator (the source) itself runs on the Thread in which the subscribe() call was made. The following example runs a Mono in a new thread:
public static void main(String[] args) throws InterruptedException {
  final Mono<String> mono = Mono.just("hello ");  // 1

  Thread t = new Thread(() -> mono
      .map(msg -> msg + "thread ")
      .subscribe(v ->  //2
          System.out.println(v + Thread.currentThread().getName())  //3
      )
  );
  t.start();
  t.join();

}
1 | The |
|---|---|
2 | However, it is subscribed to in thread |
3 | As a consequence, both the |
The preceding code produces the following output:
hello thread Thread-0Schedulers
In Reactor, the execution model and where the execution happens is determined by the Scheduler that is used. A Scheduler has scheduling responsibilities similar to an ExecutorService, but having a dedicated abstraction lets it do more, notably acting as a clock and enabling a wider range of implementations (virtual time for tests, trampolining or immediate scheduling, and so on).
The Schedulers class has static methods that give access to the following execution contexts:
No execution context (
Schedulers.immediate()): at processing time, the submittedRunnablewill be directly executed, effectively running them on the currentThread(can be seen as a "null object" or no-opScheduler).A single, reusable thread (
Schedulers.single()). Note that this method reuses the same thread for all callers, until the Scheduler is disposed. If you want a per-call dedicated thread, useSchedulers.newSingle()for each call.An unbounded elastic thread pool (
Schedulers.elastic()). This one is no longer preferred with the introduction ofSchedulers.boundedElastic(), as it has a tendency to hide backpressure problems and lead to too many threads (see below).A bounded elastic thread pool (
Schedulers.boundedElastic()). This is a handy way to give a blocking process its own thread so that it does not tie up other resources. This is a better choice for I/O blocking work. See How Do I Wrap a Synchronous, Blocking Call?, but doesn’t pressure the system too much with new threads. Starting from 3.6.0 this can offer two different implementations depending on the setup:ExecutorService-based, which reuses platform threads between tasks. This implementation, like its predecessorelastic(), creates new worker pools as needed and reuses idle ones. Worker pools that stay idle for too long (the default is 60s) are also disposed. Unlike itselastic()predecessor, it has a cap on the number of backing threads it can create (default is number of CPU cores x 10). Up to 100 000 tasks submitted after the cap has been reached are enqueued and will be re-scheduled when a thread becomes available (when scheduling with a delay, the delay starts when the thread becomes available).Thread-per-task-based, designed to run on
VirtualThreadinstances. To embrace that functionality, the application should run in Java 21+ environment and set thereactor.schedulers.defaultBoundedElasticOnVirtualThreadssystem property totrue. Once the above is set, the sharedSchedulers.boundedElastic()return a specific implementation ofBoundedElasticSchedulertailored to run every task on a new instance of theVirtualThreadclass. This implementation is similar in terms of the behavior to theExecutorService-based one but does not have idle pool and creates a newVirtualThreadfor each task.A fixed pool of workers that is tuned for parallel work (
Schedulers.parallel()). It creates as many workers as you have CPU cores.
Additionally, you can create a Scheduler out of any pre-existing ExecutorService by using Schedulers.fromExecutorService(ExecutorService). (You can also create one from an Executor, although doing so is discouraged.)
You can also create new instances of the various scheduler types by using the newXXX methods. For example, Schedulers.newParallel(yourScheduleName) creates a new parallel scheduler named yourScheduleName.
parallel & single & fromExecutorService
https://projectreactor.io/docs/core/release/api/reactor/core/scheduler/Schedulers.html#parallel--
Schedulers.parallel() : 创建CPU内核数量一样多线程池; Schedulers.single(): 可重用单个线程 Schedulers.elastic() : 无限制的弹性线程池,可以一直创建线程 Schedulers.boundedElastic() : 有界的弹性线程池,它会回收闲置的线程,默认是60s;它对创建的线程数做了限制,默认值为CPU内核数x 10,达到上限后,最多可提交10万个任务; Schedulers.fromExecutorService(): 根据我们自定义线程池进行引用;
Reactor offers two means of switching the execution context (or Scheduler) in a reactive chain: publishOn and subscribeOn. Both take a Scheduler and let you switch the execution context to that scheduler. But the placement of publishOn in the chain matters, while the placement of subscribeOn does not. To understand that difference, you first have to remember that nothing happens until you subscribe .
In Reactor, when you chain operators, you can wrap as many Flux and Mono implementations inside one another as you need. Once you subscribe, a chain of Subscriber objects is created, backward (up the chain) to the first publisher. This is effectively hidden from you. All you can see is the outer layer of Flux (or Mono) and Subscription, but these intermediate operator-specific subscribers are where the real work happens.
With that knowledge, we can have a closer look at the publishOn and subscribeOn operators:
publishOn & subscribeOn
https://projectreactor.io/docs/core/release/reference/coreFeatures/schedulers.html
publishOn 和 subscribeOn都是在指定的Scheduler中运行。当某些操作执行慢,阻碍运行速度时可以在指定的Scheduler中执行。
publishOn、subscribeOn二者区别:
虽然publishOn 和 subscribeOn 两个方法都可以配置Scheduler,但二者的作用范围不同,publishOn 仅对之后的operator 起作用,而subscribeOn 则从源头影响整个执行过程。
subscribeOn:subscribeOn用于指定在哪个线程执行订阅操作(即subscribe()方法)。它的影响范围是在整个流的生命周期内,包括数据源的生成和操作符的执行。
使用
subscribeOn可以决定整个流的调度策略,它会影响整个流的执行线程。
publishOn:publishOn用于指定在哪个线程执行操作符的后续操作,即从该操作符开始的后续操作。它只影响其后的操作符,不会影响之前的部分。
使用
publishOn可以在流中的特定位置更改执行线程,从而实现部分流的调度策略变更。
总结:
subscribeOn影响整个流的调度策略,可以在流的起始位置指定执行线程。publishOn用于更改从该操作符开始的后续操作的执行线程,可以在流的中间位置进行调度策略变更。
通常情况下,建议在流的起始位置使用 subscribeOn,以确定数据源的生成和整个流的调度策略,而在流的中间位置使用 publishOn 进行局部的调度策略变更。
publishOn一般使用在订阅链的中间位置,并且从下游获取信号,影响调用位置起后续运算的执行位置。
subscribeOn一般用于构造向后传播的订阅过程。并且无论放到什么位置,它始终会影响源发射的上下文。同时不会影响对publishOn的后续调用的行为。
publishOn会强制让下一个运算符(或者下下个)运行于不同的线程上,subscribeOn会强制让上一个(或者上上个)运算符在不同的线程上执行。
publishOn applies in the same way as any other operator, in the middle of the subscriber chain. It takes signals from upstream and replays them downstream while executing the callback on a worker from the associated Scheduler. Consequently, it affects where the subsequent operators execute (until another publishOn is chained in), as follows:
Changes the execution context to one
Threadpicked by theScheduleras per the specification,
onNextcalls happen in sequence, so this uses up a single threadunless they work on a specific
Scheduler, operators afterpublishOncontinue execution on that same thread
The following example uses the publishOn method:
Scheduler s = Schedulers.newParallel("parallel-scheduler", 4);  // 1

final Flux<String> flux = Flux
    .range(1, 2)
    .map(i -> 10 + i)  //2
    .publishOn(s)  //3
    .map(i -> "value " + i);  //4

new Thread(() -> flux.subscribe(System.out::println));  //5
1 | Creates a new |
|---|---|
2 | The first |
3 | The |
4 | The second |
5 | This anonymous |
subscribeOn applies to the subscription process, when the backward chain is being constructed. It is usually recommended to place it immediately after the source of data, as intermediate operators can affect the context of the execution.
However, this does not affect the behavior of subsequent calls to publishOn — they still switch the execution context for the part of the chain after them.
Changes the
Threadfrom which the whole chain of operators subscribesPicks one thread from the
Scheduler
The following example uses the subscribeOn method:
Scheduler s = Schedulers.newParallel("parallel-scheduler", 4);  //1

final Flux<String> flux = Flux
    .range(1, 2)
    .map(i -> {    //2
                    System.out.println("first map:" +Thread.currentThread().getName());
                    return 10 + i;
                })
    .subscribeOn(s)  // 3
     .map(i -> { //4
                    System.out.println("second map:" + Thread.currentThread().getName());
                    return "value " + i;
                });

new Thread(() -> flux.subscribe(System.out::println)).start();  //5
1 | Creates a new |
|---|---|
2 | The first |
3 | …because |
4 | The second |
5 | This anonymous |
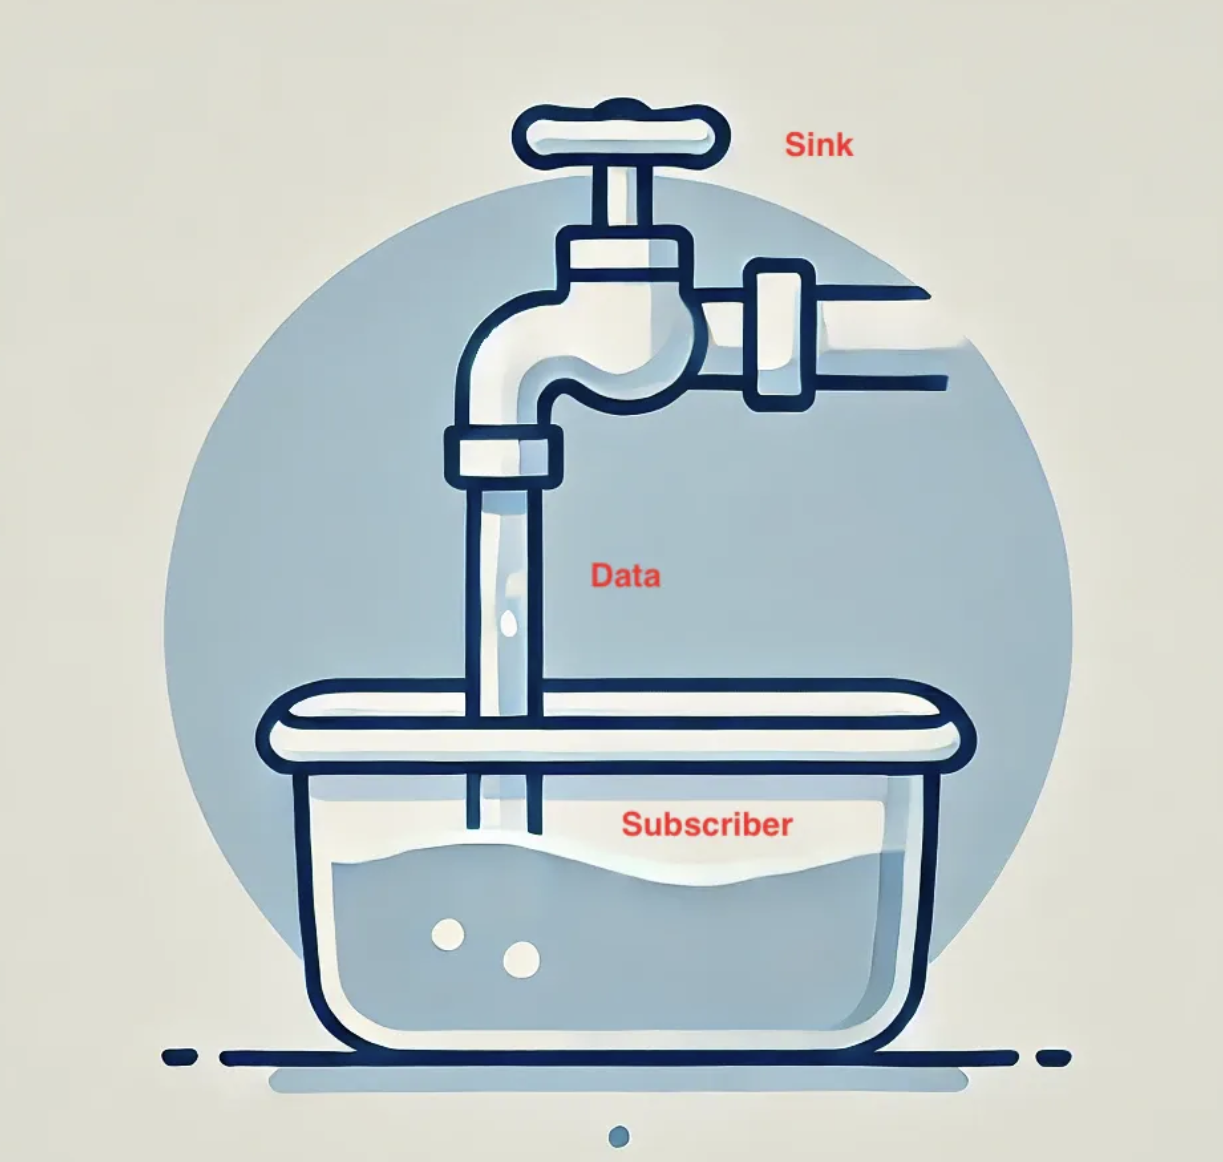
Sink
Think of a sink as a water tap in your kitchen.
Tap (Sink): It is where you control water flow from.
Water (Data): It refers to elements emitted into the stream.
Kitchen Tap (Sink): This tap represents the
Sinkin reactive programming.Flowing Water (Data): Water flowing from the tap symbolizes the data being emitted.
Container(s) under the Tap (Subscribers): The container under the tap represents the subscribers that receive the data.
常见的sink用法是
sink.next(T t) 发出元素
sink.complete() 发出流完成信号,并终止流
sink.error(Throwable e) 发出流错误信号
关于Sinks类. Sinks类是sink建造工厂类,它提供开发者编程式创建流的能力,将sink暴露给外部调用者,而不是必须在flux或mono的上下文里面才能获取.
Sink.Many: It allows emitting multiple elements at once.
Sink.One: This type allows emitting only one item.
Sink.Empty: Represents a sink that can only complete or error without emitting any data.
multicast() 允许1个流有多个subscriber,
unicast() 只允许1个流只有一个subscriber.
replay(): caches emitted elements and replays them to late subscribers.
onBackpressureBuffer()则是关于背压的设置。这个词在计算机中指的是在数据传输过程中,消费者处理消息速度比生产者慢,导致生产者无法继续生产的情况。背压的设置有3种选项:
onBackpressureBuffer()
提供一块缓冲区作为未消费数据的临时存储,直到buffer区也满了,发送者才无法发射数据。directAllOrNothing
如果一个订阅者无法消耗更多的数据,那么所有的订阅者都会停止,直到所有订阅者都能订阅数据directBestEffort
停止向无法接收数据的订阅者推送数据,其他订阅者正常
数据提交有两个方法:
emitNext 指定提交失败策略,同步提交
tryEmitNext 异步提交,返回提交成功、失败状态
Sinks.Many<Object> sinks = >Sinks.many().multicast().onBackpressureBuffer();
// 订阅者1
sinks.asFlux().subscribe(x->{
  System.out.println("sub_1:"+x);
});
// 订阅者2
sinks.asFlux().subscribe(x->{
   System.out.println("sub_2:"+x);
});
比如上述代码,同一个flux被subscribe了2次,就是2个订阅者,假如我们把multicast(),换成unicast(),则在第二次subscribe时会报错,这是不允许的
Reactor提供三种Sink类型,对应不同场景:
类型 | 特点 | 典型场景 |
|---|---|---|
Sinks.Many | 发送0-N个元素,支持多订阅者(如 | 实时数据推送、事件广播 |
Sinks.One | 发送0或1个元素,类似Mono | 单次结果返回(如异步任务) |
Sinks.Empty | 仅发送完成/错误信号 | 空操作或终止信号通知 |
示例1:
import reactor.core.publisher.Flux;
import reactor.core.publisher.Sinks;

public class ChatApplication {
    public static void main(String[] args) {
        // Create a Sink for many messages
        Sinks.Many<String> chatSink = Sinks
                                        .many()
                                        .multicast().
                                        .onBackpressureBuffer();

        // Create a Flux from the Sink
        Flux<String> chatFlux = chatSink.asFlux();

        // Subscribers
        chatFlux.subscribe(message ->
                System.out.println("User1 received: " + message)
        );

        chatFlux.subscribe(message ->
                System.out.println("User2 received: " + message)
        );

        // Emitting messages
        chatSink.tryEmitNext("Hello, everyone!");
        chatSink.tryEmitNext("How are you all?");
    }
}
示例2:
import reactor.core.publisher.Flux;
import reactor.core.publisher.Sinks;

public class TemperatureSensor {
    public static void main(String[] args) {
        // Create a Sink for many temperature readings
        Sinks.Many<Integer> temperatureSink = Sinks
                                        .many()
                                        .multicast().
                                        .onBackpressureBuffer();

        // Create a Flux from the Sink
        Flux<Integer> temperatureFlux = temperatureSink.asFlux();

        // Subscribers
        temperatureFlux.subscribe(temp ->
            System.out.println("Display received: " + temp)
        );

        temperatureFlux.subscribe(temp ->
            System.out.println("Alert system received: " + temp)
        );

        // Emitting temperature readings
        temperatureSink.tryEmitNext(25);
        temperatureSink.tryEmitNext(26);
        temperatureSink.tryEmitNext(27);
    }
}
Sink通过两种API处理多线程竞争:
tryEmitNext()
tryEmitNext 异步提交,返回提交成功、失败状态
立即返回
EmitResult状态码,适合非阻塞场景。例如:
EmitResult result = sink.tryEmitNext(data);
if (result.isFailure()) {
   // 处理失败(如队列已满)
}常见状态码:
OK:发送成功FAIL_NON_SERIALIZED:检测到非串行访问FAIL_OVERFLOW:背压导致拒绝
emitNext() + 失败处理器
emitNext 指定提交失败策略,同步提交提供重试机制,例如:
sink.emitNext(data, (signalType, emitResult) ->
  emitResult == EmitResult.FAIL_NON_SERIALIZED ? RetrySpec.retry(3) : EmitFailureHandler.stop()
);
内置处理器包括:
FAIL_FAST:立即失败busyLooping(Duration):在指定时间内忙等重试
Sinks.many().replay()
A replay Sinks.Many caches emitted elements and replays them to late subscribers.
It can be created in multiple configurations:
Caching a limited history (
Sinks.many().replay().limit(int)) or an unbounded history (Sinks.many().replay().all()).Caching a time-based replay window (
Sinks.many().replay().limit(Duration)).Caching a combination of history size and time window (
Sinks.many().replay().limit(int, Duration)).
Additional overloads for fine tuning of the above can also be found under Sinks.many().replay(), as well as a variant that allows caching of a single element (latest() and latestOrDefault(T)).
Sinks.one()
This method directly construct a simple instance of Sinks.One<T>. This flavor of Sinks is viewable as a Mono (through its asMono() view method), and has slightly different emit methods to better convey this Mono-like semantics:
emitValue(T value)generates anonNext(value)signal and - in most implementations - will also trigger an implicitonComplete()emitEmpty()generates an isolatedonComplete()signal, intended as generating the equivalent of an emptyMonoemitError(Throwable t)generates anonError(t)signal
Sinks.one() accepts one call of any of these methods, effectively generating a Mono that either completed with a value, completed empty or failed.
Handling Errors
https://projectreactor.io/docs/core/release/reference/coreFeatures/error-handling.html
In Reactive Streams, errors are terminal events. As soon as an error occurs, it stops the sequence and gets propagated down the chain of operators to the last step, the Subscriber you defined and its onError method.
Such errors should still be dealt with at the application level. For instance, you might display an error notification in a UI or send a meaningful error payload in a REST endpoint. For this reason, the subscriber’s onError method should always be defined.
Reactor also offers alternative means of dealing with errors in the middle of the chain, as error-handling operators. The following example shows how to do so:
public static void main(String[] args) {
        Flux<String> flux = Flux.just(1, 2, 0, 5)
                .map(i -> "100 / " + i + " = " + (100 / i)) //this triggers an error with 0
                .onErrorReturn("Divided by zero :(");// error handling example
        flux.subscribe(System.out::println);
    }
输出如下:
100 / 1 = 100
100 / 2 = 50
Divided by zero :(

Process finished with exit code 0
Now we can consider each means of error handling one-by-one. When relevant, we make a parallel with imperative programming’s try patterns.
1. Error Handling Operators
You may be familiar with several ways of dealing with exceptions in a try-catch block. Most notably, these include the following:
Catch and return a static default value.
Catch and execute an alternative path with a fallback method.
Catch and dynamically compute a fallback value.
Catch, wrap to a
BusinessException, and re-throw.Catch, log an error-specific message, and re-throw.
Use the
finallyblock to clean up resources or a Java 7 “try-with-resource” construct.
All of these have equivalents in Reactor, in the form of error-handling operators. Before looking into these operators, we first want to establish a parallel between a reactive chain and a try-catch block.
When subscribing, the onError callback at the end of the chain is akin to a catch block. There, execution skips to the catch in case an Exception is thrown, as the following example shows:
Flux<String> s = Flux.range(1, 10)
    .map(v -> doSomethingDangerous(v))  // 1
    .map(v -> doSecondTransform(v));   // 2
s.subscribe(value -> System.out.println("RECEIVED " + value),  //3
            error -> System.err.println("CAUGHT " + error)  //4
);
1 | A transformation that can throw an exception is performed. |
|---|---|
2 | If everything went well, a second transformation is performed. |
3 | Each successfully transformed value is printed out. |
4 | In case of an error, the sequence terminates and an error message is displayed. |
The preceding example is conceptually similar to the following try-catch block:
try {
    for (int i = 1; i < 11; i++) {
        String v1 = doSomethingDangerous(i);  // 1
        String v2 = doSecondTransform(v1);  // 2
        System.out.println("RECEIVED " + v2); // 3
    }
} catch (Throwable t) {
    System.err.println("CAUGHT " + t);  // 4
}
1 | If an exception is thrown here… |
|---|---|
2 | …the rest of the loop is skipped… |
3 | … and the execution goes straight to here. |
Now that we have established a parallel, we can look at the different error handling cases and their equivalent operators.
1.1. Static Fallback Value
The equivalent of “Catch and return a static default value” is onErrorReturn. The following example shows how to use it:
try {
  return doSomethingDangerous(10);
}
catch (Throwable error) {
  return "RECOVERED";
}
The following example shows the Reactor equivalent:
Flux.just(10)
    .map(this::doSomethingDangerous)
    .onErrorReturn("RECOVERED");
You also have the option of applying a Predicate on the exception to decide whether or not to recover, as the following example shows:
Flux.just(10)
    .map(this::doSomethingDangerous)
    .onErrorReturn(e -> e.getMessage().equals("boom10"), "recovered10");
Recover only if the message of the exception is "boom10"
1.2. Catch and swallow the error
If you don’t even want to replace the exception with a fallback value, but instead to ignore it and only propagate elements that have been produced so far, what you want is essentially replacing the onError signal with an onComplete signal. This can be done by the onErrorComplete operator:
Flux.just(10,20,30)
    .map(this::doSomethingDangerousOn30)
    .onErrorComplete();
Recover by turning the onError into an onComplete
Like onErrorReturn, onErrorComplete has variants that let you filter which exceptions to fall back on, based either on the exception’s class or on a Predicate.
1.3. Fallback Method
If you want more than a single default value and you have an alternative (safer) way of processing your data, you can use onErrorResume. This would be the equivalent of “Catch and execute an alternative path with a fallback method”.
For example, if your nominal process is fetching data from an external and unreliable service but you also keep a local cache of the same data that can be a bit more out of date but is more reliable, you could do the following:
String v1;
try {
  v1 = callExternalService("key1");
}
catch (Throwable error) {
  v1 = getFromCache("key1");
}

String v2;
try {
  v2 = callExternalService("key2");
}
catch (Throwable error) {
  v2 = getFromCache("key2");
}
The following example shows the Reactor equivalent:
Flux.just("key1", "key2")
    .flatMap(k -> callExternalService(k)
        .onErrorResume(e -> getFromCache(k))
    );
For each key, asynchronously call the external service.
If the external service call fails, fall back to the cache for that key. Note that we always apply the same fallback, whatever the source error, e, is.
Like onErrorReturn, onErrorResume has variants that let you filter which exceptions to fall back on, based either on the exception’s class or on a Predicate. The fact that it takes a Function also lets you choose a different fallback sequence to switch to, depending on the error encountered. The following example shows how to do so:
Flux.just("timeout1", "unknown", "key2")
    .flatMap(k -> callExternalService(k)
        .onErrorResume(error -> {
            if (error instanceof TimeoutException)
                return getFromCache(k);
            else if (error instanceof UnknownKeyException)
                return registerNewEntry(k, "DEFAULT");
            else
                return Flux.error(error);
        })
    );
1 | The function allows dynamically choosing how to continue. |
|---|---|
2 | If the source times out, hit the local cache. |
3 | If the source says the key is unknown, create a new entry. |
4 | In all other cases, “re-throw”. |
1.5. Catch and Rethrow
"Catch, wrap to a BusinessException, and re-throw" looks like the following in the imperative world:
try {
  return callExternalService(k);
}
catch (Throwable error) {
  throw new BusinessException("oops, SLA exceeded", error);
}
In the “fallback method” example, the last line inside the flatMap gives us a hint at achieving the same reactively, as follows:
Flux.just("timeout1")
    .flatMap(k -> callExternalService(k))
    .onErrorResume(original -> Flux.error(
            new BusinessException("oops, SLA exceeded", original))
    );
However, there is a more straightforward way of achieving the same effect with onErrorMap:
Flux.just("timeout1")
    .flatMap(k -> callExternalService(k))
    .onErrorMap(original -> new BusinessException("oops, SLA exceeded", original));
1.6. Log or React on the Side
For cases where you want the error to continue propagating but still want to react to it without modifying the sequence (logging it, for instance), you can use the doOnError operator. This is the equivalent of “Catch, log an error-specific message, and re-throw” pattern, as the following example shows:
try {
  return callExternalService(k);
}
catch (RuntimeException error) {
  //make a record of the error
  log("uh oh, falling back, service failed for key " + k);
  throw error;
}
The doOnError operator, as well as all operators prefixed with doOn , are sometimes referred to as having a “side-effect”. They let you peek inside the sequence’s events without modifying them.
Like the imperative example shown earlier, the following example still propagates the error yet ensures that we at least log that the external service had a failure:
LongAdder failureStat = new LongAdder();
Flux<String> flux =
Flux.just("unknown")
    .flatMap(k -> callExternalService(k) //1
        .doOnError(e -> {
            failureStat.increment();
            log("uh oh, falling back, service failed for key " + k);//2
        })
            //3
    );
1 | The external service call that can fail… |
|---|---|
2 | …is decorated with a logging and stats side-effect… |
3 | …after which, it still terminates with an error, unless we use an error-recovery operator here. |
We can also imagine we have statistic counters to increment as a second error side-effect.
1.7. Using Resources and the Finally Block
The last parallel to draw with imperative programming is the cleaning up that can be done either by using a “Use of the finally block to clean up resources” or by using a “Java 7 try-with-resource construct”, both shown below:
Imperative use of finally
Stats stats = new Stats();
stats.startTimer();
try {
  doSomethingDangerous();
}
finally {
  stats.stopTimerAndRecordTiming();
}
Both have their Reactor equivalents: doFinally and using.
doFinally is about side-effects that you want to be executed whenever the sequence terminates (with onComplete or onError) or is cancelled. It gives you a hint as to what kind of termination triggered the side-effect. The following example shows how to use doFinally:
Reactive finally: doFinally()
Stats stats = new Stats();
LongAdder statsCancel = new LongAdder();

Flux<String> flux =
Flux.just("foo", "bar")
    .doOnSubscribe(s -> stats.startTimer())
    .doFinally(type -> { // 1
        stats.stopTimerAndRecordTiming(); //2
        if (type == SignalType.CANCEL) //3
          statsCancel.increment();
    })
    .take(1); //4
1 |
|
|---|---|
2 | Similarly to |
3 | Here we also increment statistics in case of cancellation only. |
4 |
|
FAQ
https://projectreactor.io/docs/core/release/reference/faq.html#faq.thread-affinity-publishon
1. How Do I Wrap a Synchronous, Blocking Call?
It is often the case that a source of information is synchronous and blocking. To deal with such sources in your Reactor applications, apply the following pattern:
Mono blockingWrapper = Mono.fromCallable(() -> {
    return /* make a remote synchronous call */
});
blockingWrapper = blockingWrapper.subscribeOn(Schedulers.boundedElastic());
Create a new | |
|---|---|
Return the asynchronous, blocking resource. | |
Ensure each subscription happens on a dedicated worker from |
You should use a Mono, because the source returns one value. You should use Schedulers.boundedElastic, because it creates a dedicated thread to wait for the blocking resource without impacting other non-blocking processing, while also ensuring that there is a limit to the amount of threads that can be created, and blocking tasks that can be enqueued and deferred during a spike.
Note that subscribeOn does not subscribe to the Mono. It specifies what kind of Scheduler to use when a subscribe call happens.
Also, note that subscribeOn operator should immediately follow the source and any further operators are defined after the subscribeOn wrapper.
示例
Good Blog
https://juejin.cn/post/7001032584821997598
sse示例
pom.xml配置如下:
<parent>
<groupId>org.springframework.boot</groupId>
<artifactId>spring-boot-starter-parent</artifactId>
<version>3.3.10</version>
<relativePath/> <!-- lookup parent from repository -->
</parent>
<dependency>
<groupId>org.springframework.boot</groupId>
<artifactId>spring-boot-starter-webflux</artifactId>
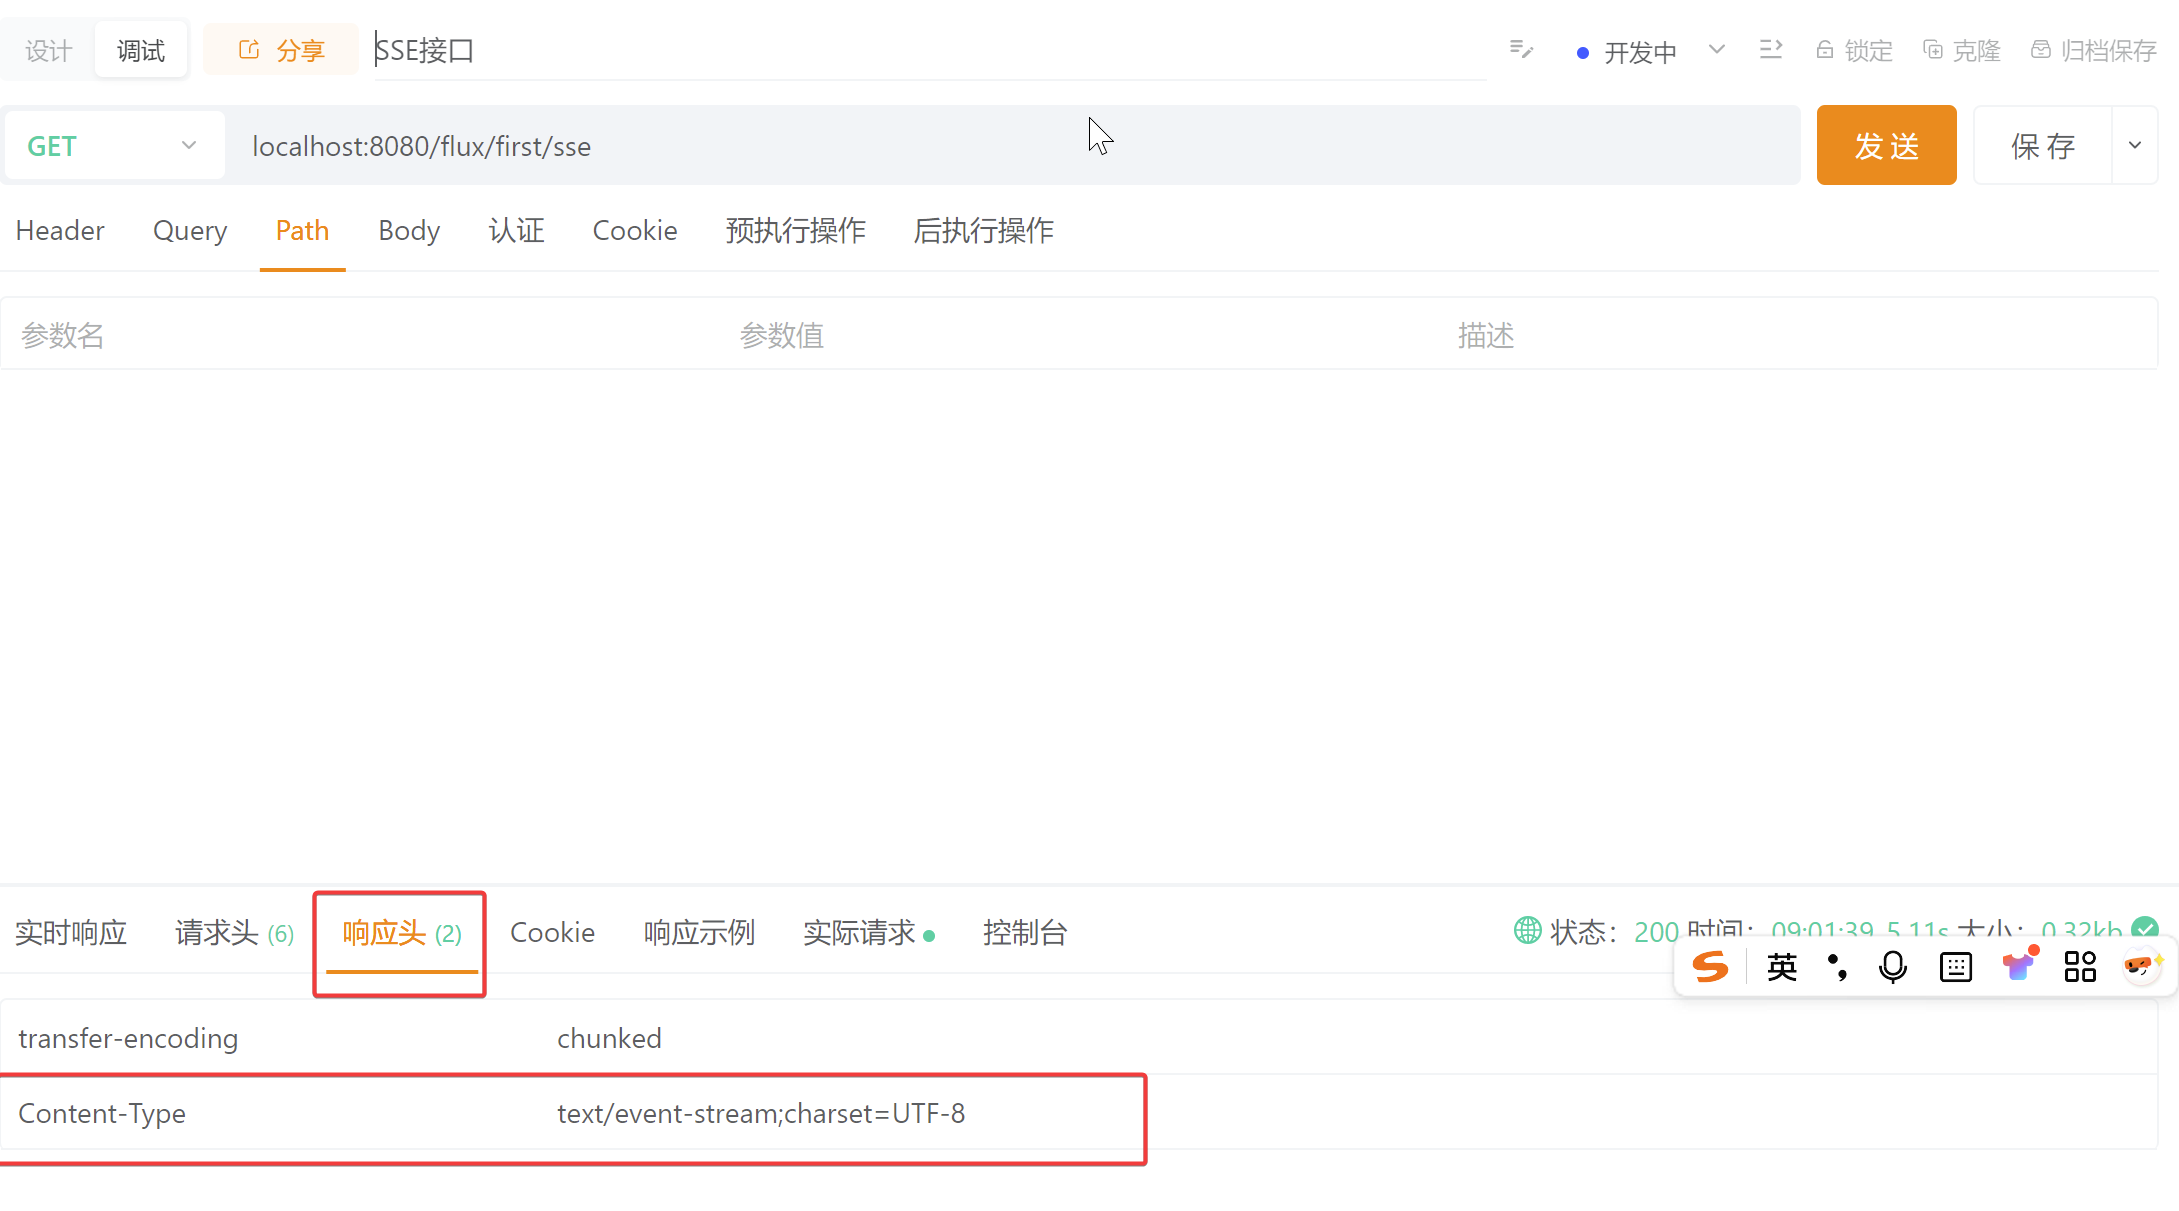
</dependency>@GetMapping(value = "/sse",produces = MediaType.TEXT_EVENT_STREAM_VALUE)
public Flux<ServerSentEvent<String>> sse() {
return Flux.interval(Duration.ofSeconds(1))
.map(sequence -> ServerSentEvent.<String>builder()
.id(String.valueOf(sequence))
.event("periodic-event")
.data("Current time: " + LocalTime.now())
.build()).take(5);
}使用apipost,进行调试,可以看到响应头中,Content-Type的值,是text/event-stream;charset=UTF-8,这个就表示是sse流
增加心跳检测(Ping)
SSE 连接如果长时间没有数据传输,可能会被中断。为此,SSE 规范推荐发送 "ping" 消息来保持连接活跃。可以通过 ServerSentEvent 的 comment() 来发送心跳信息:
@GetMapping("/sse/stream-with-ping")
public Flux<ServerSentEvent<String>> streamWithPing() {
    return Flux.interval(Duration.ofSeconds(1))
            .map(sequence -> {
                if (sequence % 5 == 0) {  // 每5秒发送一次心跳
                    return ServerSentEvent.<String>builder()
                            .comment("ping")
                            .build();
                } else {
                    return ServerSentEvent.<String>builder()
                            .data("Current time: " + LocalTime.now())
                            .build();
                }
            });
}
Synchronous, Blocking Call
1.定义阻塞服务接口
@Service
public class BlockingService {
    // 阻塞式 HTTP 调用
    public String callBlockingApi() {
        // 模拟耗时阻塞操作(如远程 HTTP 调用)
        try {
            Thread.sleep(1000);  // 模拟 IO 等待
        } catch (InterruptedException e) {
            Thread.currentThread().interrupt();
        }
        return "Blocking API Response";
    }
}
配置专用线程池
在 WebFlux 配置类中,创建一个有界弹性线程池(Bounded Elastic Scheduler):
@Configuration
public class ReactiveSchedulerConfig {
    @Bean(name = "blockingScheduler")
    public Scheduler blockingScheduler() {
        // 自定义线程池参数(核心线程数: 20,队列容量: 100)
        return Schedulers.newBoundedElastic(5, 100, "blocking-pool");
    }
}
包装阻塞操作为响应式流
在 Controller 或 Service 层中,将阻塞操作包装为 Mono/Flux,并指定线程池:
@RequestMapping("/flux/block")
@RestController
public class BlockController {

    @Autowired
    private BlockingService blockingService;

    @Autowired
    @Qualifier("blockingScheduler")
    private Scheduler blockingScheduler;

    @GetMapping("/non-blocking-endpoint")
    public Mono<String> handleRequest() {
        // 将阻塞操作包装为 Mono,并通过 subscribeOn 指定线程池
        return Mono.fromCallable(() -> blockingService.callBlockingApi())
                .subscribeOn(blockingScheduler)  // 关键:切换到阻塞线程池
                .doOnNext(result -> System.out.println("Result: " + result+":,"+Thread.currentThread().getName()))
                .onErrorResume(e -> Mono.just("Fallback Response"));
    }


}
以下是一个 完整示例,展示如何在 Spring WebFlux 中通过独立线程池隔离阻塞操作,确保非阻塞主线程不受影响:
1. 定义阻塞服务接口
假设需要调用一个阻塞的 HTTP 接口(例如使用 RestTemplate):
java
复制
public class BlockingService {
    private final RestTemplate restTemplate = new RestTemplate();

    // 阻塞式 HTTP 调用
    public String callBlockingApi() {
        // 模拟耗时阻塞操作(如远程 HTTP 调用)
        try {
            Thread.sleep(1000);  // 模拟 IO 等待
        } catch (InterruptedException e) {
            Thread.currentThread().interrupt();
        }
        return "Blocking API Response";
    }
}2. 配置专用线程池
在 WebFlux 配置类中,创建一个有界弹性线程池(Bounded Elastic Scheduler):
java
复制
@Configuration
public class SchedulerConfig {
    @Bean
    public Scheduler blockingScheduler() {
        // 自定义线程池参数(核心线程数: 20,队列容量: 100)
        return Schedulers.newBoundedElastic(20, 100, "blocking-pool");
    }
}3. 包装阻塞操作为响应式流
在 Controller 或 Service 层中,将阻塞操作包装为 Mono/Flux,并指定线程池:
java
复制
@RestController
public class ReactiveController {
    private final BlockingService blockingService;
    private final Scheduler blockingScheduler;

    // 注入依赖
    public ReactiveController(BlockingService blockingService,
                             @Qualifier("blockingScheduler") Scheduler blockingScheduler) {
        this.blockingService = blockingService;
        this.blockingScheduler = blockingScheduler;
    }

    @GetMapping("/non-blocking-endpoint")
    public Mono<String> handleRequest() {
        // 将阻塞操作包装为 Mono,并通过 subscribeOn 指定线程池
        return Mono.fromCallable(() -> blockingService.callBlockingApi())
                .subscribeOn(blockingScheduler)  // 关键:切换到阻塞线程池
                .doOnNext(result -> log.info("Result: {}", result))
                .onErrorResume(e -> Mono.just("Fallback Response"));
    }
}4. 验证线程隔离
通过日志观察线程名称,确保阻塞操作运行在独立线程池:
主线程(非阻塞)名称示例:
reactor-http-nio-2阻塞线程池名称示例:
blocking-pool-1
关键点解释
组件/步骤 | 作用 |
|---|---|
| 将阻塞操作封装为响应式流,延迟执行直到订阅。 |
| 指定操作在哪个 |
| 弹性线程池,动态管理线程数量,避免资源耗尽。 |
| 异常处理,确保即使阻塞操作失败,流也不会中断。 |
线程池参数建议
参数 | 推荐值 | 说明 |
|---|---|---|
核心线程数 (corePoolSize) | 10-50 | 根据业务负载和机器配置调整。 |
队列容量 (queueCapacity) | 100-500 | 避免过大导致内存溢出。 |
线程名前缀 | 有意义名称 | 如 |
注意事项
避免混合线程模型:确保
blockingScheduler仅在处理阻塞操作时使用。资源释放:如果使用自定义线程池,需在应用关闭时手动释放资源(如调用
dispose())。超时控制:可通过
timeout()方法设置操作超时:
Mono.fromCallable(...)
    .timeout(Duration.ofSeconds(2))  // 超时 2 秒
    .onErrorResume(TimeoutException.class, e -> ...);
通过这种方式,既能利用 WebFlux 的非阻塞优势,又能安全地调用阻塞接口,适用于必须使用传统阻塞库(如 JDBC、同步 HTTP 客户端)的场景。
Blocking Call设置超时时间
@GetMapping("/api-with-timeout")
    public Mono<String> callWithTimeout() {
        return Mono.fromCallable(() -> blockingService.callBlockingApi())
                .subscribeOn(blockingScheduler)  // 切换到阻塞线程池
                .timeout(Duration.ofSeconds(1))        // 设置超时时间
                .onErrorResume(TimeoutException.class, e -> {
                    // 超时后的降级处理
                    return Mono.just("Fallback: Timeout after 1s");
                })
                .doOnNext(result -> System.out.println("Result: " + result+":,"+Thread.currentThread().getName()));
    }
使用tomcat,替换掉默认的netty
<dependencies>
        <dependency>
            <groupId>org.springframework.boot</groupId>
            <artifactId>spring-boot-starter-webflux</artifactId>
            <exclusions>
                <!-- 排除默认的 Netty 服务器 -->
                <exclusion>
                    <groupId>org.springframework.boot</groupId>
                    <artifactId>spring-boot-starter-reactor-netty</artifactId>
                </exclusion>
            </exclusions>
        </dependency>

        <!-- 添加 Tomcat 服务器(支持响应式) -->
        <dependency>
            <groupId>org.springframework.boot</groupId>
            <artifactId>spring-boot-starter-tomcat</artifactId>
        </dependency>
    </dependencies>