Spring Boot 3
reference
https://docs.spring.io/spring-boot/3.3/reference/features/profiles.html
https://docs.spring.io/spring-boot/
功能模块化
这时我们可以对项目分模块,即按照功能拆分为多个Maven模块,然后可以通过依赖或者配置的方式将多个功能集成在主要模块上,甚至还可以控制是否启用某个功能。
需要注意的是,这里的应用拆分并不是把应用拆分成Spring Cloud分布式微服务多模块,而是仅对一个单体项目而言,它仍然是单体项目,但是每一个功能放在每个模块中,而不再是所有功能放在一个Spring Boot工程中。
要想实现Spring Boot模块化开发,我们可以借助@Import注解,实现在一个模块中,导入另一个模块中的类并将其也初始化为Bean注册到IoC容器。
下面,我们就通过一个简单的例子来学习一下。
1,再看@ComponentScan
在学习今天的内容之前,我们可以先回顾一下关于IoC容器扫描组件的基本知识。
1) IoC容器的扫描起点
相信大家对@SpringBootApplication这个注解并不陌生,我们创建的每个Spring Boot工程主类都长这样差不多:
package com.gitee.swsk33.mainmodule;

import org.springframework.boot.SpringApplication;
import org.springframework.boot.autoconfigure.SpringBootApplication;

@SpringBootApplication
public class MainModuleApplication {

 public static void main(String[] args) {
  SpringApplication.run(MainModuleApplication.class, args);
 }

}
从初学Spring Boot开始,我们就知道要想让一个类被扫描并实例化成Bean交给IoC容器托管,除了给那些类标注相关的注解(比如@Component)之外,还需要将其放在主类(也就是标注了@SpringBootApplication的类)所在的软件包或者其子包层级下,这样在IoC容器初始化时,我们的类才会被扫描到。
可见@SpringBootApplication事实上标注了IoC容器创建Bean时扫描的起点,不过@SpringBootApplication是一个复杂的复合注解,它是下列注解的组合:
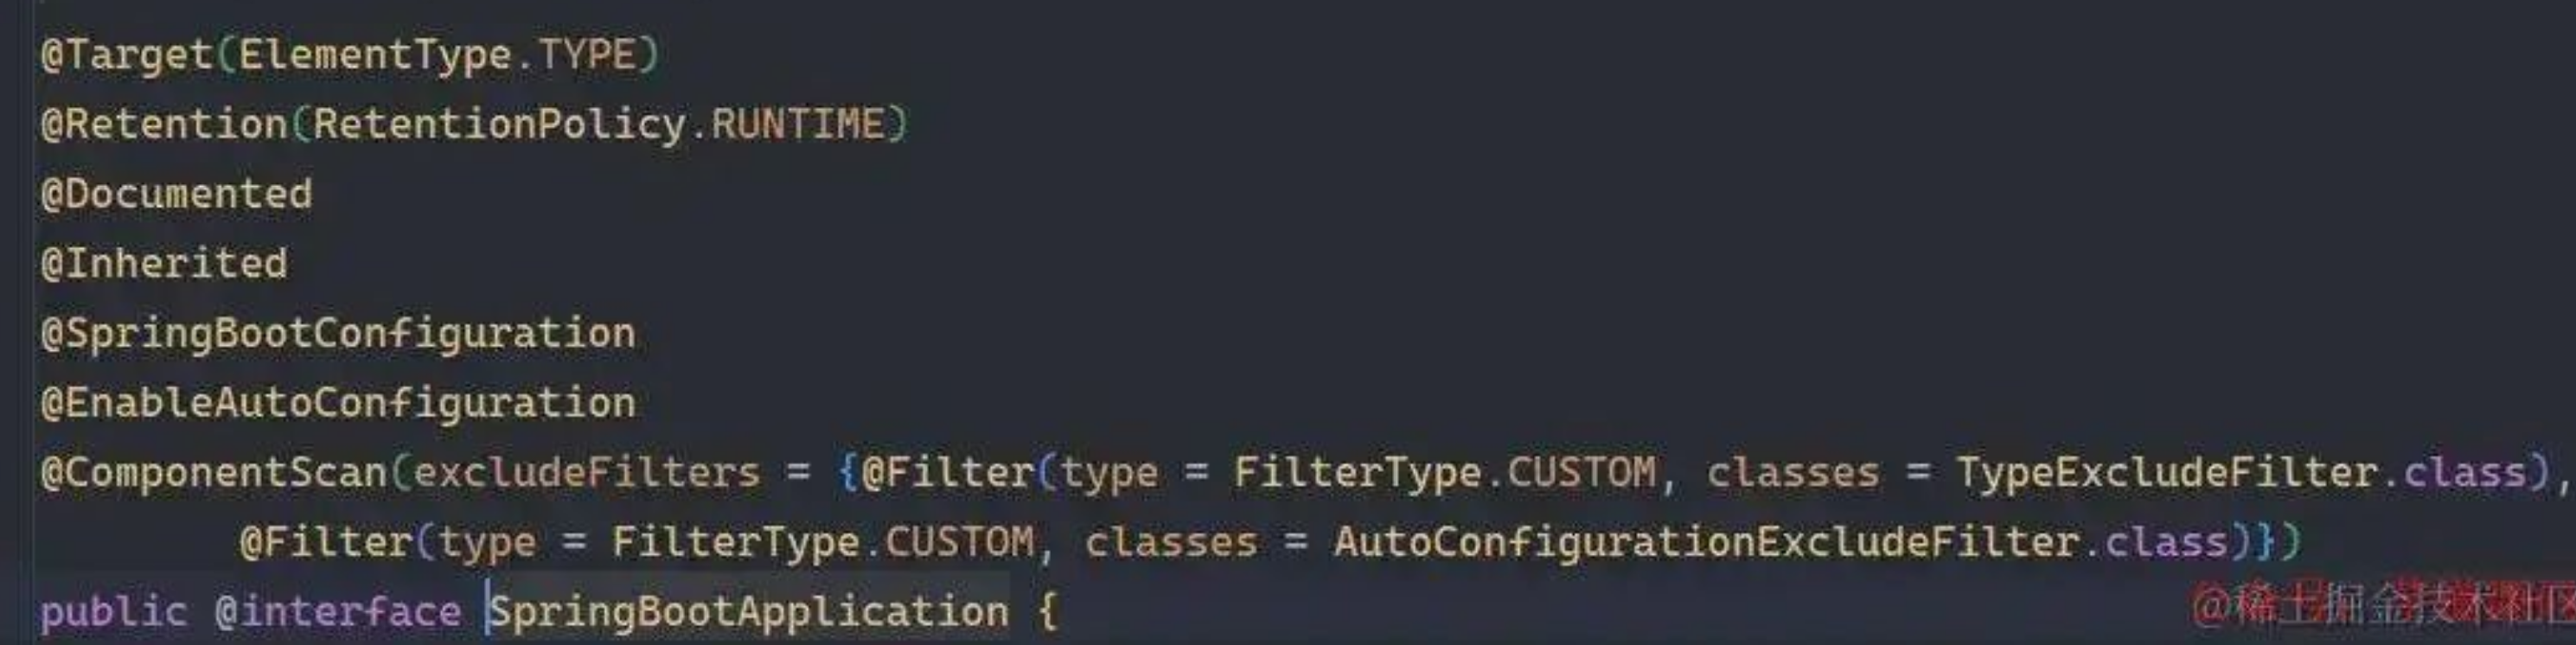
而事实上,真正起到标注扫描起点作用的注解是@ComponentScan,当该注解标注在一个类上时,这个类就会被标记为IoC容器的扫描起点,相信大家初学Spring时都写过这样类似的入门示例:
package com.gitee.swsk33.springdemo;

import com.gitee.swsk33.springdemo.service.MessageService;
import org.springframework.context.annotation.AnnotationConfigApplicationContext;
import org.springframework.context.annotation.ComponentScan;
import org.springframework.context.ApplicationContext;

@ComponentScan
public class Main {

    public static void main(String[] args) {
        // 创建基于注解的上下文容器实例,并传入配置类Main以实例化其它标注了Bean注解的类
        ApplicationContext context = new AnnotationConfigApplicationContext(Main.class);
        // 利用Spring框架,取出Bean:MessageService对象
        MessageService messageService = context.getBean(MessageService.class);
        // 这时,就可以使用了!
        messageService.printMessage();
    }

}可见上述是我的主类,其标注了@ComponentScan注解,主类位于软件包com.gitee.swsk33.springdemo,那么IoC容器初始化时,就会递归扫描位于软件包com.gitee.swsk33.springdemo中及其下所有子包中标注了相关注解(例如@Component、@Service)的类,并将它们实例化为Bean放入IoC容器托管,上述代码中,MessageService位于com.gitee.swsk33.springdemo中的子包service下且标注了相关注解,因此能够被实例化为Bean并放入IoC容器,后续我们可以取出。
事实上,无论是@ComponentScan还是@SpringBootApplication注解,都是可以指定扫描位置的,比如说:
@SpringBootApplication(scanBasePackages = "com.gitee.swsk33.mainmodule")
public class MainModuleApplication {
 // ...
}这表示启动程序时指定扫描软件包com.gitee.swsk33.mainmodule中及其所有子包下对应的类,只不过平时大多数时候我们都缺省这个参数,这样默认情况下,@ComponentScan或者@SpringBootApplication就是以自身为起点向下扫描当前包以及所有的子包中的类了。
2) 导入其它模块作为依赖?
首先假设现在有一个Maven多模块工程,其中有三个Spring Boot工程如下:
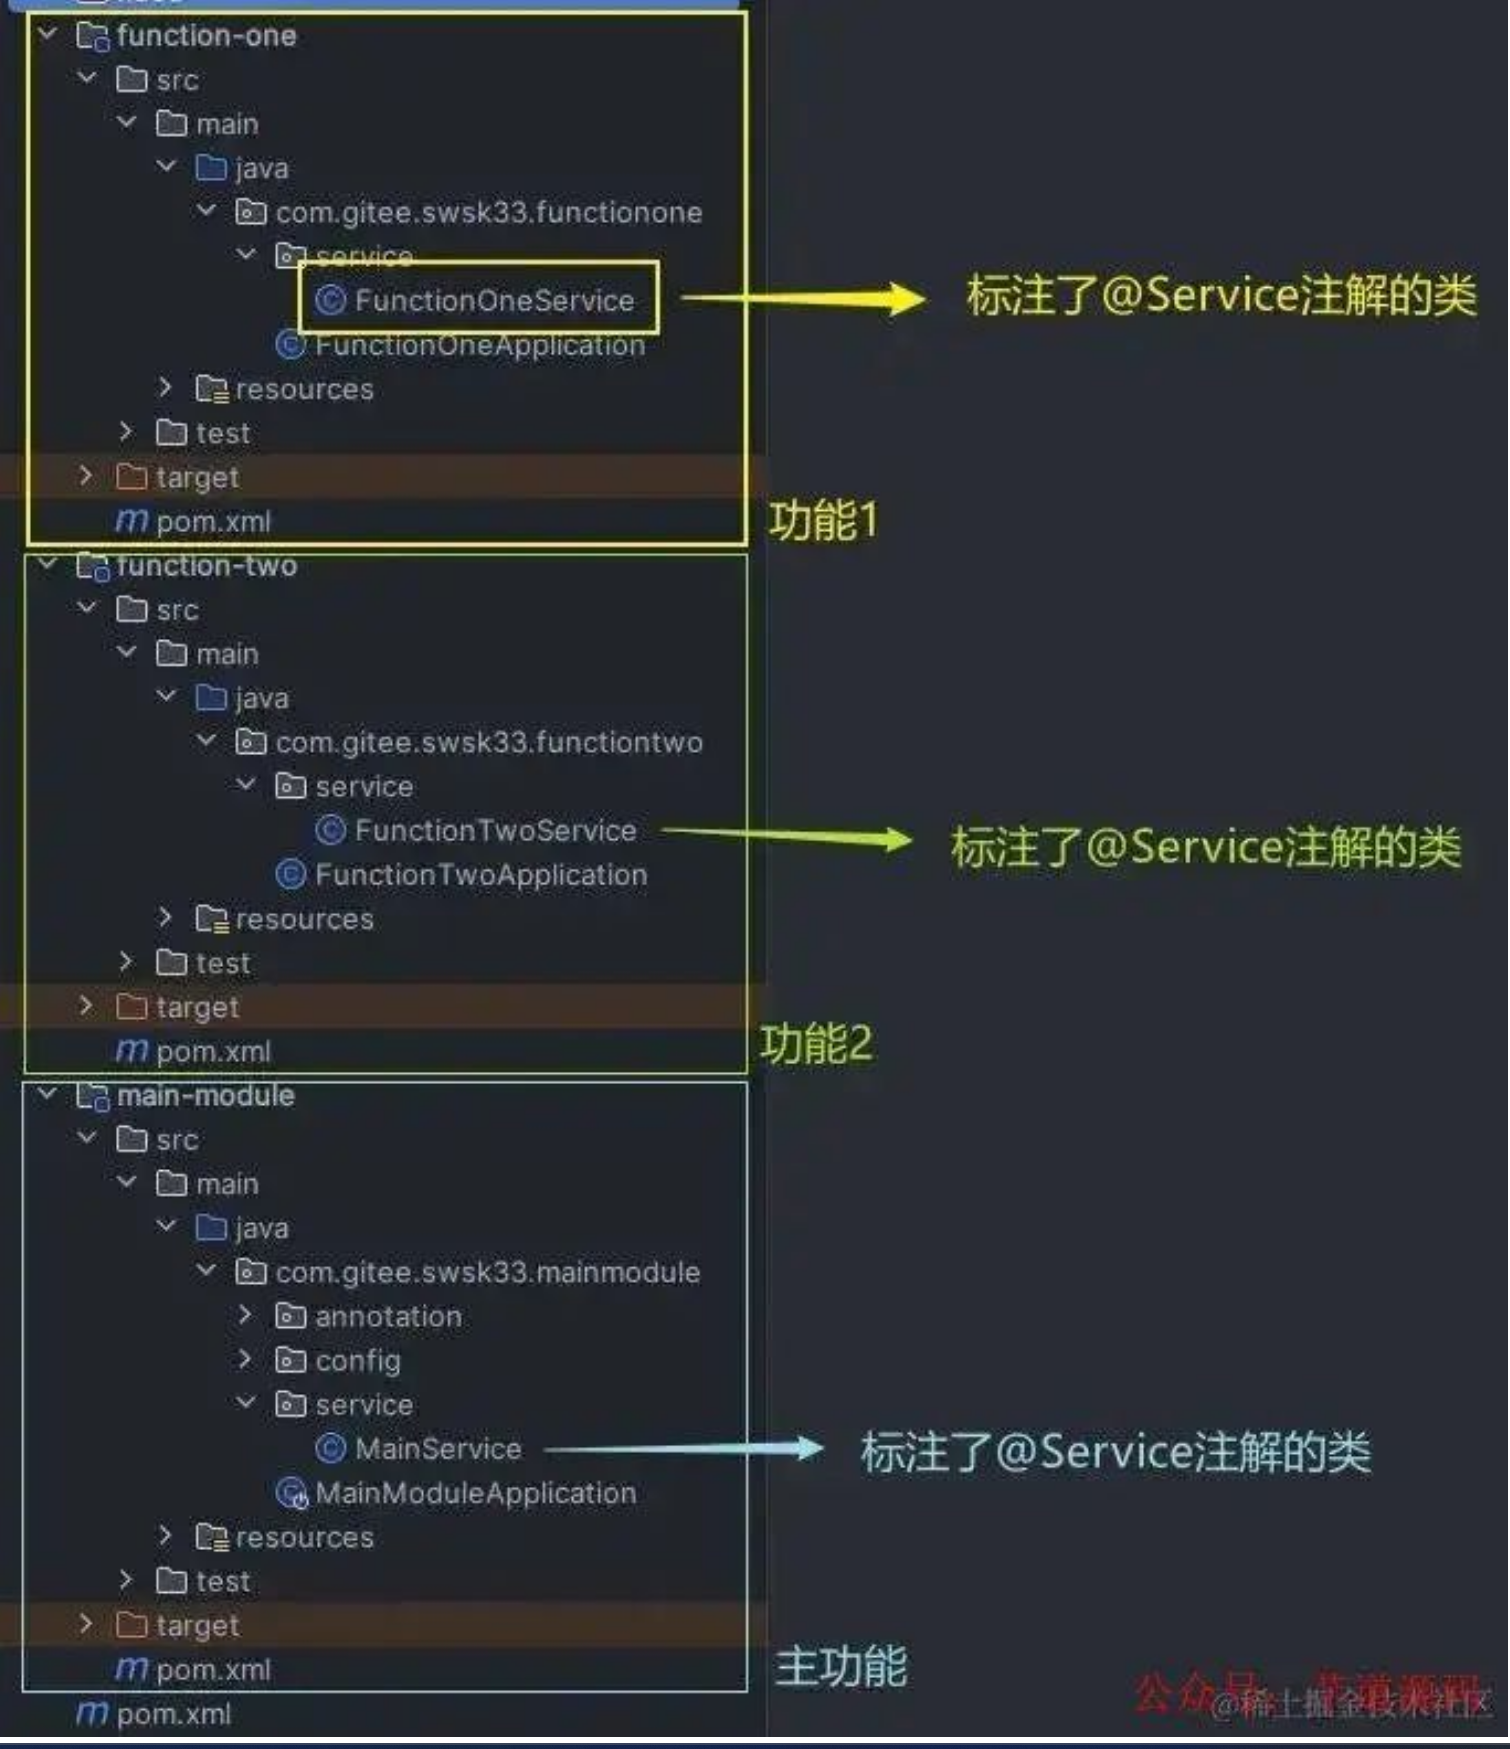
上述是一个按照功能拆分的Spring Boot多模块的项目示例,main-module工程是主功能,而另外两个是两个子功能模块,主功能模块需要以Maven依赖的形式导入子功能模块,它们才能组成一个完整的系统。
如果说现在在上述主功能中,将功能1以Maven依赖形式引入,启动主功能,功能1模块中的FunctionOneService类也会被扫描到并实例化为Bean吗?
很显然并不会。因为主功能中主类位于软件包com.gitee.swsk33.mainmodule中,那么启动时就会扫描该软件包及其子包下的类,不可能说扫描到功能1中的软件包com.gitee.swsk33.functionone了。
当然,这个问题很好解决,我们可以在@SpringBootApplication注解中指定scanBasePackages字段将两个子模块的包路径加进去就行了,这样确实没有问题,但是好像总觉得不是很优雅:如果我需要按需停用或者启用功能,那就需要修改这个主类的注解中传入的参数。
有没有别的办法呢?当然,@Import注解也可以实现这个功能。
2,@Import注解的基本使用
@Import注解通常标注在配置类上,它可以在IoC容器初始化当前配置类的同时,将其它的指定类也引入进来并初始化为Bean,例如:
@Configuration
@Import(DemoFunction.class)
public class FunctionImportConfig {
}可见上述FunctionImportConfig是一个配置类,该类会在IoC容器初始化时被扫描并初始化为Bean,那么在IoC容器扫描这个FunctionImportConfig的同时,也会读取到它上面的@Import注解,而@Import注解中指定了类DemoFunction,这就可以使得DemoFunction类也被加入扫描的候选类,最终也被实例化为Bean并交给IoC容器。
事实上,无论被标注@Import的类放在哪里,主要这个类能被扫描到,且标注了@Configuration等注解、能被实例化为Bean,那么其上的@Import注解中指定的类也会被连带着加入扫描以及初始化为Bean的候选。
当然,上述这个被导入的DemoFunction类也是有要求的,它必须是一个配置类,分下面两种情况讨论:
被导入的
DemoFunction是@Configuration标注的类: Spring会将这个DemoFuntion配置类初始化为Bean并加载到IoC容器中,这意味着只有该配置类本身、以及其中显示声明的Bean才会被加载到容器中,其他未声明的bean则不会被加载被导入的
DemoFunction是@ComponentScan标注的类: Spring则会在导入该配置类同时,还会根据@ComponentScan指定的扫描包路径,扫描其指定的全部包下对应的类(标注了@Component等等注解的)并初始化为Bean,默认则是将该类及其所在包的所有子包下的相关类初始化为Bean
回到上面的多模块项目场景中,可见我们只需要使用@Import注解不就可以在主模块中,把功能1模块中的类全部导入并初始化为Bean吗?
下面,我们就来尝试一下。
1) 导入其它模块的@ComponentScan类
大家可以根据上述工程结构创建一个多模块Maven项目,先是创建一个父模块的pom.xml,然后主模块、功能模块1和功能模块2都继承这同一个父项目,这样它们之间可以相互引用。
首先我们来看功能模块1,该模块作为一个功能,不需要作为一个完整的Spring Boot应用程序启动,因此该模块中不需要主类,只编写起点配置类和功能代码(比如Service层的类)即可,删除功能模块1的全部依赖,然后只加一个spring-boot-starter作为一些注解的基本支持即可:

然后删除功能模块1的主方法main,并将@SpringBootApplication改成@ComponentScan,仅作为扫描起点类即可,该类位于功能模块1最顶层软件包中,其中内容如下:
package com.gitee.swsk33.functionone;

import org.springframework.context.annotation.ComponentScan;

@ComponentScan
public class FunctionOneApplication {
}
然后再给功能模块1开发一个Service类,内容如下:
package com.gitee.swsk33.functionone.service;

import jakarta.annotation.PostConstruct;
import lombok.extern.slf4j.Slf4j;
import org.springframework.stereotype.Service;

@Slf4j
@Service
public class FunctionOneService {

 @PostConstruct
 private void init() {
  log.info("功能1,启动!");
 }

}
可见使其被初始化为Bean时打印一句话,让我们知道该类被扫描并且被初始化即可。
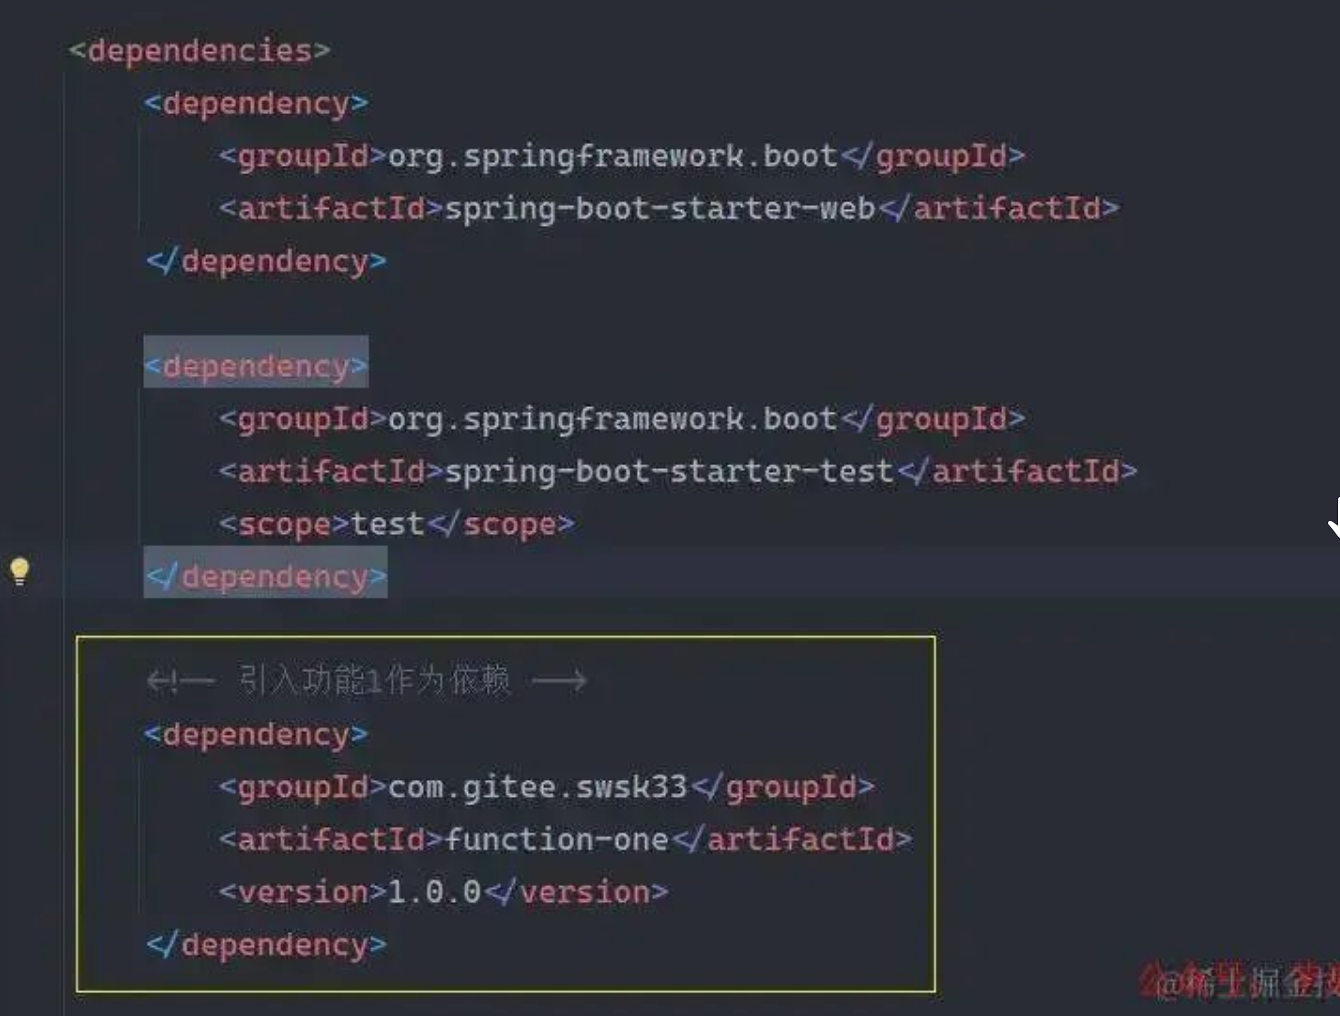
现在回到主模块,在其中将功能模块1以依赖形式引入:
然后在主模块中创建一个配置类,使用@Import导入功能模块1中的扫描起点(标注了@ComponentScan的类):
package com.gitee.swsk33.mainmodule.config;

import com.gitee.swsk33.functionone.FunctionOneApplication;
import com.gitee.swsk33.functiontwo.FunctionTwoApplication;
import org.springframework.context.annotation.Configuration;
import org.springframework.context.annotation.Import;

/**
 * 用于导入其它模块的配置,使得其它模块中的Bean也能够交给IoC托管
 */
@Configuration
@Import(FunctionOneApplication.class)
public class FunctionImportConfig {
}事实上,@Import可以导入多个类,传入数组形式即可,这里我们只导入模块1的起点类。
现在,启动主模块,可见模块1中的服务类也被成功扫描到并初始化为Bean了:
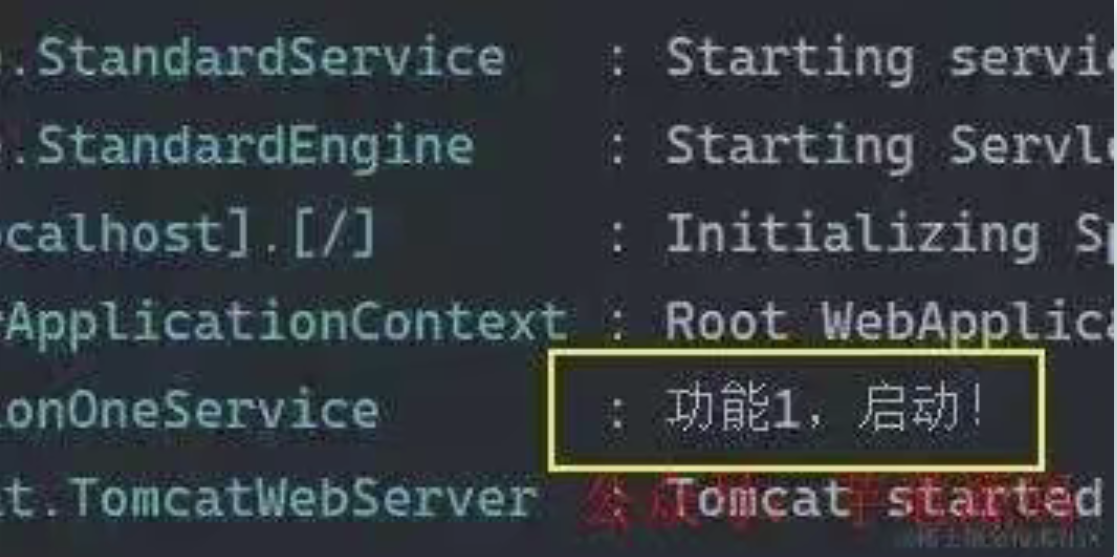
可见当我们的主模块启动时:
首先初始化主模块中的配置类
FunctionImportConfig,同时读取到该配置类上的@Import注解中指定的模块1中的类FunctionOneApplication模块1中的类
FunctionOneApplication被@ComponentScan标注,因此新增扫描起点,将FunctionOneApplication所在的包及其所有子包也加入扫描路径这样不仅仅主模块自身,还有模块1下所有标注了对应注解的类都被扫描并初始化为了Bean,并加入了IoC容器中
这样,我们就可以在主模块中,自动装配模块1中的类了
可见@Import注解可以很方便地将一个其它模块,甚至其它外部库中的对应配置类导入,并加入扫描初始化为Bean,加入到我们当前的IoC容器中去,并且在我们使用@Import导入@ComponentScan标注的类时,可以实现新增一个扫描起点的效果,而不仅仅是只扫描我们当前项目中的包路径,这样就将其它模块中的包路径也加入扫描。
2) 封装@Import注解
事实上,@EnableAsync以及@EnableDiscoveryClient这些注解,都是基于@Import实现的,当我们给自己项目的主类或者某个配置类打上该注解时,就能够启用某些功能,反之对应功能不会加载。
我们也可以来封装一个@EnableFunctionOne注解,在主模块中编写该注解代码如下:
package com.gitee.swsk33.mainmodule.annotation;

import com.gitee.swsk33.functionone.FunctionOneApplication;
import org.springframework.context.annotation.Import;

import java.lang.annotation.ElementType;
import java.lang.annotation.Retention;
import java.lang.annotation.RetentionPolicy;
import java.lang.annotation.Target;

/**
 * 结合@Import注解,实现注解控制功能模块1是否启用
 */
@Target(ElementType.TYPE)
@Retention(RetentionPolicy.RUNTIME)
@Import(FunctionOneApplication.class)
public @interface EnableFunctionOne {
}可见我们定义一个注解类,然后在这个注解类上标注@Import注解,并在其中指定需要导入的类,比如功能1的扫描起点。
现在我们可以删除之前主模块中的FunctionImportConfig,而是在主模块启动类上标注我们这个自定义注解:
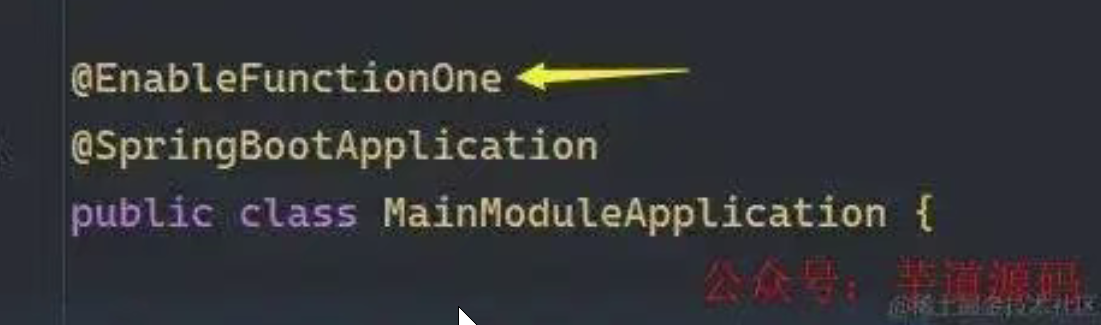
启动项目,可以达到相同的效果:
可见使用这种方式似乎更加地“优雅”了,我们也可以通过是否标注注解,来控制某个功能的开启或者关闭。
这也说明Spring在扫描注解时是会递归解析注解的,当其扫描到读取到主类的@EnableFunctionOne时,也会读取到@EnableFunctionOne中的@Import注解,并获取要导入的类的信息,完成导入。
事实上,大家还可以尝试将这个@EnableFunctionOne放在别的地方,比如某个配置类上,也可以起到一样的效果。
3,动态导入
上面只有在@Import中声明的类就会被导入,那么能不能更加灵活一点控制类的导入呢?事实上也是可以的。
事实上,@Import中指定的类,可以有三种:
@Configuration或者@ComponentScan标注的配置类实现了
ImportSelector接口的类实现了
ImportBeanDefinitionRegistrar接口的类
上面我们只是涉及到了第1种用法,而另外的用法可以通过自定义代码的方式,实现自定义的导入逻辑。
下面,我们就来一一探索一下其它的用法。
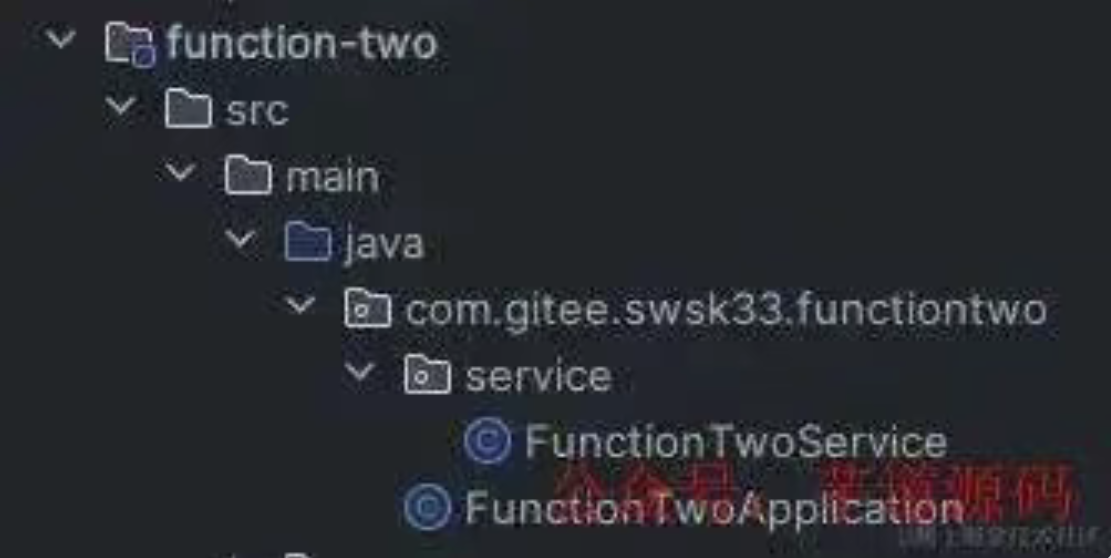
现在大家可以新建一个模块2,和模块1一样只有一个起点类,和一个服务类,并在服务类中通过@PostConstruct在启动时打印一个消息。
1) 指定实现了ImportSelector接口的类
ImportSelector接口是Spring中的一个扩展接口,用于动态地控制哪些配置类应该被导入。通过实现ImportSelector接口,我们就可以根据特定的条件或逻辑在运行时决定要导入的配置类。
这个接口定义了一个方法selectImports,该方法返回一个字符串数组,数组中就包含了需要导入的配置类的全限定类名。Spring在加载配置类时会调用selectImports方法,并根据方法返回的类名动态地导入对应的类并初始化为Bean。
我们在主模块中新建一个实现了ImportSelector接口的类如下:
package com.gitee.swsk33.mainmodule.selector;

import org.springframework.context.annotation.ImportSelector;

的全限定名放在字符串数据返回,则会导入返回的数组中指定的类
  */
 @Override
 public String[] selectImports(AnnotationMetadata importingClassMetadata) {
  // 打印被标注@Import的类的元数据
  System.out.println("被标注@Import的类名:" + importingClassMetadata.getClassName());
  // 直接引入第一个和第二个功能的主类
  return new String[]{
    "com.gitee.swsk33.functionone.FunctionOneApplication",
    "com.gitee.swsk33.functiontwo.FunctionTwoApplication"
  };
 }

}
上述代码中,大家可以通过注释了解一下该接口方法及其参数、返回值的意义,这里我直接返回了字符串数组,其中指定了需要导入的其它模块的起点类的全限定名。
然后再创建一个配置类使用@Import导入上述实现了ImportSelector接口的类即可:
package com.gitee.swsk33.mainmodule.config;

import com.gitee.swsk33.mainmodule.selector.DemoImportSelector;
import org.springframework.context.annotation.Configuration;
import org.springframework.context.annotation.Import;


/**
 * 指定导入实现了ImportSelector的类,然后就会根据其中selectImports方法返回值,实现自定义导入指定类
 */
@Configuration
@Import(DemoImportSelector.class)
public class FunctionImportConfig {
}
启动:

可见这一次我们的应用程序初始化时,在加载FunctionImportConfig配置类时,读取@Import注解,而其中指定的类是一个实现了ImportSelector的类,那么这时Spring框架就会执行实现了ImportSelector的类中的接口方法selectImports,并获取其返回值,根据返回值指定的全限定类名引入相关的类,并初始化为Bean。
需要注意的是:
实现
ImportSelector接口的类无需标注@Component等注解接口方法
selectImports返回的需要导入的类,也无需一定要是配置类,而可以是任何标注了@Component等等相关Bean注解的类
大家也可以将上述这个@Import注解进行封装,实现一个自己的@EnableXXX注解。
2) 指定实现了ImportBeanDefinitionRegistrar接口的类
ImportBeanDefinitionRegistrar接口是Spring中的另一个扩展接口,它允许我们在运行时动态地注册BeanDefinition,从而实现更高级的配置管理。与ImportSelector不同的是,ImportBeanDefinitionRegistrar不仅可以导入配置类,还可以动态地注册Bean定义。
ImportBeanDefinitionRegistrar接口定义了一个方法registerBeanDefinitions,该方法接受两个参数:
AnnotationMetadata用于获取当前类的注解信息BeanDefinitionRegistry用于注册Bean定义
通过实现ImportBeanDefinitionRegistrar接口,我们就可以根据特定的条件或逻辑在运行时注册Bean定义,从而实现更加灵活和动态的配置管理。
现在,我们在主模块创建一个实现了ImportBeanDefinitionRegistrar接口的类如下:
package com.gitee.swsk33.mainmodule.selector;

import com.gitee.swsk33.functionone.FunctionOneApplication;
import com.gitee.swsk33.functiontwo.FunctionTwoApplication;
import org.springframework.beans.factory.support.BeanDefinitionRegistry;
import org.springframework.beans.factory.support.GenericBeanDefinition;
import org.springframework.context.annotation.ImportBeanDefinitionRegistrar;
import org.springframework.core.type.AnnotationMetadata;

/**
 * 实现ImportBeanDefinitionRegistrar接口后,可在其中使用自定义的逻辑,实现动态地将对应类注册为Bean
 */
public class DemoImportSelector implements ImportBeanDefinitionRegistrar {

 /**
  * 定义一个自定义逻辑,在其中可以动态地将对应的类注册为Bean
  *
  * @param importingClassMetadata 标注了@Import注解的类的元数据
  * @param registry               用于将指定类注册到IoC容器
  */
 @Override
 public void registerBeanDefinitions(AnnotationMetadata importingClassMetadata, BeanDefinitionRegistry registry) {
  // 注册两个功能模块中标注了@ComponentScan的类为Bean
  // 定义一个Bean定义对象,传入第一个模块的@ComponentScan配置类
  GenericBeanDefinition functionOneScanBean = new GenericBeanDefinition();
  functionOneScanBean.setBeanClass(FunctionOneApplication.class);
  // 表示第二个模块的Bean定义对象
  GenericBeanDefinition functionTwoScanBean = new GenericBeanDefinition();
  functionTwoScanBean.setBeanClass(FunctionTwoApplication.class);
  // 将两个定义对象进行注册,这样上述两个类就会被注册为Bean
  registry.registerBeanDefinition("functionOneComponentScan", functionOneScanBean);
  registry.registerBeanDefinition("functionTwoComponentScan", functionTwoScanBean);
 }

}可见这个类和上述实现了ImportSelector接口的类作用一样,都是自定义导入其它类的逻辑,不过方式不一样,首先我们创建GenericBeanDefinition实例,并指定需要导入的类,然后借助BeanDefinitionRegistry参数传入我们的GenericBeanDefinition实例,实现将对应的类导入并注册为Bean。
同样地,现在只需要再在某个配置类中使用@Import指定这个实现了ImportBeanDefinitionRegistrar接口的类即可:
package com.gitee.swsk33.mainmodule.config;

import com.gitee.swsk33.mainmodule.selector.DemoImportSelector;
import org.springframework.context.annotation.Configuration;
import org.springframework.context.annotation.Import;


/**
 * 指定导入实现了ImportSelector的类,然后就会根据其中selectImports方法返回值,实现自定义导入指定类
 */
@Configuration
@Import(DemoImportSelector.class)
public class FunctionImportConfig {
}
启动:

可见这和ImportSelector大同小异,过程当然也是差不多的:初始化配置类FunctionImportConfig时,读取到@Import注解中指定的类,并运行该类接口方法registerBeanDefinitions,完成对Bean的注册。
4,结合Spring Bean条件注解
除了实现对应的接口来实现自定义的导入逻辑之外,事实上我们还可以借助Spring Bean的条件注解来通过配置或者其它方式来控制@Import是否触发生效。
比如说在标注@Import的配置类上使用@ConditionalOnProperty注解:
package com.gitee.swsk33.mainmodule.config;

import com.gitee.swsk33.functionone.FunctionOneApplication;
import org.springframework.boot.autoconfigure.condition.ConditionalOnProperty;
import org.springframework.context.annotation.Configuration;
import org.springframework.context.annotation.Import;

/**
 * 用于导入其它模块的配置,使得其它模块中的Bean也能够交给IoC托管
 * 还可以借助Spring的条件注解例如@ConditionalOnProperty,实现通过配置或者其它条件动态控制这个配置类是否加载,进而实现控制@Import是否生效
 */
@Configuration
@Import(FunctionOneApplication.class)
@ConditionalOnProperty(prefix = "com.gitee.swsk33.function-one", name = "enabled")
public class FunctionImportConfig {
}@ConditionalOnProperty注解可以用来根据配置文件条件,控制某个类是否被初始化为Bean,例如上述注解配置表示:配置文件中必须存在配置项com.gitee.swsk33.function-one.enabled且其值必须为true时,这个配置类FunctionImportConfig才会被加载并实例化为Bean,只有这样@Import才会被读取到,进而触发导入。
这时,就可以通过application.properties控制是否导入功能模块1了:
# 开启功能1
com.gitee.swsk33.function-one.enabled=true
事实上,Spring提供了好几个能够控制Bean是否加载和实例化的条件注解,我们可以使用这些注解设定一些条件,使得Bean可以根据我们的条件来决定是否加载并实例化。
7.12. Creating Your Own Auto-configuration
If you work in a company that develops shared libraries, or if you work on an open-source or commercial library, you might want to develop your own auto-configuration. Auto-configuration classes can be bundled in external jars and still be picked up by Spring Boot.
Auto-configuration can be associated to a “starter” that provides the auto-configuration code as well as the typical libraries that you would use with it. We first cover what you need to know to build your own auto-configuration and then we move on to the typical steps required to create a custom starter.
7.12.1. Understanding Auto-configured Beans
Classes that implement auto-configuration are annotated with @AutoConfiguration. This annotation itself is meta-annotated with @Configuration, making auto-configurations standard @Configuration classes. Additional @Conditional annotations are used to constrain when the auto-configuration should apply. Usually,auto-configuration classes use @ConditionalOnClass and @ConditionalOnMissingBean annotations. This ensures that auto-configuration applies only when relevant classes are found and when you have not declared your own @Configuration.
You can browse the source code of spring-boot-autoconfigure to see the @AutoConfiguration classes that Spring provides (see the META-INF/spring/org.springframework.boot.autoconfigure.AutoConfiguration.imports file).
7.12.2. Locating Auto-configuration Candidates
Spring Boot checks for the presence of a META-INF/spring/org.springframework.boot.autoconfigure.AutoConfiguration.imports file within your published jar.
The file should list your configuration classes, with one class name per line, as shown in the following example:
com.mycorp.libx.autoconfigure.LibXAutoConfiguration
com.mycorp.libx.autoconfigure.LibXWebAutoConfiguration
TIP: You can add comments to the imports file using the # character.
NOTE: Auto-configurations must be loaded only by being named in the imports file. Make sure that they are defined in a specific package space and that they are never the target of component scanning. Furthermore, auto-configuration classes should not enable component scanning to find additional components. Specific @Import annotations should be used instead.
If your configuration needs to be applied in a specific order, you can use the before, beforeName, after and afterName attributes on the @AutoConfiguration annotation or the dedicated @AutoConfigureBefore and @AutoConfigureAfter annotations.
For example, if you provide web- specific configuration, your class may need to be applied after WebMvcAutoConfiguration.
If you want to order certain auto-configurations that should not have any direct knowledge of each other, you can also use @AutoConfigureOrder. That annotation has the same semantic as the regular @Order annotation but provides a dedicated order for auto-configuration classes.
As with standard @Configuration classes, the order in which auto-configuration classes are applied only affects the order in which their beans are defined. The order in which those beans are subsequently created is unaffected and is determined by each bean’s dependencies and any @DependsOn relationships.
7.12.3. Condition Annotations
You almost always want to include one or more @Conditional annotations on your auto-configuration class. The ConditionalOnMissingBean annotation is one common example that is used to allow developers to override auto-configuration if they are not happy with your defaults.
Spring Boot includes a number of @Conditional annotations that you can reuse in your own code by annotating @Configuration classes or individual @Bean methods. These annotations include:
• Class Conditions • Bean Conditions • Property Conditions
• Resource Conditions • Web Application Conditions • SpEL Expression Conditions
Class Conditions
The @ConditionalOnClass and @ConditionalOnMissingClass annotations let @Configuration classes be included based on the presence or absence of specific classes. Due to the fact that annotation metadata is parsed by using ASM, you can use the value attribute to refer to the real class, even though that class might not actually appear on the running application classpath. You can also use the name attribute if you prefer to specify the class name by using a String value.
This mechanism does not apply the same way to @Bean methods where typically the return type is the target of the condition: before the condition on the method applies, the JVM will have loaded the class and potentially processed method references which will fail if the class is not present.
To handle this scenario, a separate @Configuration class can be used to isolate the condition, as shown in the following example:
import org.springframework.boot.autoconfigure.AutoConfiguration;
import org.springframework.boot.autoconfigure.condition.ConditionalOnClass;
import org.springframework.boot.autoconfigure.condition.ConditionalOnMissingBean;
import org.springframework.context.annotation.Bean;
import org.springframework.context.annotation.Configuration;
@AutoConfiguration
// Some conditions ...
public class MyAutoConfiguration {
// Auto-configured beans ...
@Configuration(proxyBeanMethods = false)
@ConditionalOnClass(SomeService.class)
public static class SomeServiceConfiguration {
@Bean
@ConditionalOnMissingBean
public SomeService someService() {
return new SomeService();
}
}
}
SpringBoot @Bean 和 @ConditionalOnClass 同时使用
有时候会希望存在指定类型时才注入某个 Bean:
@AutoConfiguration
public class MyAutoConfiguration {
  @Bean
  @ConditionalOnClass(MyService.class)
  public MyConditionalBean statistics() {
      return new MyConditionalBean();
  }
}但是如果按照上述代码,当MyService不存在的时候,程序会直接找不到类,导致程序无法启动。
你会发现@ConditionalOnClass用在被@Configuration标注的类上,即使MyService不存在,程序也会正常启动。
但是像上面那样就不行。
这是因为和@Configuration一起使用@ConditionalOnClass时,其注解信息通过 ASM 解析,但是在处理和@Bean一起用的@ConditionalOnClass时,所在的配置类已经被 JVM 加载了,也就是加载在解析的前面,而要加载成功,首先要能够找到@ConditionalOnClass所指明的类。
有两种解决方法:
指定全类名
@Bean
@ConditionalOnClass(name ="com.example.MyService")
public MyConditionalBean statistics() {
   return new MyConditionalBean();
}
内嵌配置类
@AutoConfiguration
public class MyAutoConfiguration {
 @Configuration
 @ConditionalOnClass(MyService.class)
 public class MyConfiguration {
     @Bean
     public MyConditionalBean statistics() {
         return new MyConditionalBean();
     }
 }
}
TIP: If you use @ConditionalOnClass or @ConditionalOnMissingClass as a part of a meta-annotation to compose your own composed annotations, you must use name as referring to the class in such a case is not handled.
Bean Conditions
The @ConditionalOnBean and @ConditionalOnMissingBean annotations let a bean be included based on the presence or absence of specific beans. You can use the value attribute to specify beans by type or name to specify beans by name. The search attribute lets you limit the ApplicationContext hierarchy that should be considered when searching for beans.
When placed on a @Bean method, the target type defaults to the return type of the method, as shown in the following example:
import org.springframework.boot.autoconfigure.AutoConfiguration;
import org.springframework.boot.autoconfigure.condition.ConditionalOnMissingBean;
import org.springframework.context.annotation.Bean;
@AutoConfiguration
public class MyAutoConfiguration {
@Bean
@ConditionalOnMissingBean
public SomeService someService() {
return new SomeService();
}
}
In the preceding example, the someService bean is going to be created if no bean of type SomeService is already contained in the ApplicationContext.
TIP: You need to be very careful about the order in which bean definitions are added, as these conditions are evaluated based on what has been processed so far.
For this reason, we recommend using only @ConditionalOnBean and @ConditionalOnMissingBean annotations on auto-configuration classes (since these are guaranteed to load after any user-defined bean definitions have been added).
NOTE: @ConditionalOnBean and @ConditionalOnMissingBean do not prevent @Configuration classes from being created. The only difference between using these conditions at the class level and marking each contained @Bean method with the annotation is that the former prevents registration of the @Configuration class as a bean if the condition does not match.
TIP: When declaring a @Bean method, provide as much type information as possible in the method’s return type. For example, if your bean’s concrete class implements an interface the bean method’s return type should be the concrete class and not the interface. Providing as much type information as possible in @Bean methods is particularly important when using bean conditions as their evaluation can only rely upon to type information that is available in the method signature.
Property Conditions
The @ConditionalOnProperty annotation lets configuration be included based on a Spring Environment property. Use the prefix and name attributes to specify the property that should be checked. By default, any property that exists and is not equal to false is matched. You can also create more advanced checks by using the havingValue and matchIfMissing attributes.
7.1.7. Application Events and Listeners
In addition to the usual Spring Framework events, such as ContextRefreshedEvent , a SpringApplicationsends some additional application events.
Some events are actually triggered before the ApplicationContextis created, so you cannot register a listener on those as a @Bean. You can register them with the SpringApplication.addListeners(…) method or the SpringApplicationBuilder.listeners(…) method.
If you want those listeners to be registered automatically, regardless of the way the application is created, you can add a META-INF/spring.factoriesfile to your project and reference your listener(s) by using the org.springframework.context.ApplicationListenerkey, as shown in the following example:
org.springframework.context.ApplicationListener=com.example.project.MyLi stener
Application events are sent in the following order, as your application runs:
An ApplicationStartingEventis sent at the start of a run but before any processing, except for the registration of listeners and initializers.
An ApplicationEnvironmentPreparedEvent is sent when the Environmentto be used in the context is known but before the context is created.
An ApplicationContextInitializedEvent is sent when the ApplicationContext is prepared and ApplicationContextInitializers have been called but before any bean definitions are loaded.
An ApplicationPreparedEventis sent just before the refresh is started but after bean definitions have been loaded.
An ApplicationStartedEventis sent after the context has been refreshed but before any application and command-line runners have been called.
An AvailabilityChangeEvent is sent right after with LivenessState.CORRECT to indicate that the application is considered as live.
An ApplicationReadyEvent is sent after any application and command-line runners have been called.
An AvailabilityChangeEventis sent right after with ReadinessState.ACCEPTING_TRAFFIC to indicate that the application is ready to service requests.
An ApplicationFailedEventis sent if there is an exception on startup.
The above list only includes SpringApplicationEvents that are tied to a SpringApplication. In addition to these, the following events are also published after ApplicationPreparedEventand before ApplicationStartedEvent:
A WebServerInitializedEvent is sent after the WebServer is ready. ServletWebServerInitializedEvent and ReactiveWebServerInitializedEvent are the servlet and reactive variants respectively.
A ContextRefreshedEvent is sent when an ApplicationContextis refreshed.
TIP You often need not use application events, but it can be handy to know that they exist. Internally, Spring Boot uses events to handle a variety of tasks.
NOTE Event listeners should not run potentially lengthy tasks as they execute in the same thread by default. Consider using application and command-line runners instead.
Application events are sent by using Spring Framework's event publishing mechanism. Part of this mechanism ensures that an event published to the listeners in a child context is also published to the listeners in any ancestor contexts. As a result of this, if your application uses a hierarchy of SpringApplication instances, a listener may receive multiple instances of the same type of application event.
To allow your listener to distinguish between an event for its context and an event for a descendant context, it should request that its application context is injected and then compare the injected context with the context of the event. The context can be injected by implementing ApplicationContextAwareor, if the listener is a bean, by using @Autowired.
使用 @EventListener(ApplicationReadyEvent.class) 替代 @PostConstruct
在 Spring Boot 中,@PostConstruct 和 @PreDestroy 是由 Jakarta EE(原 Java EE)提供的生命周期注解,特别来自 jakarta.annotation 包。这些注解并不是 Spring Boot 本身的一部分,但 Spring 支持其生命周期管理。随着 Spring Boot 3+ 的发展,尽管这些注解仍然有效,但 Spring 提供了更多现代化的替代方案,以简化和优化生命周期管理。
需要注意的是,尽管 @PostConstruct 仍然在 Spring Boot 3+ 中有效,但它已被移至 Jakarta EE 中。因此,Spring 3+ 项目建议使用 @EventListener(ApplicationReadyEvent.class) 来替代 @PostConstruct,以便在应用完全启动后执行初始化任务。
@EventListener(ApplicationReadyEvent.class) 是 Spring 提供的另一种方式,它确保初始化逻辑仅在整个 Spring 应用程序准备好之后运行。与 @PostConstruct 不同,它确保整个应用程序的上下文已经完全初始化。
为什么选择 @EventListener(ApplicationReadyEvent.class)?
确保所有的 bean 都已创建并准备好后再执行初始化逻辑。
适合进行数据库加载、后台进程启动、配置验证和发送启动通知等任务。
示例:使用 @EventListener(ApplicationReadyEvent.class) 替代 @PostConstruct
package com.icoderoad.component;
import org.springframework.boot.context.event.ApplicationReadyEvent;import org.springframework.context.event.EventListener;import org.springframework.stereotype.Component;
@Component
public class MyStartupTask {
    @EventListener(ApplicationReadyEvent.class)
    public void onApplicationReady() {
      System.out.println("应用程序完全启动并准备就绪!");
      performStartupTasks();
   }

   private void performStartupTasks() {
     System.out.println("正在执行启动任务...");
// 示例:加载数据、验证配置等
   }
 }
示例:在启动时加载初始数据
package com.icoderoad.component;
import org.springframework.boot.context.event.ApplicationReadyEvent;import org.springframework.context.event.EventListener;import org.springframework.stereotype.Component;
@Component
public class DataLoader {
    @EventListener(ApplicationReadyEvent.class)
    public void loadData() {
      System.out.println("正在加载初始数据到数据库...");
        // 加载数据的逻辑
    }
}
@PreDestroy 的作用与替代方案
@PreDestroy 是用于标记一个方法,在 Spring 容器销毁 bean 之前执行,通常在应用程序关闭时或 bean 不再需要时调用。它类似于关闭资源、清理线程等任务,确保在应用程序关闭时完成所有必要的清理。
示例:关闭资源
package com.icoderoad.service;
import javax.annotation.PreDestroy;import org.springframework.stereotype.Service;
@Service
public class FileService {
    private String fileResource = "文件已打开";

    @PreDestroy
    public void cleanUp() {
      System.out.println("在关闭之前清理资源...");
      fileResource = null; // 模拟关闭文件或资源
      }
}
为什么 @PreDestroy 在 Spring Boot 3+ 中仍然有效?
向后兼容性
Spring 保持了与现有应用程序的兼容性,尽管 Jakarta EE 迁移了注解,但
@PreDestroy仍然有效,且通常在清理资源时非常有用。Jakarta EE 过渡
@PreDestroy被迁移到 Jakarta EE 命名空间,Spring Boot 3+ 支持这种新命名空间,因此它仍然可以在 Spring Boot 中使用。
替代方案:使用 DisposableBean 或 @Bean(destroyMethod = "methodName")
使用
DisposableBean
package com.icoderoad.service;
import org.springframework.beans.factory.DisposableBean;import org.springframework.stereotype.Service;
@Service
public class MyService implements DisposableBean {
    @Override
    public void destroy() throws Exception {
        System.out.println("在关闭之前清理资源...");
        }
}使用@Bean(destroyMethod = "methodName")
package com.icoderoad.config;
import org.springframework.context.annotation.Bean;import org.springframework.context.annotation.Configuration;
@Configuration
  public class AppConfig {
    @Bean(destroyMethod = "cleanUp")
    public MyService myService() {
     return new MyService();
    }
}

public class MyService {
  public void cleanUp() {
    System.out.println("清理资源...");
  }
}
同步事件监听和异步事件监听
默认情况下(同步事件监听):发送者和监听者在同一线程
线程模型:
当使用同步事件监听时(未启用异步处理),事件发布者线程会直接调用监听器的处理逻辑,整个过程是阻塞式串行执行的。这意味着:发布事件的方法(如
publishEvent())所在的线程会依次执行所有匹配的监听器逻辑所有监听器的处理线程与发布者线程一致,例如在 HTTP 请求线程中发布事件,监听器也会在该线程执行
验证示例:
如网页2的代码示例所示,同步监听时,发布器和监听器的日志输出均在同一个线程(如http-nio-8080-exec-1)。网页4通过添加
Thread.sleep()延迟进一步验证了这一行为,发现发布者线程需等待监听器完成后才能继续执行
2. 异步事件监听:发送者和监听者在不同线程
实现方式:
若需监听器异步执行,需通过以下方式配置:添加
@Async注解:在监听方法上标记@Async,使其由线程池执行启用异步支持:在配置类上添加
@EnableAsync注解自定义线程池(可选):通过配置
TaskExecutor指定异步线程池
线程模型:
异步模式下,事件发布者线程仅负责发布事件,监听器的处理逻辑会交由其他线程执行,两者互不阻塞。例如:发布者线程(如主线程或 HTTP 线程)会立即返回,无需等待监听器完成
监听器线程可能来自默认的
SimpleAsyncTaskExecutor或自定义线程池
验证示例:
网页4通过对比@Async注解前后的日志输出,发现异步监听时,发布者的日志输出时间与监听器无关,且监听器的异常不会影响主流程
3. 如何选择同步或异步?
同步适用场景:
监听器逻辑简单且耗时短。
需要保证监听器处理的顺序性或依赖监听结果
异步适用场景:
监听器逻辑耗时长(如发送邮件、记录日志)。
需要提高系统吞吐量或避免阻塞主线程
4. 注意事项
默认行为:Spring Boot 事件的默认处理是同步的,需显式配置才能启用异步
线程池配置:若未自定义线程池,异步任务可能使用默认线程池(如
SimpleAsyncTaskExecutor),需注意资源管理异常处理:异步监听器的异常需在方法内捕获,否则可能导致线程池任务失败
Start & Exit
7.1.10. Using the ApplicationRunner or CommandLineRunner
If you need to run some specific code once the SpringApplicationhas started, you can implement the ApplicationRunner or CommandLineRunner interfaces. Both interfaces work in the same way and offer a single runmethod, which is called just before SpringApplication.run(…) completes.
NOTE
This contract is well suited for tasks that should run after application startup but before it starts accepting traffic.
The CommandLineRunner interfaces provides access to application arguments as a string array, whereas the ApplicationRunner uses the ApplicationArguments interface discussed earlier. The following example shows a CommandLineRunner with a run method:
import org.springframework.boot.CommandLineRunner;
import org.springframework.stereotype.Component;
@Component
public class MyCommandLineRunner implements CommandLineRunner     {
  @Override
  public void run(String... args) {
  // Do something...
  }
}
If several CommandLineRunner or ApplicationRunnerbeans are defined that must be called in a specific order, you can additionally implement the org.springframework.core.Ordered interface or use the org.springframework.core.annotation.Order annotation.
Spring Data Jpa
https://docs.spring.io/spring-data/jpa/reference/3.3/repositories/core-concepts.html
JPQL
JPQL: The Jakarta Persistence Query Language
https://openjpa.apache.org/builds/4.1.0/apache-openjpa/docs/jpa_overview_query.html
https://openjpa.apache.org/builds/4.1.0/apache-openjpa/docs/jpa_langref.html
JPQL中使用 in 查询,注意 sql 中的 in 后面不需要加括号了,直接写占位符即可,然后参数就传个List数组就好啦
springboot 3.x & query dsl:
https://blog.csdn.net/m0_37970303/article/details/131151971
https://github.com/querydsl/querydsl/issues/3493
https://dzone.com/articles/upgrade-guide-to-spring-boot-3-for-spring-data-jpa-3-and-querydsl-5
批量新增
https://github.com/zhangzhenhuajack/spring-data-jpa-guide/issues/31
https://keitaroinc.medium.com/implementing-bulk-updates-with-spring-data-jpa-39e5a715783d
Spring Boot Starter Parent
What is Spring Boot Starter Parent?
In pom.xml, all Spring Boot projects normally utilise spring-boot-starter-parent as the parent.
    <parent>
        <groupId>org.springframework.boot</groupId>
        <artifactId>spring-boot-starter-parent</artifactId>
        <version>3.0.2</version>
    </parent>
Parent poms’ let you handle the following for several child projects and modules:
Configuration - Java Version and Other Properties
Depedency Management - Version of dependencies
Default Plugin Configuration
What is inside Spring Boot Starter Parent?
First and foremost, Spring Boot Starter The parent pom defines spring-boot-dependencies. It inherits spring-boot-dependencies’ dependency management. Details in the next section.
<parent>
    <groupId>org.springframework.boot</groupId>
    <artifactId>spring-boot-dependencies</artifactId>
    <version>3.0.2</version>
    <relativePath>../../spring-boot-dependencies</relativePath>
</parent>
Default java version is 1.6. A project can override this by specifying a property `17
3.1.1
` in the project pom. A few other settings related to encoding and source, target version are also set in the parent pom.
<java.version>17</java.version>
<resource.delimiter>@</resource.delimiter>
<maven.compiler.source>${java.version}</maven.compiler.source>
<maven.compiler.target>${java.version}</maven.compiler.target>
<project.build.sourceEncoding>UTF-8</project.build.sourceEncoding>
<project.reporting.outputEncoding>UTF-8</project.reporting.outputEncoding>
Spring Boot Starter Parent specifies the default configuration for a host of plugins including maven-compiler-plugin, maven-failsafe-plugin, maven-jar-plugin, maven-war-plugin and more .
<plugin>
    <groupId>org.apache.maven.plugins</groupId>
    <artifactId>maven-compiler-plugin</artifactId>
    <configuration>
        <parameters>true</parameters>
    </configuration>
</plugin>
<plugin>
    <groupId>org.apache.maven.plugins</groupId>
    <artifactId>maven-failsafe-plugin</artifactId>
    <executions>
        <execution>
            <goals>
                <goal>integration-test</goal>
                <goal>verify</goal>
            </goals>
        </execution>
    </executions>
    <configuration>
       <classesDirectory>${project.build.outputDirectory}</classesDirectory>
    </configuration>
</plugin>
<plugin>
    <groupId>org.apache.maven.plugins</groupId>
    <artifactId>maven-jar-plugin</artifactId>
    <configuration>
            <archive>
                <manifest>
                    <mainClass>${start-class}</mainClass>
                    <addDefaultImplementationEntries>true</addDefaultImplementationEntries>
                </manifest>
            </archive>
    </configuration>
</plugin>
<plugin>
    <groupId>org.apache.maven.plugins</groupId>
    <artifactId>maven-war-plugin</artifactId>
    <configuration>
        <archive>
            <manifest>
            <mainClass>${start-class}</mainClass>
            <addDefaultImplementationEntries>true</addDefaultImplementationEntries>
            </manifest>
        </archive>
    </configuration>
</plugin>
What does Spring Boot Starter Parent inherit from spring-boot-dependencies?
Spring Boot Dependencies defines the Spring Boot project’s default dependency management. If we wish to utilise a new version of a certain dependency, we may do so by adding a new property to the project pom. The following extract demonstrates some of the essential dependencies controlled by the Spring Boot Dependencies parent pom. Spring Boot Starter Parent inherits all of these properties from spring-boot-dependencies.
<properties>
    <angus-mail.version>1.0.0</angus-mail.version>
    <artemis.version>2.26.0</artemis.version>
    ...
    <ehcache3.version>3.10.8</ehcache3.version>
    ...
    <h2.version>2.1.214</h2.version>
    <hamcrest.version>2.2</hamcrest.version>
    <hazelcast.version>5.1.5</hazelcast.version>
    <hibernate.version>6.1.6.Final</hibernate.version>
    <hibernate-validator.version>8.0.0.Final</hibernate-validator.version>
    <hikaricp.version>5.0.1</hikaricp.version>
    <hsqldb.version>2.7.1</hsqldb.version>
    <htmlunit.version>2.65.0</htmlunit.version>
    <httpasyncclient.version>4.1.5</httpasyncclient.version>
    <httpclient.version>4.5.14</httpclient.version>
    <httpclient5.version>5.1.4</httpclient5.version>
    <httpcore.version>4.4.16</httpcore.version>
    <httpcore5.version>5.1.4</httpcore5.version>
    <influxdb-java.version>2.23</influxdb-java.version>
    <jackson-bom.version>2.14.1</jackson-bom.version>
    <jakarta-activation.version>2.1.1</jakarta-activation.version>
    <jakarta-annotation.version>2.1.1</jakarta-annotation.version>
    ....
    <jetty.version>11.0.13</jetty.version>
    <junit-jupiter.version>5.9.2</junit-jupiter.version>
    <kafka.version>3.3.2</kafka.version>
    <kotlin.version>1.7.22</kotlin.version>
    ...
    <log4j2.version>2.19.0</log4j2.version>
    <logback.version>1.4.5</logback.version>
    <lombok.version>1.18.24</lombok.version>
    <maven-antrun-plugin.version>3.1.0</maven-antrun-plugin.version>
    <maven-assembly-plugin.version>3.4.2</maven-assembly-plugin.version>
    <maven-clean-plugin.version>3.2.0</maven-clean-plugin.version>
    <maven-compiler-plugin.version>3.10.1</maven-compiler-plugin.version>
    <maven-dependency-plugin.version>3.3.0</maven-dependency-plugin.version>
    <maven-deploy-plugin.version>3.0.0</maven-deploy-plugin.version>
    <maven-enforcer-plugin.version>3.1.0</maven-enforcer-plugin.version>
    <maven-failsafe-plugin.version>2.22.2</maven-failsafe-plugin.version>
    <maven-help-plugin.version>3.3.0</maven-help-plugin.version>
    <maven-install-plugin.version>3.0.1</maven-install-plugin.version>
    <maven-invoker-plugin.version>3.3.0</maven-invoker-plugin.version>
    <maven-jar-plugin.version>3.3.0</maven-jar-plugin.version>
    <maven-javadoc-plugin.version>3.4.1</maven-javadoc-plugin.version>
    <maven-resources-plugin.version>3.3.0</maven-resources-plugin.version>
    <maven-shade-plugin.version>3.4.1</maven-shade-plugin.version>
    <maven-source-plugin.version>3.2.1</maven-source-plugin.version>
    <maven-surefire-plugin.version>2.22.2</maven-surefire-plugin.version>
    <maven-war-plugin.version>3.3.2</maven-war-plugin.version>
    <micrometer.version>1.10.3</micrometer.version>
    <micrometer-tracing.version>1.0.1</micrometer-tracing.version>
    <spring-security.version>6.0.1</spring-security.version>
    <tomcat.version>10.1.5</tomcat.version>
    <undertow.version>2.3.3.Final</undertow.version>
    <webjars-locator.version>0.52</webjars-locator.version>
    <wsdl4j.version>1.6.3</wsdl4j.version>
    <xml-maven-plugin.version>1.0.2</xml-maven-plugin.version>
    <xmlunit2.version>2.9.1</xmlunit2.version>
    <zipkin.version>3.0.2</zipkin.version>
</properties>
Defines Maven 3.2.1 as the minimum version needed.
<prerequisites>
    <maven>3.2.1</maven>
</prerequisites>
When Not to Use Spring Boot Starter Parent
If your project already uses a different parent POM, adding the Spring Boot Starter Parent as a parent would not be possible due to Maven’s single-parent limitation. In such cases, you can still use the benefits of the Spring Boot dependency versions by declaring it as a “Bill Of Materials” (BOM) in the dependencyManagement section:
<dependencyManagement>
    <dependencies>
        <dependency>
            <groupId>org.springframework.boot</groupId>
            <artifactId>spring-boot-dependencies</artifactId>
            <version>2.5.4</version>
            <type>pom</type>
            <scope>import</scope>
        </dependency>
    </dependencies>
</dependencyManagement>
This approach provides version management for Spring Boot dependencies without requiring a parent relationship.
The Dependency Management Tag
To manage a different version of a dependency provided by the starter parent, we can declare the dependency and its version explicitly in the dependencyManagement section:
<dependencyManagement>
    <dependencies>
        <dependency>
            <groupId>org.springframework.boot</groupId>
            <artifactId>spring-boot-starter-data-jpa</artifactId>
            <version>3.1.5</version>
        </dependency>
    </dependencies>
</dependencyManagement>
Properties
To change the value of any property defined in the starter parent, we can re-declare it in our properties section.
The spring-boot-starter-parent via its parent spring-boot-dependencies uses properties for configuring all the dependencies versions, Java version, and Maven plugin versions. Therefore, it makes it easy for us to control these configurations by just changing the corresponding property.
If we want to change the version of any dependency that we want to pull from the starter parent, we can add the dependency in the dependency tag and directly configure its property:
<properties>
    <junit.version>4.11</junit.version>
</properties>
Other Property Overrides
We can also use properties for other configurations, such as managing plugin versions, or even some base configurations, like managing the Java version and source encoding. We need to re-declare the property with a new value.
For example, to change the Java version, we can indicate it in the java.version property:
<properties>
    <java.version>17</java.version>
</properties>
spring-boot-starter-parent 与 spring-boot-dependencies的关系
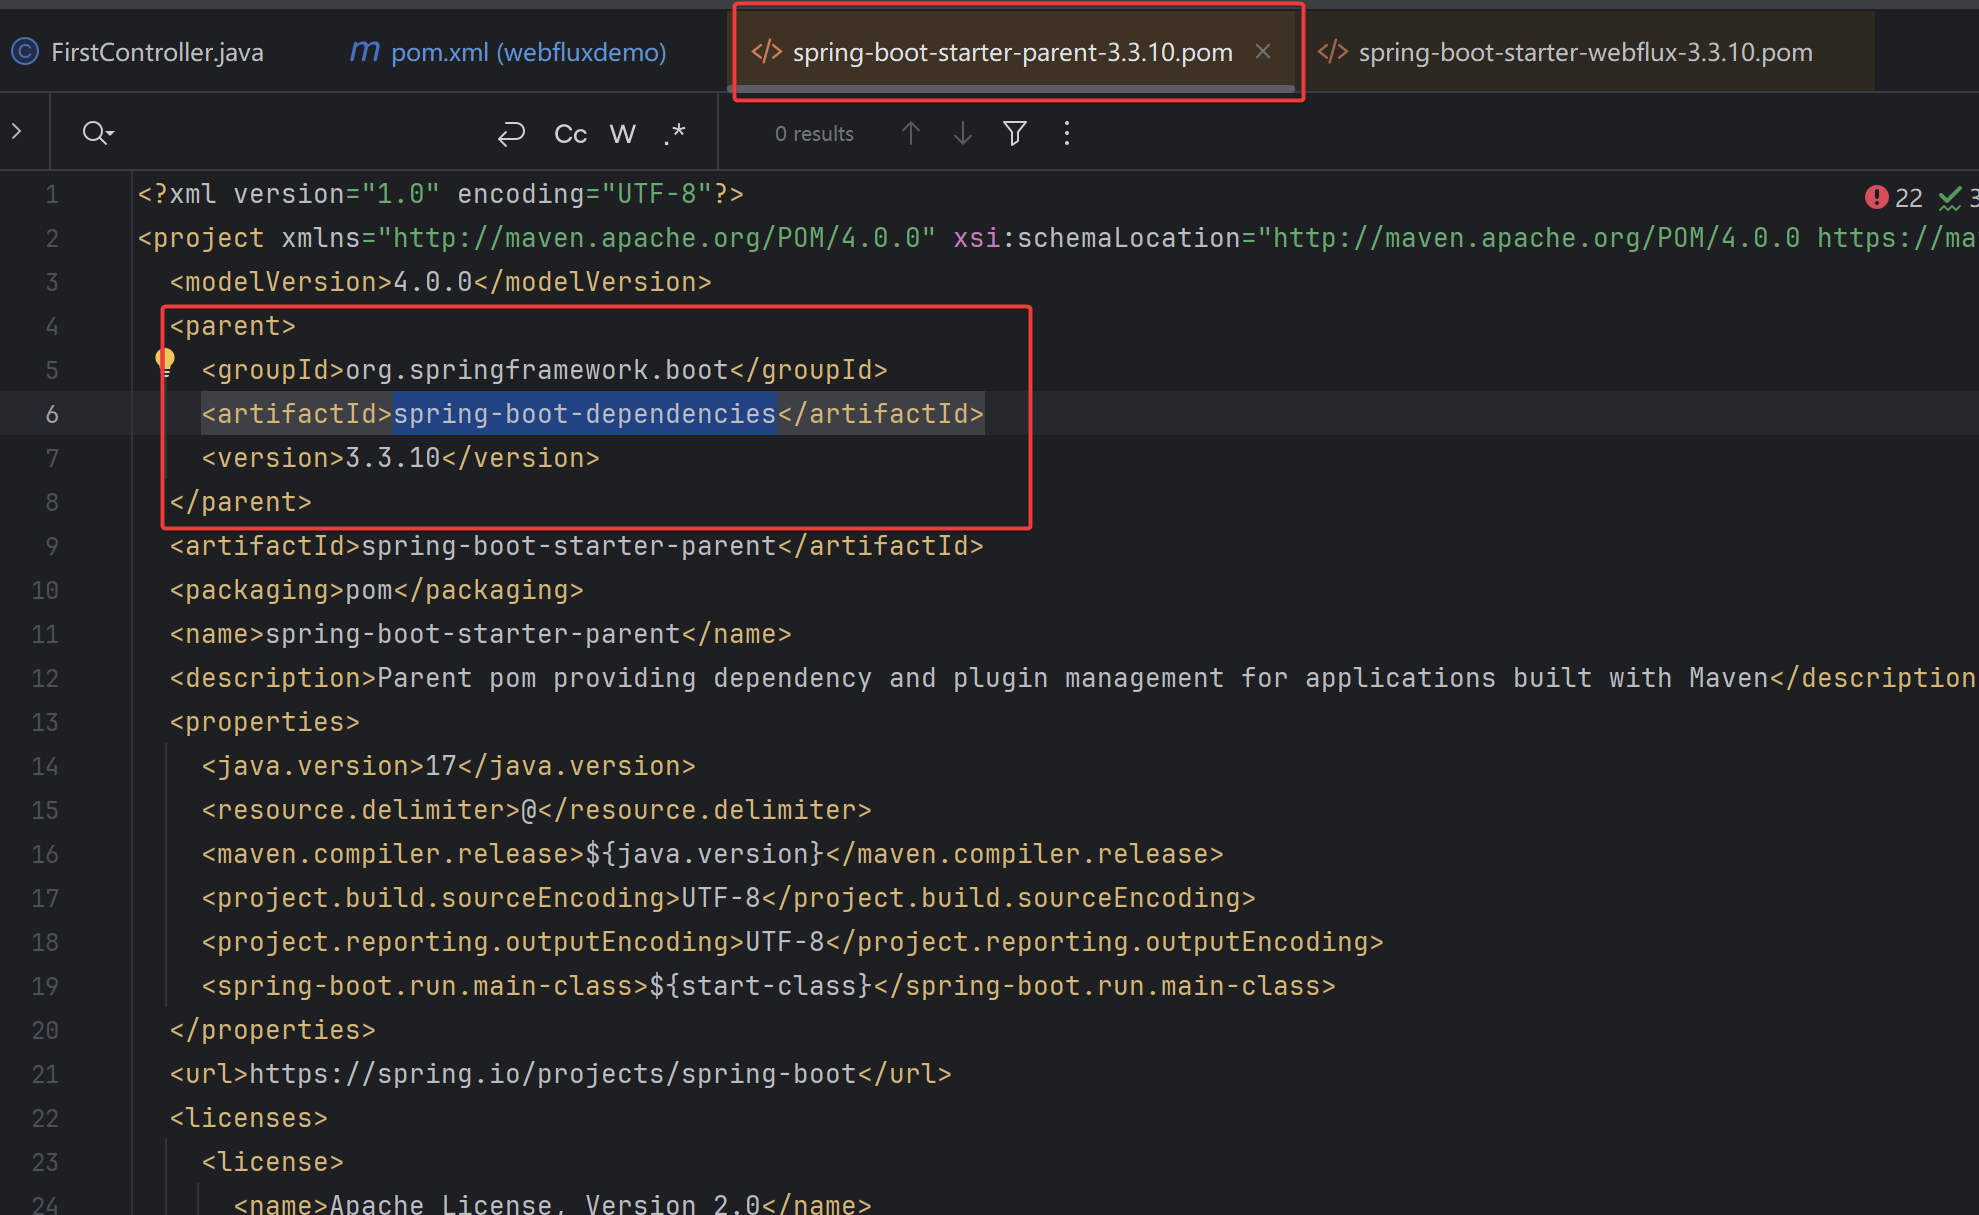
可以看到,dependencies是starter-parent的parent
spring-boot-starter 和 spring-boot-autoconfigure
spring-boot-starter-webflux 依赖于 以下组件:
spring-boot-starter
spring-boot-starter-json
spring-boot-starter-reactor-netty
spring-web
spring-webflux
而spring-boot-starter 依赖于 以下组件:
spring-boot
spring-boot-autoconfigure
spring-boot-starter-logging
jakarta.annotation-api
spring-core
snakeyaml
Name 名字 | Description |
|---|---|
| Core starter, including auto-configuration support, logging and YAML |
而spring-boot-starter本身,就是一个单纯的空jar,只有pom.xml,没有任何代码。相当于是一个依赖的集成包。