Common Usage
Feign Client Timeout
如何设置feignClient的超时时间呢?
如何设置默认的feignClient的超时时间呢?
如何给各feignClient,设置不同的超时时间呢?
Default Setting
默认情况下,feign的超时时间设置如下:
connect-timeout:10秒
read-timeout:60秒
这个设置在下面这个地方能找到:
Globally Setting
We can set the connection and read timeouts that apply to every Feign Client in the application via the feign.client.config.default property set in our application.yml file:
feign:
  client:
    config:
      default:
        connect-timeout: 60000
        read-timeout: 1200000
The values represent the number of milliseconds before a timeout occurs.
Per-client Setting
It’s also possible to set these timeouts per specific client by naming the client:
feign:
  client:
    config:
      FooClient:
        connectTimeout: 10000
        readTimeout: 20000
And, we could, of course, list a global setting and also per-client overrides together without a problem.
Feign与HttpClient
Feign底层发起http请求,依赖于其它的框架。其底层客户端实现包括:
URLConnection:默认实现,不支持连接池

Apache HttpClient :支持连接池

OKHttp:支持连接池
因此提高Feign的性能主要手段就是使用连接池 代替 默认的URLConnection
feign:
  httpclient:
    enabled: true     # 开启feign对HttpClient的支持
不同content-type,使用FeignClient
常见的content-type,有以下几种:
- application/x-www-form-urlencoded
- application/json;charset=UTF-8
- multipart/form-data
Json下的FeignClient
首先,在Server端,定义一个接口,如下:
package org.wp.feignserverdemo.controller;

import com.alibaba.fastjson2.JSON;
import org.springframework.http.MediaType;
import org.springframework.web.bind.annotation.PostMapping;
import org.springframework.web.bind.annotation.RequestBody;
import org.springframework.web.bind.annotation.RequestMapping;
import org.springframework.web.bind.annotation.RestController;
import org.wp.feignserverdemo.entity.Person;

import java.util.List;

@RestController
@RequestMapping("/jsontest")
public class JsonController {

    @PostMapping(value = "/list", consumes = MediaType.APPLICATION_JSON_UTF8_VALUE, produces = MediaType.APPLICATION_JSON_UTF8_VALUE)
    public List<Person> list(@RequestBody Person person) {
        System.out.println("接口接收到的参数:"+ JSON.toJSONString(person));

        Person zhangsan = new Person();
        zhangsan.setName("zhangsan");
        zhangsan.setAge(18);

        Person lisi = new Person();
        lisi.setName("lisi");
        lisi.setAge(22);

        return List.of(zhangsan, lisi);
    }

}
接下来,在Client端,创建一个FeignClient,如下:
package org.wp.feignclientdemo.feign.client;

import com.alibaba.fastjson2.JSONArray;
import org.springframework.cloud.openfeign.FeignClient;
import org.springframework.http.MediaType;
import org.springframework.web.bind.annotation.PostMapping;
import org.springframework.web.bind.annotation.RequestBody;
import org.wp.feignclientdemo.feign.entity.PersonFeignDTO;

@FeignClient(name = "jsonFeignClient",url = "${demo.server.ipport}/jsontest")
public interface JsonFeignClient {

    // 这里的consumes含义是指,这个client对应的server端接口,配置了该接口接收哪种数据格式。是server端的配置!!!
    // 这里的produces含义是指,这个client对应的server端接口,配置了该接口返回哪种数据格式。是server端的配置!!!
    @PostMapping(value = "/list", consumes = MediaType.APPLICATION_JSON_UTF8_VALUE, produces = MediaType.APPLICATION_JSON_UTF8_VALUE)
    public JSONArray list(@RequestBody PersonFeignDTO person);
}
注意,Configuration配置类中,增加@EnableFeignClients注解
@EnableFeignClients(basePackages = {"org.wp.feignclientdemo.feign"})
@Configuration
public class FeignClientConfiguration {
}
实体类PersonFeignDTO如下:
public class PersonFeignDTO {
    private String name;

    private int age;

    public String getName() {
        return name;
    }

    public void setName(String name) {
        this.name = name;
    }

    public int getAge() {
        return age;
    }

    public void setAge(int age) {
        this.age = age;
    }

}
最后测试:
@SpringBootTest
class FeignClientDemoApplicationTests {

    @Autowired
    private JsonFeignClient jsonFeignClient;

     @Test
     void jsonClientTest() {
        PersonFeignDTO wangwu = new PersonFeignDTO();
        wangwu.setName("wangwu");
        wangwu.setAge(100);
        JSONArray jsonArray = jsonFeignClient.list(wangwu);
        System.out.println("client得到的接口响应值,是:"+jsonArray.toJSONString());
    }

}
Form-Urlencoded下的FeignClient
首先,在Server端,定义一个接口,如下:
package org.wp.feignserverdemo.controller;

import org.springframework.http.MediaType;
import org.springframework.web.bind.annotation.*;
import org.wp.feignserverdemo.entity.Person;

import java.util.List;

@RestController
@RequestMapping("/formUrlencode")
public class FormUrlEncodedController {

    @PostMapping(value = "/list", consumes = MediaType.APPLICATION_FORM_URLENCODED_VALUE, produces = MediaType.APPLICATION_JSON_UTF8_VALUE)
    public List<Person> list(@RequestParam("name") String name, @RequestParam("age") Integer age) {
        System.out.println("接口接收到的参数,name:"+ name + ",age:" + age);

        Person zhangsan = new Person();
        zhangsan.setName("zhangsan");
        zhangsan.setAge(18);

        Person lisi = new Person();
        lisi.setName("lisi");
        lisi.setAge(22);

        return List.of(zhangsan, lisi);
    }
}
然后,在Client端,创建一个feignClient
package org.wp.feignclientdemo.feign.client;

import com.alibaba.fastjson2.JSONArray;
import org.springframework.cloud.openfeign.FeignClient;
import org.springframework.http.MediaType;
import org.springframework.web.bind.annotation.PostMapping;
import org.springframework.web.bind.annotation.RequestParam;

@FeignClient(name = "formUrlencodeFeignClient",url = "${demo.server.ipport}/formUrlencode")
public interface FormUrlencodeFeignClient {

    // 这里的consumes含义是指,这个client对应的server端接口,配置了该接口接收哪种数据格式。是server端的配置!!!
    // 这里的produces含义是指,这个client对应的server端接口,配置了该接口返回哪种数据格式。是server端的配置!!!
    @PostMapping(value = "/list", consumes = MediaType.APPLICATION_FORM_URLENCODED_VALUE, produces = MediaType.APPLICATION_JSON_UTF8_VALUE)
    public JSONArray list(@RequestParam("name") String name,@RequestParam("age") Integer age);
}
最后测试:
@SpringBootTest
class FeignClientDemoApplicationTests {

    @Autowired
    private FormUrlencodeFeignClient formUrlencodeFeignClient;


    @Test
    void formUrlencodeClientTest() {
        JSONArray jsonArray = formUrlencodeFeignClient.list("mm", 1234);
        System.out.println("client得到的接口响应值,是:"+jsonArray.toJSONString());
    }

}
Form-Data下的FeignCleint
首先,在Server端,定义一个接口,如下:
package org.wp.feignserverdemo.controller;

import org.springframework.http.MediaType;
import org.springframework.web.bind.annotation.PostMapping;
import org.springframework.web.bind.annotation.RequestMapping;
import org.springframework.web.bind.annotation.RequestPart;
import org.springframework.web.bind.annotation.RestController;
import org.springframework.web.multipart.MultipartFile;

import java.util.Map;

@RestController
@RequestMapping("/formData")
public class FormDataController {

    @PostMapping(value = "/submit", consumes = MediaType.MULTIPART_FORM_DATA_VALUE, produces = MediaType.APPLICATION_JSON_UTF8_VALUE)
    public Map<String,String> submit(@RequestPart("vendor") String vendor,@RequestPart("file") MultipartFile file) {
        String originalFilename = file.getOriginalFilename();
        System.out.println("上传的文件名是:"+originalFilename);
        System.out.println("上传的文件大小:"+file.getSize());
        System.out.println("上传的供应商:"+vendor);
        return Map.of("originalFilename",originalFilename,"vendor",vendor);
    }
}
然后,在Client端,创建一个feignClient,如下:
package org.wp.feignclientdemo.feign.client;

import org.springframework.cloud.openfeign.FeignClient;
import org.springframework.http.MediaType;
import org.springframework.web.bind.annotation.PostMapping;
import org.springframework.web.bind.annotation.RequestPart;
import org.springframework.web.multipart.MultipartFile;

import java.util.Map;

@FeignClient(name = "formDataFeignClient",url = "${demo.server.ipport}/formData")
public interface FormDataFeignClient {

    // 这里的consumes含义是指,这个client对应的server端接口,配置了该接口接收哪种数据格式。是server端的配置!!!
    // 这里的produces含义是指,这个client对应的server端接口,配置了该接口返回哪种数据格式。是server端的配置!!!
    @PostMapping(value = "/submit", consumes = MediaType.MULTIPART_FORM_DATA_VALUE, produces = MediaType.APPLICATION_JSON_UTF8_VALUE)
    public Map<String, String> submit(@RequestPart("vendor") String vendor, @RequestPart("file") MultipartFile file);

}
最后测试:
@SpringBootTest
class FeignClientDemoApplicationTests {

    @Autowired
    private FormDataFeignClient formDataFeignClient;

     @Test
    void formDataClientTest() throws Exception {
        File file = new File("C:\\Users\\backe\\Desktop\\bb\\工业物联网开关机.docx");
        MultipartFile multipartFile = FileUtils.convertFileToMultipartFile(file, file.getName());

        Map<String, String> map = formDataFeignClient.submit("迈思德科技有限公司", multipartFile);
        System.out.println("client得到的接口响应值,是:"+ JSON.toJSONString(map));
    }

}
辅助类FileUtils如下:
package org.wp.feignclientdemo.file;

import org.apache.commons.fileupload.FileItem;
import org.apache.commons.fileupload.FileItemFactory;
import org.apache.commons.fileupload.disk.DiskFileItemFactory;
import org.apache.commons.io.IOUtils;
import org.springframework.web.multipart.MultipartFile;
import org.springframework.web.multipart.commons.CommonsMultipartFile;

import java.io.File;
import java.io.FileInputStream;
import java.io.IOException;
import java.io.OutputStream;

public class FileUtils {

    public static MultipartFile convertFileToMultipartFile(File file, String fileName) throws Exception {

        String contentType = "application/octet-stream";
        FileItem item;
        try {
            FileItemFactory factory = new DiskFileItemFactory();
            item = factory.createItem("file", contentType, false, fileName);

            try (FileInputStream fileInputStream = new FileInputStream(file);
                 OutputStream outputStream = item.getOutputStream()) {
                 IOUtils.copyLarge(fileInputStream, outputStream);
            }

            return new CommonsMultipartFile(item);
        } catch (IOException e) {
            throw e;
        }
    }
}
@SpringQueryMap & Get请求
Spring Cloud OpenFeign 提供了等效的@SpringQueryMap注解,用于将 POJO 或 Map ,映射为 GET 方法的参数。
通过@SpringQueryMap标注之后呢,会变成这样子
url?username=zhangsan&passwd=******
注意:被@SpringQueryMap注解的对象只能有一个。因为不能保证多个对象中是否会存在相同的属性名,这是值得注意的一点。
@SpringQueryMap 注解用法也很简单,假设有一个叫 StudentDTO的类
java 代码解读复制代码public class StudentDTO {
    private String name;
    private String age;

    // get、set 方法
}
spring-cloud-openfeign-core:2.1.0.RELEASE 之前,你不能直接传递对象,只能将它手动拆分成多个字段进行传参
java 代码解读复制代码@FeignClient("demo")
public interface DemoTemplate {

    @GetMapping(path = "/demo")
    String demoEndpoint(@RequestParam String name, @RequestParam String age);
}
spring-cloud-openfeign-core:2.1.0.RELEASE 开始 @SpringQueryMap注解可以自动帮你完成参数映射
java 代码解读复制代码// 等效于上面的写法
@FeignClient("demo")
public interface DemoTemplate {

    @GetMapping(path = "/demo")
    String demoEndpoint(@SpringQueryMap StudentDTO studentDTO);
}
@RequestHeader & FeignClient
如果,想往HTTP请求中,添加自定义的header,需要使用到@RequestHeader注解。
如果只需要添加一个header,那么如下:
 @RequestMapping(method = RequestMethod.POST, value = "/simplefile/v2/filetransfer/upload/uploadByProgram",
            consumes = MediaType.MULTIPART_FORM_DATA_VALUE)
    public JSONObject uploadFile(@RequestHeader("Authorization") String token,
                                 @RequestPart("file") MultipartFile file, @RequestParam("quickUploadReq") String quickUploadReq);
如果需要添加多个header,那么需要使用到MultiValueMap,如下:
/**
     * 生成消息或待办
     * @param alarmRecordPushReqDTO
     * @param headers
     */
    @PostMapping(value = "/api/v1/WorkManage/MaxDataMessage")
    public void maxDataMessage(@RequestBody AlarmRecordPushReqDTO alarmRecordPushReqDTO, @RequestHeader MultiValueMap<String, String> headers);
MultiValueMap的构造如下:
private HttpHeaders buildHeaders(String branchId) {
        HttpHeaders httpHeaders = new HttpHeaders();
        httpHeaders.set("Branch-Id", branchId);
        httpHeaders.set("Water-Account", "jshxhb");
        String curTime = String.valueOf(DateTimeUtils.getSecondByLocalDateTime(LocalDateTime.now()));
        httpHeaders.set("Curtime",curTime);
        httpHeaders.set("CheckSum",getCheckSum("jshxhb123456",curTime));
        return httpHeaders;
    }
源码追踪
超时时间的源码追踪
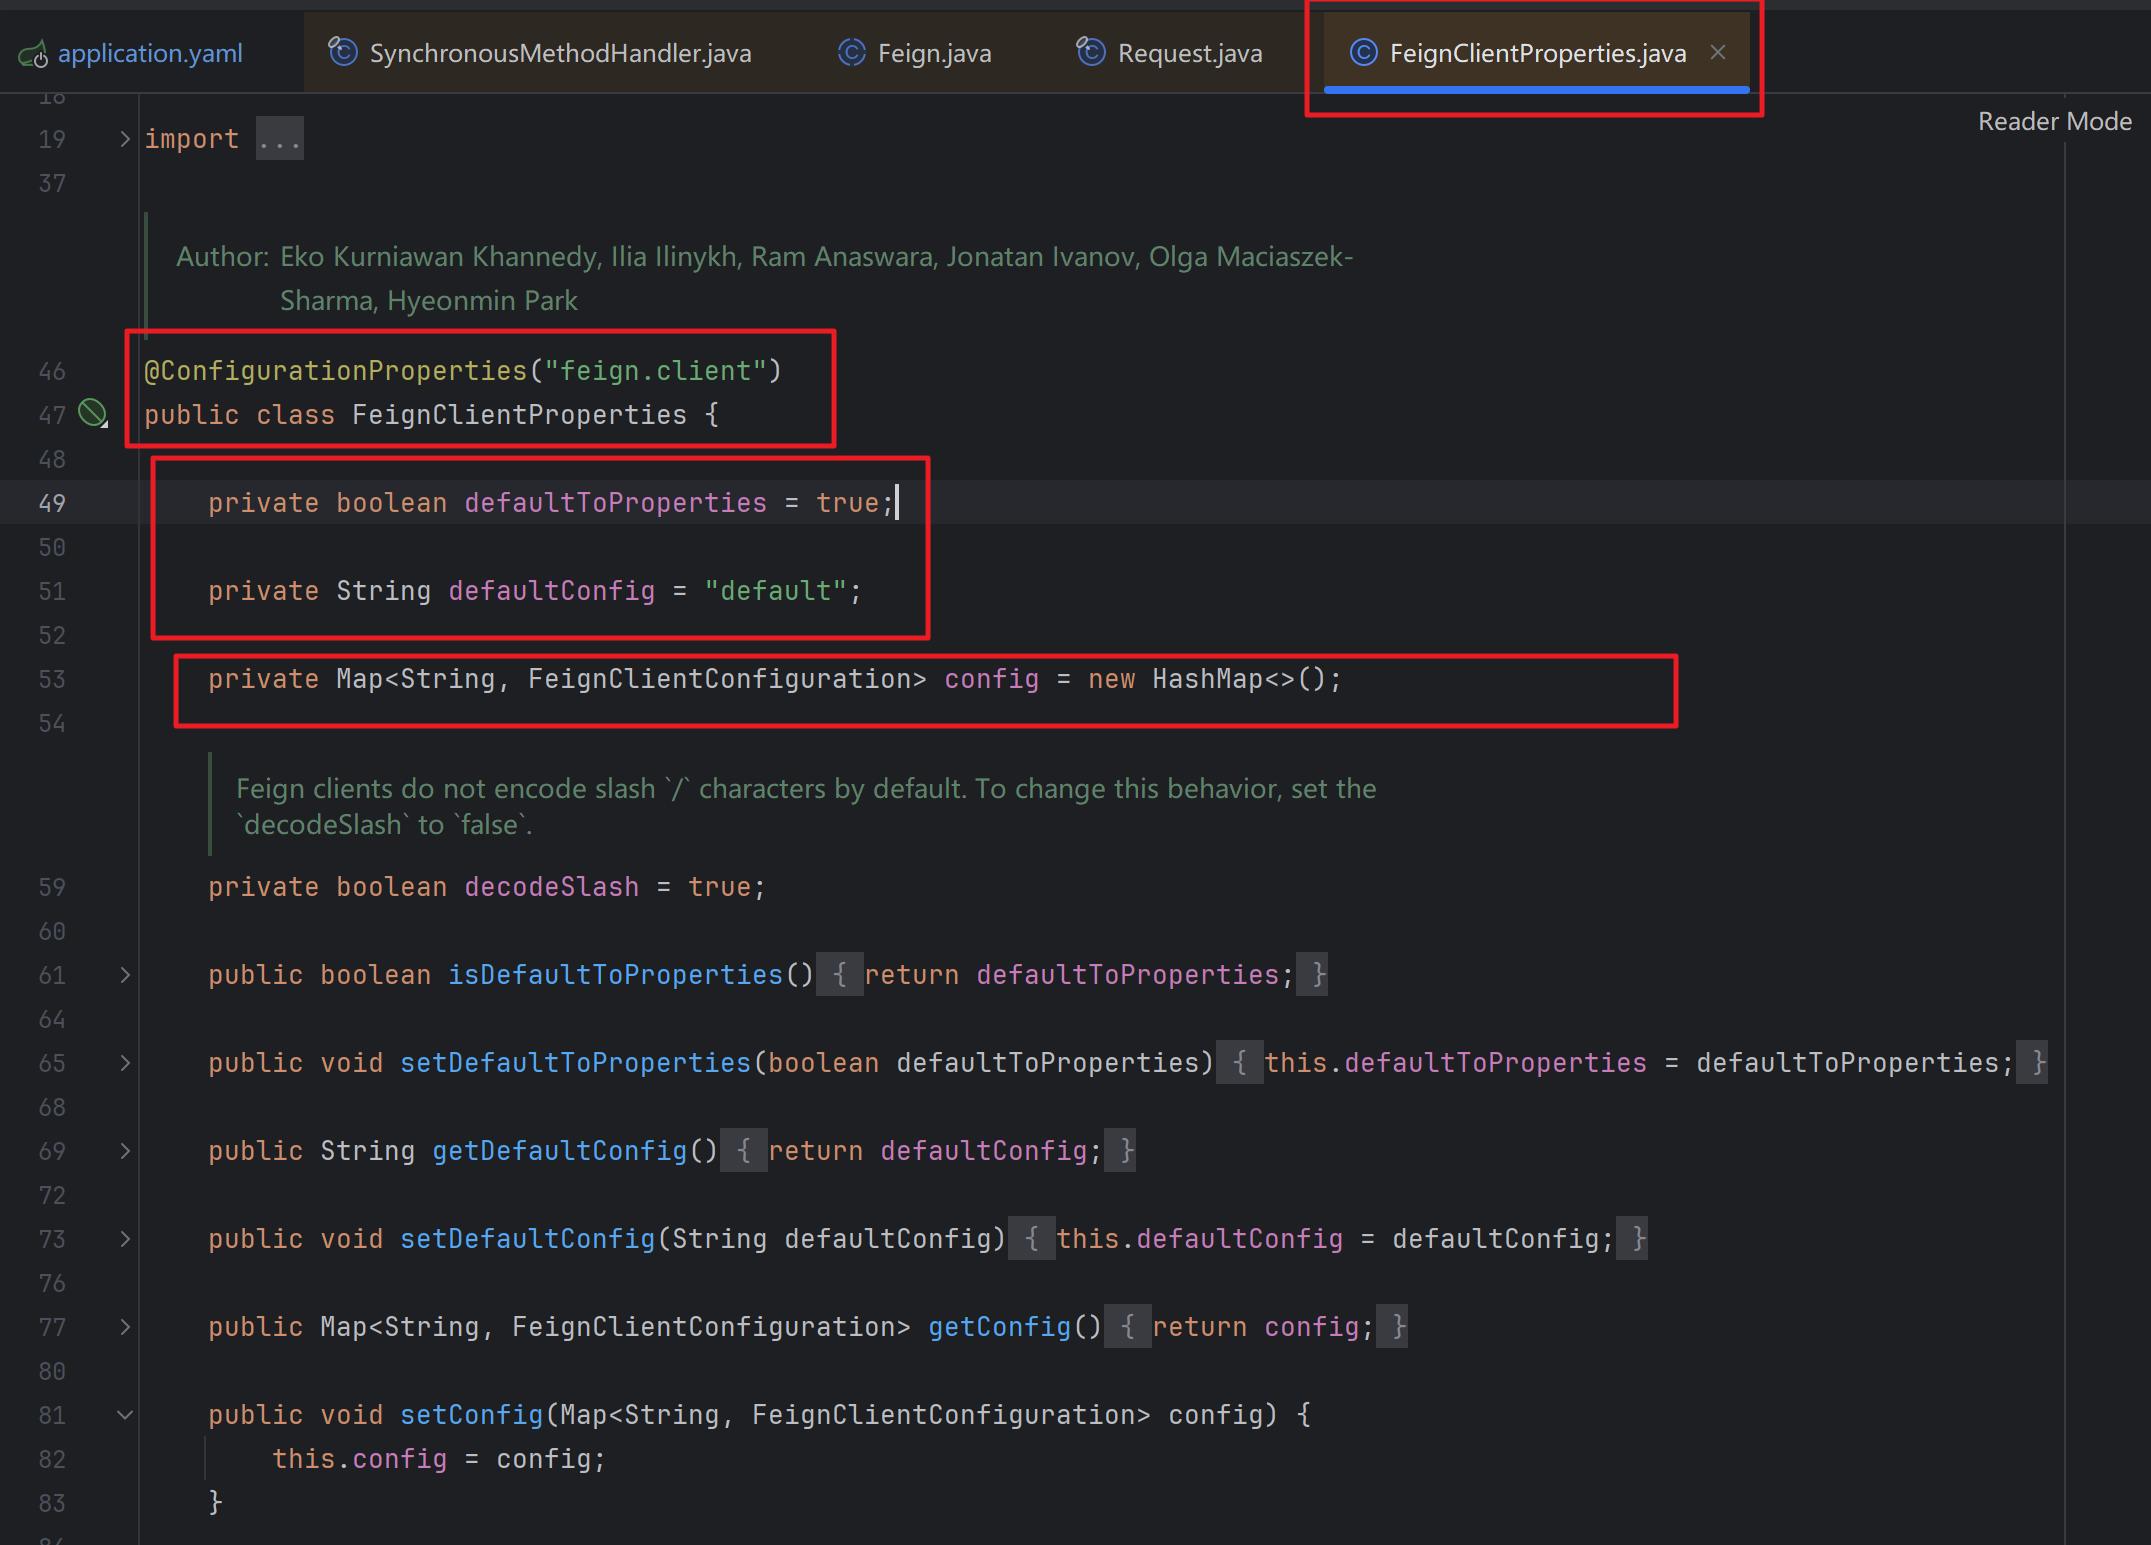
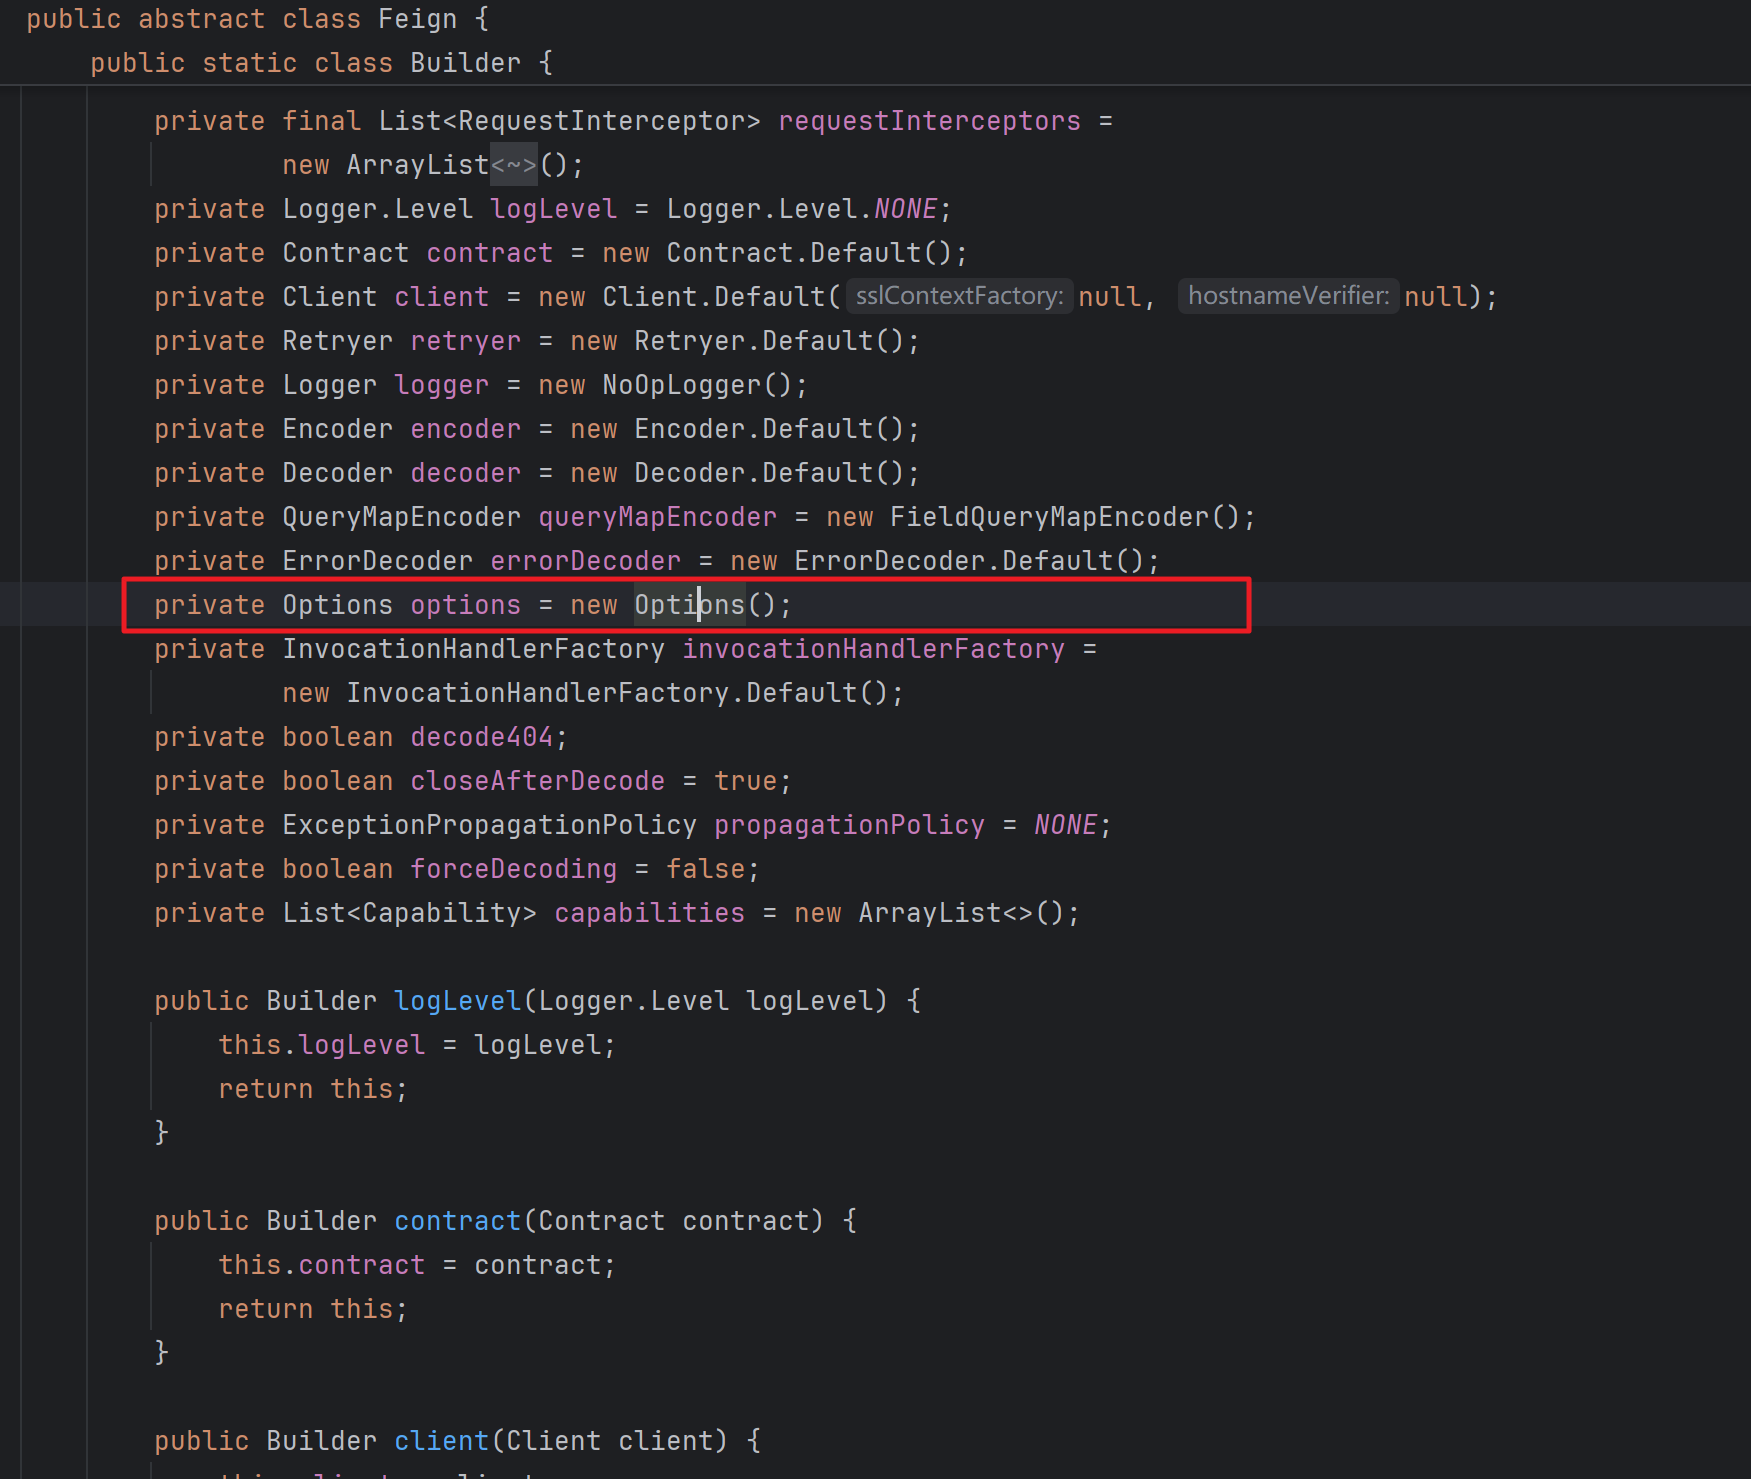
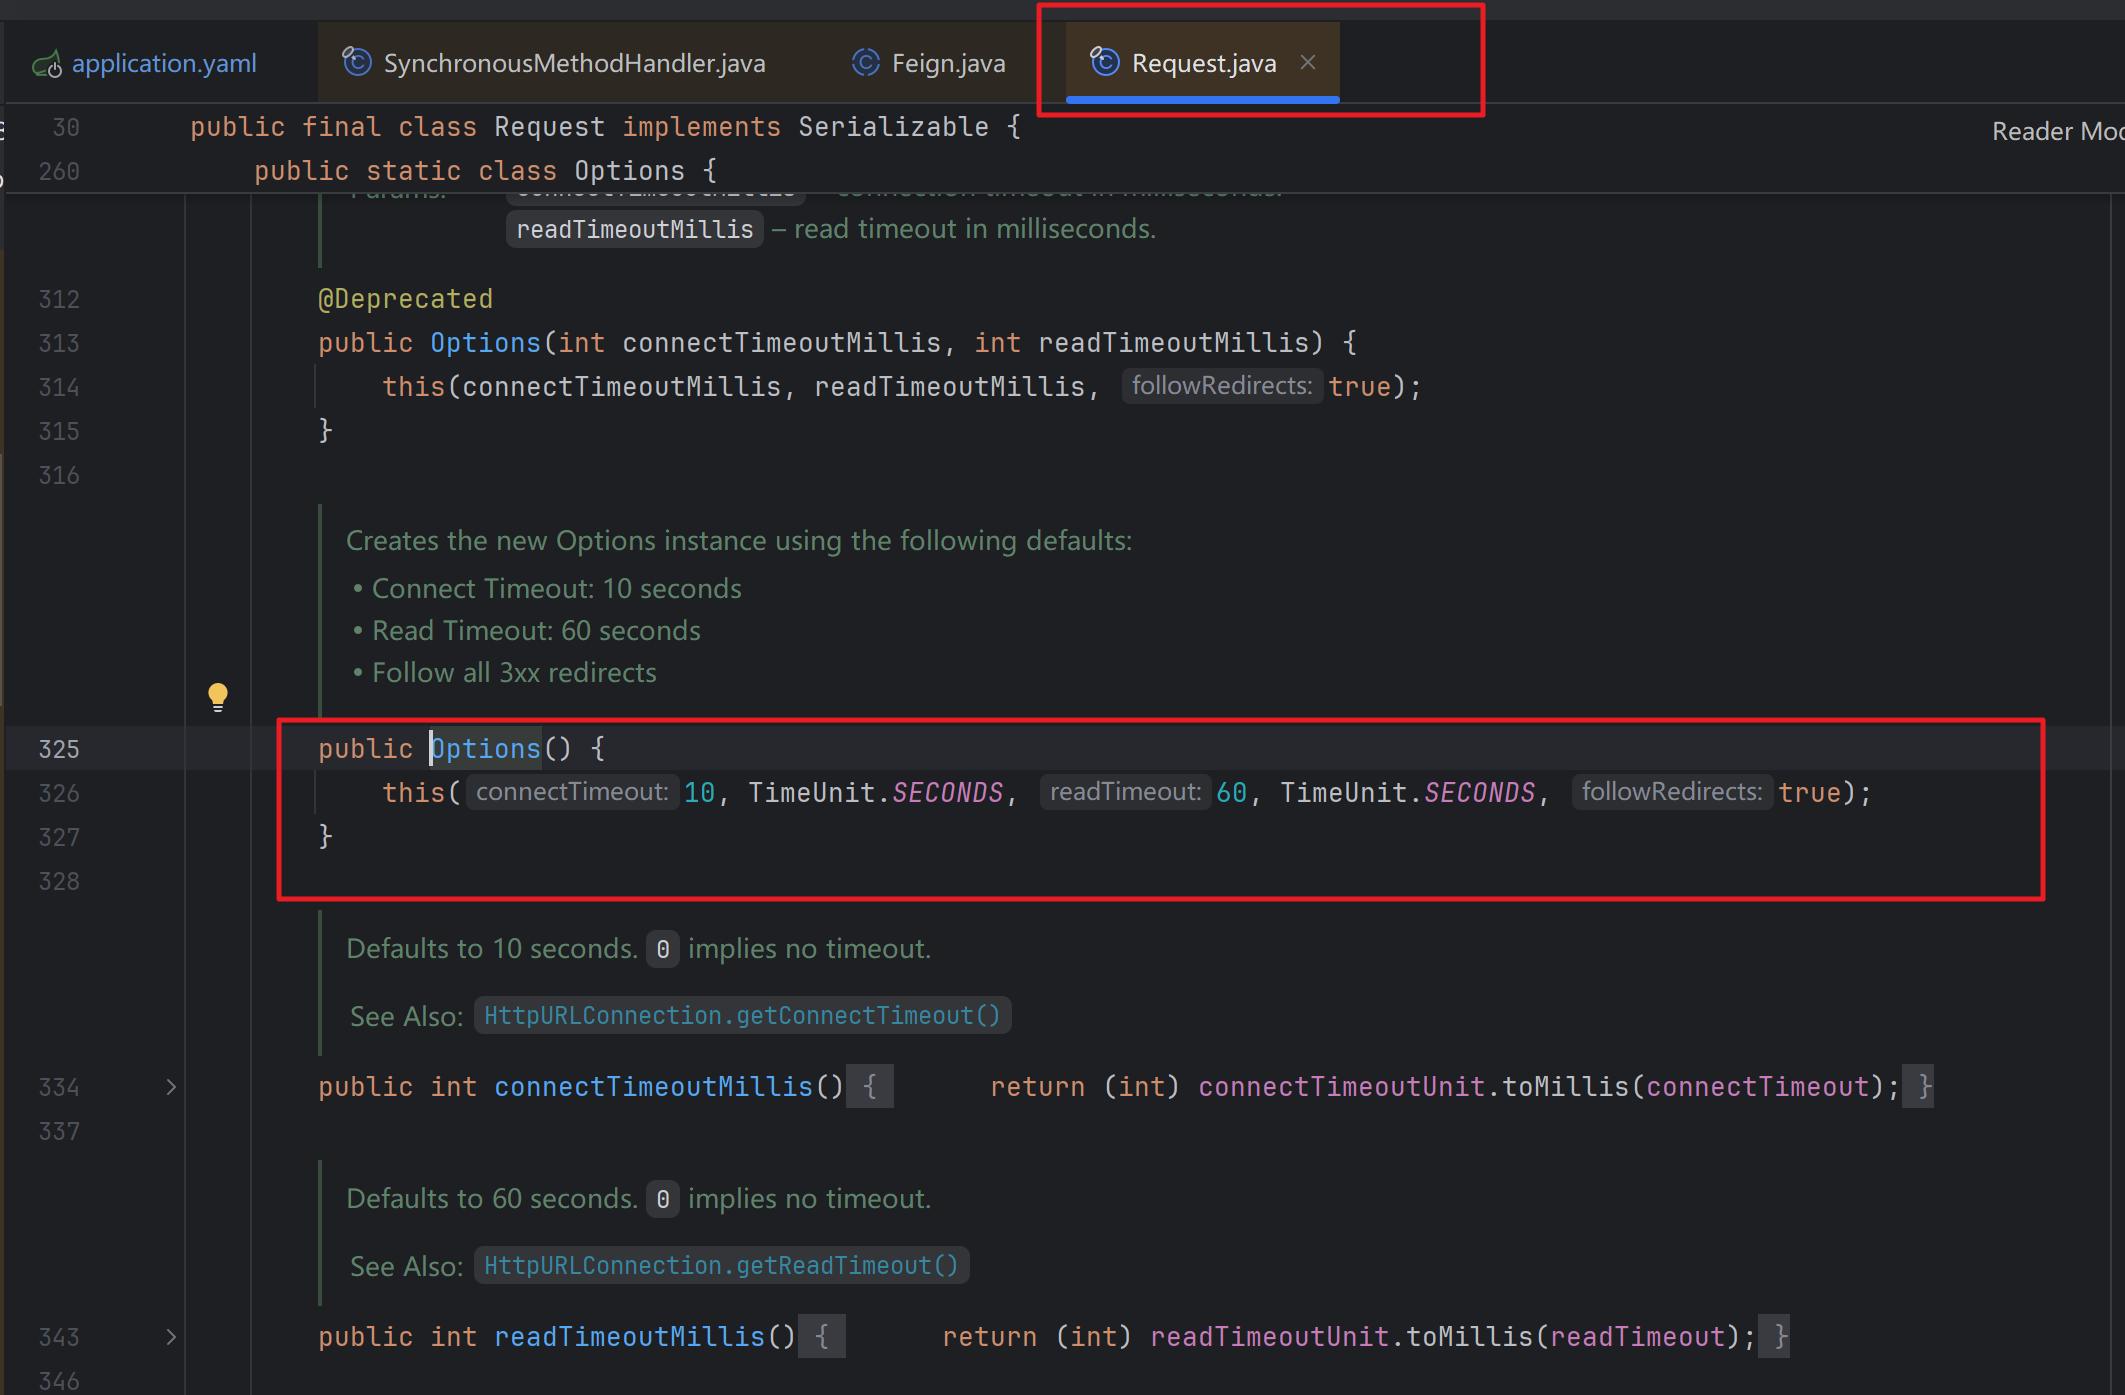
可以看到,FeignClientProperties是Feign客户端的配置类,对应我们在yml文件中的feign.client
这里面,有3个重要的属性,有个是defaultConfig变量,这个变量的值,设置为default字符串,还有一个defaultToProperties变量,设置为true。我们来看下,这2个变量,用在了什么地方:
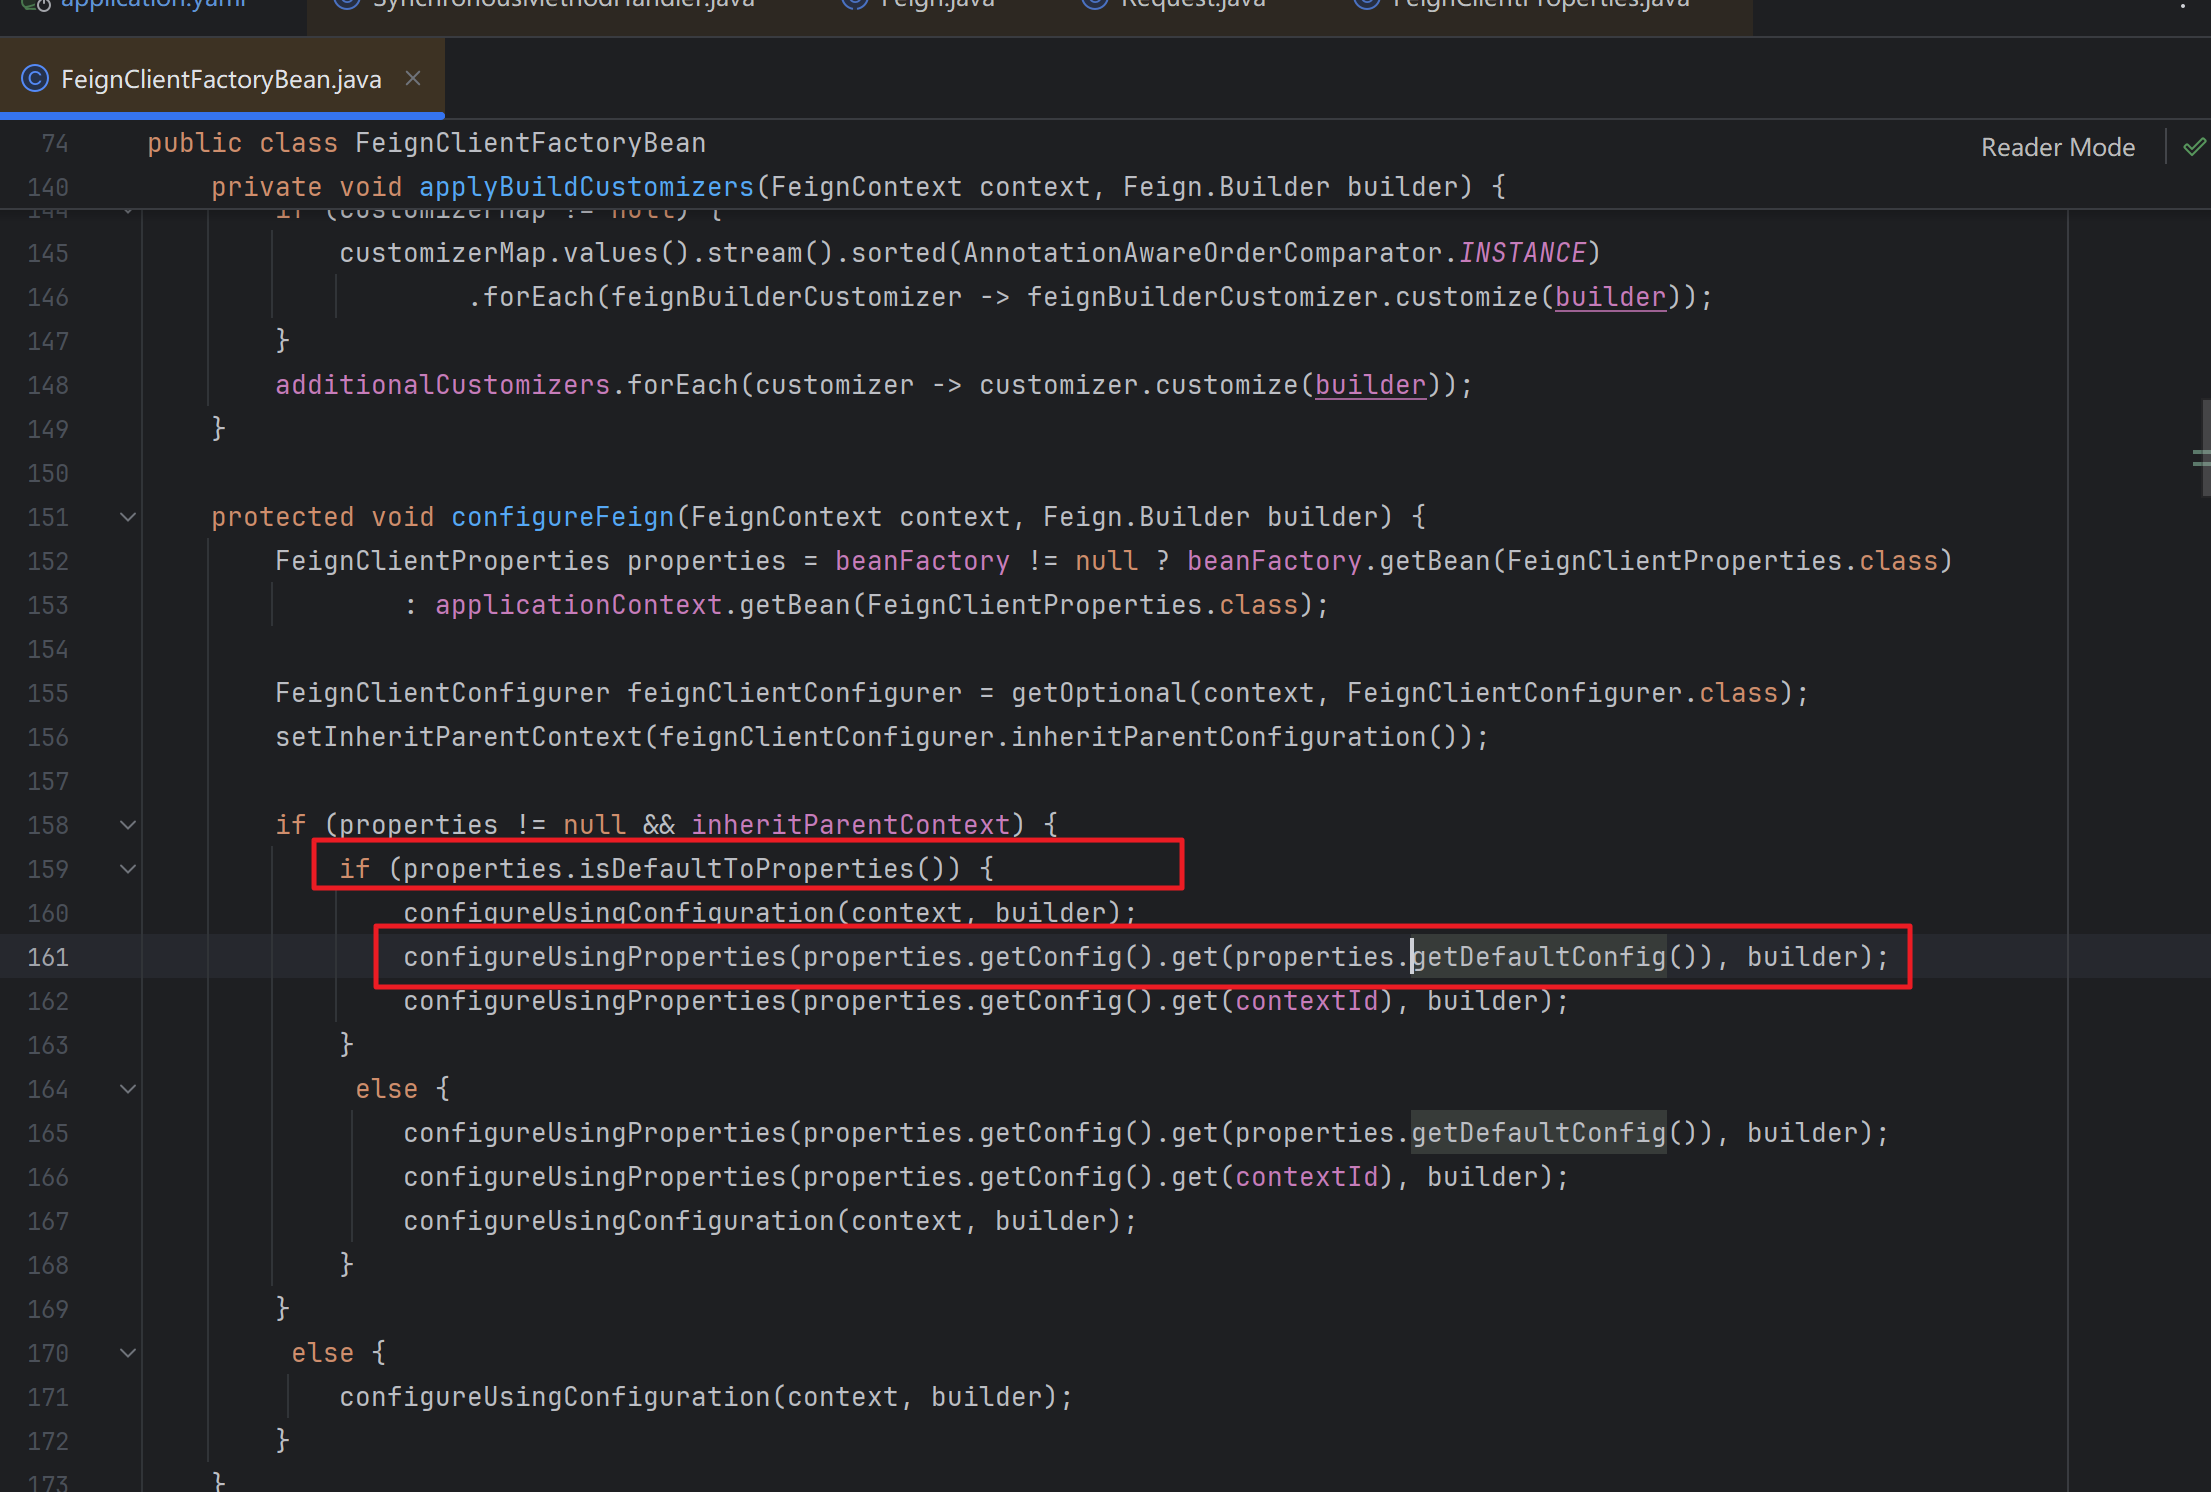
我们可以看到,在FeignClientFactoryBean中,这个FeignClientFactoryBean,是专门用来创建各种FeignClient的。
在创建feignClient的过程中,FeignClientFactoryBean会获取到FeignClientProperties,然后判断FeignClientProperties中的defaultToProperties是否为true,如果是的话,那么就会获取配置文件中的default配置信息,来继续完成feignClient的创建。
feign:
  client:
    config:
      default:
        connect-timeout: 60000
        read-timeout: 1200000
就是上面的的default配置项
FeignClientProperties中,还有一个config属性
private Map<String, FeignClientConfiguration> config = new HashMap<>();
这个config是一个map,key就是各feignClient的名字,value就是该feignClient对应的自定义配置信息
FeignClientsConfiguration配置类
FeignClientsConfiguration是一个配置类,在这个类中,配置了Encoder、Decoder、Retryer等对象。
我们简单看几个:
// org.springframework.cloud.openfeign.FeignClientsConfiguration


    @Bean
	@ConditionalOnMissingBean
	public Decoder feignDecoder(ObjectProvider<HttpMessageConverterCustomizer> customizers) {
		return new OptionalDecoder(new ResponseEntityDecoder(new SpringDecoder(messageConverters, customizers)));
	}

	@Bean
	@ConditionalOnMissingBean
	@ConditionalOnMissingClass("org.springframework.data.domain.Pageable")
	public Encoder feignEncoder(ObjectProvider<AbstractFormWriter> formWriterProvider,
			ObjectProvider<HttpMessageConverterCustomizer> customizers) {
		return springEncoder(formWriterProvider, encoderProperties, customizers);
	}


        @Bean
	@ConditionalOnMissingBean
	public Retryer feignRetryer() {
		return Retryer.NEVER_RETRY;
	}


        @Bean
	@ConditionalOnMissingBean(FeignLoggerFactory.class)
	public FeignLoggerFactory feignLoggerFactory() {
		return new DefaultFeignLoggerFactory(logger);
	}
就以上面的feignEncoder为例,我们看下代码:
// org.springframework.cloud.openfeign.FeignClientsConfiguration#springEncoder

private Encoder springEncoder(ObjectProvider<AbstractFormWriter> formWriterProvider,
			FeignEncoderProperties encoderProperties, ObjectProvider<HttpMessageConverterCustomizer> customizers) {
		AbstractFormWriter formWriter = formWriterProvider.getIfAvailable();

		if (formWriter != null) {
			return new SpringEncoder(new SpringPojoFormEncoder(formWriter), messageConverters, encoderProperties,
					customizers);
		}
		else {
                // 默认情况下,走这里
			return new SpringEncoder(new SpringFormEncoder(), messageConverters, encoderProperties, customizers);
		}
	}
可以看到,默认注册到容器的是SpringEncoder,且这个SpringEncoder里面真正使用的是SpringFormEncoder
feign发起Http调用源码追踪
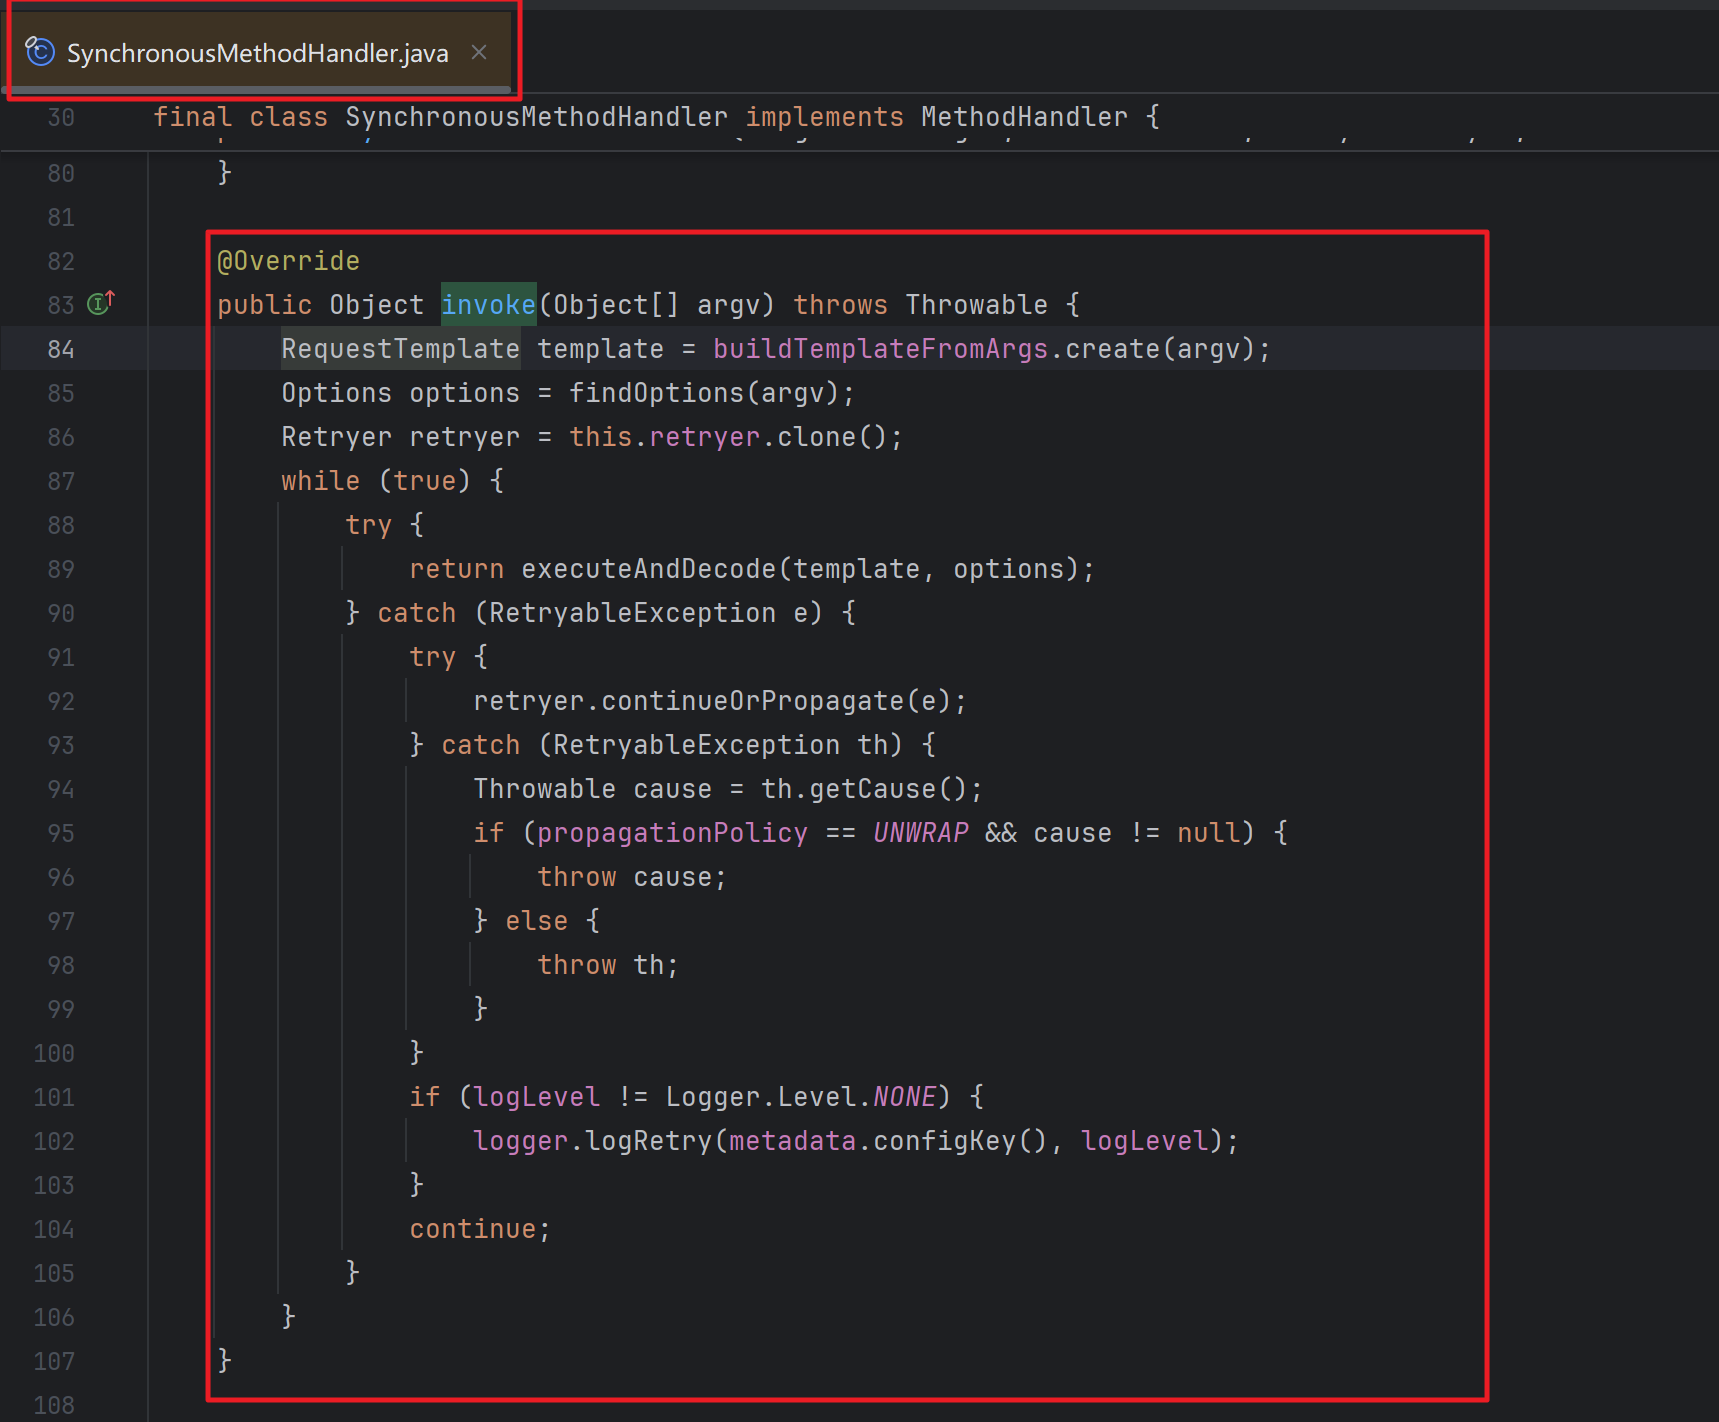
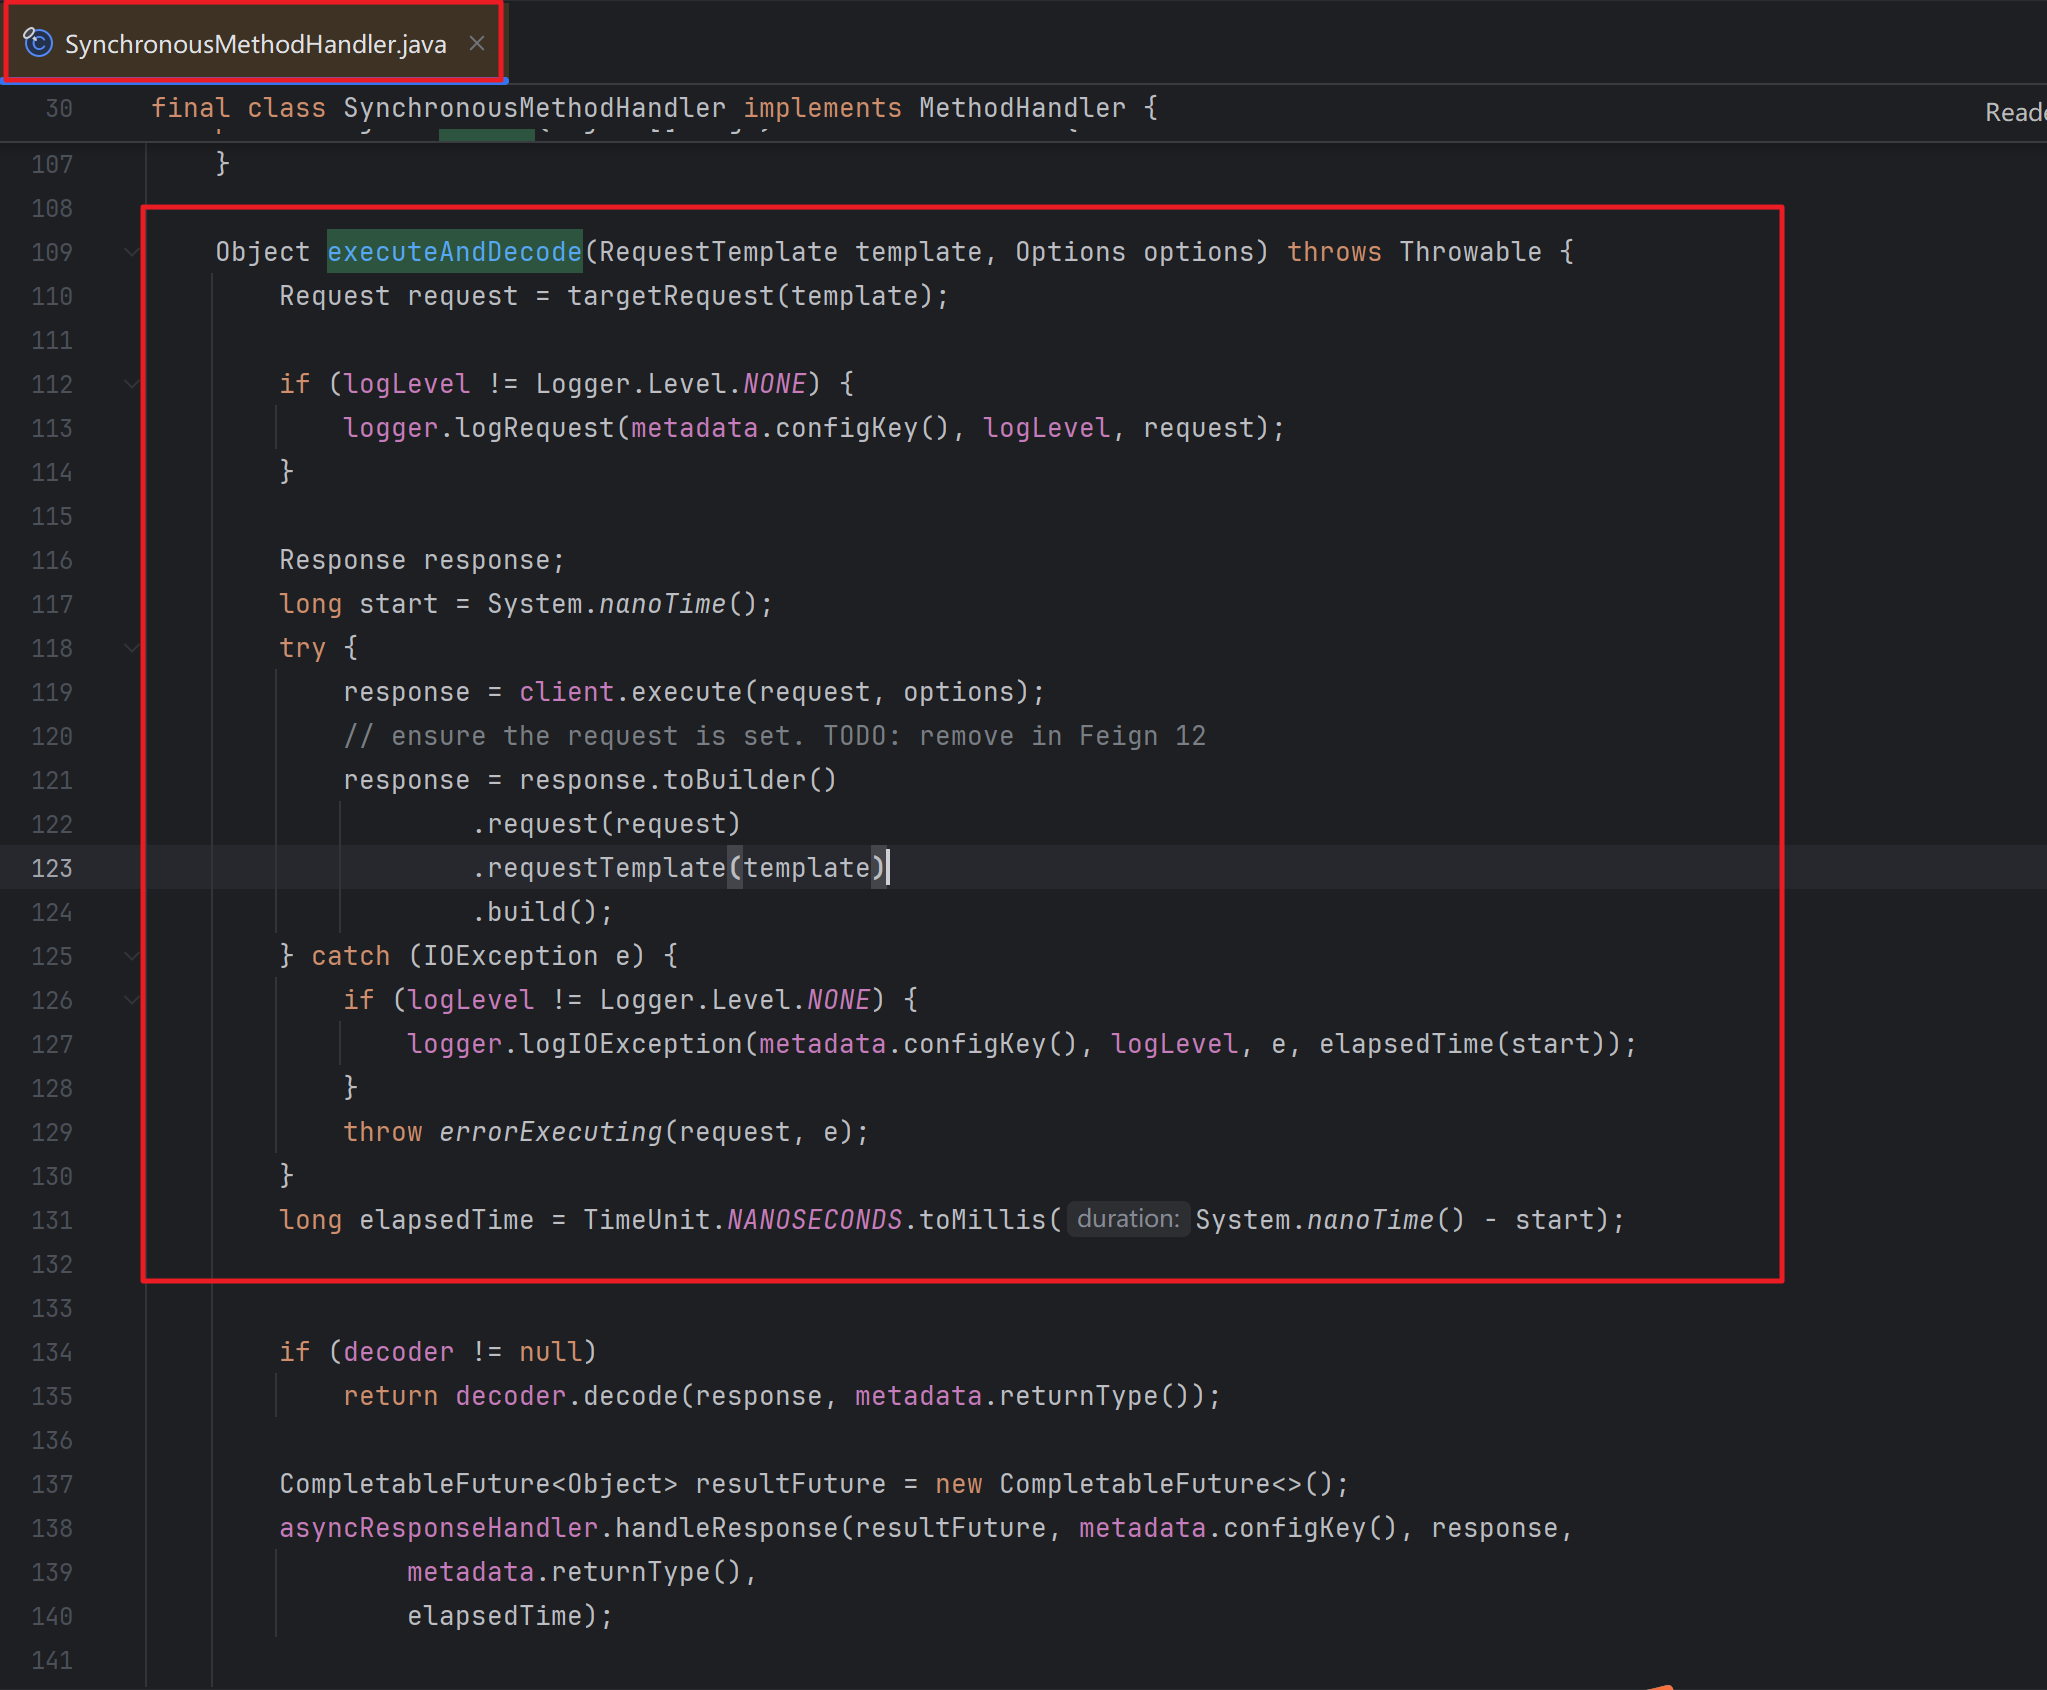
核心关键类:feign.SynchronousMethodHandler
主要看feign.SynchronousMethodHandler#invoke 和 feign.SynchronousMethodHandler#executeAndDecode 这2个方法:
feign Encoder源码追踪
参考: https://juejin.cn/post/7108554977198473246
feign.codec.Encoder
Encoder的实现类如下:

调用栈如下:
feign.SynchronousMethodHandler#invoke  --->

feign.ReflectiveFeign.BuildTemplateByResolvingArgs#create   --->

feign.ReflectiveFeign.BuildFormEncodedTemplateFromArgs#resolve

--->  org.springframework.cloud.openfeign.support.SpringEncoder#encode   --->

feign.form.spring.SpringFormEncoder#encode  --->  feign.form.FormEncoder#encode
上面的SpringEncoder的encode方法如下:
@Override
	public void encode(Object requestBody, Type bodyType, RequestTemplate request) throws EncodeException {
		// template.body(conversionService.convert(object, String.class));
		if (requestBody != null) {
			Collection<String> contentTypes = request.headers().get(HttpEncoding.CONTENT_TYPE);

			MediaType requestContentType = null;
			if (contentTypes != null && !contentTypes.isEmpty()) {
				String type = contentTypes.iterator().next();
				requestContentType = MediaType.valueOf(type);
			}
                    // 如果content-type是form-Urlencoded 或者 form-data类型的,就走springFormEncoder.encode
			if (isFormRelatedContentType(requestContentType)) {
				springFormEncoder.encode(requestBody, bodyType, request);
				return;
			}
			else {
				if (bodyType == MultipartFile.class) {
					log.warn("For MultipartFile to be handled correctly, the 'consumes' parameter of @RequestMapping "
							+ "should be specified as MediaType.MULTIPART_FORM_DATA_VALUE");
				}
			}
			encodeWithMessageConverter(requestBody, bodyType, request, requestContentType);
		}
	}
关键点,在于feign.form.FormEncoder#encode,
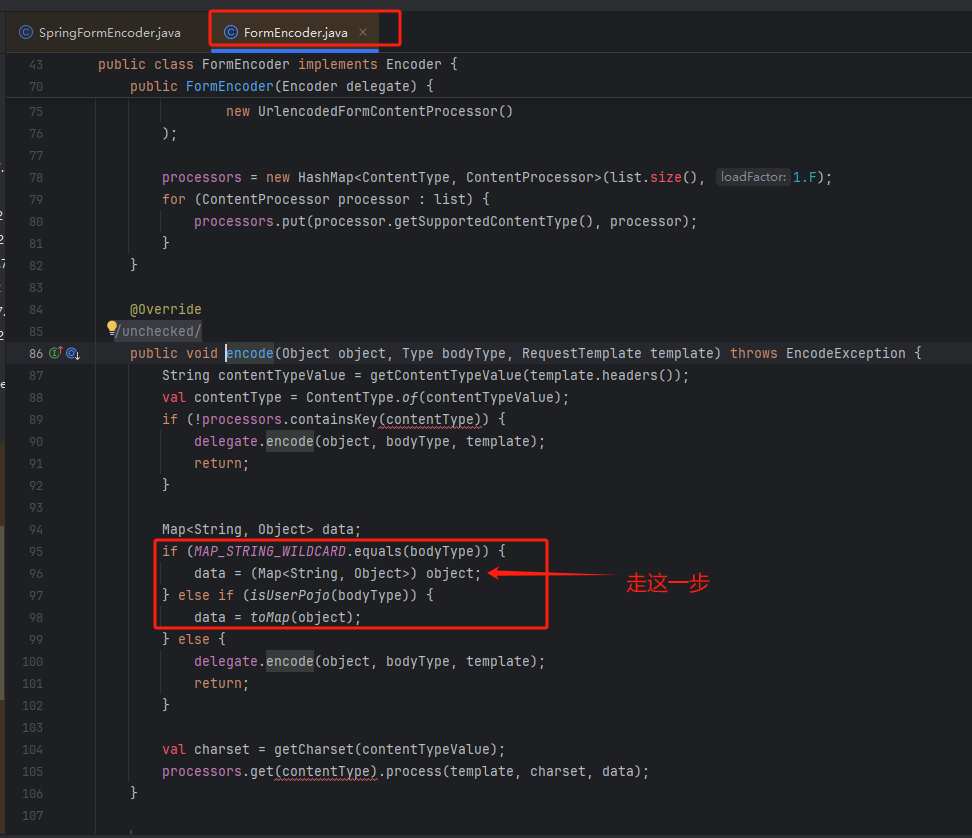
如果bodyMap是Map类型,那么直接用map来存储请求参数;
如果bodyMap是用户自定义的实体类,那么就走toMap(object)方法